By choosing to create a custom partitioning layout, you must now tell the installation program where to install Fedora. This is done by defining mount points for one or more disk partitions in which Fedora is installed. You may also need to create and/or delete partitions at this time.
The Fedora installer can handle the partitioning requirements for a typical installation.
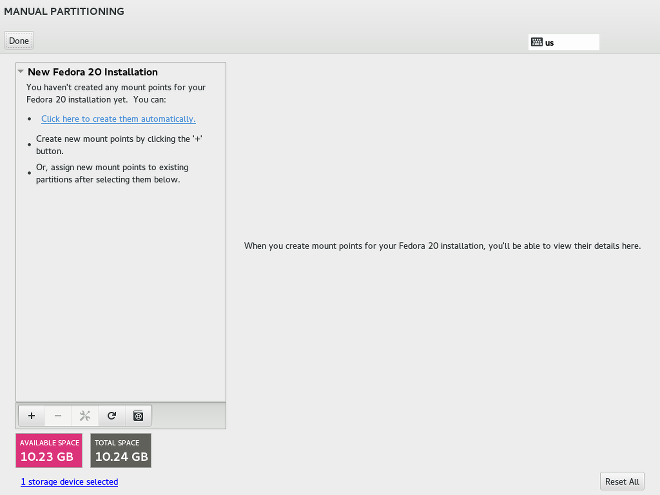
9.14.1. Adding and Configuring Partitions
Adding a partition is a two-step process. You first create the partition at a certain size and specify the mount point. The partition will appear in the left pane. Next, you customize it using the options in the right pane, where you can choose a name, device type, file system type, label, and whether to encrypt or reformat the partition. This differs from previous partitioning methods where the partition was created and customized in the same step.
If you configured your disks in the shell prompt, click the arrow button at the bottom of the left-hand pane before you begin partitioning. In the resulting dialog, click Rescan disks. This enables the installer to take advantage of your changes.
If you have no existing partitions and want the system to create the required partitions and their mount points for you, use your mouse to click the link in the left pane for creating mount points automatically. This will generate a
/boot partition, a
/ (root) partition, and a swap partition proportionate to the size of the device. These are the recommended partitions for a typical installation (refer to
Section 9.14.5, “Recommended Partitioning Scheme”), but you can add additional partitions if you need to.
Alternatively, create individual partitions using the + button at the bottom of the pane. The Add a New Mount Point dialog will open. Type a path for the mount point or select one from the drop-down menu (for example, enter / for the root partition, /boot for the boot partition, and so on). Enter the desired size of the partition in megabytes or gigabytes (for example, type "2GB" to create a 2 gigabyte partition). After entering these details, click Add a mount point. This action creates the partition.
To change which devices a non-LVM mount point should be located on, click the configuration button at the bottom of the pane to open the Configure Mount Point dialog. Select one or more devices and click Select.
To customize a partition, select it in the left-hand pane and the following customizable features will appear to the right (click Customize to reveal them all):
Name: Assign a name to the partition. Certain partitions will be named automatically when they are created and their name is unavailable for editing, such as /home being assigned the name sda1. Others can be named arbitrarily.
Mount point: Enter the partition's mount point. For example, if this partition should be the root partition, enter /; enter /boot for the /boot partition, and so on. For a swap partition the mount point should not be set — setting the filesystem type to swap is sufficient.
Label: Assign a label to the partition.
Desired capacity: Enter the desired size (in megabytes) of the partition.
Device Type: Choose between
Standard Partition,
LVM, and
BTRFS. If two or more disks were selected for partitioning,
RAID will also be available. For more information on these options, refer to
Section 9.14.1.1, “File System Types”. Check the adjacent
Encrypt box to encrypt the partition. You will be prompted to generate a password later.
File System: Using the pull-down menu, select the appropriate file system type for this partition. For more information on file system types, refer to
Section 9.14.1.1, “File System Types”. Check the adjacent
Reformat box to format an existing partition, or leave it unchecked to retain your data.
Click Update Settings to save your changes and select another partition to customize. To undo the changes you have made to the partitions and start again, click Reset All.
When all partitions have been created and customized, click Done to return to the Installation Summary Menu. The Summary of Changes dialog will appear first, prompting you to either review and accept your partitions or to return and modify them.
9.14.1.1. File System Types
Fedora allows you to create different partition types and file systems. The following is a brief description of the different partition types and file systems available, and how they can be used.
Partition types
standard partition — A standard partition can contain a file system or swap space, or it can provide a container for software RAID or an LVM physical volume.
logical volume (LVM) — Creating an LVM partition automatically generates an LVM logical volume. LVM can improve performance when using physical disks. To create a logical volume, refer to
Section 9.14.3, “ Create LVM Logical Volume ”. For more information regarding LVM, refer to the
Fedora System Administrators Guide.
software RAID — Creating two or more software RAID partitions allows you to create a RAID device. One RAID partition is assigned to each disk on the system. To create a RAID device, refer to
Section 9.14.2, “ Create Software RAID ”. For more information regarding RAID, refer to the chapter
RAID (Redundant Array of Independent Disks) in the
Fedora System Administrators Guide.
LVM thin provisioning – Using thin provisioning, you can manage a storage pool of free space, known as a thin pool, which can be allocated to an arbitrary number of devices when needed by applications. The thin pool can be expanded dynamically when needed for cost-effective allocation of storage space.
Btrfs — Btrfs is under development as a file system with several device-like features, so is presented in the installer as a type of partition. It is capable of addressing and managing more files, larger files, and larger volumes than the ext2, ext3, and ext4 file systems. To create a Btrfs volume and read more information, refer to
Section 9.14.4, “ Create a Btrfs subvolume”.
File systems
ext4 — The ext4 file system is based on the ext3 file system and features a number of improvements. These include support for larger file systems and larger files, faster and more efficient allocation of disk space, no limit on the number of subdirectories within a directory, faster file system checking, and more robust journaling. The ext4 file system is selected by default and is highly recommended.
ext3 — The ext3 file system is based on the ext2 file system and has one main advantage — journaling. Using a journaling file system reduces time spent recovering a file system after a crash as there is no need to
fsck
the file system.
ext2 — An ext2 file system supports standard Unix file types (regular files, directories, symbolic links, etc). It provides the ability to assign long file names, up to 255 characters.
swap — Swap partitions are used to support virtual memory. In other words, data is written to a swap partition when there is not enough RAM to store the data your system is processing. Refer to the Fedora System Administrators Guide for additional information.
BIOS Boot — A small partition required for booting a device with a GPT/GUID partition table on BIOS systems. Not required for UEFI systems.
xfs — XFS is a highly scalable, high-performance file system that supports filesystems up to 16 exabytes (approximately 16 million terabytes), files up to 8 exabytes (approximately 8 million terabytes) and directory structures containing tens of millions of entries. XFS supports metadata journaling, which facilitates quicker crash recovery. The XFS file system can also be defragmented and resized while mounted and active.
vfat — The VFAT file system is a Linux file system that is compatible with Microsoft Windows long filenames on the FAT file system.