9.11. Storage and partitioning
It is always a good idea to back up any data that you have on your systems. For example, if you are upgrading or creating a dual-boot system, you should back up any data you wish to keep on your storage devices. Mistakes do happen and can result in the loss of all your data.
If you install Fedora in text mode, you can only use the default partitioning schemes described in this section. You cannot add or remove partitions or file systems beyond those that the installer automatically adds or removes. If you require a customized layout at installation time, you should perform a graphical installation over a VNC connection or a kickstart installation.
Furthermore, advanced options such as encrypted filesystems and resizable filesystems are available only in graphical mode and kickstart.
If you have a RAID card, be aware that some BIOSes do not support booting from the RAID card. In cases such as these, the /boot/ partition must be created on a partition outside of the RAID array, such as on a separate hard drive. An internal hard drive is necessary to use for partition creation with problematic RAID cards.
A /boot/ partition is also necessary for software RAID setups.
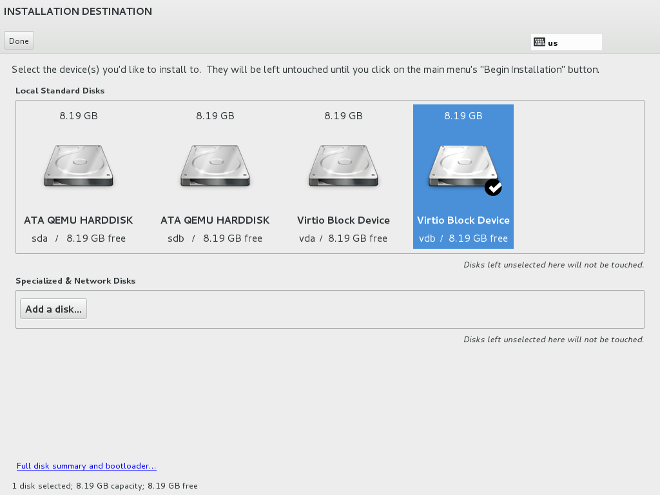
Select Installation Destination from the Installation Summary Menu to select and partition the disks Fedora will be installed on.
Partitioning allows you to divide your hard drive into isolated sections, where each section behaves as its own hard drive. Partitioning is particularly useful if you run multiple operating systems. If you are not sure how you want your system to be partitioned, read
Appendix A, An Introduction to Disk Partitions for more information.
On this screen you can choose to create the default partition layout automatically, or choose to partition storage devices manually to create a custom layout.
If you do not feel comfortable with partitioning your system, choose automatic partitioning and let the installation program partition the storage devices for you.
Choose the disks to install Fedora on by clicking their graphical representations from the pane at the top of the screen. Each disk is marked with its label, size, and available space. Hold down Ctrl or Shift while clicking on the disks to select or unselect multiple disks. A tick icon will appear on the disk once it is selected.
Click Done once you have made your selections.
Selecting a partitioning layout will not immediately affect your disks. The installer will make no changes to them until you return to the Installation Summary Menu and click Begin Installation.
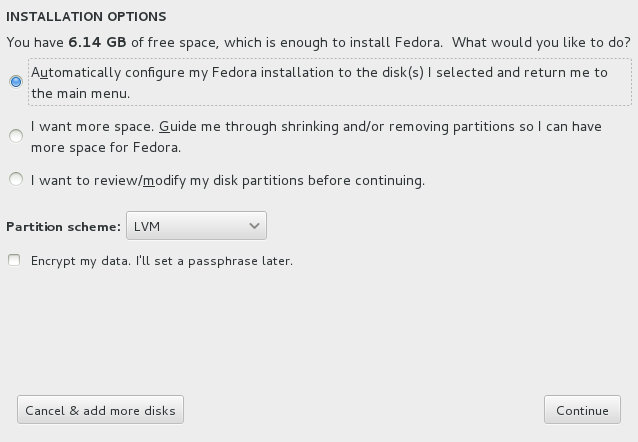
The Installation Options dialog now appears, informing you if there is enough space on the selected drive to install Fedora.
If there is sufficient space to install Fedora, choose from the following paths:
click Cancel & add more disks if you would like to add more storage space
select Automatically configure my Fedora installation to the disk(s) I selected... and press Continue to return to the Installation Summary Menu
select
I want more space... and press
Continue to reassign space to this installation by manually shrinking or removing partitions (refer to
Section 9.13, “Reclaim disk space”)
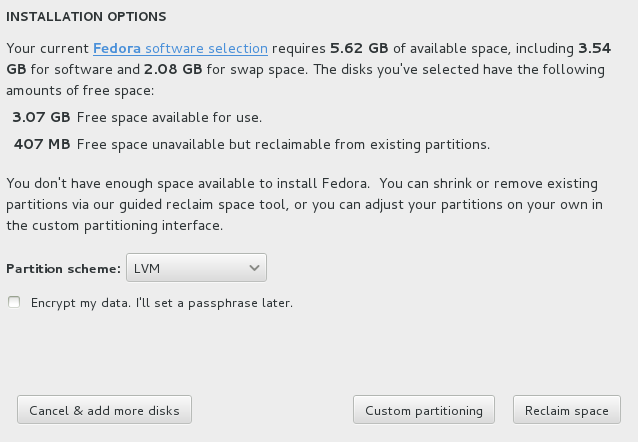
If there is not enough space and there are existing filesystems on the selected disk, you will be informed how much space could be reclaimed by shrinking or deleting these filesystems. The potential space is presented in two categories:
Choose from the following paths to generate sufficient space to install Fedora:
To encrypt all partitions except the
/boot partition, check the box labeled
Encrypt my data. I'll set a passphrase later in the
Installation Options dialog (refer to
Appendix C, Disk Encryption for information on encryption). You will be prompted to create a passphrase when you click
Continue or
Reclaim space (refer to
Section 9.12, “ Encrypt Partitions ”).
Optionally, use the Partition Scheme dropdown menu in the Installation Options dialog to choose a partitioning scheme. This will apply to both automated and manually-generated partitions, although individual partitions can later be modified during the manual partitioning process. Choose from:
When you install Fedora on a system with multipath and non-multipath storage devices, the automatic partitioning layout in the installer might create volume groups that contain a mix of multipath and non-multipath devices. This defeats the purpose of multipath storage.
9.11.1. Specialized and Networked Disks
The Specialized and Networked Disks selection screen displays all specialized storage devices to which anaconda has access.
Devices are grouped under the following tabs:
- Multipath Devices
Storage devices accessible through more than one path, such as through multiple SCSI controllers or Fiber Channel ports on the same system.
The installer only detects multipath storage devices with serial numbers that are 16 or 32 characters in length.
- Other SAN Devices
Any other devices available on a storage area network (SAN).
- Firmware RAID
Storage devices attached to a firmware RAID controller.
To assign non-friendly multipath device names, click Device Options and uncheck Use friendly names for multipath devices.
The Specialized and Networked Disks selection screen also contains a Search tab that allows you to filter storage devices either by their World Wide Identifier (WWID) or by the port, target, or logical unit number (LUN) at which they are accessed.
The tab contains a drop-down menu to select searching by port, target, WWID, or LUN (with corresponding text boxes for these values). Searching by WWID or LUN requires additional values in the corresponding text box.
Each tab presents a list of devices detected by anaconda with columns of information about the device to help you to identify it, such as , , , and .
Each device is presented on a separate row, with a checkbox to its left. Click the checkbox to make a device available during the installation process, or click the radio button at the left of the column headings to select or deselect all the devices listed in a particular screen. Later in the installation process, you can choose to install Fedora onto any of the devices selected here, and can choose to automatically mount any of the other devices selected here as part of the installed system.
Note that the devices that you select here are not automatically erased by the installation process. Selecting a device on this screen does not, in itself, place data stored on the device at risk. Note also that any devices that you do not select here to form part of the installed system can be added to the system after installation by modifying the /etc/fstab file.
When you have selected the storage devices to make available during installation, click Done to return to the Installation Destination screen.
9.11.1.1. Add an iSCSI target
To use iSCSI storage devices for the installation, anaconda must be able to discover them as iSCSI targets and be able to create an iSCSI session to access them. Each of these steps might require a username and password for CHAP (Challenge Handshake Authentication Protocol) authentication. Additionally, you can configure an iSCSI target to authenticate the iSCSI initiator on the system to which the target is attached (reverse CHAP), both for discovery and for the session. Used together, CHAP and reverse CHAP are called mutual CHAP or two-way CHAP. Mutual CHAP provides the greatest level of security for iSCSI connections, particularly if the username and password are different for CHAP authentication and reverse CHAP authentication.
Repeat the iSCSI discovery and iSCSI login steps as many times as necessary to add all required iSCSI storage. However, you cannot change the name of the iSCSI initiator after you attempt discovery for the first time. To change the iSCSI initiator name, you must restart the installation.
Procedure 9.1. iSCSI discovery
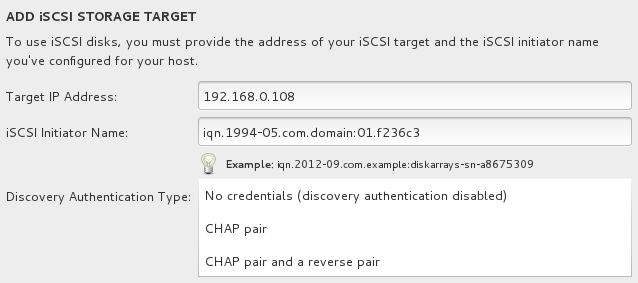
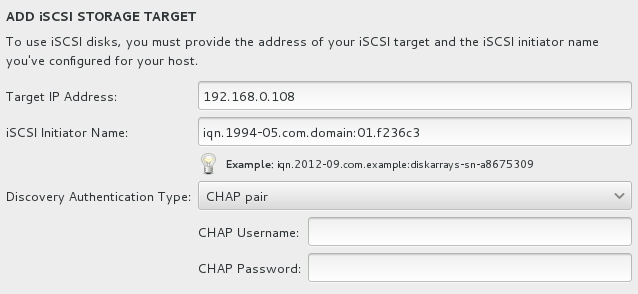
Use the Add iSCSI Storage Target dialog to provide anaconda with the information that it needs to discover the iSCSI target.
Enter the IP address of the iSCSI target in the Target IP Address field.
The iSCSI Initiator Name will be automatically filled by the installer with a generated initiator name. You may change this field to a different name, provided it follows the iSCSI qualified name (IQN) format.
A valid IQN contains:
the string iqn. (note the period)
a date code that specifies the year and month in which your organization's Internet domain or subdomain name was registered, represented as four digits for the year, a dash, and two digits for the month, followed by a period. For example, represent September 2010 as 2010-09.
your organization's Internet domain or subdomain name, presented in reverse order with the top-level domain first. For example, represent the subdomain storage.example.com as com.example.storage
a colon followed by a string that uniquely identifies this particular iSCSI initiator within your domain or subdomain. For example, :diskarrays-sn-a8675309.
A complete IQN therefore resembles: iqn.2010-09.storage.example.com:diskarrays-sn-a8675309, and anaconda pre-populates the iSCSI Initiator Name field with a name in this format to help you with the structure.
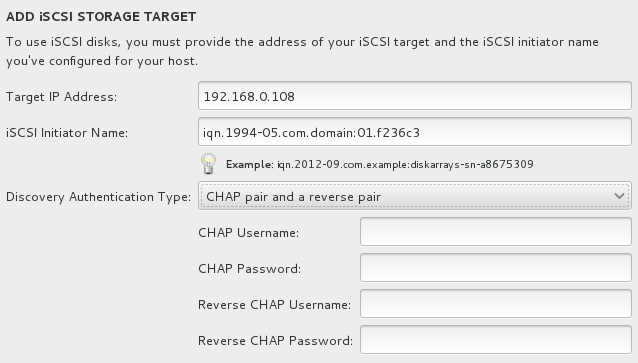
Use the drop-down menu to specify the type of authentication to use for iSCSI discovery:
If you selected as the authentication type, provide the username and password for the iSCSI target in the CHAP Username and CHAP Password fields.
If you selected as the authentication type, provide the username and password for the iSCSI target in the CHAP Username and CHAP Password field and the username and password for the iSCSI initiator in the Reverse CHAP Username and Reverse CHAP Password fields.
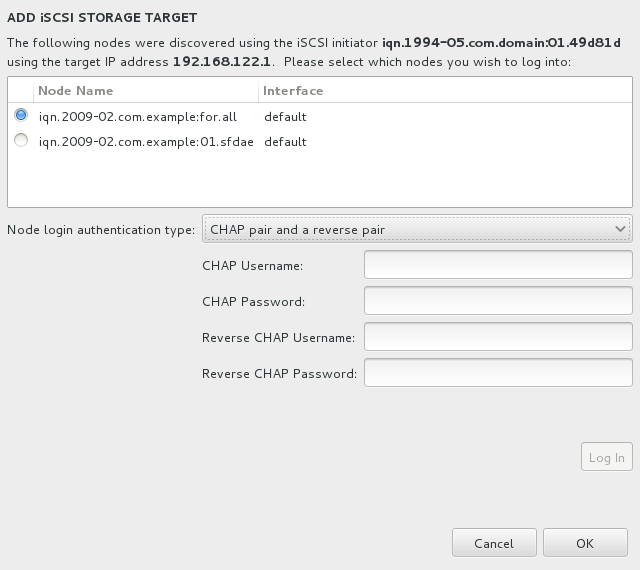
Click Start Discovery. Anaconda will attempt to discover an iSCSI target based on the information that you provided. If the discovery succeeds, a new dialog will present you with a list of all the iSCSI nodes discovered on the target. if the discovery fails, an error message will appear describing the nature of the problem.
In the list of discovered nodes, select the one you want to access using the radio buttons in the left hand side column. Then select an authentification method from the drop-down menu. If you selected or , fill out the appropriate fields with valid credentials. To use the same credentials used in the discovery process, select the option.
Click Log In to initiate an iSCSI session.
If anaconda discovered multiple nodes, you will be returned to the Add iSCSI Storage Target window, which will contain a list of discovered nodes you have not logged in to yet. Nodes you have already logged in to will not be displayed in the list. If you want to configure additional nodes, repeat step 6 in this procedure.
After you log in to all the nodes you want to configure, click OK. You will then be returned to the Specialized and Network Disks screen.
9.11.1.2. Add an FCoE SAN
To configure an FCoE SAN, select Add FCoE SAN and click Add Drive.
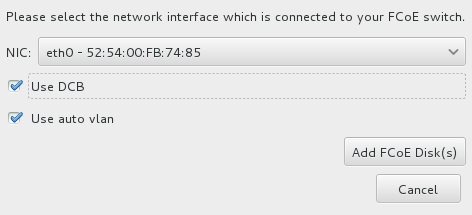
On the menu that appears in the next dialog box, select the network interface that is connected to your FCoE switch and click Add FCoE Disk(s).
Data Center Bridging (DCB) is a set of enhancements to the Ethernet protocols designed to increase the efficiency of Ethernet connections in storage networks and clusters. Enable or disable the installer's awareness of DCB with the checkbox in this dialog.