7.2.3. Setting up the Timeline
At the top of the main Ardour window, to the right of the transport's toolbar, are two relatively large clocks. If you do not need both clocks, you can turn off one of them. Right-click the clocks to choose what you want them to display:
displays the number of bars and beats
displays the time since beginning of track
displays frames-per-second timecode (usually for work with films)
displays the samples since start
The menu is located between the timeline and the clocks. This menu controls where regions may move. You need to change these as you work with a session, depending on the current activity. The left menu contains:
: regions can move freely
: regions must start on the nearest grid point
regions can move freely, but when they are near a grid point, they automatically snap to it
The middle menu controls where to place the grid lines: by SMPTE timecode, by clock time, by beats and bars, or by regions.
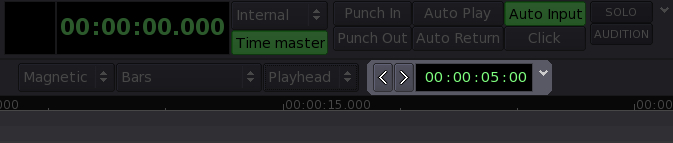
Figure 7.5, “The Ardour nudge pane” shows the nudge pane, part of the transport. The nudge tool moves a selected region or regions forward or back in the session by a specific amount. The
< button moves regions back in the session. The
> button moves regions forward in the session. If no regions are selected, the nudge tool moves the transport head. The display to the right of the
> button tells you how far a selected region would move. In this case, the nudge tool moves regions by 5 seconds.
The timeline contains many rulers that show different time-marking scales. The timeline is located at the top of the canvas area, below the toolbars. Use the context menu (right-click) to select which rulers you want to display. The rulers you should choose depends on the clock settings and the snap mode.