Product SiteDocumentation Site

22.2.2. Using the Kernel Dump Configuration Utility

To start the Kernel Dump Configuration utility, select ApplicationsOtherKernel crash dumps from the Activities menu, or type 
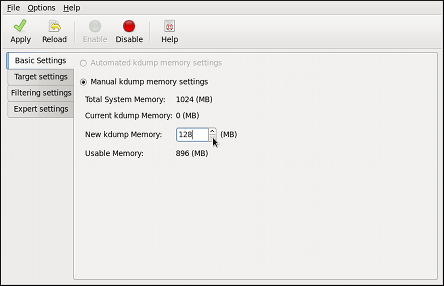
system-config-kdump at a shell prompt. You will be presented with a window as shown in Figure 22.1, “Basic Settings”.
The utility allows you to configure kdump as well as to enable or disable starting the service at boot time. When you are done, click Apply to save the changes. The system reboot will be requested, and unless you are already authenticated, you will be prompted to enter the superuser password.

Make sure the system has enough memory

Unless the system has enough memory, this option will not be available. For the information on minimum memory requirements, refer to the Hardware Overview section of the Fedora 19 Release Notes. When the kdump crash recovery is enabled, the minimum memory requirements increase by the amount of memory reserved for it. This value is determined by the user, and defaults to 128 MB plus 64 MB for each TB of physical memory (that is, a total of 192 MB for a system with 1 TB of physical memory).

22.2.2.1. Enabling the Service

To start the kdump daemon at boot time, click the Enable button on the toolbar. This will enable the service and start it for the current session. Similarly, clicking the Disable button will disable it and stop the service immediately.
For more information on system services and their configuration, refer to Chapter 6, Services and Daemons.

22.2.2.2. The Basic Settings Tab

The Basic Settings tab enables you to configure the amount of memory that is reserved for the kdump kernel. To do so, select the Manual kdump memory settings radio button, and click the up and down arrow buttons next to the New kdump Memory field to increase or decrease the value. Notice that the Usable Memory field changes accordingly showing you the remaining memory that will be available to the system.
Basic Settings

Figure 22.1. Basic Settings

22.2.2.3. The Target Settings Tab

The Target Settings tab enables you to specify the target location for the 
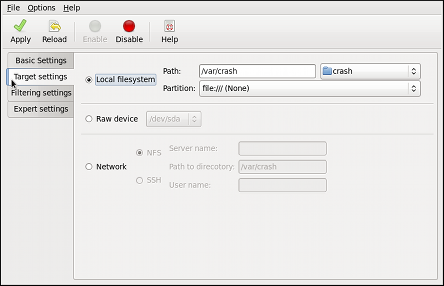
vmcore dump. It can be either stored as a file in a local file system, written directly to a device, or sent over a network using the NFS (Network File System) or SSH (Secure Shell) protocol.
Target Settings

Figure 22.2. Target Settings

To save the dump to the local file system, select the Local filesystem radio button. Optionally, you can customize the settings by choosing a different partition from the Partition, and a target directory from the Path pulldown lists.
To write the dump directly to a device, select the Raw device radio button, and choose the desired target device from the pulldown list next to it.
To store the dump to a remote machine, select the Network radio button. To use the NFS protocol, select the NFS radio button, and fill the Server name and Path to directory fields. To use the SSH protocol, select the SSH radio button, and fill the Server name, Path to directory, and User name fields with the remote server address, target directory, and a valid remote user name respectively. See Chapter 8, OpenSSH for information on how to configure an SSH server, and how to set up a key-based authentication.
For a complete list of currently supported targets, see Table 22.1, “Supported kdump targets”.

Table 22.1. Supported kdump targets

Type Supported Targets Unsupported Targets
Raw device All locally attached raw disks and partitions.
Local file system ext2, ext3, ext4, minix file systems on directly attached disk drives, hardware RAID logical drives, LVM devices, and mdraid arrays. The eCryptfs file system.
Remote directory Remote directories accessed using the NFS or SSH protocol over IPv4. Remote directories on the rootfs file system accessed using the NFS protocol.
Remote directories accessed using the iSCSI protocol over hardware initiators. Remote directories accessed using the iSCSI protocol over software initiators.
Remote directories accessed over IPv6.
Remote directories accessed using the SMB/CIFS protocol.
Remote directories accessed using the FCoE (Fibre Channel over Ethernet) protocol.
Remote directories accessed using wireless network interfaces.
Multipath-based storages.
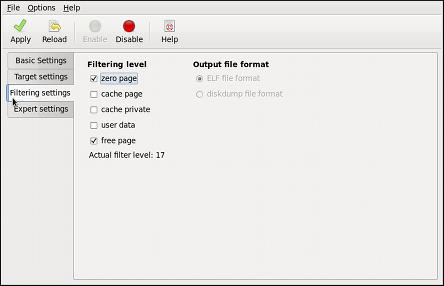
22.2.2.4. The Filtering Settings Tab

The Filtering Settings tab enables you to select the filtering level for the vmcore dump.
Filtering Settings

Figure 22.3. Filtering Settings

To exclude the zero page, cache page, cache private, user data, or free page from the dump, select the checkbox next to the appropriate label.

22.2.2.5. The Expert Settings Tab

The Expert Settings tab enables you to choose which kernel and initial RAM disk to use, as well as to customize the options that are passed to the kernel and the core collector program.
Expert Settings

Figure 22.4. Expert Settings

To use a different initial RAM disk, select the Custom initrd radio button, and choose the desired RAM disk from the pulldown list next to it.
To capture a different kernel, select the Custom kernel radio button, and choose the desired kernel image from the pulldown list on the right.
To adjust the list of options that are passed to the kernel at boot time, edit the content of the Edited text field. Note that you can always revert your changes by clicking the Refresh button.
To choose what action to perform when 
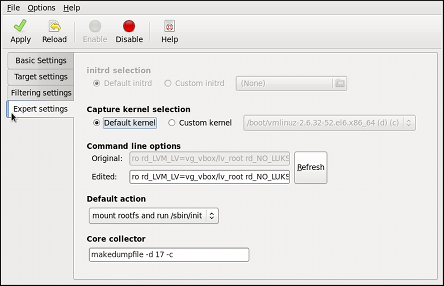
kdump fails to create a core dump, select an appropriate option from the Default action pulldown list. Available options are mount rootfs and run /sbin/init (the default action), reboot (to reboot the system), shell (to present a user with an interactive shell prompt), halt (to halt the system), and poweroff (to power the system off).
To customize the options that are passed to the makedumpfile core collector, edit the Core collector text field; see Section 22.2.3.3, “Configuring the Core Collector” for more information.