HTTP (Hypertext Transfer Protocol) server, or a web server, is a network service that serves content to a client over the web. This typically means web pages, but any other documents can be served as well.
httpd, an open source web server developed by the Apache Software Foundation. In Fedora 20 the Apache server has been updated to Apache HTTP Server 2.4. This section describes the basic configuration of the httpd service, and covers some advanced topics such as adding server modules, setting up virtual hosts, or configuring the secure HTTP server.
httpd service configuration accordingly. This section reviews some of the newly added features, outlines important changes, and guides you through the update of older configuration files.
apachectl and systemctl commands to control the service, in place of the service command. The following examples are specific to the httpd service. The command: service httpd gracefulis replaced by
apachectl gracefulThe command:
service httpd configtestis replaced by
apachectl configtestThe
systemd unit file for httpd has different behavior from the init script as follows:
systemd unit file runs the httpd daemon using a private /tmp directory, separate to the system /tmp directory.
/etc/httpd/conf.modules.d directory. Packages, such as php, which provide additional loadable modules for httpd will place a file in this directory. Any configuration files in the conf.modules.d are processed before the main body of httpd.conf. Configuration files in the /etc/httpd/conf.d directory are now processed after the main body of httpd.conf.
/etc/httpd/conf.d/autoindex.confThis configures mod_autoindex directory indexing.
/etc/httpd/conf.d/userdir.confThis configures access to user directories, for example,
http://example.com/~username/; such access is disabled by default for security reasons.
/etc/httpd/conf.d/welcome.confAs in previous releases, this configures the welcome page displayed for
http://localhost/ when no content is present.
httpd.conf is now provided by default. Many common configuration settings, such as Timeout or KeepAlive are no longer explicitly configured in the default configuration; hard-coded settings will be used instead, by default. The hard-coded default settings for all configuration directives are specified in the manual. See Section 9.1.8.1, “Installed Documentation” for more information.
httpd configuration syntax were made which will require changes if migrating an existing configuration from httpd 2.2 to httpd 2.4. See the following Apache document for more information on upgrading http://httpd.apache.org/docs/2.4/upgrading.html
httpd binaries: the forked model, “prefork”, as /usr/sbin/httpd, and the thread-based model “worker” as /usr/sbin/httpd.worker.
httpd binary is used, and three MPMs are available as loadable modules: worker, prefork (default), and event. The configuration file /etc/httpd/conf.modules.d/00-mpm.conf can be changed to select which of the three MPM modules is loaded.
/var/cache/mod_proxy directory is no longer provided; instead, the /var/cache/httpd/ directory is packaged with a proxy and ssl subdirectory.
httpd has been moved from /var/www/ to /usr/share/httpd/:
/usr/share/httpd/icons/The
/var/www/icons/ has moved to /usr/share/httpd/icons. This directory contains a set of icons used with directory indices. Available at http://localhost/icons/ in the default configuration, via /etc/httpd/conf.d/autoindex.conf.
/usr/share/httpd/manual/The
/var/www/manual/ has moved to /usr/share/httpd/manual/. This directory, contained in the httpd-manual package, contains the HTML version of the manual for httpd. Available at http://localhost/manual/ if the package is installed, via /etc/httpd/conf.d/manual.conf.
/usr/share/httpd/error/The
/var/www/error/ has moved to /usr/share/httpd/error/. Custom multi-language HTTP error pages. Not configured by default, the example configuration file is provided at /usr/share/doc/httpd-VERSION/httpd-multilang-errordoc.conf.
Order, Deny and Allow directives should be adapted to use the new Require syntax. See the following Apache document for more information http://httpd.apache.org/docs/2.4/howto/auth.html
setuid root; instead, it has file system capability bits set which allow a more restrictive set of permissions. In conjunction with this change, the suexec binary no longer uses the /var/log/httpd/suexec.log logfile. Instead, log messages are sent to syslog; by default these will appear in the /var/log/secure log file.
httpd module interface, httpd 2.4 is not compatible with third-party binary modules built against httpd 2.2. Such modules will need to be adjusted as necessary for the httpd 2.4 module interface, and then rebuilt. A detailed list of the API changes in version 2.4 is available here: http://httpd.apache.org/docs/2.4/developer/new_api_2_4.html.
/usr/sbin/apxs to /usr/bin/apxs.
httpd modules removed in Fedora 20:
LoadModule directive for each module that has been renamed.
/etc/httpd/conf.d/ssl.conf to enable the Secure Sockets Layer (SSL) protocol.
~]# apachectl configtest
Syntax OKhttpd service, make sure you have the httpd installed. You can do so by using the following command:
~]# yum install httpdhttpd service, type the following at a shell prompt as root:
~]# systemctl start httpd.service~]# systemctl enable httpd.service
ln -s '/usr/lib/systemd/system/httpd.service' '/etc/systemd/system/multi-user.target.wants/httpd.service'Using the secure server
httpd service, type the following at a shell prompt as root:
~]# systemctl stop httpd.service~]# systemctl disable httpd.service
rm '/etc/systemd/system/multi-user.target.wants/httpd.service'httpd service:
root:
~]# systemctl restart httpd.servicehttpd service and immediately starts it again. Use this command after installing or removing a dynamically loaded module such as PHP.
root, type:
~]# systemctl reload httpd.servicehttpd service to reload its configuration file. Any requests being currently processed will be interrupted, which may cause a client browser to display an error message or render a partial page.
root:
~]# service httpd gracefulhttpd service to reload its configuration file. Any requests being currently processed will use the old configuration.
httpd service is running, type the following at a shell prompt:
~]# systemctl is-active httpd.service
activehttpd service is started, by default, it reads the configuration from locations that are listed in Table 9.1, “The httpd service configuration files”.
Table 9.1. The httpd service configuration files
httpd service.
~]# apachectl configtest
Syntax OK/etc/httpd/conf/httpd.conf configuration file:
<Directory> <Directory> directive allows you to apply certain directives to a particular directory only. It takes the following form:
<Directory directory>
  directive
  …
</Directory>
cgi-bin directories for server-side scripts located outside the directory that is specified by ScriptAlias. In this case, the ExecCGI and AddHandler directives must be supplied, and the permissions on the target directory must be set correctly (that is, 0755).
Example 9.1. Using the <Directory> directive
<Directory /var/www/html>
  Options Indexes FollowSymLinks
  AllowOverride None
  Order allow,deny
  Allow from all
</Directory>
<IfDefine> IfDefine directive allows you to use certain directives only when a particular parameter is supplied on the command line. It takes the following form:
<IfDefine [!]parameter>
  directive
  …
</IfDefine>-Dparameter command line option (for example, httpd -DEnableHome). If the optional exclamation mark (that is, !) is present, the enclosed directives are used only when the parameter is not specified.
<IfModule> <IfModule> directive allows you to use certain directive only when a particular module is loaded. It takes the following form:
<IfModule [!]module>
  directive
  …
</IfModule>!) is present, the enclosed directives are used only when the module is not loaded.
Example 9.3. Using the <IfModule> directive
<IfModule mod_disk_cache.c>
  CacheEnable disk /
  CacheRoot /var/cache/mod_proxy
</IfModule>
<Location> <Location> directive allows you to apply certain directives to a particular URL only. It takes the following form:
<Location url>
  directive
  …
</Location>
DocumentRoot directive (for example, /server-info), or an external URL such as http://example.com/server-info.
Example 9.4. Using the <Location> directive
<Location /server-info>
  SetHandler server-info
  Order deny,allow
  Deny from all
  Allow from .example.com
</Location>
<Proxy> <Proxy> directive allows you to apply certain directives to the proxy server only. It takes the following form:
<Proxy pattern>
  directive
  …
</Proxy>
http://example.com/*).
Example 9.5. Using the <Proxy> directive
<Proxy *>
  Order deny,allow
  Deny from all
  Allow from .example.com
</Proxy>
<VirtualHost> <VirtualHost> directive allows you apply certain directives to particular virtual hosts only. It takes the following form:
<VirtualHost address[:port]…>
  directive
  …
</VirtualHost>Table 9.2. Available <VirtualHost> options
| Option | Description |
|---|---|
* | Represents all IP addresses. |
_default_ | Represents unmatched IP addresses. |
Example 9.6. Using the <VirtualHost> directive
<VirtualHost *:80>
  ServerAdmin webmaster@penguin.example.com
  DocumentRoot /www/docs/penguin.example.com
  ServerName penguin.example.com
  ErrorLog logs/penguin.example.com-error_log
  CustomLog logs/penguin.example.com-access_log common
</VirtualHost>
AccessFileName AccessFileName directive allows you to specify the file to be used to customize access control information for each directory. It takes the following form:
AccessFileName filename…
.htaccess.
Files tag to prevent the files beginning with .ht from being accessed by web clients. This includes the .htaccess and .htpasswd files.
Example 9.7. Using the AccessFileName directive
AccessFileName .htaccess

<Files ~ "^\.ht">
  Order allow,deny
  Deny from all
  Satisfy All
</Files>
Action Action directive allows you to specify a CGI script to be executed when a certain media type is requested. It takes the following form:
Action content-type path
text/html, image/png, or application/pdf. The path refers to an existing CGI script, and must be relative to the directory specified by the DocumentRoot directive (for example, /cgi-bin/process-image.cgi).
AddDescription AddDescription directive allows you to specify a short description to be displayed in server-generated directory listings for a given file. It takes the following form:
AddDescription "description" filename…
"). The filename can be a full file name, a file extension, or a wildcard expression.
AddEncoding AddEncoding directive allows you to specify an encoding type for a particular file extension. It takes the following form:
AddEncoding encoding extension…
x-compress, x-gzip, etc. The extension is a case sensitive file extension, and is conventionally written with a leading dot (for example, .gz).
AddHandler AddHandler directive allows you to map certain file extensions to a selected handler. It takes the following form:
AddHandler handler extension…
.cgi).
.cgi extension as CGI scripts regardless of the directory they are in. Additionally, it is also commonly used to process server-parsed HTML and image-map files.
AddIcon AddIcon directive allows you to specify an icon to be displayed for a particular file in server-generated directory listings. It takes the following form:
AddIcon path pattern…
DocumentRoot directive (for example, /icons/folder.png). The pattern can be a file name, a file extension, a wildcard expression, or a special form as described in the following table:
Table 9.3. Available AddIcon options
| Option | Description |
|---|---|
^^DIRECTORY^^ | Represents a directory. |
^^BLANKICON^^ | Represents a blank line. |
AddIconByEncoding AddIconByEncoding directive allows you to specify an icon to be displayed for a particular encoding type in server-generated directory listings. It takes the following form:
AddIconByEncoding path encoding…
DocumentRoot directive (for example, /icons/compressed.png). The encoding has to be a valid MIME encoding such as x-compress, x-gzip, etc.
Example 9.13. Using the AddIconByEncoding directive
AddIconByEncoding /icons/compressed.png x-compress x-gzip
AddIconByType AddIconByType directive allows you to specify an icon to be displayed for a particular media type in server-generated directory listings. It takes the following form:
AddIconByType path content-type…
DocumentRoot directive (for example, /icons/text.png). The content-type has to be either a valid MIME type (for example, text/html or image/png), or a wildcard expression such as text/*, image/*, etc.
AddLanguage AddLanguage directive allows you to associate a file extension with a specific language. It takes the following form:
AddLanguage language extension…
cs, en, or fr. The extension is a case sensitive file extension, and is conventionally written with a leading dot (for example, .cs).
AddType AddType directive allows you to define or override the media type for a particular file extension. It takes the following form:
AddType content-type extension…
text/html, image/png, etc. The extension is a case sensitive file extension, and is conventionally written with a leading dot (for example, .cs).
Alias Alias directive allows you to refer to files and directories outside the default directory specified by the DocumentRoot directive. It takes the following form:
Alias url-path real-path
DocumentRoot directive (for example, /images/). The real-path is a full path to a file or directory in the local file system.
Directory tag with additional permissions to access the target directory. By default, the /icons/ alias is created so that the icons from /var/www/icons/ are displayed in server-generated directory listings.
Example 9.17. Using the Alias directive
Alias /icons/ /var/www/icons/

<Directory "/var/www/icons">
  Options Indexes MultiViews FollowSymLinks
  AllowOverride None
  Order allow,deny
  Allow from all
<Directory>
AllowAllow directive allows you to specify which clients have permission to access a given directory. It takes the following form:
Allow from client…
all for all clients.
AllowOverride AllowOverride directive allows you to specify which directives in a .htaccess file can override the default configuration. It takes the following form:
AllowOverride type…
Table 9.4. Available AllowOverride options
| Option | Description |
|---|---|
All | All directives in .htaccess are allowed to override earlier configuration settings. |
None | No directive in .htaccess is allowed to override earlier configuration settings. |
AuthConfig | Allows the use of authorization directives such as AuthName, AuthType, or Require. |
FileInfo | Allows the use of file type, metadata, and mod_rewrite directives such as DefaultType, RequestHeader, or RewriteEngine, as well as the Action directive. |
Indexes | Allows the use of directory indexing directives such as AddDescription, AddIcon, or FancyIndexing. |
Limit | Allows the use of host access directives, that is, Allow, Deny, and Order. |
Options[=option,…] | Allows the use of the Options directive. Additionally, you can provide a comma-separated list of options to customize which options can be set using this directive. |
BrowserMatch BrowserMatch directive allows you to modify the server behavior based on the client's web browser type. It takes the following form:
BrowserMatch pattern variable…
CacheDefaultExpire CacheDefaultExpire option allows you to set how long to cache a document that does not have any expiration date or the date of its last modification specified. It takes the following form:
CacheDefaultExpire time
3600 (that is, one hour).
CacheDisable CacheDisable directive allows you to disable caching of certain URLs. It takes the following form:
CacheDisable path
DocumentRoot directive (for example, /files/).
CacheEnable CacheEnable directive allows you to specify a cache type to be used for certain URLs. It takes the following form:
CacheEnable type url
DocumentRoot directive (for example, /images/), a protocol (for example, ftp://), or an external URL such as http://example.com/.
Table 9.5. Available cache types
| Type | Description |
|---|---|
mem | The memory-based storage manager. |
disk | The disk-based storage manager. |
fd | The file descriptor cache. |
CacheLastModifiedFactor CacheLastModifiedFactor directive allows you to customize how long to cache a document that does not have any expiration date specified, but that provides information about the date of its last modification. It takes the following form:
CacheLastModifiedFactor number
0.1 (that is, one tenth).
CacheMaxExpire CacheMaxExpire directive allows you to specify the maximum amount of time to cache a document. It takes the following form:
CacheMaxExpire time
86400 (that is, one day).
CacheNegotiatedDocs CacheNegotiatedDocs directive allows you to enable caching of the documents that were negotiated on the basis of content. It takes the following form:
CacheNegotiatedDocs option
Off.
Table 9.6. Available CacheNegotiatedDocs options
| Option | Description |
|---|---|
On | Enables caching the content-negotiated documents. |
Off | Disables caching the content-negotiated documents. |
CacheRoot CacheRoot directive allows you to specify the directory to store cache files in. It takes the following form:
CacheRoot directory
/var/cache/mod_proxy/.
CustomLog CustomLog directive allows you to specify the log file name and the log file format. It takes the following form:
CustomLog path format
ServerRoot directive (that is, /etc/httpd/ by default). The format has to be either an explicit format string, or a format name that was previously defined using the LogFormat directive.
DefaultIcon DefaultIcon directive allows you to specify an icon to be displayed for a file in server-generated directory listings when no other icon is associated with it. It takes the following form:
DefaultIcon path
DocumentRoot directive (for example, /icons/unknown.png).
DefaultType DefaultType directive allows you to specify a media type to be used in case the proper MIME type cannot be determined by the server. It takes the following form:
DefaultType content-type
text/html, image/png, application/pdf, etc.
Deny Deny directive allows you to specify which clients are denied access to a given directory. It takes the following form:
Deny from client…
all for all clients.
DirectoryIndex DirectoryIndex directive allows you to specify a document to be served to a client when a directory is requested (that is, when the URL ends with the / character). It takes the following form:
DirectoryIndex filename…
index.html, and index.html.var.
DocumentRoot DocumentRoot directive allows you to specify the main directory from which the content is served. It takes the following form:
DocumentRoot directory
/var/www/html/.
ErrorDocument ErrorDocument directive allows you to specify a document or a message to be displayed as a response to a particular error. It takes the following form:
ErrorDocument error-code action
403 (Forbidden), 404 (Not Found), or 500 (Internal Server Error). The action can be either a URL (both local and external), or a message string enclosed in double quotes (that is, ").
Example 9.34. Using the ErrorDocument directive
ErrorDocument 403 "Access Denied"
ErrorDocument 404 /404-not_found.html
ErrorLog ErrorLog directive allows you to specify a file to which the server errors are logged. It takes the following form:
ErrorLog path
ServerRoot directive (that is, /etc/httpd/ by default). The default option is logs/error_log
ExtendedStatus ExtendedStatus directive allows you to enable detailed server status information. It takes the following form:
ExtendedStatus option
Off.
Table 9.7. Available ExtendedStatus options
| Option | Description |
|---|---|
On | Enables generating the detailed server status. |
Off | Disables generating the detailed server status. |
Group Group directive allows you to specify the group under which the httpd service will run. It takes the following form:
Group group
apache.
Group is no longer supported inside <VirtualHost>, and has been replaced by the SuexecUserGroup directive.
HeaderName HeaderName directive allows you to specify a file to be prepended to the beginning of the server-generated directory listing. It takes the following form:
HeaderName filename
HEADER.html.
HostnameLookups HostnameLookups directive allows you to enable automatic resolving of IP addresses. It takes the following form:
HostnameLookups option
Off.
Table 9.8. Available HostnameLookups options
| Option | Description |
|---|---|
On | Enables resolving the IP address for each connection so that the hostname can be logged. However, this also adds a significant processing overhead. |
Double | Enables performing the double-reverse DNS lookup. In comparison to the above option, this adds even more processing overhead. |
Off | Disables resolving the IP address for each connection. |
Include Include directive allows you to include other configuration files. It takes the following form:
Include filename
filename can be an absolute path, a path relative to the directory specified by the ServerRoot directive, or a wildcard expression. All configuration files from the /etc/httpd/conf.d/ directory are loaded by default.
IndexIgnore IndexIgnore directive allows you to specify a list of file names to be omitted from the server-generated directory listings. It takes the following form:
IndexIgnore filename…
Example 9.41. Using the IndexIgnore directive
IndexIgnore .??* *~ *# HEADER* README* RCS CVS *,v *,t
IndexOptions IndexOptions directive allows you to customize the behavior of server-generated directory listings. It takes the following form:
IndexOptions option…
Charset=UTF-8, FancyIndexing, HTMLTable, NameWidth=*, and VersionSort.
Table 9.9. Available directory listing options
| Option | Description |
|---|---|
Charset=encoding | Specifies the character set of a generated web page. The encoding has to be a valid character set such as UTF-8 or ISO-8859-2. |
Type=content-type | Specifies the media type of a generated web page. The content-type has to be a valid MIME type such as text/html or text/plain. |
DescriptionWidth=value | Specifies the width of the description column. The value can be either a number of characters, or an asterisk (that is, *) to adjust the width automatically. |
FancyIndexing | Enables advanced features such as different icons for certain files or possibility to re-sort a directory listing by clicking on a column header. |
FolderFirst | Enables listing directories first, always placing them above files. |
HTMLTable | Enables the use of HTML tables for directory listings. |
IconsAreLinks | Enables using the icons as links. |
IconHeight=value | Specifies an icon height. The value is a number of pixels. |
IconWidth=value | Specifies an icon width. The value is a number of pixels. |
IgnoreCase | Enables sorting files and directories in a case-sensitive manner. |
IgnoreClient | Disables accepting query variables from a client. |
NameWidth=value | Specifies the width of the file name column. The value can be either a number of characters, or an asterisk (that is, *) to adjust the width automatically. |
ScanHTMLTitles | Enables parsing the file for a description (that is, the title element) in case it is not provided by the AddDescription directive. |
ShowForbidden | Enables listing the files with otherwise restricted access. |
SuppressColumnSorting | Disables re-sorting a directory listing by clicking on a column header. |
SuppressDescription | Disables reserving a space for file descriptions. |
SuppressHTMLPreamble | Disables the use of standard HTML preamble when a file specified by the HeaderName directive is present. |
SuppressIcon | Disables the use of icons in directory listings. |
SuppressLastModified | Disables displaying the date of the last modification field in directory listings. |
SuppressRules | Disables the use of horizontal lines in directory listings. |
SuppressSize | Disables displaying the file size field in directory listings. |
TrackModified | Enables returning the Last-Modified and ETag values in the HTTP header. |
VersionSort | Enables sorting files that contain a version number in the expected manner. |
XHTML | Enables the use of XHTML 1.0 instead of the default HTML 3.2. |
Example 9.42. Using the IndexOptions directive
IndexOptions FancyIndexing VersionSort NameWidth=* HTMLTable Charset=UTF-8
KeepAlive KeepAlive directive allows you to enable persistent connections. It takes the following form:
KeepAlive option
Off.
Table 9.10. Available KeepAlive options
| Option | Description |
|---|---|
On | Enables the persistent connections. In this case, the server will accept more than one request per connection. |
Off | Disables the keep-alive connections. |
KeepAliveTimeout to a low number, and monitor the /var/log/httpd/logs/error_log log file carefully.
KeepAliveTimeout KeepAliveTimeout directive allows you to specify the amount of time to wait for another request before closing the connection. It takes the following form:
KeepAliveTimeout time
15.
LanguagePriority LanguagePriority directive allows you to customize the precedence of languages. It takes the following form:
LanguagePriority language…
cs, en, or fr.
Listen Listen [ip-address:]port [protocol]
80.
httpd service.
LoadModule LoadModule directive allows you to load a Dynamic Shared Object (DSO) module. It takes the following form:
LoadModule name path
/usr/lib/httpd/ on 32-bit and /usr/lib64/httpd/ on 64-bit systems by default).
LogFormat LogFormat format name
CustomLog directive.
Table 9.11. Common LogFormat options
| Option | Description |
|---|---|
%b | Represents the size of the response in bytes. |
%h | Represents the IP address or hostname of a remote client. |
%l | Represents the remote log name if supplied. If not, a hyphen (that is, -) is used instead. |
%r | Represents the first line of the request string as it came from the browser or client. |
%s | Represents the status code. |
%t | Represents the date and time of the request. |
%u | If the authentication is required, it represents the remote user. If not, a hyphen (that is, -) is used instead. |
%{field} | Represents the content of the HTTP header field. The common options include %{Referer} (the URL of the web page that referred the client to the server) and %{User-Agent} (the type of the web browser making the request). |
LogLevel LogLevel directive allows you to customize the verbosity level of the error log. It takes the following form:
LogLevel option
warn.
Table 9.12. Available LogLevel options
| Option | Description |
|---|---|
emerg | Only the emergency situations when the server cannot perform its work are logged. |
alert | All situations when an immediate action is required are logged. |
crit | All critical conditions are logged. |
error | All error messages are logged. |
warn | All warning messages are logged. |
notice | Even normal, but still significant situations are logged. |
info | Various informational messages are logged. |
debug | Various debugging messages are logged. |
MaxKeepAliveRequests MaxKeepAliveRequests directive allows you to specify the maximum number of requests for a persistent connection. It takes the following form:
MaxKeepAliveRequests number
0 allows unlimited number of requests. The default option is 100.
NameVirtualHost NameVirtualHost directive allows you to specify the IP address and port number for a name-based virtual host. It takes the following form:
NameVirtualHost ip-address[:port]*) representing all interfaces. Note that IPv6 addresses have to be enclosed in square brackets (that is, [ and ]). The port is optional.
Using secure HTTP connections
Options Options directive allows you to specify which server features are available in a particular directory. It takes the following form:
Options option…
Table 9.13. Available server features
| Option | Description |
|---|---|
ExecCGI | Enables the execution of CGI scripts. |
FollowSymLinks | Enables following symbolic links in the directory. |
Includes | Enables server-side includes. |
IncludesNOEXEC | Enables server-side includes, but does not allow the execution of commands. |
Indexes | Enables server-generated directory listings. |
MultiViews | Enables content-negotiated “MultiViews”. |
SymLinksIfOwnerMatch | Enables following symbolic links in the directory when both the link and the target file have the same owner. |
All | Enables all of the features above with the exception of MultiViews. |
None | Disables all of the features above. |
Order Order directive allows you to specify the order in which the Allow and Deny directives are evaluated. It takes the following form:
Order option
allow,deny.
Table 9.14. Available Order options
| Option | Description |
|---|---|
allow,deny | Allow directives are evaluated first. |
deny,allow | Deny directives are evaluated first. |
PidFile PidFile directive allows you to specify a file to which the process ID (PID) of the server is stored. It takes the following form:
PidFile path
ServerRoot directive (that is, /etc/httpd/ by default). The default option is run/httpd.pid.
ProxyRequests ProxyRequests directive allows you to enable forward proxy requests. It takes the following form:
ProxyRequests option
Off.
Table 9.15. Available ProxyRequests options
| Option | Description |
|---|---|
On | Enables forward proxy requests. |
Off | Disables forward proxy requests. |
ReadmeName ReadmeName directive allows you to specify a file to be appended to the end of the server-generated directory listing. It takes the following form:
ReadmeName filename
README.html.
Redirect Redirect directive allows you to redirect a client to another URL. It takes the following form:
Redirect [status] path urlDocumentRoot directive (for example, /docs). The url refers to the current location of the content (for example, http://docs.example.com).
Table 9.16. Available status options
| Status | Description |
|---|---|
permanent | Indicates that the requested resource has been moved permanently. The 301 (Moved Permanently) status code is returned to a client. |
temp | Indicates that the requested resource has been moved only temporarily. The 302 (Found) status code is returned to a client. |
seeother | Indicates that the requested resource has been replaced. The 303 (See Other) status code is returned to a client. |
gone | Indicates that the requested resource has been removed permanently. The 410 (Gone) status is returned to a client. |
mod_rewrite module that is part of the Apache HTTP Server installation.
ScriptAlias ScriptAlias directive allows you to specify the location of CGI scripts. It takes the following form:
ScriptAlias url-path real-path
DocumentRoot directive (for example, /cgi-bin/). The real-path is a full path to a file or directory in the local file system.
Directory tag with additional permissions to access the target directory. By default, the /cgi-bin/ alias is created so that the scripts located in the /var/www/cgi-bin/ are accessible.
ScriptAlias directive is used for security reasons to prevent CGI scripts from being viewed as ordinary text documents.
Example 9.58. Using the ScriptAlias directive
ScriptAlias /cgi-bin/ /var/www/cgi-bin/

<Directory "/var/www/cgi-bin">
  AllowOverride None
  Options None
  Order allow,deny
  Allow from all
</Directory>
ServerAdmin ServerAdmin directive allows you to specify the email address of the server administrator to be displayed in server-generated web pages. It takes the following form:
ServerAdmin email
root@localhost.
webmaster@hostname, where hostname is the address of the server. Once set, alias webmaster to the person responsible for the web server in /etc/aliases, and as superuser, run the newaliases command.
ServerName ServerName directive allows you to specify the hostname and the port number of a web server. It takes the following form:
ServerName hostname[:port]Listen directive.
/etc/hosts file.
ServerRoot ServerRoot directive allows you to specify the directory in which the server operates. It takes the following form:
ServerRoot directory
/etc/httpd/.
ServerSignature ServerSignature directive allows you to enable displaying information about the server on server-generated documents. It takes the following form:
ServerSignature option
On.
Table 9.17. Available ServerSignature options
| Option | Description |
|---|---|
On | Enables appending the server name and version to server-generated pages. |
Off | Disables appending the server name and version to server-generated pages. |
EMail | Enables appending the server name, version, and the email address of the system administrator as specified by the ServerAdmin directive to server-generated pages. |
ServerTokens ServerTokens directive allows you to customize what information are included in the Server response header. It takes the following form:
ServerTokens option
OS.
Table 9.18. Available ServerTokens options
| Option | Description |
|---|---|
Prod | Includes the product name only (that is, Apache). |
Major | Includes the product name and the major version of the server (for example, 2). |
Minor | Includes the product name and the minor version of the server (for example, 2.2). |
Min | Includes the product name and the minimal version of the server (for example, 2.2.15). |
OS | Includes the product name, the minimal version of the server, and the type of the operating system it is running on (for example, Red Hat). |
Full | Includes all the information above along with the list of loaded modules. |
SuexecUserGroup SuexecUserGroup directive allows you to specify the user and group under which the CGI scripts will be run. It takes the following form:
SuexecUserGroup user group
root privileges. Note that in <VirtualHost>, SuexecUserGroup replaces the User and Group directives.
Timeout Timeout directive allows you to specify the amount of time to wait for an event before closing a connection. It takes the following form:
Timeout time
60.
TypesConfig TypesConfig allows you to specify the location of the MIME types configuration file. It takes the following form:
TypesConfig path
ServerRoot directive (that is, /etc/httpd/ by default). The default option is /etc/mime.types.
/etc/mime.types, the recommended way to add MIME type mapping to the Apache HTTP Server is to use the AddType directive.
UseCanonicalName UseCanonicalName allows you to specify the way the server refers to itself. It takes the following form:
UseCanonicalName option
Off.
Table 9.19. Available UseCanonicalName options
| Option | Description |
|---|---|
On | Enables the use of the name that is specified by the ServerName directive. |
Off | Disables the use of the name that is specified by the ServerName directive. The hostname and port number provided by the requesting client are used instead. |
DNS | Disables the use of the name that is specified by the ServerName directive. The hostname determined by a reverse DNS lookup is used instead. |
User User directive allows you to specify the user under which the httpd service will run. It takes the following form:
User user
apache.
httpd service should not be run with root privileges. Note that User is no longer supported inside <VirtualHost>, and has been replaced by the SuexecUserGroup directive.
UserDir UserDir directive allows you to enable serving content from users' home directories. It takes the following form:
UserDir option
public_html), or a valid keyword as described in Table 9.20, “Available UserDir options”. The default option is disabled.
Table 9.20. Available UserDir options
| Option | Description |
|---|---|
enabled user… | Enables serving content from home directories of given users. |
disabled [user…] | Disables serving content from home directories, either for all users, or, if a space separated list of users is supplied, for given users only. |
Set the correct permissions
UserDir directive. For example, to allow access to public_html/ in the home directory of user joe, type the following at a shell prompt as root:
~]#chmod a+x /home/joe/~]#chmod a+rx /home/joe/public_html/
/etc/httpd/conf.d/ssl.conf:
SetEnvIf SetEnvIf directive allows you to set environment variables based on the headers of incoming connections. It takes the following form:
SetEnvIf option pattern [!]variable[=value]…
!) is present, the variable is removed instead of being set.
Table 9.21. Available SetEnvIf options
| Option | Description |
|---|---|
Remote_Host | Refers to the client's hostname. |
Remote_Addr | Refers to the client's IP address. |
Server_Addr | Refers to the server's IP address. |
Request_Method | Refers to the request method (for example, GET). |
Request_Protocol | Refers to the protocol name and version (for example, HTTP/1.1). |
Request_URI | Refers to the requested resource. |
SetEnvIf directive is used to disable HTTP keepalives, and to allow SSL to close the connection without a closing notification from the client browser. This is necessary for certain web browsers that do not reliably shut down the SSL connection.
Example 9.70. Using the SetEnvIf directive
SetEnvIf User-Agent ".*MSIE.*" \
         nokeepalive ssl-unclean-shutdown \
downgrade-1.0 force-response-1.0/etc/httpd/conf.d/ssl.conf file to be present, the mod_ssl needs to be installed. See Section 9.1.7, “Setting Up an SSL Server” for more information on how to install and configure an SSL server.
IfModule. By default, the server-pool is defined for both the prefork and worker MPMs.
/etc/httpd/conf/httpd.conf:
MaxClients MaxClients directive allows you to specify the maximum number of simultaneously connected clients to process at one time. It takes the following form:
MaxClients number
256 when using the prefork MPM.
MaxRequestsPerChild MaxRequestsPerChild directive allows you to specify the maximum number of request a child process can serve before it dies. It takes the following form:
MaxRequestsPerChild number
0 allows unlimited number of requests.
MaxRequestsPerChild directive is used to prevent long-lived processes from causing memory leaks.
MaxSpareServers MaxSpareServers directive allows you to specify the maximum number of spare child processes. It takes the following form:
MaxSpareServers number
prefork MPM only.
MaxSpareThreads MaxSpareThreads directive allows you to specify the maximum number of spare server threads. It takes the following form:
MaxSpareThreads number
MinSpareThreads and ThreadsPerChild. This directive is used by the worker MPM only.
MinSpareServers MinSpareServers directive allows you to specify the minimum number of spare child processes. It takes the following form:
MinSpareServers number
prefork MPM only.
MinSpareThreads MinSpareThreads directive allows you to specify the minimum number of spare server threads. It takes the following form:
MinSpareThreads number
worker MPM only.
StartServers StartServers directive allows you to specify the number of child processes to create when the service is started. It takes the following form:
StartServers number
ThreadsPerChild ThreadsPerChild directive allows you to specify the number of threads a child process can create. It takes the following form:
ThreadsPerChild number
worker MPM only.
httpd service is distributed along with a number of Dynamic Shared Objects (DSOs), which can be dynamically loaded or unloaded at runtime as necessary. By default, these modules are located in /usr/lib/httpd/modules/ on 32-bit and in /usr/lib64/httpd/modules/ on 64-bit systems.
LoadModule directive as described in Section 9.1.4.1, “Common httpd.conf Directives”. Note that modules provided by a separate package often have their own configuration file in the /etc/httpd/conf.d/ directory.
httpd service.
root:
~]# yum install httpd-develapxs) utility required to compile a module.
~]# apxs -i -a -c module_name.c/usr/share/doc/httpd-VERSION/httpd-vhosts.conf into the /etc/httpd/conf.d/ directory, and replace the @@Port@@ and @@ServerRoot@@ placeholder values. Customize the options according to your requirements as shown in Example 9.80, “Example virtual host configuration”.
Example 9.80. Example virtual host configuration
<VirtualHost *:80>
    ServerAdmin webmaster@penguin.example.com
    DocumentRoot "/www/docs/penguin.example.com"
    ServerName penguin.example.com
    ServerAlias www.penguin.example.com
    ErrorLog "/var/log/httpd/dummy-host.example.com-error_log"
    CustomLog "/var/log/httpd/dummy-host.example.com-access_log" common
</VirtualHost>ServerName must be a valid DNS name assigned to the machine. The <VirtualHost> container is highly customizable, and accepts most of the directives available within the main server configuration. Directives that are not supported within this container include User and Group, which were replaced by SuexecUserGroup.
Changing the port number
Listen directive in the global settings section of the /etc/httpd/conf/httpd.conf file accordingly.
httpd service.
mod_ssl, a module that uses the OpenSSL toolkit to provide the SSL/TLS support, is commonly referred to as the SSL server.
mod_ssl prevents any inspection or modification of the transmitted content. This section provides basic information on how to enable this module in the Apache HTTP Server configuration, and guides you through the process of generating private keys and self-signed certificates.
Table 9.22. CA lists for most common web browsers
| Web Browser | Link |
|---|---|
| Mozilla Firefox | Mozilla root CA list. |
| Opera | Root certificates used by Opera. |
| Internet Explorer | Windows root certificate program members. |
mod_ssl module) and openssl (the OpenSSL toolkit) packages installed. To do so, type the following at a shell prompt as root:
~]# yum install mod_ssl opensslmod_ssl configuration file at /etc/httpd/conf.d/ssl.conf, which is included in the main Apache HTTP Server configuration file by default. For the module to be loaded, restart the httpd service as described in Section 9.1.3.3, “Restarting the Service”.
/etc/pki/tls/private/ and /etc/pki/tls/certs/ directories respectively. You can do so by running the following commands as root:
~]#mvkey_file.key/etc/pki/tls/private/hostname.key~]#mvcertificate.crt/etc/pki/tls/certs/hostname.crt
/etc/httpd/conf.d/ssl.conf configuration file:
SSLCertificateFile /etc/pki/tls/certs/hostname.crt
SSLCertificateKeyFile /etc/pki/tls/private/hostname.key
httpd service as described in Section 9.1.3.3, “Restarting the Service”.
Example 9.81. Using a key and certificate from the Red Hat Secure Web Server
~]#mv /etc/httpd/conf/httpsd.key /etc/pki/tls/private/penguin.example.com.key~]#mv /etc/httpd/conf/httpsd.crt /etc/pki/tls/certs/penguin.example.com.crt
root, you can install it by typing the following at a shell prompt:
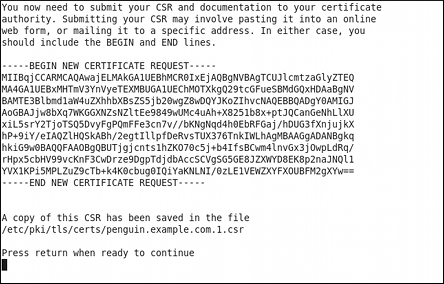
~]# yum install crypto-utilsReplacing an existing certificate
root, use the following command instead of genkey:
~]# openssl req -x509 -new -set_serial number -key hostname.key -out hostname.crtRemove a previously created key
root:
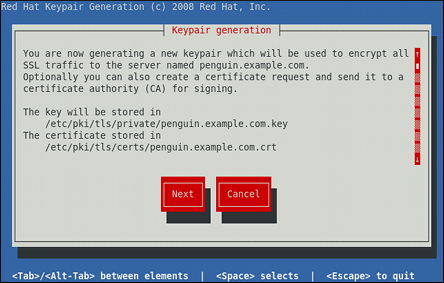
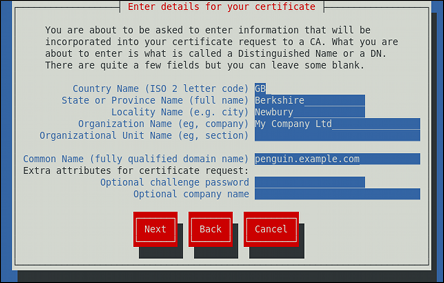
~]# rm /etc/pki/tls/private/hostname.keyroot, run the genkey command followed by the appropriate host name (for example, penguin.example.com):
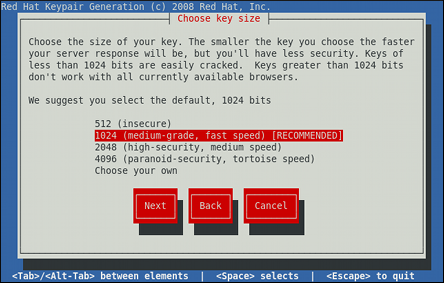
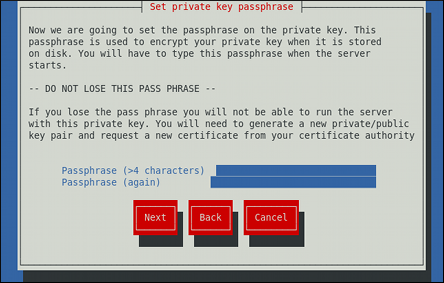
~]# genkey hostname2048 bits. See NIST Special Publication 800-131A.
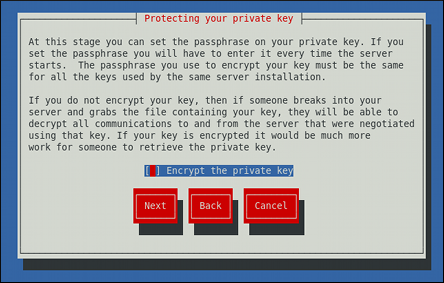
[*]) or disable ([ ]) the encryption of the private key.
Do not forget the passphrase
/etc/httpd/conf.d/ssl.conf configuration file:
SSLCertificateFile /etc/pki/tls/certs/hostname.crt
SSLCertificateKeyFile /etc/pki/tls/private/hostname.key
httpd service as described in Section 9.1.3.3, “Restarting the Service”, so that the updated configuration is loaded.
/usr/share/doc/httpd/man httpd httpd service containing the complete list of its command line options.
man apachectl man genkey genkey containing the full documentation on its usage.