Edition 1
Abstract
/etc/crypttab/etc/fstabMono-spaced Bold
To see the contents of the filemy_next_bestselling_novelin your current working directory, enter thecat my_next_bestselling_novelcommand at the shell prompt and press Enter to execute the command.
Press Enter to execute the command.Press Ctrl+Alt+F2 to switch to a virtual terminal.
mono-spaced bold. For example:
File-related classes includefilesystemfor file systems,filefor files, anddirfor directories. Each class has its own associated set of permissions.
Choose → → from the main menu bar to launch Mouse Preferences. In the Buttons tab, select the Left-handed mouse check box and click to switch the primary mouse button from the left to the right (making the mouse suitable for use in the left hand).To insert a special character into a gedit file, choose → → from the main menu bar. Next, choose → from the Character Map menu bar, type the name of the character in the Search field and click . The character you sought will be highlighted in the Character Table. Double-click this highlighted character to place it in the Text to copy field and then click the button. Now switch back to your document and choose → from the gedit menu bar.
Mono-spaced Bold Italic or Proportional Bold Italic
To connect to a remote machine using ssh, typessh username@domain.nameat a shell prompt. If the remote machine isexample.comand your username on that machine is john, typessh john@example.com.Themount -o remount file-systemcommand remounts the named file system. For example, to remount the/homefile system, the command ismount -o remount /home.To see the version of a currently installed package, use therpm -q packagecommand. It will return a result as follows:package-version-release.
Publican is a DocBook publishing system.
mono-spaced roman and presented thus:
books        Desktop   documentation  drafts  mss    photos   stuff  svn
books_tests  Desktop1  downloads      images  notes  scripts  svgs
mono-spaced roman but add syntax highlighting as follows:
package org.jboss.book.jca.ex1;
import javax.naming.InitialContext;
public class ExClient
{
public static void main(String args[])
throws Exception
{
InitialContext iniCtx = new InitialContext();
Object ref = iniCtx.lookup("EchoBean");
EchoHome home = (EchoHome) ref;
Echo echo = home.create();
System.out.println("Created Echo");
System.out.println("Echo.echo('Hello') = " + echo.echo("Hello"));
}
}Note
Important
Warning
Fedora and the component install-guide. The following link automatically loads this information for you: https://bugzilla.redhat.com/enter_bug.cgi?product=Fedora&component=install-guide.
Summary field.
Description field and give us the details of the error or suggestion as specifically as you can. If possible, include some surrounding text so we know where the error occurs or the suggestion fits.
Document URL:


Section number and name:


Error or suggestion:


Additional information:
Other Sources of Documentation
Experts Only
Verify your downloads
netinst.iso image for a minimal boot CD or USB flash drive. Write the image to the appropriate physical media to create bootable media. The boot media contains no packages but must be pointed at a hard disk or online repository to complete the installation.
vmlinuz kernel file and the initrd.img ramdisk image from the distribution's isolinux/ directory. Configure your operating system to boot the kernel and load the ramdisk image. For further information on installation without media, refer to Chapter 12, Installing Without Media.
Resizing Partitions
Download Links
fedora/linux/releases/20/. This directory contains a folder for each architecture supported inside that folder, in a folder called iso/. For example, you can find the file for the DVD distribution of Fedora 20 for x86_64 at fedora/linux/releases/20/Fedora/x86_64/iso/Fedora-20-x86_64-DVD.iso.
Minimal Boot Images
Verify your download
Table 2.1. Processor and architecture types
| Processor manufacturer and model | Architecture type for Fedora |
|---|---|
| Intel Atom (see note below,) Core series, Pentium 4, and recent vintage Xeon; AMD Athlon, Duron, some Semprons; and older; VIA C3, C7 | i386 (32-bit) |
| Intel Atom (See note below), Core 2 series, Core i series and Xeon; AMD: Athlon 64, Athlon II, Sempron64, Phenom series, Fusion series, Bulldozer series and Opteron; Apple MacBook, MacBook Pro, and MacBook Air | x86_64 (64-bit) |
i386 Works for Most Windows Compatible Computers
i386.
Intel Atom Processor Architectures Vary
i386 architecture. The 230 and 330 Series and the rest of the N Series Atom processors are based on the x86_64 architecture. Refer to http://ark.intel.com/products/family/29035 for more details.
Fedora supports UEFI only on 64bit systems
CSM> boot methods. This change is made in the system firmware's menu, refer to your manufacturer's documentation for details.
Fedora-20-x86_64-DVD.iso. Refer to Section 2.1.2, “Which Architecture Is My Computer?” if you are unsure of your computer's architecture.
Install to Hard Drive on the desktop to copy Fedora to your hard disk (alternatively, in GNOME, a shortcut can be found in the menu). You can download the Live image directly from a mirror, or using BitTorrent.
Download Size
http://download.fedoraproject.org will automatically resolve one.
Table 2.2. Locating files
| Media type | File locations |
|---|---|
| Full distribution on DVD | fedora/linux/releases/20/Fedora/arch/iso/Fedora-20-arch-DVD.iso |
| Live image | fedora/linux/releases/20/Live/arch/iso/Fedora-Live-Desktop-arch-20-1.iso, fedora/linux/releases/20/Live/arch/iso/Fedora-Live-KDE-arch-20-1.iso |
| Minimal CD boot media | fedora/linux/releases/20/Fedora/arch/iso/Fedora-20-arch-netinst.iso |
Table 3.1. Boot and installation media
| Architecture | Installation DVD | Installation USB flash drive | Boot CD or boot DVD | Boot USB flash drive | Live image DVD or USB flash drive |
|---|---|---|---|---|---|
| BIOS-based 32-bit x86 | x86 DVD ISO image file | x86 DVD ISO image file | x86 netinst ISO image file | x86 netinst ISO image file | x86 Live ISO image file |
| UEFI-based 32-bit x86 | Not available | ||||
| BIOS-based AMD64 and Intel 64 | x86_64 DVD ISO image file (to install 64-bit operating system) or x86 DVD ISO image file (to install 32-bit operating system) | x86_64 DVD ISO image file (to install 64-bit operating system) or x86 DVD ISO image file (to install 32-bit operating system) | x86_64 netinst ISO image file | x86_64 netinst ISO image file | x86_64 Live ISO image file |
| UEFI-based AMD64 and Intel 64 | x86_64 DVD ISO image file | x86_64 DVD ISO image file | x86_64 netinst ISO image file | x86_64 netinst ISO image file | x86_64 Live ISO image file |
Applications folder.
Ensure your USB media has sufficient space
Unusual USB Media
Note — This Method Is Not Destructive
Important — Enable Extra Packages for Enterprise Linux
Note — This Method Is Not Destructive
su -c 'yum -y install liveusb-creator'liveusb-creator on the command line. Enter the root password for your system when LiveUSB Creator prompts you for it.
Important — Enable Extra Packages for Enterprise Linux
Note — This Method Is Not Destructive
su -c 'yum -y install livecd-tools'/dev/disk/by-label, or use the findfs command:
findfs LABEL=MyLabeldmesg command shortly after connecting the media to your computer. After running the command, the device name (such as sdb or sdc) should appear in several lines towards the end of the output.
livecd-iso-to-disk command to write the ISO image to the media:
su -c 'livecd-iso-to-disk the_image.iso/dev/sdX1'Warning — These instructions could destroy data
Note
/dev/disk/by-label, or use the findfs command:
findfs LABEL=MyLabeldmesg command shortly after connecting the media to your computer. After running the command, the device name (such as sdb or sdc) should appear in several lines towards the end of the output.
dd command to transfer the boot ISO image to the USB device:
su -c 'dd if=path/image_name.iso of=/dev/device bs=block size'device is the device name for the USB flash drive. Ensure you specify the device name (such as sdc), not the partition name (such as sdc1). The bs option specifies the block size; it can be omitted, but specifying it will speed up the process. For example:
su -c 'dd if=~/Downloads/Fedora-Live-Desktop-x86_64-20-1.iso of=/dev/sdc bs=512k'Note — This Method Is Not Destructive
/dev/disk/by-label, or use the findfs command:
findfs LABEL=MyLabeldmesg command shortly after connecting the media to your computer. After running the command, the device name (such as sdb or sdc) should appear in several lines towards the end of the output.
su - to become root, and enter the root password when your system prompts you.
/tmp/livecd as the mount point, type mkdir /tmp/livecd and press Enter.
mount -o loop /path/to/image/file/imagefile.iso /path/to/mount/point, where /path/to/image/file is the location of the image file that you downloaded, imagefile.iso is the image file, and /path/to/mount/point is the mount point that you just created.
LiveOS directory of the image that you just mounted. mount point where you just mounted the Fedora image. For example, cd /tmp/livecd/LiveOS.
./livecd-iso-to-disk /path/to/image/file/imagefile.iso device, where /path/to/image/file is the location of the image file that you downloaded, imagefile.iso is the image file, and device is the USB media device.
Example 3.1. Mounting a Fedora live image file and using livecd-iso-to-disk to create live USB media
Fedora-Live-Desktop-x86_64-20-1.iso, to a folder named Downloads in your home directory. You have a USB flash drive plugged into your computer, named /dev/sdc, with a partition named /dev/sdc1
su -
mkdir /mnt/livecd
mount -o loop /home/Username/Downloads/Fedora-Live-Desktop-x86_64-20-1.iso /mnt/livecd
LiveOS directory of the live CD image:
cd /mnt/livecd/LiveOS
./livecd-iso-to-disk /home/Username/Downloads/Fedora-Live-Desktop-x86_64-20-1.iso /dev/sdc1
Warning — These instructions could destroy data
Note
/dev/disk/by-label, or use the findfs command:
findfs LABEL=MyLabeldmesg command shortly after connecting the media to your computer. After running the command, the device name (such as sdb or sdc) should appear in several lines towards the end of the output.
dd command to transfer the boot ISO image to the USB device:
su -c 'dd if=path/image_name.iso of=/dev/device bs=block size'device is the device name for the USB flash drive. Ensure you specify the device name (such as sdc), not the partition name (such as sdc1). The bs option specifies the block size; it can be omitted, but specifying it will speed up the process. For example:
su -c 'dd if=~/Downloads/Fedora-Live-Desktop-x86_64-20-1.iso of=/dev/sdc bs=512k'netinst.iso that is available at the same location as the images of the Fedora 20 installation DVD — refer to Chapter 2, Obtaining Fedora.
netinst.iso to a blank CD or DVD using the same procedure detailed in Section 3.1, “Making an installation DVD” for the installation disc, or transfer the netinst.iso file to a USB device with the dd command as detailed in Section 3.2, “Preparing a USB flash drive as an installation source”. As the netinst.iso file is only around 300 MB in size, you do not need an especially large USB flash drive.
Table of Contents
| Consult the release notes for minimum system requirements at http://docs.fedoraproject.org/release-notes . |
| Seek Support at http://fedoraproject.org/wiki/Communicating_and_getting_help |
| Check online compatibility lists, such as http://www.fsf.org/resources/hw and http://www.linux-drivers.org/ |
Important — Systems with Intel BIOS RAID sets
/etc/fstab, /etc/crypttab or other configuration files which refer to devices by their device node names will not work in Fedora 20. Before migrating these files, you must therefore edit them to replace device node paths with device UUIDs instead. You can find the UUIDs of devices with the blkid command.
Post-installation Usage
/ and swap) must be dedicated to Fedora.
linux repo=cdrom:device:/device boot option, or by selecting on the menu (refer to Section 8.1, “Installation Method”).
linux repo=hd:device:/path or you select from the menu after starting the installation. (refer to Section 8.1, “Installation Method”). Refer to Section 8.1.2, “Installing from a Hard Drive”, for hard drive installation instructions. If your system already has GRUB installed, you can set up a completely medialess installation with the instructions at Chapter 12, Installing Without Media.
linux repo=nfs:server :options:/path boot option, or the option on the menu described in Section 8.1, “Installation Method”). Refer to Section 8.1.3, “Installing via NFS” for network installation instructions. Note that NFS installations may also be performed in GUI mode.
linux repo=ftp://user:password@host/path, or linux repo=http://host/path boot option, or the option on the menu described in Section 8.1, “Installation Method”). Refer to Section 8.1.4, “Installing via FTP or HTTP”, for FTP and HTTP installation instructions.
Note
Note
boot: prompt:
linux rd.live.checkNote
/var/www/inst/Fedora20 on the network server can be accessed as http://network.server.com/inst/Fedora20.
/location/of/disk/space. The directory that will be made publicly available via FTP, NFS, or HTTP will be specified as /publicly_available_directory. For example, /location/of/disk/space may be a directory you create called /var/isos. /publicly_available_directory might be /var/www/html/Fedora20, for an HTTP install.
dd if=/dev/dvd of=/path_to_image/name_of_image.isomv /path_to_image/name_of_image.iso /publicly_available_directory/$ sha256sum name_of_image.iso/etc/exports file on the network server so that the directory is available via NFS.
/publicly_available_directory client.ip.address (ro)/publicly_available_directory * (ro)systemctl start nfs). If NFS is already running, reload the configuration file (use systemctl reload nfs).
Note
boot: prompt:
linux rd.live.checkNote — Not all file systems supported
Cannot Install from LVM Partitions
dd if=/dev/dvd of=/path_to_image/name_of_image.iso$ sha256sum name_of_image.isoNote
boot: prompt:
linux rd.live.check/boot on sda1, / on sda2, and /home on sdb1. This will allow you to identify specific partitions during the partitioning process.
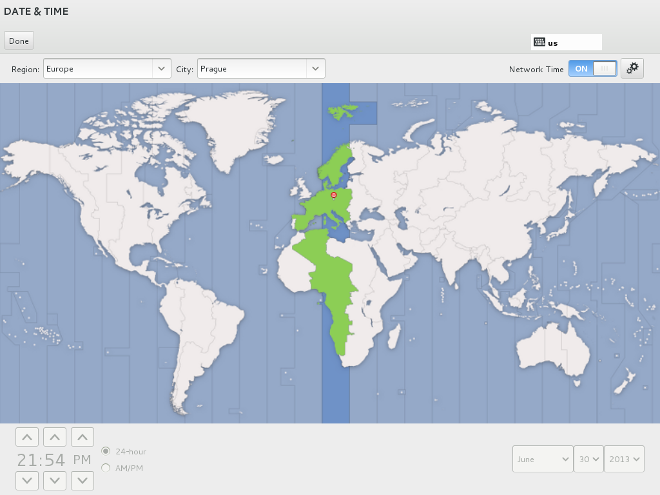
/etc/adjtime. Changing the hardware clock setting in Section 9.5, “Date and time” may cause unexpected behavior in Fedora.
Important — UEFI for 32-bit x86 systems
Important — UEFI for AMD64 and Intel 64
Press F10 to select boot device, although the specific wording and the key that you must press varies widely from computer to computer. Consult the documentation for your computer or motherboard, or seek support from the hardware manufacturer or vendor. On Apple computers, the C key boots the system from the DVD drive. On older Apple hardware you might need to press Cmd+Opt+Shift+Del to boot from the DVD drive.
Note — Aborting the Installation
Important — UEFI for 32-bit x86 systems
Important — UEFI for AMD64 and Intel 64
Press F10 to select boot device, although the specific wording and the key that you must press varies widely from computer to computer. Consult the documentation for your computer or motherboard, or seek support from the hardware manufacturer or vendor. On Apple computers, the C key boots the system from the DVD drive. On older Apple hardware you might need to press Cmd+Opt+Shift+Del to boot from the DVD drive.
boot: prompt, at which you can enter additional boot options as described in Section 7.1.3, “Additional Boot Options”.
boot: prompt at which you can specify custom boot options, press the Esc key and refer to Section 7.1.3, “Additional Boot Options”.
boot: prompt appears, at which you can use the boot loader options described below.
Note
linux text
linux rd.live.check
linux console=<device>
linux text console=<device>linux text console=ttyS0.
utf8 command as a boot-time option to the installation program. For example:
linux console=ttyS0 utf8
linux updates
linux text updatesrhupdates/ on the server.
Network Boot or Boot Services. Once you properly configure PXE booting, the computer can boot the Fedora installation system without any other media.
Note — Multiple NICs and PXE installation
pxelinux.cfg/* config files:
IPAPPEND 2
APPEND ksdevice=bootif
ksdevice=link
Note
linux repo=cdrom:device
linux rd.live.check before seeking support.
linux repo= boot option:
linux repo=hd:device
/dev/sd. Each individual drive has its own letter, for example /dev/sda. Each partition on a drive is numbered, for example /dev/sda1.
Table 8.1. Location of ISO images for different partition types
| Partition type | Volume | Original path to files | Directory to use |
|---|---|---|---|
| VFAT | D:\ | D:\Downloads\Fedora20 | /Downloads/Fedora20 |
| ext2, ext3, ext4 | /home | /home/user1/Fedora20 | /user1/Fedora20 |
/. If the ISO images are located in a subdirectory of a mounted partition, enter the name of the directory holding the ISO images within that partition. For example, if the partition on which the ISO images is normally mounted as /home/, and the images are in /home/new/, you would enter /new/.
Use a leading slash
linux repo= boot command, proceed with Chapter 9, Using the Fedora installer.
linux repo= boot option. To specify an expanded tree of installation files, type:
linux repo=nfs:options:server:/path
linux repo=nfsiso:options:server:/path
eastcoast in the domain example.com, enter eastcoast.example.com.
publicly_available_directory.
linux repo= command, proceed with Chapter 9, Using the Fedora installer.
Important — you must specify the protocol
http:// or ftp:// as the protocol.
linux repo= boot option:
linux repo={ftp|http}://URL
/images directory for your architecture. For example:
http://name.example.com/fedora/linux/releases/20/Fedora/x86_64/iso/
{ftp|http}://<user>:<password>@<hostname>[:<port>]/<directory>/
http://install:fedora20pw@name.example.com/fedora/linux/releases/20/Fedora/x86_64/iso/
linux repo= command, proceed with Chapter 9, Using the Fedora installer.
Important — Graphical installation recommended
xdriver=vesa option – refer to Chapter 11, Boot Options
Important — Graphical Interface on the Installed System
boot: prompt
linux textlinux ip option can be used to configure network settings. Refer to Section 11.1, “Configuring the Installation System at the Boot Menu” for instructions. Alternatively, consider a kickstart installation. Refer to Section 15.4, “Kickstart Options” for available kickstart options.
Note
Warning
/root/anaconda-screenshots.
autostep --autoscreenshot option to generate a screenshot of each step of the installation automatically. Refer to Section 15.3, “Creating the Kickstart File” for details of configuring a Kickstart file.
Table 9.1. Console, Keystrokes, and Contents
| console | keystrokes | contents |
|---|---|---|
| 1 | Ctrl+alt+f1 | standard output |
| 2 | Ctrl+alt+f2 | shell prompt |
| 3 | Ctrl+alt+f3 | installation log |
| 4 | Ctrl+alt+f4 | storage log |
| 5 | Ctrl+alt+f5 | external program log |
| 6 | Ctrl+alt+f6 | localhost login |
| 7 | Ctrl+alt+f6 | graphical display |
Note
Note
Important
Note
latin1 option, which uses dead keys to access certain characters, such as those with diacritical marks. When you press a dead key, nothing will appear on your screen until you press another key to "complete" the character. For example, to type é on a latin1 keyboard layout, you would press (and release) the ' key, and then press the E key. By contrast, you access this character on some other keyboards by pressing and holding down a key (such as Alt-Gr) while you press the E key. Other keyboards might have a dedicated key for this character.
Important
Fedora Software Mirrors
repodata.
Network Access Required
Valid Host Names
Modem Configuration
Note
Note
Note
Installing in text mode
Note
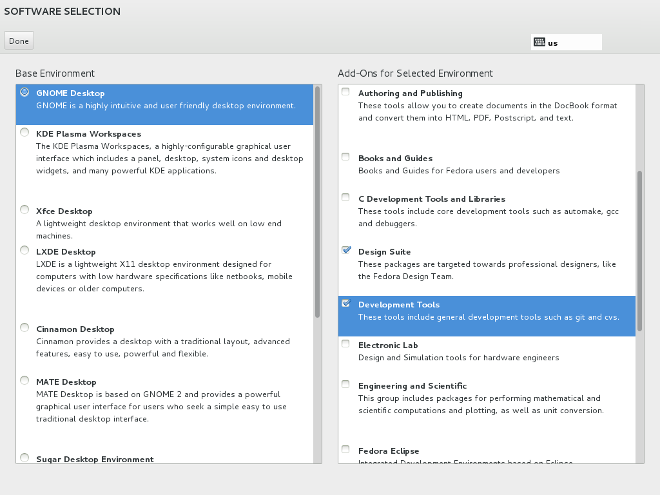
yum groupinstall command. Refer to the Fedora System Administrators Guide for information about using yum.
Warning — Back up your data
Important — Installing in text mode
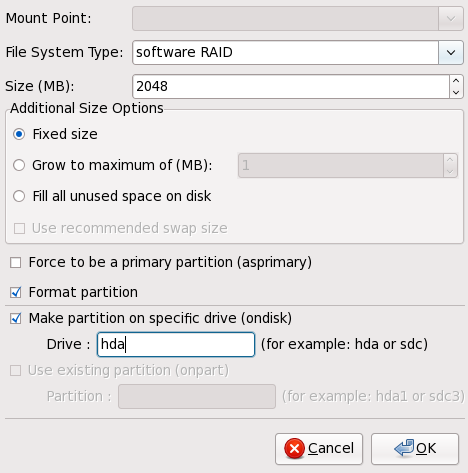
Important — Booting from RAIDs
/boot/ partition must be created on a partition outside of the RAID array, such as on a separate hard drive. An internal hard drive is necessary to use for partition creation with problematic RAID cards.
/boot/ partition is also necessary for software RAID setups.
/boot/ partition (refer to Section 9.14, “Creating a Custom Partition Layout”.
Note
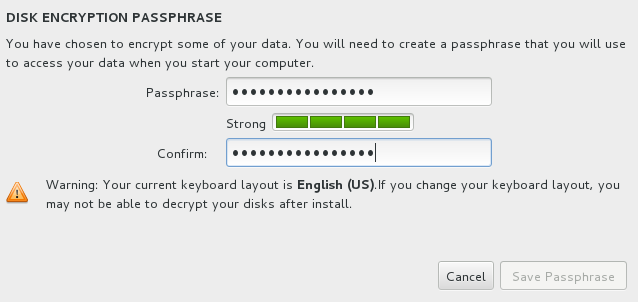
/boot partition, check the box labeled Encrypt my data. I'll set a passphrase later in the Installation Options dialog (refer to Appendix C, Disk Encryption for information on encryption). You will be prompted to create a passphrase when you click or (refer to Section 9.12, “ Encrypt Partitions ”).
Important — Mixing multipath and non-multipath devices
Important — device serial numbers must be 16 or 32 characters
/etc/fstab file.
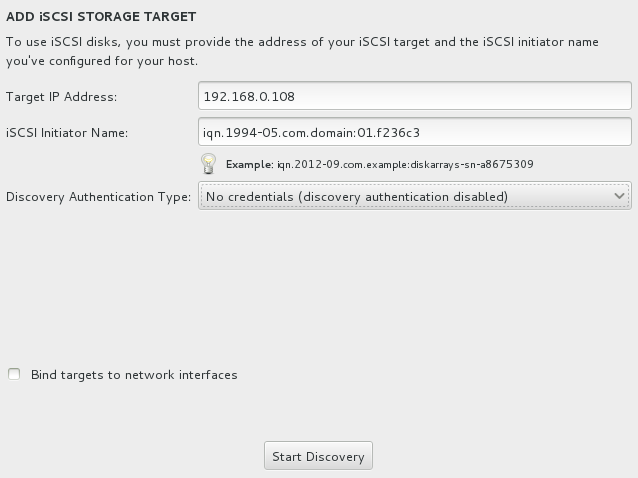
Procedure 9.1. iSCSI discovery
iqn. (note the period)
2010-09.
storage.example.com as com.example.storage
:diskarrays-sn-a8675309.
iqn.2010-09.storage.example.com:diskarrays-sn-a8675309, and anaconda pre-populates the iSCSI Initiator Name field with a name in this format to help you with the structure.
Installing GRUB
Warning
Note
/boot Linux partition on the first 1024 cylinders of your hard drive to boot Linux. The other Linux partitions can be after cylinder 1024.
parted, 1024 cylinders equals 528MB. For more information, refer to:
http://www.pcguide.com/ref/hdd/bios/sizeMB504-c.html
Important
Warning — Do not lose this passphrase
Important
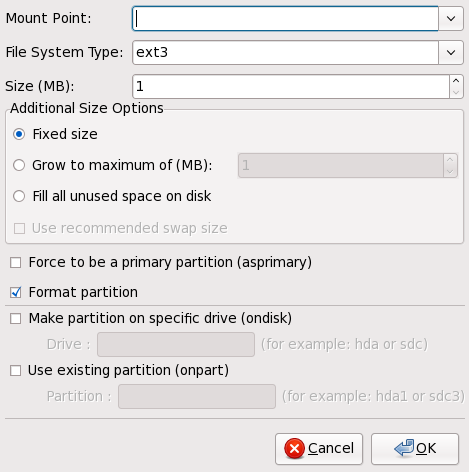
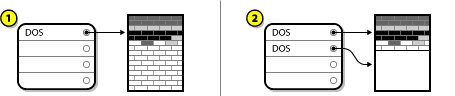
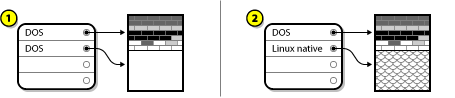
/boot partition, a / (root) partition, and a swap partition proportionate to the size of the device. These are the recommended partitions for a typical installation (refer to Section 9.14.5, “Recommended Partitioning Scheme”), but you can add additional partitions if you need to.
/ for the root partition, /boot for the boot partition, and so on). Enter the desired size of the partition in megabytes or gigabytes (for example, type "2GB" to create a 2 gigabyte partition). After entering these details, click . This action creates the partition.
/home being assigned the name sda1. Others can be named arbitrarily.
/; enter /boot for the /boot partition, and so on. For a swap partition the mount point should not be set — setting the filesystem type to swap is sufficient.
Partition types
File systems
Important - LVM in Text-Mode is Automatic Partitioning Only
Btrfs is still experimental
Note
Important
/boot on a Btrfs subvolume may lead to instability and is not recommended.
swap partition
/boot partition
/ partition
/home partition
swap partition (at least 256 MB)Table 9.2. Recommended System Swap Space
| Amount of RAM in the system | Recommended swap space | Recommended swap space if allowing for hibernation |
|---|---|---|
| ⩽ 2GB | 2 times the amount of RAM | 3 times the amount of RAM |
| > 2GB – 8GB | Equal to the amount of RAM | 2 times the amount of RAM |
| > 8GB – 64GB | 0.5 times the amount of RAM | 1.5 times the amount of RAM |
| > 64GB | 4GB of swap space | No extra space needed |
/boot/ partition (500 MB)/boot/ contains the operating system kernel (which allows your system to boot Fedora), along with files used during the bootstrap process. For most users, a 500 MB boot partition is sufficient.
Note
/boot/ partition if you want the / (root) partition to use all of the remaining space on your hard drive.
Note
/boot/ partition must be created on a partition outside of the RAID array, such as on a separate hard drive.
root partition (3.0 GB - 5.0 GB)/" (the root directory) is located. In this setup, all files (except those stored in /boot) are on the root partition.
Root and /root
/ (or root) partition is the top of the directory structure. The /root directory/root (sometimes pronounced "slash-root") directory is the home directory of the user account for system administration.
home partition (at least 100 MB)/home directory. This will enable you to upgrade or reinstall Fedora without erasing user data files.
/ partition, upgrades become easier.
/foo must be at least 2 GB, and you do not make a separate /foo partition, then the / (root) partition must be at least 2 GB.
Table 9.3. Minimum partition sizes
| Directory | Minimum size |
|---|---|
/ | 2 GB |
/usr | /usr on a seperate partition is not supported. |
/tmp | tmpfs by default, 50 MB otherwise. |
/var | 500 MB |
/home | 100 MB |
/boot | 250 MB |
Leave Excess Capacity Unallocated
/home partition.
/boot partition. The boot partition can also be used during upgrades, so leaving extra room is recommended. Unless you plan to install a great many kernels, the default partition size of 500 MB for /boot should suffice.
/var directory holds content for a number of applications, including the Apache web server. It also is used to store downloaded update packages on a temporary basis. Ensure that the partition containing the /var directory has enough space to download pending updates and hold your other content.
Warning
/var/cache/yum/ by default. If you partition the system manually, and create a separate /var/ partition, be sure to create the partition large enough (3.0 GB or more) to download package updates.
/usr directory holds the majority of software content on a Fedora system. Because crucial applications and utilities are located in /usr, Fedora does not support placing it on a separate partition.
Do not place /usr on a separate file system
/usr is on a separate file system from /, the boot process becomes much more complex because /usr contains boot-critical components. In some situations (like installations on iSCSI drives), the boot process might not work at all.
/var/lib/mysql, make a separate partition for that directory in case you need to reinstall later.
/boot/efi with an HFS+ file system, Apple Bootstrap, or a PPC PReP boot partition.
Example Usage
Example 9.1. Example partition setup
Table 9.4. Example partition setup
| Partition | Size and type |
|---|---|
/boot | 500 MB ext3 partition |
swap | 2 GB swap |
| LVM physical volume | Remaining space, as one LVM volume group |
Table 9.5. Example partition setup: LVM physical volume
| Partition | Size and type |
|---|---|
/ | 13 GB ext4 |
/var | 4 GB ext4 |
/home | 50 GB ext4 |
Last chance to cancel safely
/root/install.log once you reboot your system.
Note
su command to change to root only when you need to perform tasks that require superuser authorization. These basic rules minimize the chances of a typo or an incorrect command doing damage to your system.
Note
su - at the shell prompt in a terminal window and then press Enter. Then, enter the root password and press Enter.
Note
system-config-users command in a shell prompt to launch the User Manager, a powerful user management and configuration tool. If you are not root, it prompts you for the root password to continue.
root account.
Note — Network Login Not Available During Installation
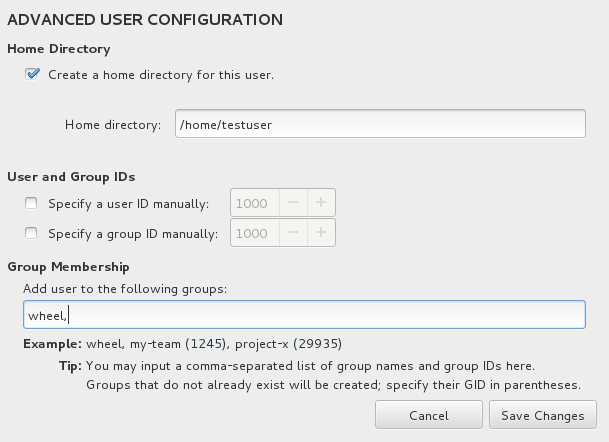
wheel group, which gives you access to all administrative functions, including installing and updating software, creating and altering configuration files, and administering other users.
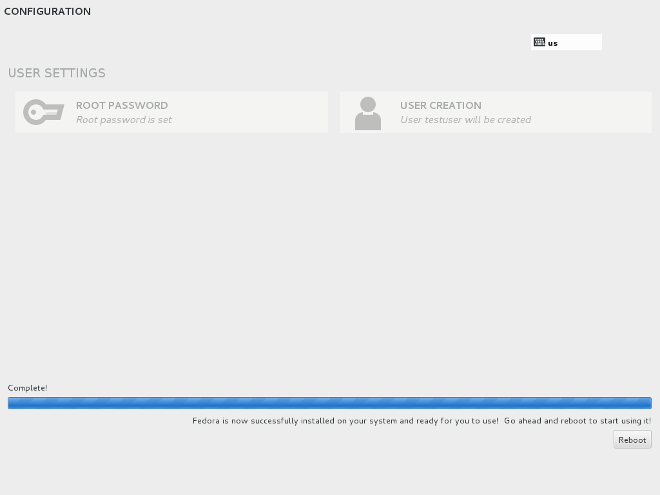
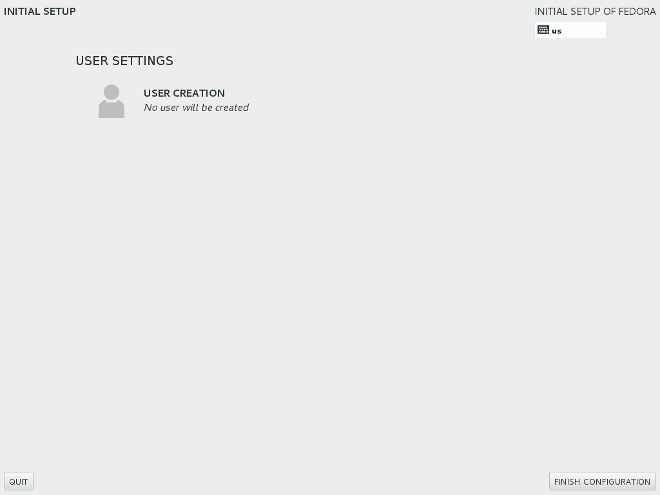
Important — Create at least one user account
Note — Creating Extra User Accounts
login: prompt or a GUI login screen (if you installed the X Window System and chose to start X automatically) appears. Once you have logged in, you can begin using Fedora.
fsck application is used to check the file system for metadata consistency and optionally repair one or more Linux file systems.
/tmp directory. These files include:
/tmp/anaconda.log/tmp/program.log/tmp/storage.log/tmp/yum.log/tmp/syslog/tmp/anaconda-tb-identifier, where identifier is a random string.
scp on the installation image (not the other way round).
GRUB: ) and a flashing cursor may be all that appears. If this is the case, you must repartition your system.
/boot partition outside of the RAID array, such as on a separate hard drive. An internal hard drive is necessary to use for partition creation with problematic RAID cards.
/boot/ partition.
boot: or yaboot: prompt:
linux rd.live.check
http://www.bitwizard.nl/sig11/xdriver=vesa boot option at the boot prompt. Alternatively, you can force the installer to use a specific screen resolution with the resolution= boot option. This option may be most helpful for laptop users. Another solution to try is the driver= option to specify the driver that should be loaded for your video card. If this works, you should report it as a bug, because the installer failed to detect your video card automatically. Refer to Chapter 11, Boot Options for more information on boot options.
Note
nofb boot option. This command may be necessary for accessibility with some screen reading hardware.
No devices found to install Fedora Error MessageNo devices found to install Fedora, there is probably a SCSI controller that is not being recognized by the installation program.
continue and press Enter.
The partition table on device hda was unreadable. To create new partitions it must be initialized, causing the loss of ALL DATA on this drive.
swap and a / (root) partition created, and you have selected the root partition to use the remaining space, but it does not fill the hard drive.
/boot partition if you want the / (root) partition to use all of the remaining space on your hard drive.
/ (root) partition
Note
/etc/default/grub file:
GRUB_TERMINAL=console
grub.cfg file by running the following command with root privileges so the changes will take effect:
grub2-mkconfig --output=/boot/grub2/grub.cfg# character at the beginning of the line.
cat (hdpartitionnumber,drivenumber)/grub/grub.conf/boot directory. If you do not know the location, boot the machine using a Fedora live CD to find out and then reboot to return to the GRUB command line. See the GRUB documentation at http://www.gnu.org/software/grub/grub-documentation.html for help with partition numbering.
linux and initrd lines and paste them as individual commands. For example:
linux /vmlinuz-3.3.0-1.fc17.x86_64 ro root=/dev/mapper/VolGroup-lv_root rd_LVM_LV=VolGroup/lv_root rd_LVM_LV=VolGroup/lv_swap rd_NO_LUKS rd_NO_MD rd_NO_DM LANG=en_US.UTF-8 SYSFONT=latarcyrheb-sun16 KEYTABLE=us rhgb quietinitrd /initramfs-3.3.0-1.fc17.x86_64.imgboot command.
grub2-mkconfig --output=/boot/grub2/grub.cfgstartx.
default.target file, which is a symbolic link (or symlink) to a specific target file.
su command.
default2:
ln -s /lib/systemd/system/graphical.target /etc/systemd/system/default2.target default.target symlink with the new symlink:
mv /etc/systemd/system/default2.target /etc/systemd/system/default.target df -h
df command should help you diagnose which partition is full. For additional information about df and an explanation of the options available (such as the -h option used in this example), refer to the df man page by typing man df at a shell prompt.
/home/ and /tmp/ partitions can sometimes fill up quickly with user files. You can make some room on that partition by removing old files. After you free up some disk space, try running X as the user that was unsuccessful before.
linux single.
e for edit when the GRUB boot screen has loaded. You are presented with a list of items in the configuration file for the boot label you have selected.
kernel and type e to edit this boot entry.
kernel line, add:
singleb to boot the system.
# prompt, you must type passwd root, which allows you to enter a new password for root. At this point you can type shutdown -r now to reboot the system with the new root password.
su - and enter your root password when prompted. Then, type passwd <username>. This allows you to enter a new password for the specified user account.
Only showing 3.5GB?
cat /proc/meminfo command and verify that the displayed quantity is the same as the known amount of RAM in your system. If they are not equal, you can first make a temporary change to confirm whether editing the kernel will be effective.
e for edit.
linux or linuxefi.
kernel line, add
mem=xxMcat /proc/meminfo again. If the known amount of RAM in your system is now displayed, add the following to the GRUB_CMDLINE_LINUX line in /etc/default/grub, inside the quotes, to make the change permanent:
mem=xxMgrub.cfg file so that the change will take effect, run the following command with root privileges.
    # for BIOS systems
    grub2-mkconfig --output=/boot/grub2/grub.cfg
    # for UEFI systems
    grub2-mkconfig --output=/boot/efi/EFI/fedora/grub.cfg
     menuentry 'Fedora (3.16.0-0.rc2.git2.1.fc21.x86_64) 21 (Rawhide)' {
      load_video
      set gfxpayload=keep
      insmod gzio
      insmod part_gpt
      insmod ext2
      set root='hd1,gpt2'
      if [ x$feature_platform_search_hint = xy ]; then
        search --no-floppy --fs-uuid --set=root --hint-bios=hd1,gpt2 --hint-efi=hd1,gpt2 --hint-baremetal=ahci1,gpt2  b34a57d9-03d7-415f-94f6-91689404d951
      else
        search --no-floppy --fs-uuid --set=root b34a57d9-03d7-415f-94f6-91689404d951
      fi
      linuxefi /vmlinuz-3.16.0-0.rc2.git2.1.fc21.x86_64 root=UUID=ece86abc-6419-4f29-84b6-1b810128f98d ro rootflags=subvol=root vconsole.font=latarcyrheb-sun16  vconsole.keymap=us LANG=en_US.UTF-8 mem=8192M
      initrdefi /initramfs-3.16.0-0.rc2.git2.1.fc21.x86_64.img
    }
system-config-printer command at a shell prompt to launch the Printer Configuration Tool. If you are not root, it prompts you for the root password to continue.
/etc/hosts file:
127.0.0.1 localhost.localdomain localhost
Table of Contents
='). These options require a value to be specified. For example, the inst.vncpassword= option must also contain a password — for example, inst.vncpassword=testpasswd. Other options are presented without the = sign; these options are booleans. This means that you either use them without specifying a value, or you can append either =1 or =0 to enable or disable them, respectively. For example, the rd.live.check option is the same as rd.live.check=1, and using rd.live.check=0 is exactly the same as not using the option at all.
Note
boot: prompt always expects the first option to specify the image file to be loaded. When using custom boot options with the Anaconda installer, the linux option will come first in most cases. A valid command in the boot prompt will therefore almost always look like the following:
boot:linux options
linux option is not displayed, but it is implied. A valid set of boot options will then be:
>options
dracut.cmdline(7) man page.
Note
inst. in this guide. Currently, this prefix is optional, for example, inst.resolution= will work exactly the same as resolution=. However, it is expected that Anaconda will require the inst. prefix in future releases.
Specifying the Installation Source
inst.repo=inst.repo=cdrom.treeinfo file
Table 11.1. Installation Sources
| Installation source | Option format |
|---|---|
| Any CD/DVD drive | inst.repo=cdrom |
| Specific CD/DVD drive | inst.repo=cdrom:device |
| Hard Drive | inst.repo=hd:device/path |
| HTTP Server | inst.repo=http://host/path |
| HTTPS Server | inst.repo=https://host/path |
| FTP Server | inst.repo=ftp://username:password@host/path |
| NFS Server | inst.repo=nfs:[options:]server:/path
[a] |
[a]
This option uses NFS protocol version 3 by default. To use a different version, add +nfsvers=X to options.
| |
/dev/sda1 or sdb2
LABEL=Flash or LABEL=RHEL7
UUID=8176c7bf-04ff-403a-a832-9557f94e61db
\xNN, where NN is the hexadecimal representation of the character. For example, \x20 is a white space (' ').
inst.stage2=inst.dd=inst.dd= option. It can be used multiple times. The location of a driver rpm package can be specified using any of the formats detailed in Specifying the Installation Source. For example:
inst.dd=cdromKickstart Boot Options
inst.ks=inst.repo. See Specifying the Installation Source for details.
/ks.cfg on the specified device. If you use this option without specifying a device, the installer will use the following:
inst.ks=nfs:next-server:/filenamenext-server option or the IP address of the DHCP server itself, and filename is the DHCP filename option, or /kickstart/. If the given file name ends with the / character, ip-kickstart is appended. For example:
Table 11.2. Default Kickstart File Location
| DHCP server address | Client address | Kickstart file location |
|---|---|---|
192.168.122.1 | 192.168.122.100 | 192.168.122.1:/kickstart/192.168.122.100-kickstart |
inst.ks.sendmacHTTP requests with the MAC addresses of all network interfaces. For example:
X-RHN-Provisioning-MAC-0: eth0 01:23:45:67:89:abinst.ks=http to provision systems.
inst.ks.sendsnHTTP requests. This header will contain the system's serial number, read from /sys/class/dmi/id/product_serial. The header has the following syntax:
X-System-Serial-Number: R8VA23DConsole, Environment and Display Options
console=console=ttyS0. Implies the inst.text option.
console=ttyS0 console=ttyS1, the installer will use ttyS1.
inst.lang=lang Kickstart command as described in Section 15.4, “Kickstart Options”. On systems where the system-config-language package is installed, a list of valid values can also be find in /usr/share/system-config-language/locale-list.
inst.geoloc=inst.geoloc=valueTable 11.3. Valid Values for the inst.geoloc Option
| Disable geolocation | inst.geoloc=0 |
| Use the Fedora GeoIP API | inst.geoloc=provider_fedora_geoip |
| Use the Hostip.info GeoIP API | inst.geoloc=provider_hostip |
provider_fedora_geoip.
inst.keymap=keyboard Kickstart command as described in Section 15.4, “Kickstart Options”.
inst.textinst.cmdlineinst.graphicalinst.resolution=640x480.
inst.headlessinst.xdriver=X driver to be used both during the installation and on the installed system.
inst.usefbxX driver instead of a hardware-specific driver. This option is equivalent to inst.xdriver=fbdev.
inst.sshdsshd service during the installation, which allows you to connect to the system during the installation using SSH and monitor its progress. For more information on SSH, see the ssh(1) man page and the corresponding chapter in the Fedora System Administrator's Guide.
Note
root account has no password by default. You can set a root password to be used during the installation with the sshpw Kickstart command as described in Section 15.4, “Kickstart Options”.
Network Boot Options
dracut.cmdline(7) man page.
ip=ip option multiple times — once for each interface. If multiple interfaces are configured, you must specify a primary boot interface using the bootdev option described below.
Table 11.4. Network Interface Configuration Formats
| Configuration Method | Option format |
|---|---|
| Automatic configuration of any interface | ip=method |
| Automatic configuration of a specific interface | ip=interface:method |
| Static configuration | ip=ip::gateway:netmask:hostname:interface:none |
| Automatic configuration of a specific interface with an override [a] | ip=ip::gateway:netmask:hostname:method:mtu |
[a]
Brings up the specified interface using the specified method of automatic configuration, such as dhcp, but overrides the automatically obtained IP address, gateway, netmask, hostname or other specified parameter. All parameters are optional; only specify the ones you wish to override and automatically obtained values will be used for the others.
| |
method parameter can be any the following:
Table 11.5. Automatic Interface Configuration Methods
| Automatic configuration method | Value |
|---|---|
| DHCP | dhcp |
| IPv6 DHCP | dhcp6 |
| IPv6 automatic configuration | auto6 |
| iBFT (iSCSI Boot Firmware Table) | ibft |
Note
inst.ks=http://host:/path and you did not specify the ip option, the installer will use ip=dhcp.
IPv6 addresses can be specified by putting them in square brackets, for example, [2001:DB8::1].
255.255.255.0) or a prefix (for example 64).
nameserver=bootdev=ip option.
ifname=ifname=interface:MAC. For example:
ifname=eth0:01:23:45:67:89:abinst.dhcpclass=dhcpd service will see this value as vendor-class-identifier. The default value is anaconda-$(uname -srm).
Advanced Installation Options
inst.multilibx86_64) and packages for all architectures (marked as noarch would be installed. When you use this option, packages for 32-bit AMD/Intel systems (marked as i586, i686, etc.) will be automatically installed as well if available.
%packages section. If a package is only installed as a dependency, only the exact specified dependency will be installed. For example, if you are installing package foo which depends on package bar, the former will be installed in multiple variants, while the latter will only be installed in variants specifically required.
gptEnabling Remote Access
inst.vncVNC session. If you specify this option, you will need to connect to the system using a VNC client application to be able to interact with the installer. VNC sharing is enabled, so multiple clients can connect to the system at the same time.
Note
inst.vncpassword=inst.vncpassword=testpasswd will set the password to testpasswd.
inst.vncconnect=inst.vncconnect=host:port, where host is the address to the VNC client's host, and port specifies which port to use. The port parameter is optional, if you do not specify one, the installer will use 5900.
Debugging and Troubleshooting
inst.updates=updates.img file to be applied to the installer runtime. The syntax is the same as in the inst.repo option — see Table 11.1, “Installation Sources” for details. In all formats, if you do not specify a file name but only a directory, the installer will look for a file named updates.img.
inst.loglevel=debug, info, warning, error and critical. The default value is info, which means that by default, the logging terminal will display messages ranging from info to critical.
inst.syslog=inst.virtiolog=virtio port (a character device at /dev/virtio-ports/name) to be used for forwarding logs. The default value is org.fedoraproject.anaconda.log.0; if this port is present, it will be used.
Check the Release Notes
Table 11.6. Hardware Options
| Compatibility | Option |
|---|---|
| Disable all hardware detection | noprobe |
| Disable graphics, keyboard, and mouse detection | headless |
| Disable passing keyboard and mouse information to stage 2 of the installation program | nopass |
| Use basic VESA driver for video | xdriver=vesa |
| Disable shell access on virtual console 2 during installation | noshell |
| Disable advanced configuration and power interface (ACPI) | acpi=off |
| Disable machine check exception (MCE) CPU self-diagnosis. | nomce |
| Disable non-uniform memory access on the AMD64 architecture | numa-off |
| Force kernel to detect a specific amount of memory, where xxx is a value in megabytes | mem=xxxm |
| Enable DMA only for IDE and SATA drives | libata.dma=1 |
| Disable BIOS-assisted RAID | nodmraid |
| Disable Firewire device detection | nofirewire |
| Disable parallel port detection | noparport |
| Disable PC Card (PCMCIA) device detection | nopcmcia |
| Disable all probing of network hardware | nonet |
Additional Screen
isa option causes the system to display an additional text screen at the beginning of the installation process. Use this screen to configure the ISA devices on your computer.
Important
Note
rd.live.check to the boot loader command line. Note that this option is used automatically if you select the default installation option from the boot menu ().
inst.rescue boot option.
/mnt/sysimage/.
Linux Required
vmlinuz and initrd.img files from a Fedora DVD (or DVD image) to the /boot/ directory, renaming them to vmlinuz-install and initrd.img-install. You must have root privileges to write files into the /boot/ directory.
/etc/default/grub and the scripts in etc/grub.d/. To configure GRUB to boot from the new files, add a boot stanza to /etc/grub.d/40_custom that refers to them.
menuentry "Fedora Linux" {
        set root=(hd0,1)
        linux /vmlinuz-install
        initrd /initrd.img-install
}linux line of the boot stanza. For example:
linux /vmlinuz-install stage2=http://my.internal.server/17/x86_64/os/
repo= option instead.
linux line, which will set preliminary options in Anaconda that the user normally sets interactively. For a list of available installer boot options, refer to Chapter 11, Boot Options.
ip=
repo=
lang=
keymap=
ksdevice= (if installation requires an interface other than eth0)
vnc and vncpassword= for a remote installation
grub.cfg file:
grub2-mkconfig --output=/boot/grub2/grub.cfggrub.cfg to view the updated configuration. Locate your new menu entry stanza and determine its place in the stanza order.
GRUB_DEFAULT option in /etc/default/grub to point to the new stanza you added. 0 will refer to the first stanza, 1 to the second, and so on. For example:
GRUB_DEFAULT=0
GRUB_DEFAULT="Fedora Linux"
Experience Required
Warning
repo= boot option with the Fedora DVD. Alternatively, if the system to be installed contains a network interface card (NIC) with Pre-Execution Environment (PXE) support, it can be configured to boot from files on another networked system rather than local media such as a DVD.
tftp server (which provides the files necessary to start the installation program), and the location of the files on the tftp server. This is possible because of PXELINUX, which is part of the syslinux package.
root account with the command su -. As an alternative, you can run a command with the -c option, using the form su -c 'command'.
yum -y install cobblercobbler command can check its own settings for validity and report the results. Run the following command to check the settings:
cobbler checksetsebool -P httpd_can_network_connect_cobbler 1getsebool -a|grep cobbler/etc/cobbler/settings file to reflect the IP address information for the server. You must change at least the server and next_server options, although these options may point to the same IP address.
manage_dhcp option to 1. If you are running a DHCP server, configure it according to the instructions found in the syslinux package documentation. For more information, refer to your local files /usr/share/doc/syslinux/syslinux.doc and /usr/share/doc/syslinux/pxelinux.doc.
Network Locations
mkdir /mnt/dvdmount -o context=system_u:object_r:httpd_sys_content_t:s0 /dev/dvd /mnt/dvdmount -ro loop,context=system_u:object_r:httpd_sys_content_t:s0 /path/to/image.iso /mnt/dvdIf SELinux enabled, use the default label
iso9660_t label instead of httpd_sys_content_t.
/etc/exports and add the following line to it:
/mnt/dvd *(ro,async)
systemctl start rpcbindsystemctl start nfs
yum to install the Apache web server if it is not already installed:
yum -y install httpdln -s /mnt/dvd /var/www/html/distrocobbler to create an installation server. The cobbler command can fetch the distribution over the network as part of the import process.
cobbler import tasks using a different name for each method. For best results, use the installation method as part of the name, so it appears in the client's boot menu.
cobbler, run this command:
cobbler import --path=/mnt/dvd --name=distro_namecobbler, run this command. Replace network_URI with the URI you found in Section 13.3, “Mirroring a Network Location”, and distro_name as above:
cobbler import --path=network_URI --name=distro_nameImporting a Source
cobbler imports a distribution with the commands above, it copies all the files to the server's local storage, which may take some time.
--available-as option.
cobbler import --path=/mnt/dvd --name=distro_name --available-as=network_URIcobbler import --path=network_URI --name=distro_name --available-as=network_URI
cobbler server reaches the mirror location at the same URI as the clients. If not, substitute an appropriate URI for the --path option. The following examples are URI locations that work if you have been following the procedures in this section, and your server's IP address is 192.168.1.1:
nfs://192.168.1.1:/mnt/dvd
http://192.168.1.1:/distro
cobbler server.
cobbler sync to apply the changes. To check that your cobbler server is listening on the correct ports, use the netstat -lp command.
Firewall Considerations
system-config-securitylevel command to permit access to some or all of these network services:
cobbler server is to provide HTTP installation service
cobbler server is to provide FTP installation service
cobbler server is to provide NFS installation service
tftp server necessary for PXE booting.
tftp service.
tftp server so they can be found when the client requests them. The tftp server is usually the same server as the network server exporting the installation tree.
yum install tftp-server.
/etc/xinet.d/tftp, change the disabled parameter from yes to no.
systemctl start xinetdsystemctl enable xinetdsystemctl status xinetd
/etc/dhcp/dhcpd.conf might look like:
  option space pxelinux;
  option pxelinux.magic code 208 = string;
  option pxelinux.configfile code 209 = text;
  option pxelinux.pathprefix code 210 = text;
  option pxelinux.reboottime code 211 = unsigned integer 32;

  subnet 10.0.0.0 netmask 255.255.255.0 {
          option routers 10.0.0.254;
          range 10.0.0.2 10.0.0.253;

          class "pxeclients" {
                  match if substring (option vendor-class-identifier, 0, 9) = "PXEClient";
                  next-server 10.0.0.1;

                  if option arch = 00:06 {
                          filename "pxelinux/bootia32.efi";
                  } else if option arch = 00:07 {
                          filename "pxelinux/bootx64.efi";
                  } else {
                          filename "pxelinux/pxelinux.0";
                  }
          }

          host example-ia32 {
                  hardware ethernet XX:YY:ZZ:11:22:33;
                  fixed-address 10.0.0.2;
          }
  }
pxelinux.0 file from the SYSLINUX package installed with Fedora. Create a pxelinux directory within tftpboot and copy pxelinux.0 and vesamenu.c32into it:
mkdir /var/lib/tftpboot/pxelinuxcp /usr/share/syslinux/{pxelinux.0, vesamenu.c32} /var/lib/tftpboot/pxelinux
pxelinux.cfg directory within pxelinux:
mkdir /var/lib/tftpboot/pxelinux/pxelinux.cfgdefault or named after the IP address. For example, if your machine's IP address is 10.0.0.1, the filename would be 0A000001.
/var/lib/tftpboot/pxelinux/pxelinux.cfg/default might look like:
default vesamenu.c32
prompt 1
timeout 600

display boot.msg

label linux
  menu label ^Install or upgrade an existing system
  menu default
  kernel vmlinuz
  append initrd=initrd.img repo=http://dl.fedoraproject.org/pub/fedora/linux/releases
      /20/Fedora/x86_64/os/
label vesa
  menu label Install system with ^basic video driver
  kernel vmlinuz
  append initrd=initrd.img xdriver=vesa nomodeset repo=http://dl.fedoraproject.org
      /pub/fedora/linux/releases/20/Fedora/x86_64/os/
label rescue
  menu label ^Rescue installed system
  kernel vmlinuz
  append initrd=initrd.img root=live:http://dl.fedoraproject.org/pub/fedora/linux/releases/20/Fedora/x86_64/os/LiveOS/squashfs.img rescue
label local
  menu label Boot from ^local drive
  localboot 0xffff
label memtest86
  menu label ^Memory test
  kernel memtest
  append -
repo= boot option. If they are on separate servers, use stage2= instead.
tftp root directory:
cp /path/to/x86_64/os/images/pxeboot/{vmlinuz,initrd.img} /var/lib/tftpboot/pxelinux/yum install tftp-server.
/etc/xinet.d/tftp, change the disabled parameter from yes to no.
tftpboot for the EFI boot images, and then copy them from your installation media:
mkdir /var/lib/tftpboot/pxelinuxmkdir /var/lib/tftpboot/pxelinux/bootx64.eficp /path/to/image/os/EFI/BOOT/grubx64.efi /var/lib/tftpboot/pxelinux/
systemctl start xinetdsystemctl enable xinetdsystemctl status xinetd
/etc/dhcp/dhcpd.conf might look like:
  option space PXE;
  option PXE.mtftp-ip    code 1 = ip-address;
  option PXE.mtftp-cport code 2 = unsigned integer 16;
  option PXE.mtftp-sport code 3 = unsigned integer 16;
  option PXE.mtftp-tmout code 4 = unsigned integer 8;
  option PXE.mtftp-delay code 5 = unsigned integer 8;
  option arch code 93 = unsigned integer 16; # RFC4578

  subnet 10.0.0.0 netmask 255.255.255.0 {
          option routers 10.0.0.254;
          range 10.0.0.2 10.0.0.253;

          class "pxeclients" {
                  match if substring (option vendor-class-identifier, 0, 9) = "PXEClient";
                  next-server 10.0.0.1;

                  if option arch = 00:06 {
                          filename "pxelinux/bootia32.efi";
                  } else if option arch = 00:07 {
                          filename "pxelinux/bootx64.efi";
                  } else {
                          filename "pxelinux/pxelinux.0";
                  }
          }

          host example-ia32 {
                  hardware ethernet XX:YY:ZZ:11:22:33;
                  fixed-address 10.0.0.2;
          }
  }
filename option must be replaced with a bootfile-url string. Both identify the boot file that the PXE tftp process should download, but each is specific to the version of the IP protocol being used. bootfile-url specifies an IPv6 network location for the boot file.
/etc/dhcp/dhcpd6.conf might look like:
  default-lease-time 2592000;
  preferred-lifetime 604800;
  option dhcp-renewal-time 3600;
  option dhcp-rebinding-time 7200;
  option dhcp6.name-servers 3ffe:501:ffff:100:200:ff:fe00:3f3e;
  option dhcp6.domain-search "test.example.com","example.com";
  option dhcp6.info-refresh-time 21600;
  dhcpv6-lease-file-name "/var/lib/dhcpd/dhcpd6.leases";

  subnet6 3ffe:501:ffff:100::/64 {
	  range6 3ffe:501:ffff:100::10 3ffe:501:ffff:100::;
	  range6 3ffe:501:ffff:100:: temporary;
	  prefix6 3ffe:501:ffff:100:: 3ffe:501:ffff:111:: /64;

	  option dhcp6.bootfile-url "tftp://[3ffe:501:ffff:100::1]/grubx64.efi";
	  option dhcp6.name-servers 3ffe:501:ffff:100::1;

	 }
tftp in Secure Boot mode. shim is specified using the filename option in IPv4 configurations and the bootfile-url option in IPv6 configurations.
grub.efi or grubx64.efi and be available at the same location as shim and be accessible by tftp.
pxelinux.cfg directory within pxelinux:
mkdir /var/lib/tftpboot/pxelinux/pxelinux.cfgefidefault or named after the IP address. For example, if your machine's IP address is 10.0.0.1, the filename would be 0A000001.
/var/lib/tftpboot/pxelinux/pxelinux.cfg/efidefault might look like:
default=0
timeout=1
hiddenmenu
title Fedora
        root (nd)
        kernel vmlinuz
        initrd initrd.img inst.repo=nfs:10.0.0.1:/path/to/tree
tftp root directory:
cp /path/to/image/os/images/pxeboot/{vmlinuz,initrd.img} /var/lib/tftpboot/pxelinux/tftp Servertftp-server package is installed with the command rpm -q tftp-server.
tftp is an xinetd-based service. Configure xinetd to process tftp requests by editing /etc/xinetd.d/tftp so that disable = no.
tftp service with the following commands:
systemctl start xinetd.servicesystemctl enable xinetd.service
tftp and xinetd services to immediately turn on and also configure them to start at boot.
/tftpboot/linux-install/msgs/boot.msg to use a custom boot message.
# yum install tigervncvnc://SERVER:DISPLAY, where SERVER is the IP address or DNS host name of the VNC server you wish to connect to and DISPLAY is the VNC display number (usually 1), and click Connect.
vnc as a boot argument.
vnc command in the kickstart file used for installation.
Running anaconda VERSION, the PRODUCT system installer - please wait...
vnc vncconnect boot parameter:
boot: linux vnc vncconnect=HOST[:port]vnc is passed as a boot parameter. To add the vnc parameter, you will need a console attached to the target system that allows you to interact with the boot process. Enter the following at the prompt:
boot: linux vncvnc command to the kickstart file. If the target system is using DHCP, add vnc vncconnect=HOST[:port] to the boot arguments for the target system. HOST is the IP address or DNS host name of the VNC viewer system. Specifying the port is optional. Enter the following at the prompt:
boot: linux vnc vncconnect=HOST[:port]Note
vnc command to the kickstart file for the system. You will be able to connect to the target system using your VNC viewer and monitor the installation progress. The address to use is the one the system is configured with via the kickstart file.
vnc vncconnect method may work better for you. Rather than adding the vnc boot parameter to the kickstart file, add the vnc vncconnect=HOST[:port] parameter to the list of boot arguments for the target system. For HOST, put the IP address or DNS host name of the VNC viewer system. Specifying the port is optional. See the next section for more details on using the vncconnect mode.
vnc boot parameter, you may also want to pass the vncpassword parameter in these scenarios. While the password is sent in plain text over the network, it does provide an extra step before a viewer can connect to a system. Once the viewer connects to the target system over VNC, no other connections are permitted. These limitations are usually sufficient for installation purposes.
Important
vncpassword option. It should not be a password you use on any systems, especially a real root password.
vnc vncconnect parameter. In this mode of operation, you start the viewer on your system first telling it to listen for an incoming connection. Pass vnc vncconnect=HOST[:port] at the boot prompt and the installer will attempt to connect to the specified HOST (either a hostname or IP address). Specifying the port is optional.
/tmp directory to assist with debugging installation failures.
Note — /tmp/netinfo no longer used
/tmp/netinfo in previous versions of Fedora must now source the ifcfg files in /etc/sysconfig/network-scripts.
/root/anaconda-ks.cfg. You should be able to edit it with any text editor or word processor that can save files as ASCII text.
%packages section — Refer to Section 15.5, “Package Selection” for details.
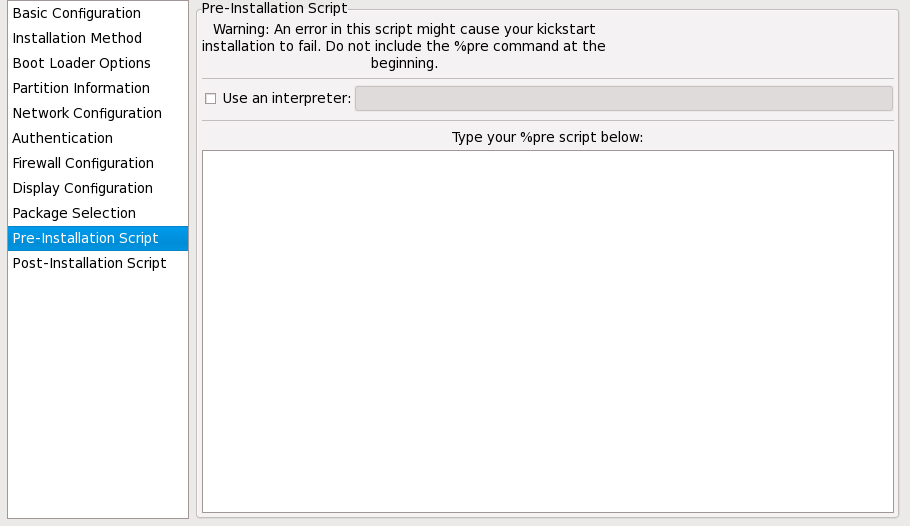
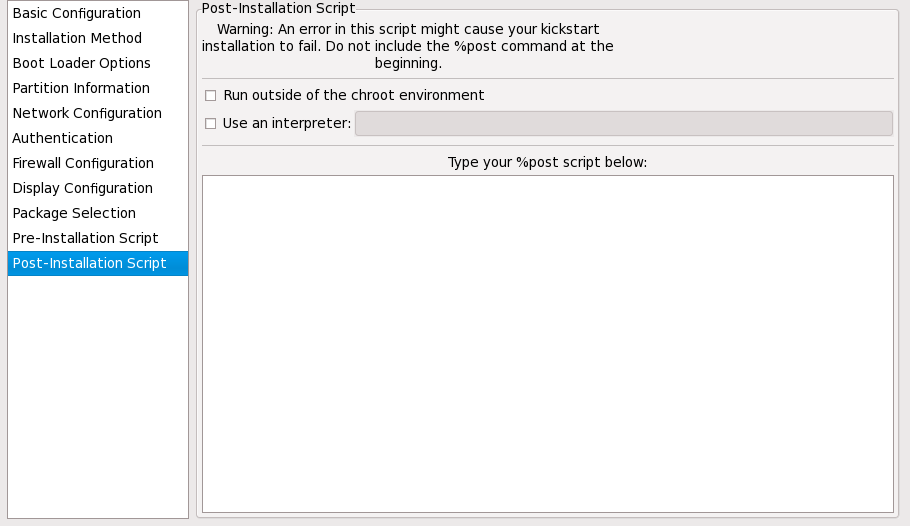
%pre and %post sections — These two sections can be in any order and are not required. Refer to Section 15.6, “Pre-installation Script” and Section 15.7, “Post-installation Script” for details.
upgrade keyword
Note
auth or authconfig (required) authconfig command, which can be run after the install. By default, passwords are normally encrypted and are not shadowed.
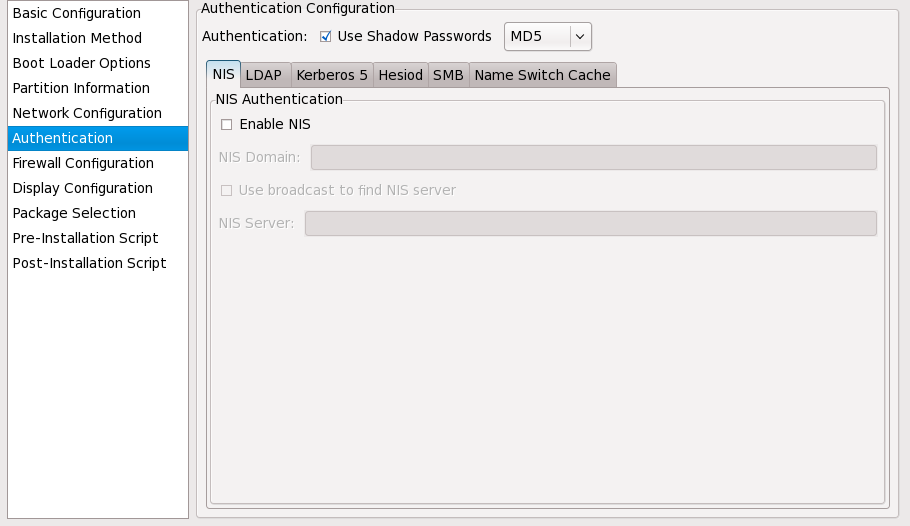
--enablenis — Turns on NIS support. By default, --enablenis uses whatever domain it finds on the network. A domain should almost always be set by hand with the --nisdomain= option.
--nisdomain= — NIS domain name to use for NIS services.
--nisserver= — Server to use for NIS services (broadcasts by default).
--useshadow or --enableshadow — Use shadow passwords.
--enableldap — Turns on LDAP support in /etc/nsswitch.conf, allowing your system to retrieve information about users (for example, their UIDs, home directories, and shells) from an LDAP directory. To use this option, you must install the nss-pam-ldapd package. You must also specify a server and a base DN (distinguished name) with --ldapserver= and --ldapbasedn=.
--enableldapauth — Use LDAP as an authentication method. This enables the pam_ldap module for authentication and changing passwords, using an LDAP directory. To use this option, you must have the nss-pam-ldapd package installed. You must also specify a server and a base DN with --ldapserver= and --ldapbasedn=. If your environment does not use TLS (Transport Layer Security), use the --disableldaptls switch to ensure that the resulting configuration file works.
--ldapserver= — If you specified either --enableldap or --enableldapauth, use this option to specify the name of the LDAP server to use. This option is set in the /etc/ldap.conf file.
--ldapbasedn= — If you specified either --enableldap or --enableldapauth, use this option to specify the DN in your LDAP directory tree under which user information is stored. This option is set in the /etc/ldap.conf file.
--enableldaptls — Use TLS (Transport Layer Security) lookups. This option allows LDAP to send encrypted usernames and passwords to an LDAP server before authentication.
--disableldaptls — Do not use TLS (Transport Layer Security) lookups in an environment that uses LDAP for authentication.
--enablekrb5 — Use Kerberos 5 for authenticating users. Kerberos itself does not know about home directories, UIDs, or shells. If you enable Kerberos, you must make users' accounts known to this workstation by enabling LDAP, NIS, or Hesiod or by using the /usr/sbin/useradd command. If you use this option, you must have the pam_krb5 package installed.
--krb5realm= — The Kerberos 5 realm to which your workstation belongs.
--krb5kdc= — The KDC (or KDCs) that serve requests for the realm. If you have multiple KDCs in your realm, separate their names with commas (,).
--krb5adminserver= — The KDC in your realm that is also running kadmind. This server handles password changing and other administrative requests. This server must be run on the master KDC if you have more than one KDC.
--enablehesiod — Enable Hesiod support for looking up user home directories, UIDs, and shells. More information on setting up and using Hesiod on your network is in /usr/share/doc/glibc/README.hesiod, which is included in the glibc package. Hesiod is an extension of DNS that uses DNS records to store information about users, groups, and various other items.
--hesiodlhs and --hesiodrhs — The Hesiod LHS (left-hand side) and RHS (right-hand side) values, set in /etc/hesiod.conf. The Hesiod library uses these values to search DNS for a name, similar to the way that LDAP uses a base DN.
jim, the Hesiod library looks up jim.passwd<LHS><RHS>, which should resolve to a TXT record that contains a string identical to an entry for that user in the passwd file: jim:*:501:501:Jungle Jim:/home/jim:/bin/bash. To look up groups, the Hesiod library looks up jim.group<LHS><RHS> instead.
501.uid a CNAME for jim.passwd, and 501.gid a CNAME for jim.group. Note that the library does not place a period (.) in front of the LHS and RHS values when performing a search. Therefore, if the LHS and RHS values need to have a period placed in front of them, you must include the period in the values you set for --hesiodlhs and --hesiodrhs.
--enablesmbauth — Enables authentication of users against an SMB server (typically a Samba or Windows server). SMB authentication support does not know about home directories, UIDs, or shells. If you enable SMB, you must make users' accounts known to the workstation by enabling LDAP, NIS, or Hesiod or by using the /usr/sbin/useradd command.
--smbservers= — The name of the servers to use for SMB authentication. To specify more than one server, separate the names with commas (,).
--smbworkgroup= — The name of the workgroup for the SMB servers.
--enablecache — Enables the nscd service. The nscd service caches information about users, groups, and various other types of information. Caching is especially helpful if you choose to distribute information about users and groups over your network using NIS, LDAP, or Hesiod.
--passalgo= — specify sha256 to set up the SHA-256 hashing algorithm or sha512 to set up the SHA-512 hashing algorithm.
autopart (optional) /) partition (1 GB or bigger), a /swap partition, and an appropriate /boot partition for the architecture. On large enough drives, this also creates a /home partition.
Note
autopart option cannot be used together with the part/partition, raid, logvol, or volgroup options in the same kickstart file.
--encrypted — Should all devices with support be encrypted by default? This is equivalent to checking the Encrypt checkbox on the initial partitioning screen.
--cipher= — Specifies which type of encryption will be used if the anaconda default aes-xts-plain64 is not satisfactory. You must use this option together with the --encrypted option; by itself it has no effect. Available types of encryption are listed in the Red Hat Enterprise Linux Security Guide, but Red Hat strongly recommends using either aes-xts-plain64 or aes-cbc-essiv:sha256.
--passphrase= — Provide a default system-wide passphrase for all encrypted devices.
--escrowcert=URL_of_X.509_certificate — Store data encryption keys of all encrypted volumes as files in /root, encrypted using the X.509 certificate from the URL specified with URL_of_X.509_certificate. The keys are stored as a separate file for each encrypted volume. This option is only meaningful if --encrypted is specified.
--backuppassphrase= — Add a randomly-generated passphrase to each encrypted volume. Store these passphrases in separate files in /root, encrypted using the X.509 certificate specified with --escrowcert. This option is only meaningful if --escrowcert is specified.
--type= — Select one of the predefined automatic partitioning scheme you want to use. Accepts the following values:
lvm: The LVM partitioning scheme.
btrfs: The BTRFS partitioning scheme.
thinp: The LVM Thin Provisioning partitioning scheme.
plain: Regular partitions with no LVM or BTRFS.
--nolvm — Do not use LVM or BTRFS for automatic partitioning. This option is equal to --type=plain.
autostep (optional) --autoscreenshot — Take a screenshot at every step during installation and copy the images over to /root/anaconda-screenshots after installation is complete. This is most useful for documentation.
bootloader (required)Important
--append= — Specifies kernel parameters. To specify multiple parameters, separate them with spaces. For example:
bootloader --location=mbr --append="hdd=ide-scsi ide=nodma"
--driveorder — Specify which drive is first in the BIOS boot order. For example:
bootloader --driveorder=sda,hda
--boot-drive= — Specifies which drive the bootloader is installed to.
--location= — Specifies where the boot record is written. Valid values are the following: mbr (the default), partition (installs the boot loader on the first sector of the partition containing the kernel), or none (do not install the boot loader).
--leavebootorder= — Boot the drives in their existing order, to override the default of booting into the newly installed drive on Power Systems servers and EFI systems. This is useful for systems that, for example, should network boot first before falling back to a local boot.
--md5pass= — If using GRUB, similar to --password= except the password should already be encrypted.
--password= — If using GRUB, sets the GRUB boot loader password to the one specified with this option. This should be used to restrict access to the GRUB shell, where arbitrary kernel options can be passed.
--timeout= — Specify the number of seconds before the bootloader times out and boots the default option. Specifying 0 will tell GRUB not to display these menus.
--upgrade — Upgrade the existing boot loader configuration, preserving the old entries. This option is only available for upgrades.
--extlinux — install and use the extlinux bootloader.
btrfs (optional) btrfs <mntpoint> --data=<level> --metadata=<level> --label=<label> <partitions>
btrfs <mntpoint> --subvol --name=<path> <parent>
--data= — RAID level to use for filesystem data (such as 0, 1, or 10).
--metadata= — RAID level to use for filesystem/volume metadata (such as 0, 1, or 10).
--label= — Specify a label for the BTRFS filesystem.
--noformat — Use an existing BTRFS volume and do not reformat the filesystem.
clearpart (optional) Note
clearpart command is used, then the --onpart command cannot be used on a logical partition.
--all — Erases all partitions from the system.
--drives= — Specifies which drives to clear partitions from. For example, the following clears all the partitions on the first two drives on the primary IDE controller:
clearpart --drives=hda,hdb --all
disk/by-id/dm-uuid-mpath-WWID, where WWID is the world-wide identifier for the device. For example, to clear a disk with WWID 2416CD96995134CA5D787F00A5AA11017, use:
clearpart --drives=disk/by-id/dm-uuid-mpath-2416CD96995134CA5D787F00A5AA11017
dm-uuid-mpath. Instead, to clear a multipath device that uses LVM, use the format disk/by-id/scsi-WWID, where WWID is the world-wide identifier for the device. For example, to clear a disk with WWID 58095BEC5510947BE8C0360F604351918, use:
clearpart --drives=disk/by-id/scsi-58095BEC5510947BE8C0360F604351918
Warning — Never specify multipath devices by device names like mpatha
mpatha are not specific to a particular disk. The disk named /dev/mpatha during installation might not be the one that you expect it to be. Therefore, the clearpart command could target the wrong disk.
--list= — Specifies individual partitions to be removed. For example, the following removes the first partition on the hda drive and the second partition on the hdb drive:
clearpart --list=hda1,hdb2
--initlabel — Initializes the disk label to the default for your architecture (for example msdos for x86). It is useful so that the installation program does not ask if it should initialize the disk label if installing to a brand new hard drive.
--linux — Erases all Linux partitions.
--none (default) — Do not remove any partitions.
cmdline (optional) device (optional) device command, which tells the installation program to install extra modules, is in this format:
device <moduleName> --opts=<options>
--opts= — Mount options to use for mounting the NFS export. Any options that can be specified in /etc/fstab for an NFS mount are allowed. The options are listed in the nfs(5) man page. Multiple options are separated with a comma.
driverdisk (optional) driverdisk command to tell the installation program where to look for the driver disk.
driverdisk <partition> --source=<url> --biospart=<biospart> [--type=<fstype>]
driverdisk --source=ftp://path/to/dd.img
driverdisk --source=http://path/to/dd.img
driverdisk --source=nfs:host:/path/to/img
nfs:host:/path/to/img.
82p2).
--type= — File system type (for example, vfat or ext2).
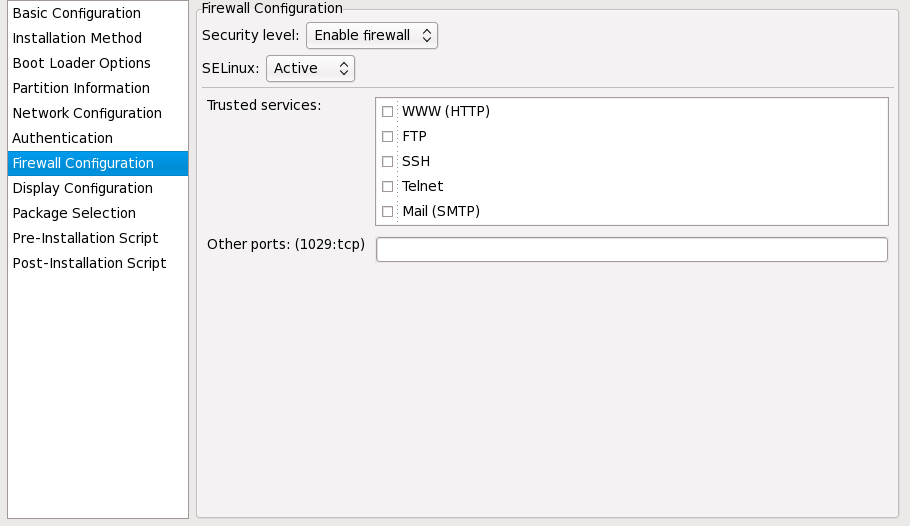
firewall (optional) firewall --enabled|--disabled [--trust=] <device> [--port=]
--enabled or --enable — Reject incoming connections that are not in response to outbound requests, such as DNS replies or DHCP requests. If access to services running on this machine is needed, you can choose to allow specific services through the firewall.
--disabled or --disable — Do not configure any iptables rules.
--trust= — Listing a device here, such as eth0, allows all traffic coming from that device to go through the firewall. To list more than one device, use --trust eth0 --trust eth1. Do NOT use a comma-separated format such as --trust eth0, eth1.
--ssh
--smtp
--http
--ftp
--port= — You can specify that ports be allowed through the firewall using the port:protocol format. For example, to allow IMAP access through your firewall, specify imap:tcp. Numeric ports can also be specified explicitly; for example, to allow UDP packets on port 1234 through, specify 1234:udp. To specify multiple ports, separate them by commas.
graphical (optional) halt (optional) halt option is equivalent to the shutdown -h command.
poweroff, reboot, and shutdown kickstart options.
ignoredisk (optional) ignoredisk, attempting to deploy on a SAN-cluster the kickstart would fail, as the installer detects passive paths to the SAN that return no partition table.
ignoredisk --drives=drive1,drive2,...
sda, sdb,..., hda,... etc.
disk/by-id/dm-uuid-mpath-WWID, where WWID is the world-wide identifier for the device. For example, to ignore a disk with WWID 2416CD96995134CA5D787F00A5AA11017, use:
ignoredisk --drives=disk/by-id/dm-uuid-mpath-2416CD96995134CA5D787F00A5AA11017
dm-uuid-mpath. Instead, to ignore a multipath device that uses LVM, use the format disk/by-id/scsi-WWID, where WWID is the world-wide identifier for the device. For example, to ignore a disk with WWID 58095BEC5510947BE8C0360F604351918, use:
ignoredisk --drives=disk/by-id/scsi-58095BEC5510947BE8C0360F604351918
Warning — Never specify multipath devices by device names like mpatha
mpatha are not specific to a particular disk. The disk named /dev/mpatha during installation might not be the one that you expect it to be. Therefore, the ignoredisk command could target the wrong disk.
--only-use — specifies a list of disks for the installer to use. All other disks are ignored. For example, to use disk sda during installation and ignore all other disks:
ignoredisk --only-use=sda
ignoredisk --only-use=disk/by-id/dm-uuid-mpath-2416CD96995134CA5D787F00A5AA11017
ignoredisk --only-use=disk/by-id/scsi-58095BEC5510947BE8C0360F604351918
install (optional) cdrom, harddrive, nfs, or url (for FTP or HTTP installations). The install command and the installation method command must be on separate lines.
cdrom — Install from the first optical drive on the system.
harddrive — Install from a Fedora installation tree on a local drive, which must be either vfat or ext2.
--biospart=
--partition=
--dir=
variant directory of the installation tree.
harddrive --partition=hdb2 --dir=/tmp/install-tree
liveimg — Install a disk image instead of packages. The image can be the squashfs.img file from a live image or a bare image from any existing filesystem mountable by the installation media, such as ext4. The image will be downloaded to the target drive after it has been partitioned.
--url=<url> — specify where the live image should be downloaded from. HTTP, HTTPS, FTP, and local file access are all supported.
--proxy=[protocol://][username[:password]@]host[:port] — specify a HTTP, HTTPS, or FTP proxy, if desired.
--checksum= — pass the optional sha256 image checksum before files are copied to the target system.
--noverifyssl — skip checking the SSL certificate if downloading via HTTPS.
liveimg --url=https://<server>/<dir> [--checksum=sha256] [--noverifyssl]
Important
nfs — Install from the NFS server specified.
--server=
--dir=
variant directory of the installation tree.
--opts=
nfs --server=nfsserver.example.com --dir=/tmp/install-tree
url — Install from an installation tree on a remote server via FTP or HTTP.
url --url http://<server>/<dir>
url --url ftp://<username>:<password>@<server>/<dir>
iscsi (optional)iscsi parameter, you must also assign a name to the iSCSI node, using the iscsiname parameter earlier in the kickstart file.
iscsi parameter. Anaconda automatically detects and uses disks configured in BIOS or firmware and no special configuration is necessary in the kickstart file.
iscsi parameter, ensure that networking is activated at the beginning of the installation, and that the iscsi parameter appears in the kickstart file before you refer to iSCSI disks with parameters such as clearpart or ignoredisk.
--port= (mandatory) — the port number (typically, --port=3260)
--user= — the username required to authenticate with the target
--password= — the password that corresponds with the username specified for the target
--reverse-user= — the username required to authenticate with the initiator from a target that uses reverse CHAP authentication
--reverse-password= — the password that corresponds with the username specified for the initiator
iscsiname (optional) iscsi parameter in your kickstart file, you must specify iscsiname earlier in the kickstart file.
keyboard (required) keyboard --vckeymap=<keymap>|--xlayouts=<layout1>,...,<layoutN>|<layout> [--switch=<option1>,...<optionN>]
--vckeymap=<keymap> — specify a VConsole keymap to serve as the keyboard layout. Available keymap names are listed in /usr/lib/kbd/keymaps/architecture with the .map.gz extension removed.
--xlayouts= — specify a list of X layouts as a comma-separated list with no spaces. Layouts come in one of the following formats: layout and 'layout (variant)'. For example:
keyboard --xlayouts=cz,'cz (qwerty)'
<layout> — an earlier format for specifying the keyboard layout. This format is still supported and accepts both VConsole keymap names and X layouts.
--switch= — specify keyboard shortcuts for switching between layouts. The list should be comma-separated with no spaces. Refer to https://fedoraproject.org/wiki/Anaconda/Kickstart for the available options.
lang (required) lang en_US
/usr/share/system-config-language/locale-list provides a list of the valid language codes in the first column of each line and is part of the system-config-language package.
lang command, the installation process continues in English, but the installed system uses your selection as its default language.
--addsupport — Set additional languages to be supported on the installed system.
langsupport (deprecated) %packages section of your kickstart file. For instance, adding support for French means you should add the following to %packages:
@french-support
logvol (optional) logvol <mntpoint> --vgname=<name> --size=<size> --name=<name> <options>
--noformat — Use an existing logical volume and do not format it.
--useexisting — Use an existing logical volume and reformat it.
--fstype= — Sets the file system type for the logical volume. Valid values are xfs, ext2, ext3, ext4, swap, vfat, and hfs.
--fsoptions= — Specifies a free form string of options to be used when mounting the filesystem. This string will be copied into the /etc/fstab file of the installed system and should be enclosed in quotes.
--grow= — Tells the logical volume to grow to fill available space (if any), or up to the maximum size setting.
--maxsize= — The maximum size in megabytes when the logical volume is set to grow. Specify an integer value here such as 500 (do not include the unit).
--recommended= — Determine the size of the logical volume automatically.
--percent= — Specify the amount by which to grow the logical volume, as a percentage of the free space in the volume group after any statically-sized logical volumes are taken into account. This option must be used in conjunction with the --size and --grow options for logvol.
--encrypted — Specifies that this logical volume should be encrypted, using the passphrase provided in the --passphrase option. If you do not specify a passphrase, anaconda uses the default, system-wide passphrase set with the autopart --passphrase command, or stops the installation and prompts you to provide a passphrase if no default is set.
--passphrase= — Specifies the passphrase to use when encrypting this logical volume. You must use this option together with the --encrypted option; by itself it has no effect.
--escrowcert=URL_of_X.509_certificate — Store data encryption keys of all encrypted volumes as files in /root, encrypted using the X.509 certificate from the URL specified with URL_of_X.509_certificate. The keys are stored as a separate file for each encrypted volume. This option is only meaningful if --encrypted is specified.
--backuppassphrase= — Add a randomly-generated passphrase to each encrypted volume. Store these passphrases in separate files in /root, encrypted using the X.509 certificate specified with --escrowcert. This option is only meaningful if --escrowcert is specified.
--thinpool= — Create a thin pool logical volume. (Use a mountpoint of "none")
--metadatasize=size — Specify the metadata area size (in MiB) for a new thin pool device.
--chunksize=size — Specify the chunk size (in KiB) for a new thin pool device.
--thin — Create a thin logical volume. (Requires use of --poolname)
--poolname=name — Specify the name of the thin pool in which to create a thin logical volume. (Requires --thin)
--resize — Resize an existing partition. This option must be used in conjunction with the --size= to specify the new size and --useexisting.
part pv.01 --size 3000
volgroup myvg pv.01
logvol / --vgname=myvg --size=2000 --name=rootvol
part pv.01 --size 1 --grow
volgroup myvg pv.01
logvol / --vgname=myvg --size=1 --name=rootvol --grow --percent=90
logging (optional) --host= — Send logging information to the given remote host, which must be running a syslogd process configured to accept remote logging.
--port= — If the remote syslogd process uses a port other than the default, it may be specified with this option.
--level= — One of debug, info, warning, error, or critical.
mediacheck (optional) monitor (optional) --hsync= — Specifies the horizontal sync frequency of the monitor.
--monitor= — Use specified monitor; monitor name should be from the list of monitors in /usr/share/hwdata/MonitorsDB from the hwdata package. The list of monitors can also be found on the X Configuration screen of the Kickstart Configurator. This is ignored if --hsync or --vsync is provided. If no monitor information is provided, the installation program tries to probe for it automatically.
--noprobe= — Do not try to probe the monitor.
--vsync= — Specifies the vertical sync frequency of the monitor.
mouse (deprecated) network (optional) network command is activated automatically if network access is required during installation, for example, during a network installation or installation over VNC. You can also explicitly require device to activate in the installer environment with the --activate option.
How to manually input network settings
network. Instead, enter your network settings at the boot prompt (refer to Section 15.10, “Starting a Kickstart Installation” for available boot options).
Note
asknetwork boot option
--activate — activate this device in the installer environment.
--activate option on a device that has already been activated (for example, an interface you configured with boot options so that the system could retrieve the kickstart file) the device is reactivated to use the details specified in the kickstart file.
--nodefroute option to prevent the device from using the default route.
activate option is new in Fedora 16.
--biosdevname=0 — disables consistent network device naming (refer to Appendix A in the Fedora System Administrators Guide).
--bootproto= — One of dhcp, bootp, ibft, or static.
ibft option is new in Fedora 16.
bootproto option defaults to dhcp. bootp and dhcp are treated the same.
network --bootproto=dhcp
network --bootproto=bootp
network --bootproto=ibft
network --bootproto=static --ip=10.0.2.15 --netmask=255.255.255.0
 --gateway=10.0.2.254 --nameserver=10.0.2.1
network --bootproto=static --ip=10.0.2.15 --netmask=255.255.255.0
 --gateway=10.0.2.254 --nameserver 192.168.2.1,192.168.3.1
--device= — specifies the device to be configured (and eventually activated) with the network command. For the first network command, --device= defaults (in order of preference) to one of:
ksdevice boot option
network command is unspecified if its --device option is missing. Take care to specify a --device option for any network command beyond the first.
eth0
00:12:34:56:78:9a
link, which specifies the first interface with its link in the up state
bootif, which uses the MAC address that pxelinux set in the BOOTIF variable. Set IPAPPEND 2 in your pxelinux.cfg file to have pxelinux set the BOOTIF variable.
ibft, which uses the MAC address of the interface specified by iBFT
network --bootproto=dhcp --device=eth0
--ip= — IP address of the device.
--ipv6= — IPv6 address of the device, or auto to use automatic neighbor discovery, or dhcp to use DHCPv6.
--gateway= — Default gateway as a single IPv4 address.
--ipv6gateway= — Default gateway as a single IPv6 address.
--nameserver= — Primary nameserver, as an IP address. Multiple nameservers must each be separated by a comma.
--nodefroute — Prevents the interface being set as the default route. Use this option when you activate additional devices with the --activate= option, for example, a NIC on a separate subnet for an iSCSI target.
nodefroute option is new in Fedora 16.
--nodns — Do not configure any DNS server.
--netmask= — Network mask of the device.
--hostname= — Hostname for the installed system.
--ethtool= — Specifies additional low-level settings for the network device which will be passed to the ethtool program.
--onboot= — Whether or not to enable the device at boot time.
--dhcpclass= — The DHCP class.
--mtu= — The MTU of the device.
--noipv4 — Disable IPv4 on this device.
--noipv6 — Disable IPv6 on this device.
--vlanid — Specifies virtual LAN ID number (802.1q tag).
part or partition (required for installs, ignored for upgrades) Warning
part biosboot --fstype=biosboot --size=1.
"part biosboot" option is unnecessary.
Warning
--noformat and --onpart are used.
Important
part in action, refer to Section 15.4.1, “Advanced Partitioning Example”.
/<path>
/, /usr, /home
swap
--recommended option:
swap --recommended
--hibernation option:
swap --hibernation
--recommended plus the amount of RAM on your system.
raid.<id>
raid).
pv.<id>
logvol).
--size= — The minimum partition size in megabytes. Specify an integer value here such as 500 (do not include the unit).
Important - --size value must be high
--size value is too small, the installation will fail. Set the --size value as the minimum amount of space you require. For size recommendations, refer to Section 9.14.5, “Recommended Partitioning Scheme”.
--grow — Tells the partition to grow to fill available space (if any), or up to the maximum size setting.
Note
--grow= without setting --maxsize= on a swap partition, Anaconda will limit the maximum size of the swap partition. For systems that have less than 2GB of physical memory, the imposed limit is twice the amount of physical memory. For systems with more than 2GB, the imposed limit is the size of physical memory plus 2GB.
--maxsize= — The maximum partition size in megabytes when the partition is set to grow. Specify an integer value here such as 500 (do not include the unit).
--resize — Resize an existing partition. This option must be used in conjunction with the --size= to specify the new size and --onpart= to specify the partition.
--noformat — Specifies that the partition should not be formatted, for use with the --onpart command.
--onpart= or --usepart= — Specifies the device on which to place the partition. For example:
partition /home --onpart=hda1
/home on /dev/hda1.
--onpart option will not create it.
--ondisk= or --ondrive= — Forces the partition to be created on a particular disk. For example, --ondisk=sdb puts the partition on the second SCSI disk on the system.
disk/by-id/dm-uuid-mpath-WWID, where WWID is the world-wide identifier for the device. For example, to specify a disk with WWID 2416CD96995134CA5D787F00A5AA11017, use:
part / --fstype=ext3 --grow --asprimary --size=100 --ondisk=disk/by-id/dm-uuid-mpath-2416CD96995134CA5D787F00A5AA11017
dm-uuid-mpath. Instead, to specify a multipath device that uses LVM, use the format disk/by-id/scsi-WWID, where WWID is the world-wide identifier for the device. For example, to specify a disk with WWID 58095BEC5510947BE8C0360F604351918, use:
part / --fstype=ext3 --grow --asprimary --size=100 --ondisk=disk/by-id/scsi-58095BEC5510947BE8C0360F604351918
Warning — Never specify multipath devices by device names like mpatha
mpatha are not specific to a particular disk. The disk named /dev/mpatha during installation might not be the one that you expect it to be. Therefore, the part command could target the wrong disk or partition.
--asprimary — Forces automatic allocation of the partition as a primary partition, or the partitioning fails.
--type= (replaced by fstype) — This option is no longer available. Use fstype.
--fsoptions — Specifies a free form string of options to be used when mounting the filesystem. This string will be copied into the /etc/fstab file of the installed system and should be enclosed in quotes.
--fsprofile — Specifies a usage type to be passed to the program that makes a filesystem on this partition. A usage type defines a variety of tuning parameters to be used when making a filesystem. For this option to work, the filesystem must support the concept of usage types and there must be a configuration file that lists valid types. For ext2, ext3, and ext4, this configuration file is /etc/mke2fs.conf.
--fstype= — Sets the file system type for the partition. Valid values are xfs, ext2, ext3, ext4, swap, vfat, and hfs.
--recommended — Determine the size of the partition automatically.
--onbiosdisk — Forces the partition to be created on a particular disk as discovered by the BIOS.
--encrypted — Specifies that this partition should be encrypted, using the passphrase provided in the --passphrase option. If you do not specify a passphrase, anaconda uses the default, system-wide passphrase set with the autopart --passphrase command, or stops the installation and prompts you to provide a passphrase if no default is set.
--passphrase= — Specifies the passphrase to use when encrypting this partition. You must use this option together with the --encrypted option; by itself it has no effect.
--escrowcert=URL_of_X.509_certificate — Store data encryption keys of all encrypted partitions as files in /root, encrypted using the X.509 certificate from the URL specified with URL_of_X.509_certificate. The keys are stored as a separate file for each encrypted partition. This option is only meaningful if --encrypted is specified.
--backuppassphrase= — Add a randomly-generated passphrase to each encrypted partition. Store these passphrases in separate files in /root, encrypted using the X.509 certificate specified with --escrowcert. This option is only meaningful if --escrowcert is specified.
--label= — assign a label to an individual partition.
Note
poweroff (optional) halt option is used as default.
poweroff option is equivalent to the shutdown -p command.
Note
poweroff option is highly dependent on the system hardware in use. Specifically, certain hardware components such as the BIOS, APM (advanced power management), and ACPI (advanced configuration and power interface) must be able to interact with the system kernel. Contact your manufacturer for more information on you system's APM/ACPI abilities.
halt, reboot, and shutdown kickstart options.
raid (optional) raid <mntpoint> --level=<level> --device=<mddevice> <partitions*>
/, the RAID level must be 1 unless a boot partition (/boot) is present. If a boot partition is present, the /boot partition must be level 1 and the root (/) partition can be any of the available types. The <partitions*> (which denotes that multiple partitions can be listed) lists the RAID identifiers to add to the RAID array.
--level= — RAID level to use (0, 1, or 5).
--device= — Name of the RAID device to use (such as md0 or md1). RAID devices range from md0 to md15, and each may only be used once.
--spares= — Specifies the number of spare drives allocated for the RAID array. Spare drives are used to rebuild the array in case of drive failure.
--grow= — Only supported for RAID0. Tells the RAID device to grow to fill available space (if any), or up to the maximum size setting.
--fsprofile — Specifies a usage type to be passed to the program that makes a filesystem on this partition. A usage type defines a variety of tuning parameters to be used when making a filesystem. For this option to work, the filesystem must support the concept of usage types and there must be a configuration file that lists valid types. For ext2, ext3, and ext4, this configuration file is /etc/mke2fs.conf.
--fstype= — Sets the file system type for the RAID array. Valid values are xfs, ext2, ext3, ext4, swap, vfat, and hfs.
--fsoptions= — Specifies a free form string of options to be used when mounting the filesystem. This string will be copied into the /etc/fstab file of the installed system and should be enclosed in quotes.
--noformat — Use an existing RAID device and do not format the RAID array.
--useexisting — Use an existing RAID device and reformat it.
--encrypted — Specifies that this RAID device should be encrypted, using the passphrase provided in the --passphrase option. If you do not specify a passphrase, anaconda uses the default, system-wide passphrase set with the autopart --passphrase command, or stops the installation and prompts you to provide a passphrase if no default is set.
--passphrase= — Specifies the passphrase to use when encrypting this RAID device. You must use this option together with the --encrypted option; by itself it has no effect.
--escrowcert=URL_of_X.509_certificate — Store the data encryption key for this device in a file in /root, encrypted using the X.509 certificate from the URL specified with URL_of_X.509_certificate. This option is only meaningful if --encrypted is specified.
--backuppassphrase= — Add a randomly-generated passphrase to this device. Store the passphrase in a file in /root, encrypted using the X.509 certificate specified with --escrowcert. This option is only meaningful if --escrowcert is specified.
/, and a RAID level 5 for /usr, assuming there are three SCSI disks on the system. It also creates three swap partitions, one on each drive.
part raid.01 --size=60 --ondisk=sda
part raid.02 --size=60 --ondisk=sdb
part raid.03 --size=60 --ondisk=sdc
part swap --size=128 --ondisk=sda
part swap --size=128 --ondisk=sdb
part swap --size=128 --ondisk=sdc
part raid.11 --size=1 --grow --ondisk=sda
part raid.12 --size=1 --grow --ondisk=sdb
part raid.13 --size=1 --grow --ondisk=sdc
raid / --level=1 --device=md0 raid.01 raid.02 raid.03
raid /usr --level=5 --device=md1 raid.11 raid.12 raid.13
raid in action, refer to Section 15.4.1, “Advanced Partitioning Example”.
realm (optional) realm join <options> <domain>
--client-software= — Only join realms that can run this client software. Valid values include sssd or winbind. Not all realms support all values. By default, the client software is chosen automatically.
--server-software= — Only join realms that can run this server software. Possible values include active-directory or freeipa.
--membership-software= — Use this software when joining the realm. Valid values include samba and adcli. Not all realms support all values. By default, the membership software is chosen automatically.
--one-time-password= — Join using a one-time password. This is not possible with all types of realm.
--no-password — Join automatically without a password.
--computer-ou OU= — provide the distinguished name of an organizational unit in order to create the computer account. The exact format of the distinguished name depends on the client software and membership software. The root DSE portion of the distinguished name can typically be left out.
reboot (optional) reboot option is equivalent to the shutdown -r command.
halt, poweroff, and shutdown kickstart options.
halt option is the default completion method if no other methods are explicitly specified in the kickstart file.
Note
reboot option may result in an endless installation loop, depending on the installation media and method.
repo (optional) repo --name=<repoid> [--baseurl=<url>| --mirrorlist=<url>]
--name= — The repo id. This option is required.
--baseurl= — The URL for the repository. The variables that may be used in yum repo config files are not supported here. You may use one of either this option or --mirrorlist, not both.
--mirrorlist= — The URL pointing at a list of mirrors for the repository. The variables that may be used in yum repo config files are not supported here. You may use one of either this option or --baseurl, not both.
--cost= — An integer value to assign a cost to this repository. If multiple repositories provide the same packages, this number will be used to prioritize which repository will be used before another. Repositories with a lower cost take priority over repositories with higher cost.
--excludepkgs= — A comma-separated list of package names and globs that must not be pulled from this repository. This is useful if multiple repositories provide the same package and you want to make sure it comes from a particular repository.
--include= — A comma-separated list of package names and globs that must be pulled from this repository. This is useful if multiple repositories provide the same package and you want to make sure it comes from this repository.
--proxy=[protocol://][username[:password]@]host[:port] — Specify an HTTP/HTTPS/FTP proxy to use just for this repository. This setting does not affect any other repositories, nor how the install.img is fetched on HTTP installs. The various parts of the argument act like you would expect.
--ignoregroups=true — This option is used when composing installation trees and has no effect on the installation process itself. It tells the compose tools to not look at the package group information when mirroring trees so as to avoid mirroring large amounts of unnecessary data.
--noverifyssl — For a https repo do not check the server's certificate with what well-known CA validate and do not check the server's hostname matches the certificate's domain name.
Important
rootpw (required) rootpw [--iscrypted|--allow-changes|--frozen] <password>
--iscrypted — If this is present, the password argument is assumed to already be encrypted.
--allow-changes — If this is present, the password argument can be changed with no additional actions required.
--frozen — If this is present, the password argument cannot be changed.
selinux (optional) selinux [--disabled|--enforcing|--permissive]
--enforcing — Enables SELinux with the default targeted policy being enforced.
Note
selinux option is not present in the kickstart file, SELinux is enabled and set to --enforcing by default.
--permissive — Outputs warnings based on the SELinux policy, but does not actually enforce the policy.
--disabled — Disables SELinux completely on the system.
services (optional) --disabled — Disable the services given in the comma separated list.
--enabled — Enable the services given in the comma separated list.
Do not include spaces in the list of services
services --disabled auditd, cups,smartd, nfslock
services --disabled auditd,cups,smartd,nfslock
shutdown (optional) halt option is used as default.
shutdown option is equivalent to the shutdown command.
halt, poweroff, and reboot kickstart options.
skipx (optional) Package selection might configure X
sshpw (optional) sshpw command to create temporary accounts through which to log on. Each instance of the command creates a separate account that exists only in the installation environment. These accounts are not transferred to the installed system.
sshpw --username=<name> <password> [--iscrypted|--plaintext] [--lock]
--username — Provides the name of the user. This option is required.
--iscrypted — Specifies that the password is already encrypted.
--plaintext — Specifies that the password is in plain text and not encrypted.
--lock — If this is present, the new user account is locked by default. That is, the user will not be able to login from the console.
Important — You must boot with sshd=1
ssh available during installation, boot the system with the kernel boot option sshd=1. Refer to Console, Environment and Display Options for details of how to specify this kernel option at boot time.
text (optional) Important
timezone (required) timezone [--utc] [--nontp] [--ntpservers=<server1>,<server2>,...,<serverN>] <timezone>
--utc — If present, the system assumes the hardware clock is set to UTC (Greenwich Mean) time.
--nontp — Disable the automatic activation of the NTP service.
--ntpservers= — Specify a list of NTP servers to be used, separated by commas without spaces.
upgrade (optional) user (optional) user --name=<username> [--groups=<list>] [--homedir=<homedir>] [--password=<password>] [--iscrypted] [--shell=<shell>] [--uid=<uid>]
--name= — Provides the name of the user. This option is required.
--groups= — In addition to the default group, a comma separated list of group names the user should belong to. The groups must exist before the user account is created.
--homedir= — The home directory for the user. If not provided, this defaults to /home/<username>.
--password= — The new user's password. If not provided, the account will be locked by default.
--iscrypted= — Is the password provided by --password already encrypted or not?
--shell= — The user's login shell. If not provided, this defaults to the system default.
--uid= — The user's UID. If not provided, this defaults to the next available non-system UID.
vnc (optional) vnc [--host=<hostname>] [--port=<port>] [--password=<password>]
--host= — Instead of starting a VNC server on the install machine, connect to the VNC viewer process listening on the given hostname.
--port= — Provide a port that the remote VNC viewer process is listening on. If not provided, anaconda will use the VNC default.
--password= — Set a password which must be provided to connect to the VNC session. This is optional, but recommended.
volgroup (optional) volgroup <name> <partition> <options>
--noformat — Use an existing volume group and do not format it.
--useexisting — Use an existing volume group and reformat it.
--pesize= — Set the size of the physical extents.
part pv.01 --size 3000
volgroup myvg pv.01
logvol / --vgname=myvg --size=2000 --name=rootvol
volgroup in action, refer to Section 15.4.1, “Advanced Partitioning Example”.
xconfig (optional) xconfig command, you must provide the X configuration manually during installation.
--driver — Specify the X driver to use for the video hardware.
--videoram= — Specifies the amount of video RAM the video card has.
--defaultdesktop= — Specify either GNOME or KDE to set the default desktop (assumes that GNOME Desktop Environment and/or KDE Desktop Environment has been installed through %packages).
--startxonboot — Use a graphical login on the installed system.
zerombr (optional) zerombr is specified any invalid partition tables found on disks are initialized. This destroys all of the contents of disks with invalid partition tables.
zerombr yes. This form is now deprecated; you should now simply specify zerombr in your kickstart file instead.
%include (optional)clearpart, raid, part, volgroup, and logvol kickstart options in action:
clearpart --drives=hda,hdc --initlabel
# Raid 1 IDE config
part raid.11    --size 1000     --asprimary     --ondrive=hda
part raid.12    --size 1000     --asprimary     --ondrive=hda
part raid.13    --size 2000     --asprimary     --ondrive=hda
part raid.14    --size 8000                     --ondrive=hda
part raid.15    --size 16384 --grow             --ondrive=hda
part raid.21    --size 1000     --asprimary     --ondrive=hdc
part raid.22    --size 1000     --asprimary     --ondrive=hdc
part raid.23    --size 2000     --asprimary     --ondrive=hdc
part raid.24    --size 8000                     --ondrive=hdc
part raid.25    --size 16384 --grow             --ondrive=hdc

# You can add --spares=x
raid /          --fstype ext3 --device md0 --level=RAID1 raid.11 raid.21
raid /safe      --fstype ext3 --device md1 --level=RAID1 raid.12 raid.22
raid swap       --fstype swap --device md2 --level=RAID1 raid.13 raid.23
raid /usr       --fstype ext3 --device md3 --level=RAID1 raid.14 raid.24
raid pv.01      --fstype ext3 --device md4 --level=RAID1 raid.15 raid.25

# LVM configuration so that we can resize /var and /usr/local later
volgroup sysvg pv.01
logvol /var             --vgname=sysvg  --size=8000     --name=var
logvol /var/freespace   --vgname=sysvg  --size=8000     --name=freespacetouse
logvol /usr/local       --vgname=sysvg  --size=1 --grow --name=usrlocal
Warning — do not install every available package
@Everything or simply * in the %packages section. However, using a kickstart file in this way will introduce package and file conflicts onto the installed system
%packages command to begin a kickstart file section that lists the packages you would like to install (this is for installations only, as package selection during upgrades is not supported).
variant/repodata/comps-*.xml file on the Fedora DVD for a list of groups; alternatively, you can use the yum grouplist hidden -v command to obtain a list of package groups if you have a working installation available already. Each group has an id, user visibility value, name, description, and package list. If the group is selected for installation, the packages marked mandatory in the package list are always installed, the packages marked default are installed if they are not specifically excluded elsewhere, and the packages marked optional must be specifically included elsewhere even when the group is selected.
@ symbol, a space, and then the full group name or group id as given in the comps.xml file or in the yum grouplist hidden -v command's output. For example:
%packages
@ X Window System
@ Desktop
@ Sound and Video
Core and Base groups are always selected by default, so it is not necessary to specify them in the %packages section.
sqlite
curl
aspell
docbook*
docbook* entry includes the packages docbook-dtds, docbook-simple, docbook-slides and others that match the pattern represented with the wildcard.
-@ Graphical Internet
-autofs
-ipa*fonts
* will introduce package and file conflicts onto the installed system. Packages known to cause such problems are assigned to the @Conflicts (variant) group, where variant is Client, ComputeNode, Server or Workstation. If you specify * in a kickstart file, be sure to exclude @Conflicts (variant) or the installation will fail:
*
-@Conflicts (Server)
Note that the Fedora Project does not support the use of
* in a kickstart file, even if you exclude @Conflicts (variant).
%packages option:
--nobase--ignoremissing%packages --ignoremissing
--multilibmultilib_policy in /etc/yum.conf to "all", so that all architectural variants of a package are installed. The default is "best", where yum only installs the most suitable architectural variant available.
--resolvedeps--ignoredepsks.cfg has been parsed. This section must be placed towards the end of the kickstart file, after the kickstart commands described in Section 15.4, “Kickstart Options”, and must start with the %pre command. If your kickstart file also includes a %post section, the order of the %pre and %post sections does not matter.
%pre section; however, name service has not been configured at this point, so only IP addresses work.
Note
--interpreter /usr/bin/python%pre section:
%pre
#!/bin/sh
hds=""
mymedia=""
for file in /proc/ide/h* do
	mymedia=`cat $file/media`
	if [ $mymedia == "disk" ] ; then
		hds="$hds `basename $file`"
	fi
done
set $hds
numhd=`echo $#`
drive1=`echo $hds | cut -d' ' -f1`
drive2=`echo $hds | cut -d' ' -f2`
#Write out partition scheme based on whether there are 1 or 2 hard drives
if [ $numhd == "2" ] ; then
	#2 drives
	echo "#partitioning scheme generated in %pre for 2 drives" > /tmp/part-include
	echo "clearpart --all" >> /tmp/part-include
	echo "part /boot --fstype ext3 --size 75 --ondisk hda" >> /tmp/part-include
	echo "part / --fstype ext3 --size 1 --grow --ondisk hda" >> /tmp/part-include
	echo "part swap --recommended --ondisk $drive1" >> /tmp/part-include
	echo "part /home --fstype ext3 --size 1 --grow --ondisk hdb" >> /tmp/part-include
else
	#1 drive
	echo "#partitioning scheme generated in %pre for 1 drive" > /tmp/part-include
	echo "clearpart --all" >> /tmp/part-include
	echo "part /boot --fstype ext3 --size 75" >> /tmp/part-include
	echo "part swap --recommended" >> /tmp/part-include
	echo "part / --fstype ext3 --size 2048" >> /tmp/part-include
	echo "part /home --fstype ext3 --size 2048 --grow" >> /tmp/part-include
fi
%include /tmp/part-include
Note
%post command. If your kickstart file also includes a %pre section, the order of the %pre and %post sections does not matter.
Note
%post section. If you configured the network for DHCP, the /etc/resolv.conf file has not been completed when the installation executes the %post section. You can access the network, but you can not resolve IP addresses. Thus, if you are using DHCP, you must specify IP addresses in the %post section.
Note
--nochroot/etc/resolv.conf to the file system that was just installed.
%post --nochroot
cp /etc/resolv.conf /mnt/sysimage/etc/resolv.conf
--interpreter /usr/bin/python--log /path/to/logfile--nochroot option. For example, without --nochroot:
%post --log=/root/ks-post.log
--nochroot:
%post --nochroot --log=/mnt/sysimage/root/ks-post.log
Example 15.1. Run a script named runme from an NFS share:
mkdir /mnt/temp
mount -o nolock 10.10.0.2:/usr/new-machines /mnt/temp
openvt -s -w -- /mnt/temp/runme
umount /mnt/temp
-o nolock is required when mounting an NFS mount.
ks.cfg and must be located in the top-level directory of the disc.
ks.cfg. Separate boot media will be required.
ks.cfg and must be located in the flash memory's top-level directory. Create the boot image first, and then copy the ks.cfg file.
Fedora-version-architecture-format.iso image file that you can download from the Fedora Project site at http://download.fedoraproject.org/.
Note
ks kernel boot option in the append line of a target in your pxelinux.cfg/default file to specify the location of a kickstart file on your network. The syntax of the ks option in a pxelinux.cfg/default file is identical to its syntax when used at the boot prompt. Refer to Section 15.10, “Starting a Kickstart Installation” for a description of the syntax and refer to Example 15.2, “Using the ks option in the pxelinux.cfg/default file” for an example of an append line.
dhcpd.conf file on the DHCP server is configured to point to /tftpboot/pxelinux.0 on the BOOTP server (whether on the same physical machine or not), systems configured to boot over the network can load the kickstart file and commence installation.
Example 15.2. Using the ks option in the pxelinux.cfg/default file
foo.ks is a kickstart file available on an NFS share at 192.168.0.200:/export/kickstart/, part of your pxelinux.cfg/default file might include:
label 1
  kernel Fedora20/vmlinuz
  append initrd=Fedora20/initrd.img ramdisk_size=10000 ks=nfs:192.168.0.200:/export/kickstart/foo.ks
ks command line argument is passed to the kernel.
dd option as well. For example, if installation requires a kickstart file on a local hard drive and also requires a driver disk, boot the system with:
linux ks=hd:partition:/path/ks.cfg dd
boot: prompt (where ks.cfg is the name of the kickstart file):
linux ks=cdrom:/ks.cfg
autostepdebugdddhcpclass=<class>dns=<dns>driverdiskexpertgateway=<gw>graphicalisaip=<ip>ipv6=auto, ipv6=dhcpauto to specify automatic neighbor discovery or dhcp for a stateful configuration with DHCPv6. You cannot specify a static IPv6 address.
keymap=<keymap>be-latin1 — Belgian
bg_bds-utf8 — Bulgarian
bg_pho-utf8 — Bulgarian (Phonetic)
br-abnt2 — Brazilian (ABNT2)
cf — French Canadian
croat — Croatian
cz-us-qwertz — Czech
cz-lat2 — Czech (qwerty)
de — German
de-latin1 — German (latin1)
de-latin1-nodeadkeys — German (latin1 without dead keys)
dvorak — Dvorak
dk — Danish
dk-latin1 — Danish (latin1)
es — Spanish
et — Estonian
fi — Finnish
fi-latin1 — Finnish (latin1)
fr — French
fr-latin9 — French (latin9)
fr-latin1 — French (latin1)
fr-pc — French (pc)
fr_CH — Swiss French
fr_CH-latin1 — Swiss French (latin1)
gr — Greek
hu — Hungarian
hu101 — Hungarian (101 key)
is-latin1 — Icelandic
it — Italian
it-ibm — Italian (IBM)
it2 — Italian (it2)
jp106 — Japanese
ko — Korean
la-latin1 — Latin American
mk-utf — Macedonian
nl — Dutch
no — Norwegian
pl2 — Polish
pt-latin1 — Portuguese
ro — Romanian
ru — Russian
sr-cy — Serbian
sr-latin — Serbian (latin)
sv-latin1 — Swedish
sg — Swiss German
sg-latin1 — Swiss German (latin1)
sk-qwerty — Slovak (qwerty)
slovene — Slovenian
trq — Turkish
uk — United Kingdom
ua-utf — Ukrainian
us-acentos — U.S. International
us — U.S. English
/usr/lib/python2.6/site-packages/system_config_keyboard/keyboard_models.py on 32-bit systems or /usr/lib64/python2.6/site-packages/system_config_keyboard/keyboard_models.py on 64-bit systems also contains this list and is part of the system-config-keyboard package.
ks=nfs:<server>:/<path>/mydir/ks.cfg, the correct boot command would be ks=nfs:server.example.com:/mydir/ks.cfg.
ks=http://<server>/<path>/mydir/ks.cfg, the correct boot command would be ks=http://server.example.com/mydir/ks.cfg.
ks=hd:<device>:/<file>ks=hd:sda3:/mydir/ks.cfg).
ks=bd:<biosdev>:/<path>ks=bd:80p3:/mydir/ks.cfg). Note this does not work for BIOS RAID sets.
ks=file:/<file>initrd image.
ks=cdrom:/<path>ksks is used alone, the installation program configures the Ethernet card to use DHCP. The kickstart file is read from NFS server specified by DHCP option server-name. The name of the kickstart file is one of the following:
/, the boot file provided by DHCP is looked for on the NFS server.
/, the boot file provided by DHCP is looked for in the /kickstart directory on the NFS server.
/kickstart/1.2.3.4-kickstart, where 1.2.3.4 is the numeric IP address of the machine being installed.
ksdevice=<device>eth0
00:12:34:56:78:9a
link, which specifies the first interface with its link in the up state
bootif, which uses the MAC address that pxelinux set in the BOOTIF variable. Set IPAPPEND 2 in your pxelinux.cfg file to have pxelinux set the BOOTIF variable.
ibft, which uses the MAC address of the interface specified by iBFT
ks=nfs:<server>:/<path> ksdevice=eth1 at the boot: prompt.
kssendmaclang=<lang>loglevel=<level>mediachecknetmask=<nm>nofallbacknofbnofirewirenoipv6This option is not available during PXE installations
nomountnonetnoparportnopassnopcmcianoprobenoshellrepo=cdromrepo=ftp://<path>repo=hd:<dev>:<path>repo=http://<path>repo=nfs:<path>rescueresolution=<mode>serialskipddcsyslog=<host>[:<port>]textImportant
updatesupdates=ftp://<path>updates=http://<path>upgradeany/etc/redhat-release file.
vncvncconnect=<host>[:<port>]vncpassword=<password>su - yum install system-config-kickstart or use your graphical package manager to install the software.
system-config-kickstart, or click → → on the GNOME desktop or + → → on the KDE desktop.
variant directory of the installation tree. For example, if the NFS server contains the directory /mirrors/redhat/i386/Server/, enter /mirrors/redhat/i386/ for the NFS directory.
variant directory. For example, if the FTP server contains the directory /mirrors/redhat/i386/Server/, enter /mirrors/redhat/i386/Server/ for the FTP directory. If the FTP server requires a username and password, specify them as well.
variant directory. For example, if the HTTP server contains the directory /mirrors/redhat/i386/Server/, enter /mirrors/redhat/i386/Server/ for the HTTP directory.
md5sum program as well as the linux rd.live.check boot option as discussed in Section 11.3.2, “Verifying Boot Media”. Enter the hard drive partition that contains the ISO images (for example, /dev/hda1) in the Hard Drive Partition text box. Enter the directory that contains the ISO images in the Hard Drive Directory text box.
/boot partition). Install the boot loader on the MBR if you plan to use it as your boot loader.
cdrecord by configuring hdd=ide-scsi as a kernel parameter (where hdd is the CD-ROM device).
root.
msdos for x86), select Initialize the disk label if you are installing on a brand new hard drive.
Note
anaconda and kickstart support Logical Volume Management (LVM), at present there is no mechanism for configuring this using the Kickstart Configurator.
/dev/hda), specify hda as the drive. Do not include /dev in the drive name.
/dev/hda1), specify hda1 as the partition. Do not include /dev in the partition name.
port:protocol. For example, to allow IMAP access through the firewall, specify imap:tcp. Numeric ports can also be specified explicitly; to allow UDP packets on port 1234 through the firewall, enter 1234:udp. To specify multiple ports, separate them with commas.
enforcing, permissive or disabled mode. Finer grained configuration is not possible at this time.
skipx option is written to the kickstart file.
%packages section of the kickstart file after you save it. Refer to Section 15.5, “Package Selection” for details.
/usr/bin/python2.6 can be specified for a Python script. This option corresponds to using %pre --interpreter /usr/bin/python2.6 in your kickstart file.
arping, awk, basename, bash, bunzip2, bzcat, cat, chattr, chgrp, chmod, chown, chroot, chvt, clear, cp, cpio, cut, date, dd, df, dirname, dmesg, du, e2fsck, e2label, echo, egrep, eject, env, expr, false, fdisk, fgrep, find, fsck, fsck.ext2, fsck.ext3, ftp, grep, gunzip, gzip, hdparm, head, hostname, hwclock, ifconfig, insmod, ip, ipcalc, kill, killall, less, ln, load_policy, login, losetup, ls, lsattr, lsmod, lvm, md5sum, mkdir, mke2fs, mkfs.ext2, mkfs.ext3, mknod, mkswap, mktemp, modprobe, more, mount, mt, mv, nslookup, openvt, pidof, ping, ps, pwd, readlink, rm, rmdir, rmmod, route, rpm, sed, sh, sha1sum, sleep, sort, swapoff, swapon, sync, tail, tar, tee, top, touch, true, tune2fs, umount, uniq, vconfig, vi, wc, wget, xargs, zcat.
Important
%pre command. It is added for you.
Note
Important
%post command. It is added for you.
%post section:
echo "Hackers will be punished" > /etc/motdNote
--nochroot option in the %post section.
/mnt/sysimage/.
echo "Hackers will be punished" > /mnt/sysimage/etc/motd/usr/bin/python2.2 can be specified for a Python script. This option corresponds to using %post --interpreter /usr/bin/python2.2 in your kickstart file.
yum utility. Type this command to begin a full update of your system with yum:
su -c 'yum update'root password when prompted.
yum.
Network Connection Required
yum utility. The update process downloads information and packages from a network of servers.
Important — Access to Software Repositories Might Be Required
root account:
su -yum groupinstall "X Window System" Desktopyum groupinstall "X Window System" "KDE Desktop"rm -f /etc/systemd/system/default.targetln -s /lib/systemd/system/graphical.target/etc/systemd/system/default.target
reboot command. Your system will restart and present a graphical login.
root account:
su -mkdir -p /path/to/repo/mnt/repo
cat /proc/sys/dev/cdrom/info. The first CD or DVD drive on the system is typically named sr0. When you know the device name, mount the DVD:
mount -r -t iso9660 /dev/device_name /path/to/repomount -r -t iso9660 /dev/sr0 /mnt/repo
mount -r -t iso9660 -o loop /path/to/image/file.iso /path/to/repomount -r -o loop /home/root/Downloads/Fedora20-Server-i386-DVD.iso /mnt/repo
/dev/sdb that is not automatically mounted at boot time and which has an image file stored in a directory named Downloads on its first partition:
mkdir /mnt/tempmount /dev/sdb1 /mnt/tempmkdir /mnt/repomount -r -t iso9660 -o loop /mnt/temp/Downloads/Fedora-20-i386-DVD.iso /mnt/repo
mount command to obtain a list of current mounts. If you are not sure of the device name or partition number of a storage device, run fdisk -l and try to identify it in the output.
/etc/yum.repos.d/ directory. The name of the file is not important, as long as it ends in .repo. For example, dvd.repo is an obvious choice.
vi /etc/yum.repos.d/dvd.repoinsert mode.
[dvd]
baseurl=file:///mnt/repo/Server
enabled=1
gpgcheck=1
gpgkey=file:///etc/pki/rpm-gpg/RPM-GPG-KEY-fedora-$basearch
[dvd]. The name is not important, but you should choose something that is meaningful and recognizable.
baseurl should contain the path to the mount point that you created previously.
insert mode.
:wq and press the Enter key to save the file and exit the vi text editor.
Security Announcements
Question and Answer style support with the Fedora community.
.rpmsave extension (for example, sendmail.cf.rpmsave). The upgrade process also creates a log of its actions in /var/log/fedup.log.
Warning
Note
Note
Make sure you have the latest version of fedup
yum update.
yum install fedup at the command line and press Enter.
sudo fedup --network 20sudo fedup --iso /path/to/isofile.iso sudo fedup --device /path/to/mountpoint fedup runs successfully without errors, reboot your system.
Note
/etc/fedora-release file have been changed from the default, your Fedora installation may not be found when attempting an upgrade to Fedora 20.
linux upgradeany
linux upgradeany command if your Fedora installation was not given as an option to upgrade.
yum repolist
yum-config-manager --disable <repo-name>
yum-config-manager --enable <repo-name>
/var/log/fedup.log. You can open this file in your favorite editor, or by executing the command less /var/log/fedup.log from a terminal. The file is large, but any problems will usually be towards the end.
/dev/sda. Install the GRUB binary to the drive's Master Boot Record with the following command:
grub2-install /dev/sda
grub2-mkconfig -o /boot/grub2/grub.cfg
grub2-mkconfig -o /boot/efi/EFI/fedora/grub.cfg
yum distro-sync
leaves.
leaves, use this command:
package-cleanup --leaves
orphans.
orphans, use this command:
package-cleanup --orphans
package-cleanup can also be used for duplicate packages and old kernels, and offers more options. Refer to man package-cleanup for more information.
Be careful when cleaning packages!
package-cleanup that you might use. For example, you might use a Python library in scripts you have written, but it may not have any packaged software that depends on it. Be sure that you do not need a package before you remove it. In most cases, it will do no harm to leave the package installed.
package-cleanup, but yum distro-sync should be used first.
SELinux policy changes are applied during package updates, the filesystem can be relabeled if required. If you experience more SELinux denials after an upgrade, or otherwise need to relabel the system, use the following command, then reboot the system. The relabel will take some time, so be patient.
touch /.autorelabel
restorecon utility. For example, this command can correct labels some files used by the squid caching proxy:
restorecon -R /var/cache/squid/
These instructions may destroy data!
Legacy versions of Microsoft operating systems
Warning
Warning
diskmgmt.msc and press Enter. The Disk Management tool opens.
NTFS and corresponds to your C: drive. At least two Fedora partitions will be visible. Windows will not display a file system type for these partitions, but may allocate drive letters to some of them.
unallocated.
Note
Extending an existing Windows partition
Note
diskpart and press Enter. A command window appears.
list volume and press Enter. Diskpart displays a list of the partitions on your system with a volume number, its drive letter, volume label, filesystem type, and size. Identify the Windows partition that you would like to use to occupy the space vacated on your hard drive by Fedora and take note of its volume number (for example, your Windows C: drive might be "Volume 0").
select volume N (where N is the volume number for the Windows partition that you want to extend) and press Enter. Now type extend and press Enter. Diskpart now extends your chosen partition to fill the remaining space on your hard drive. It will notify you when the operation is complete.
Adding a new Windows partition
Disk Management window, right-click on disk space that Windows labels as unallocated and select New Partition from the menu. The New Partition Wizard starts.
Press any key to boot from CDWelcome to Setup screen appears, you can start the Windows Recovery Console. The procedure is slightly different on different versions of Windows:
fixmbr and press the Enter. The fixmbr tool now restores the Master Boot Record for the system.
exit and press the Enter key.
Warning
diskmgmt.msc into the Start Search box and press Enter. The Disk Management tool opens.
NTFS and corresponds to your C: drive. At least two Fedora partitions will be visible. Windows will not display a file system type for these partitions, but may allocate drive letters to some of them.
unallocated.
Note
Extending an existing Windows partition
Adding a new Windows partition
Disk Management window, right-click on disk space that Windows labels as unallocated and select New Simple Volume from the menu. The New Simple Volume Wizard starts.
Press any key to boot from CD or DVDbootrec /fixmbr and press Enter.
You are not using Boot Camp on your computer
/Applications/Utilities.
You are using Boot Camp on your computer
/Applications/Utilities.
Procedure 19.1. Remove Fedora partitions
mount on a system where the root of the filesystem is on a standard partition such as /dev/sda2 might resemble:
/dev/sda2 on / type ext4 (rw)
proc on /proc type proc (rw)
sysfs on /sys type sysfs (rw)
devpts on /dev/pts type devpts (rw,gid=5,mode=620)
tmpfs on /dev/shm type tmpfs (rw,rootcontext="system_u:object_r:tmpfs_t:s0")
/dev/sda1 on /boot type ext4 (rw)
none on /proc/sys/fs/binfmt_misc type binfmt_misc (rw)
sunrpc on /var/lib/nfs/rpc_pipefs type rpc_pipefs (rw)
mount on a system where the root of the filesystem is on a logical volume might resemble:
/dev/mapper/VolGroup00-LogVol00 on / type ext4 (rw)
proc on /proc type proc (rw)
sysfs on /sys type sysfs (rw)
devpts on /dev/pts type devpts (rw,gid=5,mode=620)
tmpfs on /dev/shm type tmpfs (rw,rootcontext="system_u:object_r:tmpfs_t:s0")
/dev/sda1 on /boot type ext4 (rw)
none on /proc/sys/fs/binfmt_misc type binfmt_misc (rw)
sunrpc on /var/lib/nfs/rpc_pipefs type rpc_pipefs (rw)
umount command.
Remove Fedora entries from your bootloader
Example only
su - and press Enter. When the system prompts you for the root password, type the password and press Enter.
gedit etc/grub.d/10_linux and press Enter. This opens the 10_linux file in the gedit text editor.
10_linux file consists of four lines:
Example 19.1. Example Fedora entry in 10_linux
10_linux, each corresponding to a different version of the Linux kernel. Delete each of the Fedora entries from these files
10_linux file and close gedit.
gedit etc/default/grub and press Enter.
etc/default/grub contains a line that specifies the default operating system to boot, in the format default=N where N is a number equal to or greater than 0. If N is set to 0, GRUB will boot the first operating system in the list. If N is set to 1, it will boot the second operating system, and so forth. Alternatively, the default value can be the full menu entry.
default= line contains the number one below the number of your chosen default operating system in the list.
grub file and close gedit. If you have Fedora entries in the other script files in the /etc/grub.d directory, use this procedure to remove them in the same way.
Make space available to your operating system
Note
Note
If you do not use LVM
/dev/sda.
(parted) prompt, enter print. The parted tool displays information about the partitions on your system, including their partition numbers, their sizes, and their positions on the disk.
(parted) prompt, enter resize number start end, where number is the partition number, start is the location on the disk at which the partition begins, and end is the location on the disk at which you want the partition to end. Use the start position that you previously obtained with the print command, and refer to the parted documentation for different ways to specify the end parameter.
quit at the (parted) prompt.
e2fsck partition, where partition is the partition that you just resized. For example, if you just resized /dev/sda3, enter e2fsck /dev/sda3.
resize2fs partition at a command line and press Enter, where partition is the partition that you just resized. For example, if you just resized /dev/sda3, type resize2fs /dev/sda3.
If you use LVM
Create a new partition in the free space on the disk
/dev/sda.
Command (m for help):, enter n to create a new partition. Refer to the fdisk documentation for options.
Change the partition type identifier
Command (m for help):, enter t to change a partition type.
Partition number (1-4):, type the number of the partition that you just created. For example, if you just created partition /dev/sda3, type the number 3 and press Enter. This identifies the partition whose type fdisk will change.
Hex code (type L to list codes):, enter 8e to create a Linux LVM partition.
Command (m for help):, enter w to write the changes to disk and exit fdisk.
Expand the volume group
lvm and press Enter to start the lvm2 tool.
lvm> prompt, type pvcreate partition and press Enter, where partition is the partition that you recently created. For example, pvcreate /dev/sda3. This creates /dev/sda3 as a physical volume in LVM.
lvm> prompt, type vgextend VolumeGroup partition and press Enter, where VolumeGroup is the LVM volume group on which Linux is installed and partition is the partition that you recently created. For example, if Linux is installed on /dev/VolumeGroup00, you would type vgextend /dev/VolumeGroup00 /dev/sda3 to extend that volume group to include the physical volume at /dev/sda3.
lvm> prompt, type lvextend -l +100%FREE LogVol and press Enter, where LogVol is the logical volume that contains your Linux filesystem. For example, to extend LogVol00 to fill the newly-available space in its volume group, VolGroup00, type lvextend -l +100%FREE /dev/VolGroup00/LogVol00.
lvm> prompt, type exit and press Enter to exit lvm2
e2fsck LogVol at the command line and press Enter, where LogVol is the logical volume that you just resized. For example, if you just resized /dev/VolumeGroup00/LogVol00, you would type e2fsck /dev/VolumeGroup00/LogVol00.
resize2fs LogVol at a command line and press Enter, where LogVol is the partition that you just resized. For example, if you just resized /dev/VolumeGroup00/LogVol00, you would type resize2fs /dev/VolumeGroup00/LogVol00.
fdisk utility to create a new MBR with the undocumented flag /mbr. This ONLY rewrites the MBR to boot the primary DOS partition. The command should look like the following:
fdisk /mbrfdisk, you will experience the Partitions exist but they do not exist problem. The best way to remove non-DOS partitions is with a tool that understands partitions other than DOS.
linux rescue. This starts the rescue mode program.
list-harddrives. This command lists all hard drives on your system that are recognizable by the installation program, as well as their sizes in megabytes.
Warning
parted. Start parted, where /dev/hda is the device on which to remove the partition:
parted /dev/hda
print command, view the current partition table to determine the minor number of the partition to remove:
print command also displays the partition's type (such as linux-swap, ext2, ext3, ext4 and so on). Knowing the type of the partition helps you in determining whether to remove the partition.
rm. For example, to remove the partition with minor number 3:
rm 3
Important
print command to confirm that it is removed from the partition table.
quit to quit parted.
parted, type exit at the boot prompt to exit rescue mode and reboot your system, instead of continuing with the installation. The system should reboot automatically. If it does not, you can reboot your computer using Control+Alt+Delete .
Table of Contents
/etc/crypttab/etc/fstabNote
Note
Table A.1. Partition Types
| Partition Type | Value | Partition Type | Value |
|---|---|---|---|
| Empty | 00 | Novell Netware 386 | 65 |
| DOS 12-bit FAT | 01 | PIC/IX | 75 |
| XENIX root | 02 | Old MINIX | 80 |
| XENIX usr | 03 | Linux/MINUX | 81 |
| DOS 16-bit <=32M | 04 | Linux swap | 82 |
| Extended | 05 | Linux native | 83 |
| DOS 16-bit >=32 | 06 | Linux extended | 85 |
| OS/2 HPFS | 07 | Amoeba | 93 |
| AIX | 08 | Amoeba BBT | 94 |
| AIX bootable | 09 | BSD/386 | a5 |
| OS/2 Boot Manager | 0a | OpenBSD | a6 |
| Win95 FAT32 | 0b | NEXTSTEP | a7 |
| Win95 FAT32 (LBA) | 0c | BSDI fs | b7 |
| Win95 FAT16 (LBA) | 0e | BSDI swap | b8 |
| Win95 Extended (LBA) | 0f | Syrinx | c7 |
| Venix 80286 | 40 | CP/M | db |
| Novell | 51 | DOS access | e1 |
| PReP Boot | 41 | DOS R/O | e3 |
| GNU HURD | 63 | DOS secondary | f2 |
| Novell Netware 286 | 64 | BBT | ff |
Note
Warning
Warning
Note
parted utility. This is a freely available program that can resize partitions.
parted, it is important that you be familiar with disk storage and that you perform a backup of your computer data. You should make two copies of all the important data on your computer. These copies should be to removable media (such as tape, CD-ROM, or diskettes), and you should make sure they are readable before proceeding.
parted, be aware that after parted runs you are left with two partitions: the one you resized, and the one parted created out of the newly freed space. If your goal is to use that space to install Fedora, you should delete the newly created partition, either by using the partitioning utility under your current operating system or while setting up partitions during installation.
/dev/xxyN.
/dev//dev/.
xxhd (for IDE disks) or sd (for SCSI disks).
y/dev/hda (the first IDE hard disk) or /dev/sdb (the second SCSI disk).
N1 through 4. Logical partitions start at 5. So, for example, /dev/hda3 is the third primary or extended partition on the first IDE hard disk, and /dev/sdb6 is the second logical partition on the second SCSI hard disk.
Note
/dev/hda5 is mounted on /usr/, that would mean that all files and directories under /usr/ physically reside on /dev/hda5. So the file /usr/share/doc/FAQ/txt/Linux-FAQ would be stored on /dev/hda5, while the file /etc/gdm/custom.conf would not.
/usr/ would be mount points for other partitions. For instance, a partition (say, /dev/hda7) could be mounted on /usr/local/, meaning that /usr/local/man/whatis would then reside on /dev/hda7 rather than /dev/hda5.
swap, /boot/, and / (root).
/ so that the system will automatically log in to them when it starts. If / is placed on an iSCSI target, initrd will log into this target and anaconda does not include this target in start up scripts to avoid multiple attempts to log into the same target.
/ is placed on an iSCSI target, anaconda sets NetworkManager to ignore any network interfaces that were active during the installation process. These interfaces will also be configured by initrd when the system starts. If NetworkManager were to reconfigure these interfaces, the system would lose its connection to /.
/ (if any). This is done using the iscsistart utility (which can do this without requiring iscsid to run).
/, or if any targets in the iSCSI database are marked to be logged in to automatically.
/etc/NetworkManager/dispatcher.d/04-iscsi
Important
/usr, you cannot use it to configure network access if /usr is on network-attached storage such as an iSCSI target.
dm-crypt module. This arrangement provides a low-level mapping that handles encryption and decryption of the device's data. User-level operations, such as creating and accessing encrypted devices, are accomplished through the use of the cryptsetup utility.
swap devices.
Tip
Tip
Tip
kickstart to set a separate passphrase for each new encrypted block device.
--escrowcert parameter to any of the autopart, logvol, part or raid commands. During installation, the encryption keys for the specified devices are saved in files in /root, encrypted with the certificate.
--escrowcert parameter as described in Section C.3.2, “Saving Passphrases”, followed by the --backuppassphrase parameter for each of the kickstart commands that relate to the devices for which you want to create backup passphrases.
parted, pvcreate, lvcreate and mdadm.
/dev/sda3) with random data before encrypting it greatly increases the strength of the encryption. The downside is that it can take a very long time.
Warning
dd if=/dev/urandom of=<device>
badblocks -c 10240 -s -w -t random -v <device>
Warning
cryptsetup luksFormat <device>
Note
cryptsetup(8) man page.
cryptsetup isLuks <device> && echo Success
cryptsetup luksDump <device>
device-mapper.
/dev/sda3), is guaranteed to remain constant as long as the LUKS header remains intact. To find a LUKS device's UUID, run the following command:
cryptsetup luksUUID <device>
luks-<uuid>, where <uuid> is replaced with the device's LUKS UUID (eg: luks-50ec957a-5b5a-47ee-85e6-f8085bbc97a8). This naming convention might seem unwieldy but is it not necessary to type it often.
cryptsetup luksOpen <device> <name>
/dev/mapper/<name>, which represents the decrypted device. This block device can be read from and written to like any other unencrypted block device.
dmsetup info <name>
Tip
dmsetup(8) man page.
/dev/mapper/<name>) as any other block device. To create an ext2 filesystem on the mapped device, use the following command:
mke2fs /dev/mapper/<name>
/mnt/test, use the following command:
Important
/mnt/test must exist before executing this command.
mount /dev/mapper/<name> /mnt/test
/etc/crypttab/etc/crypttab file. If the file doesn't exist, create it and change the owner and group to root (root:root) and change the mode to 0744. Add a line to the file with the following format:
<name> <device> none
cryptsetup luksUUID <device>. This ensures the correct device will be identified and used even if the device node (eg: /dev/sda5) changes.
Tip
/etc/crypttab file, read the crypttab(5) man page.
/etc/fstab/dev/mapper/<name> in the /etc/fstab file.
/etc/fstab by UUID or by a filesystem label. The main purpose of this is to provide a constant identifier in the event that the device name (eg: /dev/sda4) changes. LUKS device names in the form of /dev/mapper/luks-<luks_uuid> are based only on the device's LUKS UUID, and are therefore guaranteed to remain constant. This fact makes them suitable for use in /etc/fstab.
Title
/etc/fstab file, read the fstab(5) man page.
$HOME/keyfile.
		dd if=/dev/urandom of=$HOME/keyfile bs=32 count=1
		chmod 600 $HOME/keyfile
cryptsetup luksAddKey <device> ~/keyfile
cryptsetup luksAddKey <device>
cryptsetup luksRemoveKey <device>
ext4, and a mount point.
LVM and the Default Partition Layout
/ and swap partitions within LVM volumes, with a separate /boot partition.
/tmp directory. After the installation, the files can be found in the /var/log/anaconda directory. Another set of logs is stored in in the /root directory of the target filesystem, and can be found at /mnt/sysimage/root during the installation. Some logs are also written to the virtual terminals.
Table E.1. anaconda log files
| Logs in /tmp, /var/log/anaconda | ||
|---|---|---|
| Filename | TTY | Usage |
anaconda.log | /dev/tty3 | General installation information, including the step changes. |
storage.log | /dev/tty3 | Detection and manipulation of storage devices, including RAID, LVM, and partitioning actions. |
program.log | Calls to external programs, and their output. | |
syslog | /dev/tty4 | Messages from the kernel and external programs, such as NetworkManager. |
yum.log | Yum's internal log. | |
| Logs in /root, /mnt/sysimage/root | |
|---|---|
| Filename | Usage |
install.log | The log of the package installation process |
install.log.syslog | Messages from installation chroot logged through the system's syslog. Mostly information about users and groups created during yum's package installation. |
virtio virtio char device, logs are forwarded early in the installation and in real time. Anaconda will automatically use the port /dev/virtio-ports/org.fedoraproject.anaconda.log.0 if available.
virtio logging with virt-install virtio, use the --channel option:
--channel tcp,host=127.0.0.1:6080,mode=connect,target_type=virtio,name=org.fedoraproject.anaconda.log.0
virtio log channel with virsh edit Procedure E.1. Adding a log channel with virsh
virsh list --all
virsh edit new-fedora-guest
<devices> section:
<channel type='tcp'>
  <source mode='connect' host='127.0.0.1' service='6080'/>
  <target type='virtio' name='org.fedoraproject.anaconda.log.0'/>
</channel>
virtio logs
eval `analog -p 6080 -o rsyslogd.conf -s /path/to/logdir`
Or, view the raw logs using nc
nc -l 0.0.0.0 6080
tcp logging, but separate rsyslog instances must be used if logging by both methods.
anaconda and Fedora systems use a common set of software components. For detailed information on key technologies, refer to the Web sites listed below:
parted to partition disks. Refer to http://www.gnu.org/software/parted/ for more information.
Xorg suite to provide graphical capabilities. Components of Xorg manage the display, keyboard and mouse for the desktop environments that users interact with. Refer to http://www.x.org/ for more information.
anaconda include VNC (Virtual Network Computing) software to enable remote access to graphical displays. For more information about VNC, refer to the documentation on the RealVNC Web site: http://www.realvnc.com/documentation.html.
bash shell to provide a command-line interface. The GNU Core Utilities complete the command-line environment. Refer to http://www.gnu.org/software/bash/bash.html for more information on bash. To learn more about the GNU Core Utilities, refer to http://www.gnu.org/software/coreutils/.
anaconda may use the scp feature of OpenSSH to transfer crash reports to remote systems. Refer to the OpenSSH Web site for more information: http://www.openssh.com/.
netfilter framework to provide firewall features. The Netfilter project website provides documentation for both netfilter, and the iptables administration facilities: http://netfilter.org/documentation/index.html.
yum to manage the RPM packages that make up the system. Refer to http://docs.fedoraproject.org/yum/ for more information.
| Revision History | |||
|---|---|---|---|
| Revision 1.0-0 | Tue Dec 17 2013 | ||
| |||