Product SiteDocumentation Site

Chapter 8. Import book into Drupal

8.1. How to build a CSV file for Drupal import
8.2. The publican.cfg file
8.3. Drupal Import Guide
8.3.1. How to add a menu block
8.3.2. Setting up Node import
8.3.3. How to import book
8.3.4. How to update book
Publican 3.1 has a new functionality which allow user to create and import a book into Drupal. All xml files in a book are transformed into a single CSV file which will later be used to import into Drupal.

8.1. How to build a CSV file for Drupal import

The CSV File consists of information that tells Drupal how to import the book. Each row in the CSV file represents a html page.
Use the $ publican build command to create the CSV file for Drupal import. Before running the command, use the cd command to change into the directory where your book is located. For example, if you have a book call "User_Guide" in your home directory, then run the following command.
$ cd User_Guide/
$ publican build --langs en-US --formats=drupal-book
After running the command, you will see CSV file is created in the tmp/en-US/drupal-book/ directory.
Publican stores all the output files in /tmp/en-US/drupal-book/ directory. This directory contains the following files:
  • CSV file - The naming convention of the file is $product-$version-$docname-$lang-$edition.csv
  • en-US directory - contains all the html images.
  • tar.gz file - the archive of both CSV file and en-US directory.

Important — Use version control system

After running the $ publican build --langs en-US --formats=drupal-book command, you will notice that the xml files in the en-US directory had been changed. This is because Publican added a 'Conformance' attribute for every xml tag that has id. This attribute contains a number which is unique across xml files in the book. If you are using a version control system like git for your xml files, then you need to commit the changes so that the number won't get reset when other users run it. These unique numbers are very important, because they are use as the url path in drupal. Besides, Publican also created a database file name max_unique_id.db in the en-US directory. This database file is use to track the current maximum unique number in the book, so that Publican can know where you are up to and add a new unique number for your newly created Chapter or Section. Therefore, it is very important to add the database file to the version control and commit it if there is any change. If you add a new section in the xml, don't set the 'Comformance' attribute yourself as that will make the database outdated. Just leave it for publican to set it.

8.2. The publican.cfg file

Below are some parameters that can be configure in the publican.cfg file for Drupal import:
drupal_author
specfies the author who should be shown in drupal book page. The name must be a valid Drupal username. 'Redhat' is the default author. Set this parameter in the publican.cfg file to override it.

Important — Setting Author

The author must have permission to manage (create, update, delete) nodes in Drupal. If the default author is used, make sure you had created an account with username 'Redhat' in Drupal.
drupal_menu_title
override the bookname that will be shown in the Drupal menu. If nothing is set, publican will use the default value which is "$product $version $docname". For example, Publican 3.1 User_Guide.
drupal_menu_block
specfies which menu block the book should show in Drupal. The default value is "user-guide".

Important — Setting menu block

The menu block must exist in Drupal. For more information about adding a menu block in Drupal. Please refer to Section 8.3.1, “How to add a menu block”.
drupal_image_path
specfies the directory where the images should be stored in drupal server. The default value is "sites/default/files/".

8.3. Drupal Import Guide

Before you can import a book, you need to install a module call 'Node Import' in Drupal. This module allows Drupal to import and update content from CSV or TSV files. To install this module, simply go to drupal site and follow the instructions on the website to download it. Once this is done, then you need to copy the downloaded module to the 'modules' directory on the Drupal server. For example if your Drupal is located in 
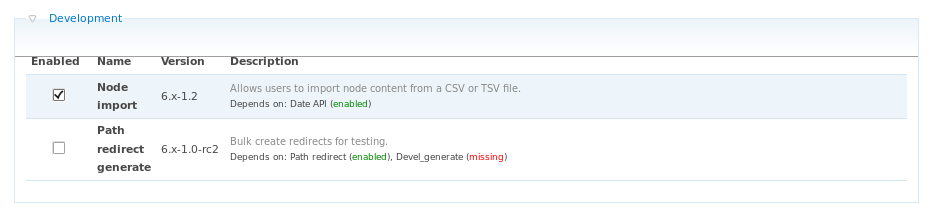
/var/www/html/drupal/ directory, then you should copy the module to /var/www/html/drupal/sites/all/modules/ directory. To enable the installed module, login to the Drupal site and go to Administer -> Site building -> Modules . In the Development section, tick the checkbox and click Save configuration button to activate the Node Import Module.

Important — Enable Drupal Core Modules

You also need to enable the following Drupal core modules:
  • Book
  • Menu
  • Path

Permission to install Module

Please consult your web adminstrator if you don't have permission to install module in drupal.

8.3.1. How to add a menu block

You can specify which menu the book should be showing in Drupal. If the specified menu block doesn't exist, Drupal will throw all the imported contents in the primary link. Therefore, if you wish to list your book in a menu block, make sure you create one before importing the book. To add a new menu block, simply login to your Drupal site and go to Administer -> Menus -> Add menu .
  • Menu name - The unique name for the menu. This is the value that you should set for the 
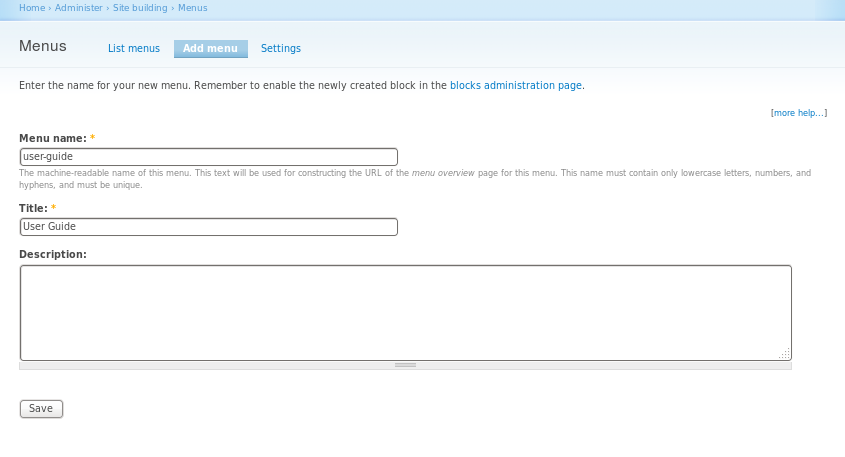
drupal_menu_block parameter in publican.cfg.
  • Title - The title of the menu. It will be displayed on top of the menu block.

8.3.2. Setting up Node import

  • Import directory - Where the CSV files to be imported are stored. The default path is 
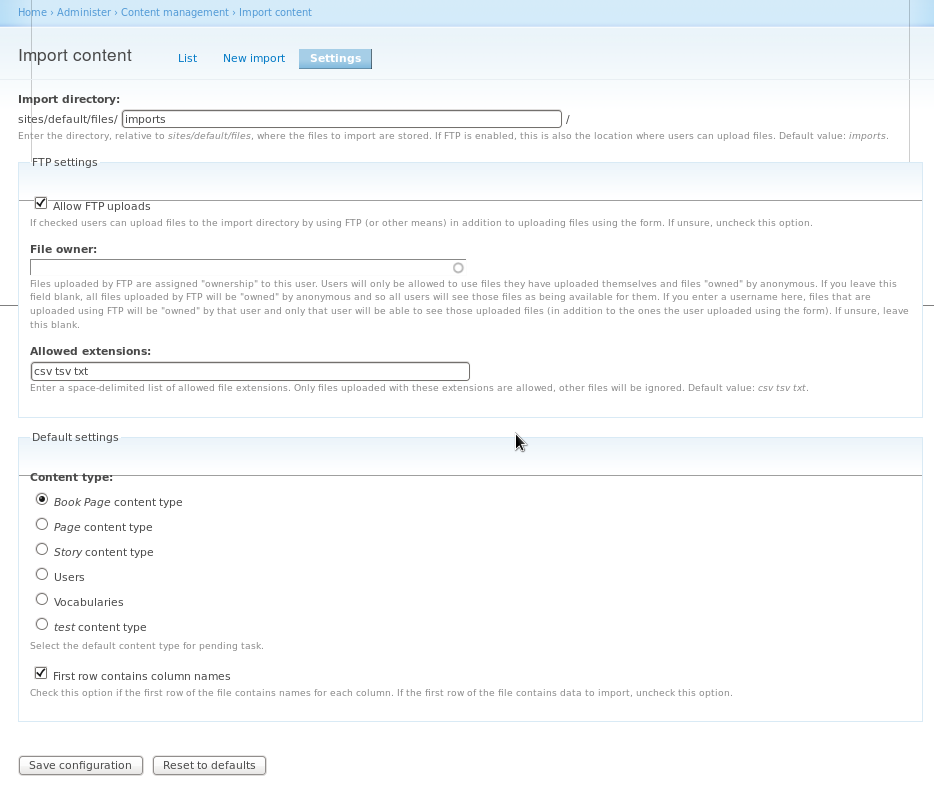
sites/default/files/imports/ .
  • FTP settings
    • Allow FTP uploads - Make sure the checkbox is checked, so that the new CSV file can be auto-detected when it is uploaded into the import directory.
    • File owner - The CSV file that you uploaded to the import directory will be assigned ownership to this user.

      Important — File Ownership

      Users will only be allowed to use files they have uploaded themselves and files owned by anonymous. If you leave this field blank, all files uploaded by FTP will be owned by anonymous and so all users will see those files as being available for them. If you enter a username here, files that are uploaded using FTP will be owned by that user and only that user will be able to see those uploaded files. It is recommended to leave this field blank.
  • Allowed extensions - The allowed import file's extension. Other extensions will be ignore by the module.
  • Default settings
    • Content type - The default content type that will be used for quick import. Make sure the Book Page content type is checked.
    • First row contains column names - This tells the node import module that the first row of the csv file is the headers.

8.3.3. How to import book

Procedure 8.1. To import book into Drupal:

  1. Upload the CSV file to import Directory in the Drupal Server
  2. Upload en-US directory to the "sites/default/files/" directory in the Drupal server. This value can be overriden in the publican.cfg. For more details, please read Section 8.2, “The publican.cfg file”
  3. Login to the Drupal website, and go to Administer -> Content management -> Import content. You will see the CSV file that you just uploaded is showing in the 'Pending Tasks" table and it is ready to import.
  4. Click Import now to start importing book. You will be redirect to the next page which is showing the import progress. When the progress bar hit 100%, that means the import is done!
  5. The book link should be showing in the specified menu block now.

8.3.4. How to update book

Simply repeat the steps in Section 8.3.3, “How to import book” to update the book.

Warning — Section Chunking

If you update the book with smaller chunks, than the missing chunks will be deleted by Drupal and the URL path for the deleted chunks will be deleted as well.