

Edition 16.9.1
Abstract
JACK ConnectionsMono-spaced Bold
To see the contents of the filemy_next_bestselling_novelin your current working directory, enter thecat my_next_bestselling_novelcommand at the shell prompt and press Enter to execute the command.
Press Enter to execute the command.Press Ctrl+Alt+F2 to switch to a virtual terminal.
mono-spaced bold. For example:
File-related classes includefilesystemfor file systems,filefor files, anddirfor directories. Each class has its own associated set of permissions.
Choose → → from the main menu bar to launch Mouse Preferences. In the Buttons tab, select the Left-handed mouse check box and click to switch the primary mouse button from the left to the right (making the mouse suitable for use in the left hand).To insert a special character into a gedit file, choose → → from the main menu bar. Next, choose → from the Character Map menu bar, type the name of the character in the Search field and click . The character you sought will be highlighted in the Character Table. Double-click this highlighted character to place it in the Text to copy field and then click the button. Now switch back to your document and choose → from the gedit menu bar.
Mono-spaced Bold Italic or Proportional Bold Italic
To connect to a remote machine using ssh, typessh username@domain.nameat a shell prompt. If the remote machine isexample.comand your username on that machine is john, typessh john@example.com.Themount -o remount file-systemcommand remounts the named file system. For example, to remount the/homefile system, the command ismount -o remount /home.To see the version of a currently installed package, use therpm -q packagecommand. It will return a result as follows:package-version-release.
Publican is a DocBook publishing system.
mono-spaced roman and presented thus:
books        Desktop   documentation  drafts  mss    photos   stuff  svn
books_tests  Desktop1  downloads      images  notes  scripts  svgs
mono-spaced roman but add syntax highlighting as follows:
package org.jboss.book.jca.ex1;
import javax.naming.InitialContext;
public class ExClient
{
public static void main(String args[])
throws Exception
{
InitialContext iniCtx = new InitialContext();
Object ref = iniCtx.lookup("EchoBean");
EchoHome home = (EchoHome) ref;
Echo echo = home.create();
System.out.println("Created Echo");
System.out.println("Echo.echo('Hello') = " + echo.echo("Hello"));
}
}Note
Important
Warning
Fedora Documentation and the component musicians-guide. The following link automatically loads this information for you: http://bugzilla.redhat.com/.
Summary field.
Description field and give us the details of the error or suggestion as specifically as you can. If possible, include some surrounding text so we know where the error occurs or the suggestion fits.
Document URL:


Section number and name:


Error or suggestion:


Additional information:
Table of Contents
pcm.svg, available from http://commons.wikimedia.org/wiki/File:Pcm.svg
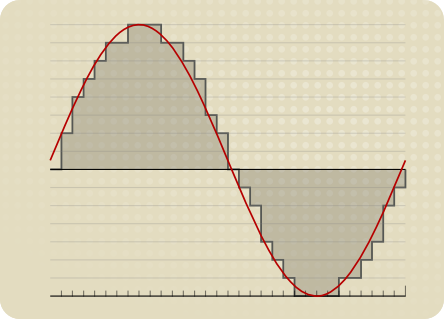
Figure 1.1. A waveform approximated by computer
JACK Audio Connection Kit is used for audio routing. JACK-aware applications (and PulseAudio ones, if so configured) provide inputs and outputs to the JACK server, depending on their configuration. The QjackCtl application can adjust the default connections. You can easily reroute the output of a program like FluidSynth so that it can be recorded by Ardour, for example, by using QjackCtl.
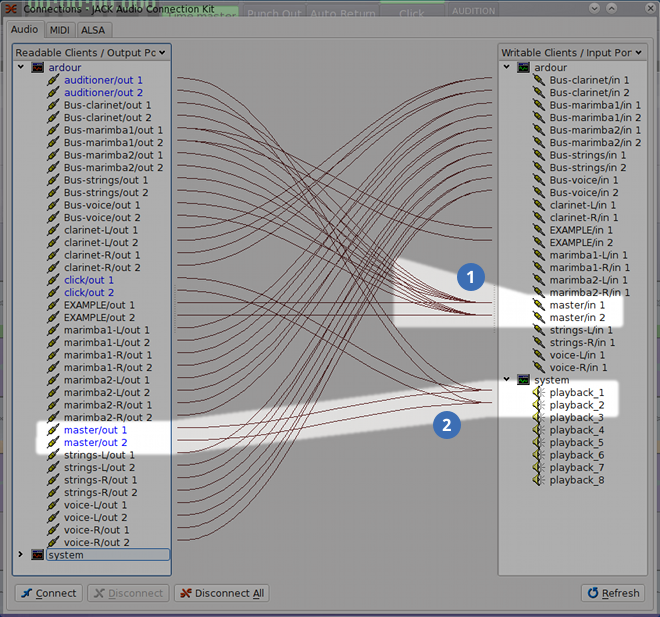
Figure 1.6. Routing and multiplexing
PulseAudio is an advanced sound server, intended to make audio programming in Linux operating systems as easy as possible. The idea behind its design is that an audio application needs only to output audio to PulseAudio. PulseAudio will take care of the rest: choosing and controlling a particular device, adjusting the volume, working with other applications, and so on. PulseAudio even has the ability to use "networked sound," which allows two computers using PulseAudio to communicate as though they were one computer - either computer can input from or output to either computer's audio hardware just as easily as its own audio hardware. This is all controlled within PulseAudio, so no further complication is added to the software.
PulseAudio as a vital part of the operating system has helped to ensure that audio applications can "just work" for most people under most circumstances. This has made it much easier for users to carry out basic audio tasks.
JACK Audio Connection KitJACK sound server offers fewer features than other sound servers but it is tailor-made to allow the functionality required by audio creation applications. JACK also makes it easier for users to configure the options that are most important for such situations. The server supports only one sample rate and format at a time, and allows applications and hardware to easily connect and multiplex in ways that other sound servers do not (see Section 1.4.7, “Routing and Multiplexing” for information about routing and multiplexing). It is also optimized to run with consistently low latencies. Although using JACK requires a better understanding of the underlying hardware, the QjackCtl application provides a graphical user interface to ease the process.
PulseAudio, but on other platforms (like Mac OS X, Windows, other versions of Linux, FreeBSD, and any other system that supports KDE), Phonon can be configured to feed its output anywhere. This is its greatest strength - that KDE applications like Amarok and Dragon Player need only be programmed to use Phonon, and they can rely on Phonon to take care of everything else. As KDE applications increasingly find their place in Windows and especially Mac OS X, this cross-platform capability is turning out to be very useful.
JACK Audio Connection KitJACKJACK server click . To stop the JACK server click .
Important
JACK operates with special real-time privileges. You must add all JACK users to the jackuser group. Learn how to add users to groups in Chapter 22, Users and Groups of the Fedora Deployment Guide, available at http://docs.fedoraproject.org. Do not add a user to the jackuser group if they will not use JACK.
JACK to use the 'default' sound card. The 'default' sound card uses all features of the ALSA driver even though JACK provides the same features. To save memory and processor time, you should configure QjackCtl with a specific sound card.
cat /proc/asound/cards
0 [SB             ]: HDA-Intel - HDA ATI SB
                  HDA ATI SB at 0xf7ff4000 irq 16
1 [MobilePre      ]: USB-Audio - MobilePre
                  M Audio MobilePre at usb-0000:00:13.0-2
In this example output, the square brackets surround the name of the sound card. The names of the sound cards in this example output are SB and MobilePre.
hw:MobilePre.
JACK, restart QjackCtl.
PulseAudio with JACKPulseAudio yields control of your computer's audio and MIDI interfaces to JACK when the JACK server starts. PulseAudio will not receive input or send output on an audio interface that JACK is using. You may want to use JACK and PulseAudio at the same time, or switch between them frequently. Follow these instructions to configure PulseAudio so its input and output is routed through JACK, so you can use both sound servers at the same time.
PulseAudio configuration file to use the JACK module.
Use Your Text Editor with Caution
/etc/pulse/default.pa with superuser privileges. For example, run this command in a terminal window: su -c 'nano /etc/pulse/default.pa'
#load-module module-alsa-sink:
load-module module-jack-sink
load-module module-jack-source
PulseAudio: killall pulseaudio PulseAudio restarts automatically.
JACK is "Active."
PulseAudio devices on each side. Ensure the PulseAudio devices are connected to "system" devices on opposite sides.
JACK server every time the program quits, even though PulseAudio is still using it.
PulseAudio starts JACK, it uses the command found in the ~/.jackdrc file. QjackCtl automatically updates this file when you change settings, but you may have to restart both PulseAudio and JACK for new changes to take effect. You may also edit that file yourself.
su -c 'yum install planetccrma-core' Note that this is a meta-package, which does not install anything by itself, but causes a number of other packages to be installed, which will themselves perform the desired installation and optimization.
yum (the command-line tool used by PackageKit and Apper) that you want to use Planet CCRMA at Home. After you install the "Planet CCRMA at Home" repository, you can install Planet CCRMA software the same way as Fedora software.
Note
Yum automatically installs the correct packages.
yum.
su -c 'yum localinstall http://ccrma.stanford.edu/planetccrma/mirror/fedora/linux/\planetccrma/16/i386/planetccrma-repo-1.1-3.fc16.ccrma.noarch.rpm
yum installs the package with the highest version number, regardless of the repository. You can change yum to install packages from a specific repository, even when another repository has a higher version number.
Warning
yum to not install security updates and accidentally leave your computer vulnerable to attack.
/etc/yum/pluginconf.d/priorities.conf exists, and contains the following text: enabled = 1. If you want to stop using the plugin, you can edit this file so it contains enabled = 0. This does not affect the priorities set in the repository configuration files.
/etc/yum.repos.d/* directory, adding a line like: priority = N where N is a number between 1 and 99, inclusive. A priority of 1 is the highest setting, and 99 is the lowest. You will need to set priorities of at least two repositories before this becomes useful.
yum installs the latest version of packages. You can change yum to not update certain packages, even when a newer version is available.
Warning
yum to not install an important security update, and leave your computer vulnerable to attack.
yum to install packages from a specific repository, even when they are available from another repository, see Section 4.3.2, “Set Repository Priorities” for more appropriate instructions.
cat or less command to verify that /etc/yum/pluginconf.d/versionlock.conf exists, and contains the following text: enabled = 1 If you want to stop using the plugin, you can edit this file so it contains enabled = 0.
/etc/yum/pluginconf.d/versionlock.list. Each package should go on its own line. For example:
jack-audio-connect-kit-1.9.4
qjackctl-0.3.6
Table of Contents
JACK ConnectionsJACK” to install JACK. We recommend using Audacity without JACK, but JACK is installed whether or not you use it.
/usr/share/sounds/alsa/Noise.wav file. This file is designed for testing audio equipment.
cat /proc/asound/cards.
cat program outputs a list of sound cards in your computer, which looks similar to this list:
0 [SB ]: HDA-Intel - HDA ATI SBHDA ATI SB at 0xf7ff4000 irq 161 [MobilePre ]: USB-Audio - MobilePreM Audio MobilePre at usb-0000:00:13.0-2
SB and MobilePre.
cat, then your Fedora does not detect it. You should also remember the number of the sound card, which is printed to the left of the name. You can use two different sound cards for recording and playback.
ALSA.
(hw:0), where 0 is replaced by the number of the sound card that you want to use.
default device, Audacity lets ALSA determine which sound card to use. When configured with the pulse device, Audacity lets PulseAudio determine which sound card to use. Audacity works most efficiently when configured with a specific sound card, so you should not use the default or pulse devices unless the other choices do not work.
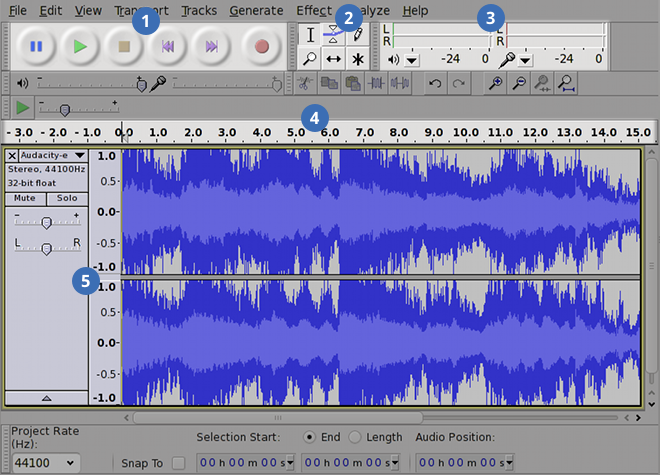
Figure 5.1. The Audacity interface
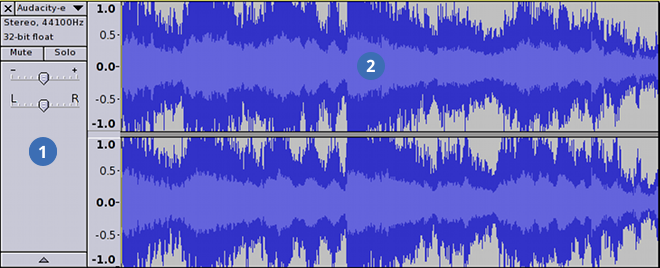
Figure 5.2. A track in Audacity
- sign on the left and a + sign on the right. The fader does not change the audio signal itself.
JACK extensively, are highly configurable, share a similar user interface, and allow users to work with both audio and MIDI signals. Many other DAWs exist, including a wide selection of commercially-available solutions. Here is a brief description of the programs documented in the Musicians' Guide:
score section of your LilyPond source file: \midi { }. There are a selection of options that can be put in the midi section; refer to the LilyPond help files for a listing.
JACK. If an error occurs, or if the DAW does not perform as expected, you should check the messages pane for information that may help you to get the desired results. The messages pane can also be used to determine whether JACK and the DAW were started successfully, with the options you prefer.
0. This clock is configured to show time in minutes and seconds, so it is a time clock. Other possible settings for clocks are to show BBT (bars, beats, and ticks — a MIDI clock), samples (a sample clock), or an SMPTE timecode (used for high-precision synchronization, usually with video — a timecode clock). Some DAWs allow the use of multiple clocks simultaneously.
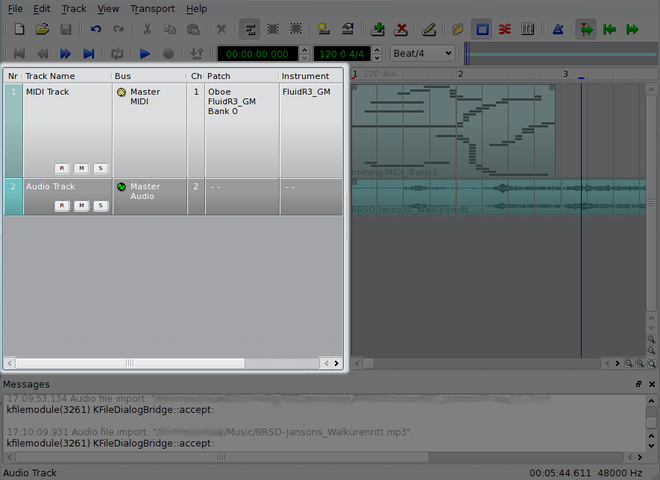
Figure 6.6. The Qtractor track info pane
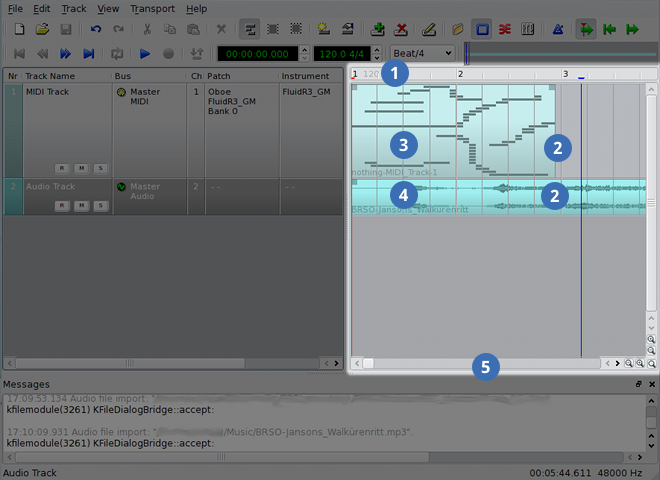
Figure 6.7. The Qtractor track pane
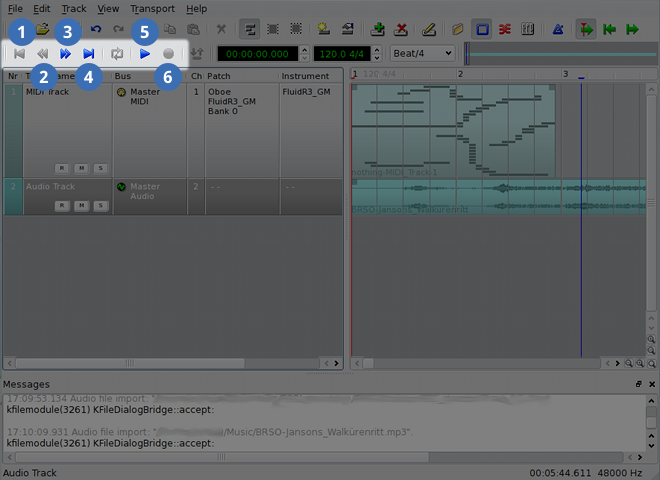
Figure 6.8. The Qtractor transport controls
JACK ConnectionsJACK Audio Connection Kit. You should install JACK before installing Ardour. Follow the instructions in Section 2.3.1, “Install and Configure JACK” to install JACK.
JACK-aware programs like FluidSynth and SuperCollider.
JACK must have the same sample rate and sample format settings each time you open a session.
JACK sound server. Use QjackCtl to start JACK before Ardour, or Ardour starts JACK for you.
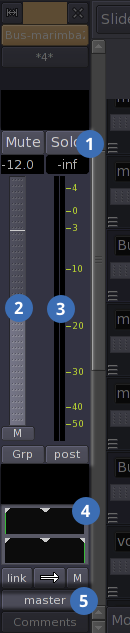
Figure 7.2. The Ardour editor mixer

Figure 7.4. The main Ardour toolbar
No Grid); the menu (currently set to Bars); and then menu (currently set to Mouse). To the left of these menus are the tool-selection buttons, the most important of which are the two left-most buttons: , and .
JACK.
Procedure 7.1. Add a track for recording
1)
Stereo, meaning 2)
Normal: creates a new Region for each recording take
Tape: destructively records over whatever is already recorded (like a tape)
Procedure 7.2. Rename tracks, to identify them
JACK Connections”):
JACK as required.
JACK ConnectionsJACK connections when it saves a session.
JACK.
JACK for both its internal and external connections allows tricks such as the earlier-mentioned recording bus (which adjusts the input level of a source), flipping the left and right audio channels, and creating a multi-channel audio output by combining many input channels. Undoubtedly, other tricks exist.
Interchange/FMG-HereIsHow/audiofiles subdirectory of the Ardour project folder from the previous step.
JACK.
JACK-aware application has a tab with its connections listed underneath.
00:00:48.00
00:01:33.300
00:02:11.500
00:02:24.500
00:02:43.000
00:02:59.000
JACK” for instructions to install JACK.
JACK (QjackCtl)Important
/usr/share/soundfonts
\score
{
   ...
   \midi { }
}
You can import LilyPond MIDI output in Qtractor. Choose → → .
JACK” for instructions to install JACK.
\score
{
   ...
   \midi { }
}
This MIDI file can then be imported into Rosegarden by selecting from the menu 'File > Import > Import MIDI File'. Unfortunately, this will erase the current session, so it can be done only once.
JACK Audio Connection Kit. If you have not already installed the JACK packages, we recommend that you do so before you install FluidSynth. See Section 2.3.1, “Install and Configure JACK” for instructions.
myFont.sf2 to the default folder (/usr/share/soundfonts), and correctly set the security settings. Note that you will need the system administrator's password (belonging to the "root" account) to complete this operation. If you do not have this password, it is best to ask the system administrator to install the files for you. Alternately, you may simply use the SoundFont file from your a sub-folder in your home folder.
su -c 'cp myFont.sf2 /usr/share/soundfonts'
myFont.sf2.
root account.
cd /usr/share/soundfonts to change to the directory of the SoundFont
su -c 'chmod 644 myFont.sf2'
myFont.sf2.
ll myFont.sf2 to verify that the permissions were set correctly.
myFont.sf2.
-rw-r--r--. 1 root root 9 2010-06-23 02:28 myFont.sf2but with a different date, time, and filename.
usr_t, which it should be by default, then there is no practical difference (no difference in enforcement) between this and a Fedora-installed SoundFont file. If you don't know what this means, or if you hadn't noticed it, then it means that this additional SoundFont file should not create a new potential security problem.
fluidsynth command. The default sample-rate is 44.1 kHz, so if you want to use JACK at a different sample rate, you need to use the -r flag, like this: fluidsynth -r 48000
/usr/share/soundfonts, if installed to the standard location specified in Section 10.2.5, “Install SoundFont Files”.
1 - - -
JACK” for instructions to install JACK.
su -c 'yum install supercollider supercollider-gedit'
RESULT = 0
Welcome to SuperCollider, for help type ctrl-c ctrl-h (Emacs) or :SChelp (vim) or ctrl-U (sced/gedit)
If this window gives a non-zero value for "RESULT," then an error has probably occurred, and you should scroll up to see what it is, and try to fix it. If you receive the following warning: "The GUI scheme 'swing' is not installed" then you will not be able to run any SuperCollider prorams that use a GUI (graphical user interface). The GUI components are not used anywhere in this Guide, and they are highly optional.
SuperCollider 3 server ready..
JackDriver: max output latency 46.4 ms
notification is on
sclang from the command-line.
Synth("temp_0": 1000)
or this:
RESULT = 0
JACK is started by SuperCollider, then it will automatically terminate when the SuperCollider server terminates.
Hello, World! (or a variation of it). It might seem useless at first, but the ability to provide feedback to an application's user is very important, and this is essentially what the Hello World Program does.
"Hello, World!".postln;
"Hello, World!".postln;
"Hello, SC!".postln;
Hello, World! Hello, World! The program appears to have been executed twice, but that is not the case. The first Hello, World! is printed by the program. The second Hello, World! appears because "Hello, World!.postln is the last (in this case, the only) value of the program. It is "returned" by the program, and the interpreter prints it.
Hello, World! Hello, SC! Hello, SC! This makes it more clear that the program is not being executed twice, and that it is the last value of a program that is returned to the interpreter.
"Hello, World!".postln;
"Hello, World!";
5.postln;
5;
"\""
5
18920982341
0.00000000000001
"characters"
"@"
""
"6"
"6" to something, for example.
6 + 3;
"6" + 3;
"six" + 3;
(
  "Hello, Fred!".postln;
  "Hello, Wilma!".postln;
)
(
  "Goodbye, Fred!".postln;
  "Goodbye, Wilma!".postln;
)
It doesn't make sense to say "hello" and "goodbye" at the same time, so separating these sections with parentheses will serve as a reminder. In case we try to execute all of the code at once, the SuperCollider interpreter will give us an error.
cheese. Then you assign cheese a value, like 5. After that point, whenever you use cheese, the interpreter will automatically know that what you really mean is 5.
(
  5 + 5;
)
(
  var x;
  x = 5;
  x + x;
)
5 + 5, which is 10, and returns that to the interpreter, which prints it out. In the second example, the program tells the interpreter that it wants to use a variable called x then it assigns cheese the value 5. Finally, the program calculates cheese + cheese, which it understands as meaning 5 + 5, and returns 10 to the interpreter, which prints it out.
var variableName;Variables can also be declared in lists, like this:
var variableName, variableOtherName;
var variableName = nil;Since you can't always assign a useful value, you can pick an arbitrary one. Assigning "nil" is common practice, because it means "nothing," but without actually being nothing (this avoids some errors). Assigning zero is another possibility; it is standard practice in many programming languages, and will avoid most errors, even if the variable is eventually supposed to hold another kind of object. Intialization and declaration of multiple variables can also be done as a list:
var variableName = 0, variableOtherName = 0;
y, if all other values are known, for the quadratic equation: y = a * x * x + b * x + c
{ "Hello, World!".postln; }.value;
Notice that there are two semicolons: one after the statement within the Function, and one after the "value" message that tells the Function to execute.
var myFunction = { "Hello, World!".postln; }; // note two semicolons
myFunction.value;
myFunction.value;
exampleFunction( 5, 7, 9 ); Argument variables are declared as the first statement in a Function, like this: arg oneNumber, twoNumber;
(
   var greeter =
   {
      arg name;
      ( "Hello" + name ).postln;
   };

   greeter.value( "Samantha" );
   greeter.value( "Jermain" );
   nil;
)
Here is how the program works:
greeter is declared, and assigned a Function.
name, and outputs "Hello" plus the name given to it.
( "Hello" + name ) ensure that the two strings are added together before the postln message prints them out.
greeter variable is used to call the Function with two different names.
nil; statement is optional, and does not affect the operation of the program. What it does is return a "nothing" value to the interpreter after program execution completes, so that the last message is not repeated.
greeter function from the last example:
greeter.value( name:"Myung-Whun" );This is more useful if there are many arguments, and you do not remember the order that they appear in the Function's definition.
postln is actually a Function, but a special kind, explained later.
(
   var greeter =
   {
      arg name, greeting = "Hello";
      postln( greeting + name );
   };

   greeter.value( "Samantha" );
   greeter.value( "Jermain", "Goodbye" );
   greeter.value( name:"Myung-Whun" );
   greeter.value( greeting:"Bienvenue", name:"Marcel" );
   nil;
)
(
   var mysticalMath =
   {
      arg input = 0;
      input * 23;
   };
   var someNumber = 9;

   someNumber = mysticalMath.value( someNumber );
   someNumber.postln;
   nil;
)
Here is how the program works:
someNumber = mysticalMath.value( someNumber ); executes the mysticalMath function, which multiplies its argument by 23 and returns the value. Then, it assigns the return value of the Function to someNumber. In any statement that contains an assignment, the assignment is always done last. In other words, the Function in this example will always be given an argument of 9, and only after the Function completes execution and returns a value will that value be assigned to someNumber.
someNumber is displayed.
(
   var mysticalMath =
   {
      arg input = 0;
      input * 23;
   };

   var someNumber = mysticalMath.value( 9 );
   someNumber.postln;
   nil;
)
(
   var mysticalMath =
   {
      arg input = 0;
      input * 23;
   };

   mysticalMath.value( 9 ).postln;
   nil;
)
( and ) or { and }, and applies to all statements within that block of code. Variable names can be re-declared in some contexts, which can be confusing.
(
   var zero = 0;
   var function =
   {
      var zero = 8;
      var sixteen = 16;
      zero.postln; // always prints 8
   };

   function.value;
   zero.postln; // always prints 0
   sixteen.postln; // always causes an error
)
Because function declares its own copy of zero, it is modified independently of the variable zero declared before the Function. Every time function is executed, it re-declares its own zero, and the interpreter keeps it separate from any other variables with the same name. When function has finished executing, the interpreter destroys its variables. Variables declared inside any Function are only ever accessible from within that Function. This is why, when we try to execute sixteen.postln;, the interpreter encounters an error: sixteen exists only within function, and is not accessible outside the function. By the way, in order to excute this example, you will need to remove the error-causing reference to sixteen.
(
   var zero = 0;
   var function =
   {
      var sixteen = 16;
      zero = 8;
      zero.postln; // always prints 8
      sixteen.postln;
   };

   function.value;
   zero.postln; // always prints 8
)
Why does the last line always print 8? It's because zero was set to 8 within function. More importantly, function did not declare its own copy of zero, so it simply accesses the one declared in the next "highest" block of code, which exists between ( and ) in this example.
(
   var a = 0;
   b =
   {
      var c = 16;
      a = 8;
      a.postln;
      c.postln;
   };

   b.value;
   a.postln;
)
This example requires careful examination. What is the scope of a, b, and c? The answers may be surprising.
a is declared just after the ( character, so the interpreter destroys it upon reaching the ) character.
c is declared just after the { character, so the interpreter destroys it upon reaching the } character.
b is not declared in this program, so it refers to the automatically-declared variable with that name. The interpreter does not destroy it until it is restarted or stopped. This means that the Function assigned to b is still available after the program finishes execution. Try it! Execute the program above, and then execute this single-line program alone: b.value;
(
   var a, b, c;

   a = 12;
   b = 25;
   c = a + b;
   a.postln;
)
Declare the variables, set the variables, do a calculation, and print the result of the calculation. This is a simple example, and a simple model, but it is very difficult to escape completely. After all, humans think of large problems in terms of algorithms (the instructions needed to do something). Computers solve large problems, so being able to program them with a series of instructions makes sense.
(
   postln( add( getinput, getinput ) );
)
getinput
getinput
add with the two numbers returned by getinput
postln with the number returned by add
var bike = Bicycle.new; All SuperCollider Objects can be instantiated in this way: you get a specific Bicycle from the generic class, and you can then modify and work with your own Object as you choose. The specific properties associated with a particular instance of a class are called instance variables.
bike.turnTheWheels; When you do this, you actually execute the turnTheWheels function, which is defined by the abstract Bicycle class. Because it doesn't make sense to turn the wheels of all bicycles in existence, you don't call the method (a synonym for "Function") from the Bicycle class itself, but from the particular instance whose wheels you want to turn. The proper way to access instance variables is by using instance methods.
postln command that was described earlier as a special kind of Function? It's actually a Function defined by SuperCollider's abstract class Object, which defines a set of messages that can be passed to any SuperCollider object. Because most things in SuperCollider are objects, we can send them the postln message, and they will understand that it means to print themselves in the "SuperCollider output" pane.
postln message? SuperCollider classes are allowed to belong to other SuperCollider classes, of which they are a part. Consider the Bicycle class again. It is a kind of vehicle, and philosophers might say that "things that are members of the bicycle class are also members of the vehicle class." That is, real-world bicycles share certain characteristics with other real-world objects that are classified as "vehicles." The bicycle class is a "sub-class" of the vehicle class, and it inherits certain properties from the vehicles class. SuperCollider allows this behaviour too, and calls it inheritance. In SuperCollider, since all classes define Objects, they are all automatically considered to be a sub-class of the class called Object. All classes therefore inherit certain characteristics from the Object class, like knowing how to respond to the postln message.
5.postln versus postln( 5 )
{ SinOsc.ar( 440, 0, 0.2 ); }.play;
SinOsc, which generates a sine wave. The class' name, SinOsc means "sine oscillator."
SinOsc.ar( 440, 0, 0.2 ); produces an "instance" of the SinOsc class, which continuously outputs a signal, based on the parameters given in parentheses. This instance produces an "audio rate" signal, which means that it is of sufficient quality to eventually become sound.
SinOsc.kr( 440, 0, 0.2 ); There is only one small difference between the two examples - for us - but for SuperCollider, the difference is huge. A control rate signal will not be of sufficient quality to become sound; it is used to control other UGens that do become sound.
new message. They should always be instantiated as either audio-rate (by passing the ar message), or control-rate (by passing the kr message). Control-rate signals are calculated much less often than audio-rate signals, which allows the SuperCollider interpreter and server to save processing power where it wouldn't be noticed.
play function does exactly what it says: it plays its input. The input must be a function with an audio-rate signal generator as the return value.
{ SinOsc.ar( 440, 0, 0.2 ); }.play;
play( { SinOsc.ar( 440, 0, 0.2 ); } );
The first example is written from an object-oriented perspective. Functions know how to play their return value, when passed the play message. This is true of all Functions whose return value is an audio-rate UGen. The second example is written from a functional perspective. The Function called play will play its input, which must be a Function whose return value is an audio-rate UGen. Whether you should write play in the functional or object-oriented way depends on which makes more sense to you.
play function operates on a variable-defined Function.
SinOsc, whether the audio- or control-rate generator, are these:
freq; it sets the frequency.
add; it is added to all values produced by the UGen.
mul; all values produced by the UGen are multiplied by this.
(
   var myFrequency =  SinOsc.kr( freq:1, mul:200, add:400 );
   var sound = { SinOsc.ar( myFrequency, 0, 0.2 ); };

   play( sound );
)
[ LeftChannel.ar( x ), RightChannel.ar( y ) ]
{ [ SinOsc.ar( 440, 0, 0.2 ), SinOsc.ar( 440, 0, 0.2 ) ]; }.play;
Not much has changed, except that the audio we hear is now being emitted from both the left and right channels. Change the frequency of one of the sine oscillators to 450 and the difference will become much more apparent.
{
   var one = [ x, y, z ];
   var two = [ a, b, c ];
   [ one, two ];
}
If a, b, c, x, y, and z were all audio-rate UGens, this function could be play'ed. It would produce stereo audio, and each channel would have three independent UGens.
{ [ SinOsc.ar( 440, 0, 0.2 ), SinOsc.ar( 440, 0, 0.2 ) ]; }.play;
{ SinOsc.ar( [440, 440], 0, 0.2 ); }.play;
The second example can be easier to read, because it is obvious that only the frequency is changing - or in this case, that nothing is changing. This technique is more useful in a situation like the following:
{ SinOsc.ar( [[440, 445, 450, 455, 460, 465],
              [440, 445, 450, 455, 460, 465]],
             0,
             0.2 ); }.play;
That's not exactly easy to read, but it's easier to figure out than the most obvious alternative:
{
   [[ SinOsc.ar( 440, 0, 0.2 ), SinOsc.ar( 445, 0, 0.2 ), SinOsc.ar( 450, 0, 0.2 ), SinOsc.ar( 455, 0, 0.2 ), SinOsc.ar( 460, 0, 0.2 ), SinOsc.ar( 465, 0, 0.2 ) ],
    [ SinOsc.ar( 440, 0, 0.2 ), SinOsc.ar( 445, 0, 0.2 ), SinOsc.ar( 450, 0, 0.2 ), SinOsc.ar( 455, 0, 0.2 ), SinOsc.ar( 460, 0, 0.2 ), SinOsc.ar( 465, 0, 0.2 ) ]];
}.play;
More importantly, multichannel expansion gives us another tool to avoid repetition. Repetition is the enemy of correctness - it's so much more difficult to find a mistake in the second example than in the first!
play this example, and experiment with changing the frequencies, volumes, and so on. The fully-commented version provides a full explanation of how the function works.
{
   // sets up the frequencies of both channels
   var frequencyL = SinOsc.kr( freq:10, mul:200, add:400 ); // oscillating
   var frequencyR = SinOsc.kr( freq:1, mul:50, add:150 ); // oscillating
   var frequencyL_drone = SinOsc.kr( freq:0.03, mul:20, add:100 ); // drone
   var frequencyR_drone = SinOsc.kr( freq:0.01, mul:20, add:210 ); // drone

   // changes the volume of the oscillating part in the left channel
   var volumeL = SinOsc.kr( freq:0.5, mul:0.02, add:0.03 );

   // left channel
   var left = [ SinOsc.ar( freq:frequencyL, mul:volumeL ), // this is the oscillating part
                SinOsc.ar( freq:[frequencyL_drone,2*frequencyL_drone], mul:0.02 ), // the rest make up the drone
                SinOsc.ar( freq:[5*frequencyL_drone,7*frequencyL_drone], mul:0.005 ),
                SinOsc.ar( freq:[13*frequencyL_drone,28*frequencyL_drone], mul:0.001 ) ];

   // right channel
   var right = [ SinOsc.ar( freq:frequencyR, mul:0.1 ), // this is the oscillating part
                 SinOsc.ar( freq:[frequencyR_drone,2*frequencyR_drone], mul:0.02 ), // the rest make up the drone
                 SinOsc.ar( freq:4*frequencyR_drone, mul:0.005 ),
                 SinOsc.ar( freq:[64*frequencyR_drone,128*frequencyR_drone], mul:0.01 ) ]; // high frequencies!

   [ left, right ];
}
(
   var tA = Array.new( 2 ); // "tA" stands for "testArray"

   tA = tA.add( 5 );
   tA = tA.add( 3 );
   tA = tA.add( 17 );

   tA.postln;
   nil;
)
Notice that Array is a Class, and it must be instantiated before use. Here, the variable
tA is assigned an Array with enough space for two objects. Notice that the elements are printed out in the order that you add them to the Array. They are not sorted or shuffled (unless you send a message like scramble). But why did I write tA = tA.add( 17 ); instead of tA.add( 17 );? Shouldn't the second method be sufficient for adding an Object to an Array, thereby making the re-assignment unnecessary? It does, but let's see what happens when we take it away:
(
   var tA = Array.new( 2 ); // "tA" stands for "testArray"

   tA.add( 5 );
   tA.add( 3 );
   tA.add( 17 );

   tA.postln;
   nil;
)
The
17 is missing - it doesn't get added into the Array! This is because the Array was only declared with two slots, and you can't add three Objects into two slots. So why did this work the first time? SuperCollider was programmed to help us fit additional items into an Array. If an Array has reached its capacity, SuperCollider will automatically make a new, larger Array for us, and returns that from the add method. Therefore, any time you add an element to an Array, you should always re-assign the result, so that you don't have to worry about whether you exceeded the Array's capacity.
at and put methods. The traditional style uses square brackets with an index number.
(
   var tA = Array.new( 3 );

   tA = tA.add( 5 );
   tA = tA.add( 3 );
   tA = tA.add( 17 );

   tA.at( 0 ).postln; // outputs 5
   tA.at( 1 ).postln; // outputs 3
   tA.at( 2 ).postln; // outputs 17

   tA.put( 0, 24 ); // assigns 24 to element 0

   tA.at( 0 ).postln; // outputs 24

   nil;
)
(
   var tA = Array.new( 3 );

   tA = tA.add( 5 );
   tA = tA.add( 3 );
   tA = tA.add( 17 );

   tA[0].postln; // outputs 5
   tA[1].postln; // outputs 3
   tA[2].postln; // outputs 17

   tA[0] = 24 ; // assigns 24 to element 0

   tA[0].postln; // outputs 24

   nil;
)
Different people prefer different styles of accessing Arrays.
List.new creates a List. You can also specify the initial number of elements as an argument, if you choose.
List.newClear( x ) creates a List with x number of slots, filled with nil.
List.copyInstance( aList ) creates a List which is a copy of aList.
List.newUsing( anArray ) creates a List with the same elements as anArray.
put( index, item ) adds item into the List at index number index.
add( item ) adds item to the end of a List.
addFirst( item ) adds item to the beginning of a List.
at( index ) returns the Object assigned to the index index number. If index is greater than the last element in the List, returns nil.
clipAt( index ) returns the Object assigned to the index index number. If index is greater than the last element in the List, returns the last element in the List.
wrapAt( index ) returns the Object assigned to the index index number. If index is greater than the last element in the List, returns an element based on a "wrap-around" index number. For a three-element List, 0 will return element 0, 1 returns 1, 2 returns 2, 3 returns 0, 4 returns 1, 5 returns 2, 6 returns 0, and so on.
foldAt( index ) returns the Object assigned to the index index number. If index is greater than the last element in the List, returns an element based on a "fold-back" index number. Whereas wrapAt() always continues from the lowest to the highest index number, foldAt() changes every time: low to high, high to low, low to high, and so on.
nil. These two Functions also remove elements from a List. They are "instance methods," meaning that they operate on a specific list.
pop returns the last element in a List, and removes it from the List.
removeAt( index ) removes the element assigned to index index number, removing it from the List and shrinking the List. removeAt() does not leave a nil element in the List.
(
   var tL = List.new;

   tL.add( 42 );
   tL.add( 820 );

   postln( tL.pop ); // outputs 820

   tL.add( 7 );
   tL.add( 19 );
   tL.add( 23 );

   postln( tL.pop ); // outputs 23
   postln( tL.pop ); // outputs 19
   postln( tL.pop ); // outputs 7
   postln( tL.pop ); // outputs 42

   postln( tL.pop ); // List is empty, so we get "nil"

   nil;
)
This code adds numbers to the end of a List, then removes them from the end of the List.
(
   var tL = List.new;

   tL.addFirst( 42 );
   tL.addFirst( 820 );

   postln( tL.pop ); // outputs 42

   tL.addFirst( 7 );
   tL.addFirst ( 19 );
   tL.addFirst ( 23 );

   postln( tL.pop ); // outputs 820
   postln( tL.pop ); // outputs 7
   postln( tL.pop ); // outputs 19
   postln( tL.pop ); // outputs 23

   postln( tL.pop ); // list is empty, so we get "nil"

   nil;
)
This modification of the first example adds numbers to the beginning of a List, then removes them from the end of the List. This is one way to ensure that the List elements are removed in the same order that they are added.
(
   var tL = List.new;

   tL.add( 42 );
   tL.add( 820 );

   postln( tL.removeAt( 0 ) ); // outputs 42

   tL.add( 7 );
   tL.add( 19 );
   tL.add( 23 );

   postln( tL.removeAt( 0 ) ); // outputs 820
   postln( tL.removeAt( 0 ) ); // outputs 7
   postln( tL.removeAt( 0 ) ); // outputs 19
   postln( tL.removeAt( 0 ) ); // outputs 23

//   postln( tL.removeAt( 0 ) ); // causes an error!

   nil;
)
This modification of the first example adds numbers to the end of a List, then removes from the beginning of the List. This is another way to ensure that the List elements are removed in the same order that they're added. Note that, when the List is empty, using the "removeAt()" Function causes an error, because you try to access a List index which doesn't exist.
(
   var tL = List.new;

   tL = [42,820,7,19,23];

   tL.at( 0 ).postln; // outputs 42
   tL.at( 1 ).postln; // outputs 820
   tL.at( 2 ).postln; // outputs 7
   tL.at( 3 ).postln; // outputs 19
   tL.at( 4 ).postln; // outputs 23
   tL.at( 5 ).postln; // outputs nil
   tL.at( 6 ).postln; // outputs nil

   nil;
)
This example shows another way to add elements to an empty List, which also works for Arrays. Then it shows what happens when you try to access elements beyond the end of a List with the "at()"Function.
(
   var tL = List.new;

   tL = [42,820,7,19,23];

   tL.clipAt( 0 ).postln; // outputs 42
   tL.clipAt( 1 ).postln; // outputs 820
   tL.clipAt( 2 ).postln; // outputs 7
   tL.clipAt( 3 ).postln; // outputs 19
   tL.clipAt( 4 ).postln; // outputs 23
   tL.clipAt( 5 ).postln; // outputs 23
   tL.clipAt( 6 ).postln; // outputs 23

   nil;
)
This example shows what happens when you try to access elements beyond the end of a List with the "clipAt()" Function. For index numbers beyond the end of the List, the interpreter will simply return the last element.
(
   var tL = List.new;

   tL = [42,820,7,19,23];

   tL.foldAt( 0 ).postln; // outputs 42
   tL.foldAt( 1 ).postln; // outputs 820
   tL.foldAt( 2 ).postln; // outputs 7
   tL.foldAt( 3 ).postln; // outputs 19
   tL.foldAt( 4 ).postln; // outputs 23
   tL.foldAt( 5 ).postln; // outputs 19
   tL.foldAt( 6 ).postln; // outputs 7

   nil;
)
This example shows what happens when you try to aceess elements beyond the end of a List with the "foldAt()" Function. For index numbers beyond the end of the List, the interpreter will start moving back through the List, towards the first element, "folding" through the List.
(
   var tL = List.new;

   tL = [42,820,7,19,23];

   tL.wrapAt( 0 ).postln; // outputs 42
   tL.wrapAt( 1 ).postln; // outputs 820
   tL.wrapAt( 2 ).postln; // outputs 7
   tL.wrapAt( 3 ).postln; // outputs 19
   tL.wrapAt( 4 ).postln; // outputs 23
   tL.wrapAt( 5 ).postln; // outputs 42
   tL.wrapAt( 6 ).postln; // outputs 820

   nil;
)
This example shows what happens when you try to access elements beyond the end of a List with the "wrapAt()" Function. For index numbers beyond the end of the List, the interpreter will start again at the beginning of the List, "wrapping" around to the beginning.
add( obj ) adds obj to a LinkedList as the last item.
addFirst( obj ) adds obj to a LinkedList as the first item.
pop removes the last item in a LinkedList and returns it.
popFirst removes the first item in a LinkedList and returns it.
first returns a copy of the first item in a LinkedList.
last returns a copy of the last item in a LinkedList.
at( index ) pretends the LinkedList is an Array, and returns a copy of what would be the element at the given index number.
put( index, obj ) pretends the LinkedList is an Array, and changes the element at the given index number to be obj.
remove( obj ) searches through a LinkedList and removes the element judged to be equal to obj, regardless of its index number.
removeAt( index ) pretends the LinkedList is an Array, and removes the element located at the given index number.
(
   var tL = LinkedList.new;

   tL.add( 42 );
   tL.add( 89 );

   tL.popFirst.postln; // prints 42

   tL.add( 256 );

   tL.popFirst.postln; // prints 89

   tL.add( 900 );

   tL.popFirst.postln; // prints 256
   tL.popFirst.postln; // prints 900

   nil;
)
do(aCollection, aFunction(number, number));
aCollection.do(aFunction(number, number));
aFunction to be executed once for each element in aCollection, which can be any kind of Collection. Each time aFunction is run, it is given two arguments, in this order: an element of aCollection, and the elements index number. For Collection's that don't have index numbers, it returns what the element's index number would have been. The loop always begins at the start of the Collection, and progresses with each element in order to the end. The second argument, really, is the integers from zero to one less than the number of elements in the Collection, increasing by one each time the loop executes aFunction.
aNumber.do(aFunction(number));
aFunction to be execute aNumber times. The interpreter still provdies two arguments to aFunction, but they are the same: it is the integers from zero to one less than aNumber. You might also think of it as the number of times that aFunction has been executed prior to this particular execution.
(
   var tL = List.new;
   tL = [27, 46, 102, 81, 34, 0, 39, 26, 203, 62];

   do( tL, { arg item, rep; [rep, item].postln; }; );

   nil;
)
This example is of the first syntax shown. For each element in tL, the interpreter executes the function once, giving it first the corresponding element of the Collection, and then the iteration counter, which happens to be equal to the element's List index number.
(
   var tL = List.new;
   var myFunc =
   {
      arg item;
      item.postln;
   };

   tL = [27, 46, 102, 81, 34, 0, 39, 26, 203, 62];

   tL.do( myFunc; );

   nil;
)
This example does several things differently, but maintains the same basic functionality as the previous example. In this case, the Function only uses the first argument that the interpreter provides, and completely ignores the iteration counter. The syntax here also puts the Collection outside the parentheses, which perhaps makes it more clear that tL is not part of the function.
(
   10.do( { "repeat".postln; }; );

   nil;
)
This example simply prints the string "repeat" ten times. If the Function accepted one argument, it would receive the integers zero through nine. If it accepted two arguments, both of the arguments would be equal.
while(boolean testFunction(number), bodyFunction(number));
testFunction.while(bodyFunction(number));
testFunc, is a function which returns a boolean value - either true or false. The loop's body, called bodyFunc, is a function which can do anything. The loop body function is not provided any arguments by the interpreter. You will have to use comparison operators and boolean expressions when writing the Function for the test condition. For information on how these work in SuperCollider, see Section 11.3.8.1, “Boolean Operators” and Section 11.3.8.2, “Boolean Expressions”.
(
   10.do( { "repeat".postln; }; );
)
and
(
   var counter = 0;
   while( { counter < 10; }, { "repeat".postln; counter = counter + 1; } );
)
and
(
   var counter = 0;
   { counter < 10; }.while( { "repeat".postln; counter = counter + 1; } );
)
You can see how it's easier to write this particular activity as a "do" loop. It's often the case that a "do" loop better reflects what you want to do, but not always.
play( some background music );
while( { is the user still inputting information? }, { keep playing music } );
stop( some background music );
The background music is begun, and then the interpreter would enter the loop. For as long as the user is still inputting information, the interpreter will then "keep playing music." When the user is not still inputting information, the interpreter will move on to the next command, which stops the music. An equivalent "do" loop would be very difficult to write, if not impossible. This is because we won't know when the user has finished inputting their information until after they've finished, so we can't plan in advance for how long to play background music.
true or false, and are most useful in boolean expressions, where they help to determine which portion of a program to execute.
true or false.
Table 11.1. Binary Boolean Operators in SuperCollider
| Operator | Meaning |
|---|---|
| < | less than |
| <= | less than or equal to |
| > | greater than |
| >= | greater than or equal to |
| == | equivalent |
| != | not equivalent |
| === | identical (the same object) |
| !== | not identical (not the same object) |
| && | logical And |
| || | logical Or |
true or false.
Table 11.2. Unary Boolean Operators in SuperCollider
| Operator | Meaning |
|---|---|
| isPositive | true if the argument is greater than or equal to 0 |
| isStrictlyPositive | true if the argument is greater than 0 |
| isNegative | true if isPositive is false |
(
	var x = 5;
	x.isPositive; // returns "true"
	isNegative( x ); // returns "false"
)
5 < 60; // evaluates to "false"
42 != 42; // evaluates to "false"
42 == 42; // evaluates to "true"
0.isPositive; // evaluates to "true"
isNegative( -256 ); // evaluates to "true"
a == 42; // evaluates to "true" or "false", depending on the value in "a"
a = 42; // assigns the value 42 to "a", over-writing the previously-stored value
One possible work-around is to write the number first.
42 == a; // evaluates to "true" or "false", depending on the value in "a"
42 = a; // causes an error, because you can't assign a value to a constant number
This way, if you accidentally leave out one of the
= signs, the interpreter will stop execution and produce an error, rather than continuing with an unexpected assignment.
(
   var a = [12,24,48];
   var b = [12,24,48];

   a == b; // evaluates to "true"
   a === b; // evaluates to "false"
)
The
== operator evaluates to true because a and b represent equivalent Objects - they are equal. The === operator evaluates to false because a and b represent different instances of the Objects - they are not identical.
(
   var a = [12,24,48];
   var b = a;

   a == b; // evaluates to "true"
   a === b; // evaluates to "true"
)
In this case, the
== operator still evaluates to true. The === operator also evaluates to true, because a and b both represent the same Object. When the interpreter evaluates var b = a; in the example above, it actually assigns b the same value that a stores, not a copy of it.
And and Ortrue if both of its arguments are true. Logical Or returns true if one of its arguments are true.
Table 11.3. Truth Table
| If the left sub-expression is... | ... and the right sub-expression is... | ... then logical And evaluates to... | ... and logical Or evaluates to... |
|---|---|---|---|
true | false | false | true |
false | true | false | true |
true | true | true | true |
false | false | false | false |
(
   var x = 5.rand; // assigns a pseudo-random number between 0 and 5

   ( x != 0 ) && ( { x = 17 / x; } ); // doesn't divide by x if it would cause division-by-zero

   x; // the interpreter automatically prints this value after execution
)
If the left-side expression of the logical And operator is "false", the interpreter doesn't evaluate the right-side expression; it simply moves on to the next expression. If the left-side expression is "true" (meaning that x is not zero), then the right-side expression is evaluated. The right-side expression happens to be a Function which assigns "x" the result of dividing 17 by its previous value. The result of the logical And operation is simply discarded in this case - it doesn't really matter to us. This isn't the most straight-forward code, and there are other ways to avoid division-by-zero. If you use this, it's probably best to include a brief explanation of what the code does, as a commment.
(
   var a = 5 == 5 && 17 != 5;
   var b = ( 5 == 5 ) && ( 17 != 5 ); // parentheses help to clarify

   a == b; // evaluates to "true"
)
(
   var a = 5.isPositive && isNegative( 6 ) || 12 + 5 * 42 - 1 > 18 ;
   var b = ( 5.isPositive && isNegative( 6 ) ) || ( ((12 + 5) * 42 - 1) > 18 ); // parentheses help to clarify

   a && b; // evaluates to "true"
)
And perhaps even more surprisingly...
( 12 + 5 * 42 - 1 ) != ( (12 + 5) * 42 - 1 );... evaluates to "false"! They're equal - the interpreter doesn't follow the standard mathematical order of precedence rules! SuperCollider evaluates from left to right, so it's important to clarify to the interpreter what you mean. Where would you put parentheses so that SuperCollider evaluates the expression as per the standard mathematical order of precedence rules, with multiplication before addition and subtraction?
if ( booleanExpression, trueFunction, falseFunction );and
booleanExpression.if( trueFunction, falseFunction );It's possible to exclude the
falseFunction, which is like telling the interpreter, "If the boolean expression is true, then execute this Function. Otherwise, don't execute it."
(
   var test = [true,false].choose; // pseudo-randomly chooses one of the elements in the List

   if ( ( true == test ), { "It's true!".postln; }, { "It's false!".postln; } );
   nil;
)
This example prints out a nice message, saying whether test is true or false. Because test is already a boolean value, we don't need to include it in an expression. The "if" statement could have been shortened like this: if ( test, { "It's true!".postln; }, { "It's false!".postln; } );
test is true.
(
   var test = [true,false].choose; // pseudo-randomly chooses one of the elements in the List

   test.if( { "It's true!".postln; } );
   nil;
)
In this example, the alternate "if" syntax is used, where the boolean expression is placed before the parentheses.
(
   var test = [1,2,3].choose; // pseudo-randomly chooses one of the elements in the List

   if( 1 == test, { "It's one!".postln; },
      if( 2 == test, { "It's two!".postln; },
         if( 3 == test, { "It's three!".postln; } ) ) );

   nil;
)
(
   var testA = [1,2,3].choose; // pseudo-randomly chooses one of the elements in the List
   var testB = [1,2,3].choose;

   if( 1 == testA, { ( 1 == testB ).if( { "It's one and one!".postln; },
                        ( 2 == testB ).if( { "It's one and two!".postln; },
                           ( 3 == testB ).if( { "It's one and three!".postln; } ) ) ); },
      if( 2 == testA, { ( 1 == testB ).if( { "It's two and one!".postln; },
                           ( 2 == testB ).if( { "It's two and two!".postln; },
                              ( 3 == testB ).if( { "It's two and three!".postln; } ) ) ); },
         if( 3 == testA, { ( 1 == testB ).if( { "It's three and one!".postln; },
                             ( 2 == testB ).if( { "It's three and two!".postln; },
                                 ( 3 == testB ).if( { "It's three and three!".postln; } ) ) ); } ) ) );

   nil;
)
As you can see, this type of nesting is not easy to figure out - from the standpoint of the original programmer or somebody else who wishes to use your code. In writing this example, it took me several attempts before getting the parentheses and braces right. Usually, if you have a long list of possibilities to test (like the nine in this example), it is better to use a "case" or "switch" structure. Not only does this help to make the code easier to understand, but the SuperCollider interpreter can apply optimizations that make the code run marginally faster.
case( compareThis,
   toThis1, { doThis; },
   toThis2, { doThis; },
   toThis3, { doThis; }
);
You can include any number of cases. Notice that there is no comma after the last case, and that I've put the concluding ");" on a separate line with the same indentation as the word "case", so that it's easy to see.
(
   var grade  = 11.rand + 1; // pseudo-randomly chooses 0 to 11, then adds 1 to give 1 to 12

   grade =
   switch( grade,
      1, { "D-" },
      2, { "D" },
      3, { "D+" },
      4, { "C-" },
      5, { "C" },
      6, { "C+" },
      7, { "B-" },
      8, { "B" },
      9, { "B+" },
      10, { "A-" },
      11, { "A" },
      12, { "A+" }
   );

   ("Your grade is" + grade).postln;
   nil;
)
The code picks a pseudo-random number between 1 and 12, then uses a "switch" structure to convert that number into a letter-grade, assigning it to the same grade variable. Then, it adds the "Your grade is" string to the value of grade (with a space between), and prints that result.
(
   var testA = [1,2,3].choose; // pseudo-randomly chooses one of the elements in the List
   var testB = [1,2,3].choose;

   switch( [testA,testB],
      [1,1], { "It's one and one!".postln; },
      [1,2], { "It's one and two!".postln; },
      [1,3], { "It's one and three!".postln; },
      [2,1], { "It's two and one!".postln; },
      [2,2], { "It's two and two!".postln; },
      [2,3], { "It's two and thre!".postln; },
      [3,1], { "It's three and one!".postln; },
      [3,2], { "It's three and two!".postln; },
      [3,3], { "It's three and three!".postln; }
   );

   nil;
)
This is an elegant way to inspect two otherwise-separate variables. Remember that the first argument to "switch" (in this case, it's [testA,tesB]) is compared to the first argument of possibe result with the equality operator: ==
true.
(
   switch( 5,
      5, { "one".postln; },
      5, { "two".postln; },
      5, { "three".postln; }
   );

   nil;
)
All of these cases are true, but this will always result in "three" being printed.
case
   <replaceable>booleanFunction</replaceable> <replaceable>resultFunction</replaceable>
   <replaceable>booleanFunction</replaceable> <replaceable>resultFunction</replaceable>
   <replaceable>booleanFunction</replaceable> <replaceable>resultFunction</replaceable>
   <replaceable>booleanFunction</replaceable> <replaceable>resultFunction</replaceable>
;
(
   var coolFunction =
   {
      case
         { is there no music playing?
           AND people are in the room } { play music }
         { has the same song been playing for too long?
           OR is the song boring? } { change the song }
         { has everybody left the room? } { turn off the music }
         { has a song been requested? } { change to that song }
         { is the music too loud? } { lower the music's volume }
         { is the music too quiet? } { raise the music's volume }
         { is the music too fast? } { lower the music's tempo }
         { is the music too slow? } { raise the music's tempo }
         { is everything okay? } { wait for 10 seconds }
      ;
   };

   ( 5 == 5 ).while( coolFunction ); // executes coolFunction contiuously
)
It might seem like this example doesn't relate to a real SuperCollider programming situation, but in fact it might. If you could program Function's which determined all of those questions and all of the answers, this sort of "case" structure would be very helpful in a situation where a computer running SuperCollider were left in a room by itself, and expected to play music whenever anybody entered the room. Since five is always equal to five, the interpreter will run coolFunction forever. If the music needs adjustment in some way, the Function will adjust the music. If everything is okay, then the interpreter will wait for 10 seconds, and then the loop will cause the Function to be re-evaluated. Because many different criteria are evaluated in the "case" structure, this represents an efficient use of the structure.
(
   var grade  = 11.rand + 1; // pseudo-randomly chooses 0 to 11, then adds 1 to give 1 to 12

   grade =
   case
      { 1 == grade; } { "D-" }
      { 2 == grade; } { "D" }
      { 3 == grade; } { "D+" }
      { 4 == grade; } { "C-" }
      { 5 == grade; } { "C" }
      { 6 == grade; } { "C+" }
      { 7 == grade; } { "B-" }
      { 8 == grade; } { "B" }
      { 9 == grade; } { "B+" }
      { 10 == grade; } { "A-" }
      { 11 == grade; } { "A" }
      { 12 == grade; } { "A+" }
   ;

   ("Your grade is" + grade).postln;
   nil;
)
This example is equivalent to one of the "switch" structure examples. This is not a good use of the "case" structure, because it requires a lot of code repetition.
(
   case
      { 5 == 5; } { "one".postln; }
      { 5 == 5; } { "two".postln; }
      { 5 == 5; } { "three".postln; }
   ;

   nil;
)
This example will always result in "one" being printed.
Mix.new(ArrayOfUGens);
Mix(ArrayOfUGens);
Mix Class doesn't really create "Mix" Objects either - it's just a Function that combines many UGen's into one.
{
   Mix( [SinOsc.ar(220, 0, 0.1),
         SinOsc.ar(440, 0, 0.1),
         SinOsc.ar(660, 0, 0.1),
         SinOsc.ar(880, 0, 0.1),
         SinOsc.ar(850, 0, 0.1),
         SinOsc.ar(870, 0, 0.1),
         SinOsc.ar(880, 0, 0.1),
         SinOsc.ar(885, 0, 0.1),
         SinOsc.ar(890, 0, 0.1),
         SinOsc.ar(1000, 0, 0.1)] );
}.play;
Notice how all of these SinOscs are heard through the left channel only. The Mix class mixes all the UGen's together into one. You could use a bus to send the audio to both the left and right channels. What happens if we don't use the Mix class? Try to remove the function, and find out. You only hear some of the SinOsc's. Which ones? The first two, representing the left and right channels. If your audio interface has more than two channels, you may be able to hear more than those first two channels.
Mix class, and it is a kind of loop. The function is called Fill, and it takes two arguments: the number of times to run a function, and the function to run. The function is provided with one argument (like in a "do" loop), which is the number of times the function has already been run.
(
   var n = 8;
   var sineFunc =
   {
      arg iteration;

      var freq = 440 + iteration;
      SinOsc.ar( freq:freq, mul:1/n );
   };

   { Mix.fill( n, sineFunc ); }.play;
)
As you can see, the fill function itself is quite simple: you provide the number of UGen's to create, and a function that creates UGen's. It's the sineFunc function that is a little confusing. The argument is called "iteration", because it holds how many times the function has already been run - how many iterations have happened already. It uses this value to help calculate the frequency (stored in a variable called freq), and then creates a SinOsc UGen. The mul argument helps to automatically control the volume level. Since the total volume should be no more than 1.0, the sineFunc function calculates UGen's' volume by dividing 1, the maximum level, by the number of UGen's that will be created. The slowly pulsating volume is part of the acoustic result of this many frequencies being so close together - it is not a hidden effect by SuperCollider.
{
   [
      [ SinOsc.ar(440, 0, 0.1), SinOsc.ar( 880, 0, 0.1 ), SinOsc.ar( 1660, 0, 0.1 ) ],
      [ SinOsc.ar(440, 0, 0.1), SinOsc.ar( 880, 0, 0.1 ), SinOsc.ar( 1660, 0, 0.1 ) ]
  ];
}.play;
Here, a two-element Array is the result of a Function, which gets sent the "play" message. Each of the elements is an equivalent, three-element Array where each element is a UGen.
{
   [
      [ SinOsc.ar(440, 0, 0.2), SinOsc.ar( 880, 0, 0.1 ), SinOsc.ar( 1660, 0, 0.05 ) ],
      [ SinOsc.ar(440, 0, 0.2), SinOsc.ar( 880, 0, 0.1 ), SinOsc.ar( 1660, 0, 0.05 ) ]
  ];
}.play;
This sounds much less harsh than the first example. Try it with the Mix Class. Even with the different "mul" values, it sounds the same as the first example! This helps Mix to ensure that the total level doesn't exceed 1.0, but it has the disadvantage that careful level-balancing on your part will be erased.
{
   [
      ( SinOsc.ar(440, 0, 0.1) + SinOsc.ar( 880, 0, 0.1 ) + SinOsc.ar( 1660, 0, 0.1 ) ),
      ( SinOsc.ar(440, 0, 0.1) + SinOsc.ar( 880, 0, 0.1 ) + SinOsc.ar( 1660, 0, 0.1 ) )
  ];
}.play;
Notice that, like with the Mix Class, independent "mul" levels are not preserved.
// When you write this...
(
   { SinOsc.ar( freq:440, mul:0.2 ); }.play;
)

// The interpreter actually does this...
(
   SynthDef.new( "temp__963", { Out.ar( 0, SinOsc.ar( freq:440, mul:0.2 ) ); } ).play;
)
Yikes! Don't despair - it's easy to understand - it just looks scary!
{ SinOsc.ar( freq:500, mul:0.2 ); }.play;
and
{ Out.ar( 0, SinOsc.ar( freq:500, mul:0.2 ) ); }.play;
The first argument to "Out.ar" is the bus number for where you want to place the second argument, which is either a UGen or a multi-channel Array of UGen's. If the second argument is an Array, then the first element is sent to the first argument's bus number, the second argument is sent to one bus number higher, the third to two bus numbers higher, and so on. This issues is explained fully in Section 11.3.11, “Busses”, but here is what you need to know for now, working with stereo (two-channel) audio:
2.postln; the interpreter just executes it. For code like { SincOsc.ar; }.play; the interpreter expands it a bit, then sends instructions to the server, which deals with the rest of the synthesis process.
someVariable = SynthDef.new( nameOfSynthDef, FunctionContainingOutUGen );
someVariable.send( nameOfServer );
and
SynthDef.new( nameOfSynthDef, FunctionContainingOutUGen ).send( nameOfServer );The
FunctionContainingOutUGen is simply that - a function that, when executed, returns an Out UGen (meaning that the Out UGen must be the last expression in the function). The nameOfSynthDef should be a symbol (as described in Section 11.3.10.4, “Symbols”), but can also be a string. The nameOfServer is a variable that represents the server to which you want to send the SynthDef's information; unless you know that you need to use a different variable for this, it's probably just the letter "s", which the interpreter automatically assigns to the default server.
(
   var playMe =
   {
      Out.ar( 0, SinOsc.ar( freq:440, mul:0.2 ) );
   };

   var playMeSynthDef = SynthDef.new( \playMe, playMe );

   playMeSynthDef.send( s );

   nil;
)
and
(
   var playMe =
   {
      Out.ar( 0, SinOsc.ar( freq:440, mul:0.2 ) );
   };

   SynthDef.new( \playMe, playMe ).send( s );

   nil;
)
The only advantage to assigning something to a variable is the ability to refer to it later. If you use the first method, then you can send the SynthDef to more than one server. Since it's rare that you will want to use more than one server, it's usually better to use the second style. In fact, if you won't be using the "playMe" Function again, you don't need to assign it to a variable!
SynthDef.new( \playMe, { Out.ar( 0, SinOsc.ar( freq:440, mul:0.2 ) ); } ).send( s );
This is all that's really needed to create and send a synthesis definition to the server. It looks long and frightening, but now at least you understand what all of the parts do.
\stopSign \\ this is a symbol
\stop sign \\ this is a symbol called 'stop' followed by the unrelated word 'sign'
'stopSign' \\ this is a symbol
'stop sign' \\ this is a symbol
'stop
sign' \\ these lines are not a symbol, and will cause an error
var a = "stop sign" \\ a string
var b = "stop sign" \\ a string with the same letters as the first string
a == b; \\ returns "true" because the strings are equivalent
a === b; \\ returns "false" because the strings are separate copies with the same characters

var c = 'stop sign' \\ a symbol
var d = 'stop sign' \\ the same symbol
c == d; \\ returns "true" because the symbols are equivalent
c === d; \\ returns "true" because the symbols are identical
Synth.new(nameOfSynthDef);
SynthDef.new() function.
SynthDef.new( \playMe, { Out.ar( 0, SinOsc.ar( freq:440, mul:0.2 ) ); } ).send( s );
var mySynth = Synth.new( \playMe );
var mySynth = { SinOsc.ar( freq:443, mul:0.2 ); }.play;
The difference is subtle: after the second example, we have no control over what name the interpreter gives to the SynthDef that it sends to the server, so we can't re-use the SynthDef. On the other hand, because we assign the name \sillyTutorialSD to the SynthDef in the first example, we know what it's called, and we can re-use it. Theoretically, we can make an infinite number of synths from this single definition. Realistically, it's limited by the amount of memory the server can use; for most modern computers, this number is so high that we don't ever need to worry about it.
var mySynth = SynthDef.new( \playMe, { Out.ar( 0, SinOsc.ar( freq:440, mul:0.2 ) ); } ).play;
This automatically sends the synthesis information to the server, creates a synth, and plays it. What minor functionality is lost when we use this shortcut?
(
   var myRandFunc =
   {
      var frequency = 440.rand + 440; // produces an integer between 440 and 880
      SinOsc.ar( freq:frequency, mul:0.025 );
   };

   10.do( { myRandFunc.play; } );
)
Execute the program a few times. The result will be different each time: ten different SinOsc's with ten different frequencies.
(
   var myRandFunc =
   {
      var frequency = 440.rand + 440; // produces an integer between 440 and 880
      Out.ar( 0, SinOsc.ar( freq:frequency, mul:0.025 ) );
   };

   SynthDef.new( \myRandFunc, myRandFunc ).send( s );

   10.do( { Synth.new( \myRandFunc ); } );
)
Execute the program a few times. The result is still different each time, but it's the same ten SinOsc's, all with the same frequency. This is the nature of a SynthDef: once it's sent to the server, you can create a synth from the same instructions without resending them.
(
   var myRandFunc =
   {
      var frequency = SinOsc.kr( freq:0.5, add:660, mul:220 ); // oscillates between 440 and 880, hitting each extreme every 2 seconds
      Out.ar( 0, SinOsc.ar( freq:frequency, mul:0.2 ) );
   };

   SynthDef.new( \myRandFunc, myRandFunc ).send( s );

   Synth.new( \myRandFunc );
)
When you use a UGen as a control-rate UGen, you have to think about its arguments quite differently than when using it as an audio-rate UGen. This table shows how the same argument gives a different result for an audio-rate vs. control-rate UGen used for pitch:
Table 11.4. Parameters in Audio-Rate and Control-Rate SinOsc UGens
| Parameter | In an audio-rate UGen... | In a control-rate UGen... |
|---|---|---|
| freq | controls the pitch | controls the speed of oscillation |
| add | ?? | sets the middle point of the sine wave by adding this to the output |
| mul | controls volume level | sets the deviation from "add" |
add, the extremes of oscillation which will be add - mul and add + mul, and the speed of oscillation with freq. The end result is very different numbers.
(
   var myRandFunc =
   {
      var frequency = Rand( 440, 880 ); // produces an integer between 440 and 880
      Out.ar( 0, SinOsc.ar( freq:frequency, mul:0.025 ) );
   };

   SynthDef.new( \myRandFunc, myRandFunc ).send( s );

   10.do( { Synth.new( \myRandFunc ); } );
)
If you run this multiple times, you will again hear ten different pitches. Depending on audio hardware, previous musical experience, and other factors, some people may have difficulty hearing that the pitches are different. Try reducing the number of synths created in the loop.
var myRandFunc =
{
   arg frequency = Rand( 440, 880 ); // default value between 440 and 880
   Out.ar( 0, SinOsc.ar( freq:frequency, mul:0.025 ) );
};
I've decided to use the Rand UGen anyway, so that supplying a frequency is optional. This adds functionality while making the added complexity optional:
(
   var myRandFunc =
   {
      arg frequency = 440;
      Out.ar( 0, SinOsc.ar( freq:frequency, mul:0.025 ) );
   };

   SynthDef.new( \myRandFunc, myRandFunc ).send( s );

   10.do( { Synth.new( \myRandFunc ); } );
)
If you use the SynthDef in the old way, as in the example, you'll get the expected result: ten Synth's, all with the same frequency. But, if you add a "rand" Function call into the loop, you can get ten different frequencies!
(
   var myRandFunc =
   {
      arg frequency = 440;
      Out.ar( 0, SinOsc.ar( freq:frequency, mul:0.025 ) );
   };

   SynthDef.new( \myRandFunc, myRandFunc ).send( s );

   10.do( { Synth.new( \myRandFunc, [\frequency,(440.rand + 440)] ); } );
)
Notice how we supply arguments: an Array with elements alternating between a string-quoted parameter name, and the value of the argument itself. If we "parameterized" all three main fields of the SinOsc, we could supply them like this:
Synth.new( \mySinOsc, [\freq,440,\add,0,\mul,0.2] );
variableHoldingSynth.set( [\argument1,value,\argument2,value,...] );This helps to save even more time and memory: rather than destroying and creating synths all the time, you can simply change pre-existing ones.
// run this first
h = List.new;

// run this second
(
   var myRandFunc =
   {
      arg frequency = 440;
      Out.ar( 0, SinOsc.ar( freq:frequency, mul:0.025 ) );
   };

   SynthDef.new( \myRandFunc, myRandFunc ).send( s );
)

// run this third
10.do( { h.add( Synth.new( \myRandFunc, [\frequency,(440.rand + 440)] ) ); } );

// run this fourth, as many times as you please
h.do( { arg item; item.set( \frequency, (440.rand + 440) ); } );
The reason that you have to run each of those segments separately is two-fold: we need to store the List of Synth's in a single-letter variable because, for this simple demonstration, this is the most efficient way; second, for the asynchronous behaviour of the server that was previously noted as causing an error.
SynthDef.new( \SynthName, [\parameter1,value,\parameter2,value] );and
existingSynth.set( \parameter1, value, \parmeter2, value );
variableHoldingSynth.free;This stops the synth and frees the associated memory - on the server. Your Synth Object still exists in the interpreter, but you can't use it any more. A Synth Object represents a synth on the server; since you got rid of the synth on the server, the Synth Object represents something that doesn't exist. If you attempt to send the "free" message again, you'll get an error. For this reason, it's a good idea to get rid of the Synth Object at the same time:
<replaceable>variableHoldingSynth</replaceable>.free;
<replaceable>variableHoldingSynth</replaceable> = nil;
If you accidentally send "free" to an already-freed Synth, the interpreter will cause an error, and program execution will stop. If you accidentally send "free" to a variable set to "nil", nothing will happen. Proactively avoiding mistakes like this is good programming practice.
Out UGen: Out.ar(busNumber, audioRateUGen);
Out.kr(busNumber, controlRateUGen);
In UGen: In.ar(busNumber, numberOfChannels);
In.kr(busNumber, numberOfChannels);
new message creates a new Bus object. This is the syntax: Bus.audio(serverName, numberOfChannels);
Bus.control(serverName, numberOfChannels);
var myBus = Bus.audio( s, 2 );
Table 11.5. Some Functions of the Bus Class
| Message/Function | Example | Return Value |
|---|---|---|
| index | b.index; | The lowest bus number used by this Bus object. |
| numChannels | b.numChannels; | The number of busses used by this Bus object. |
| rate | b.rate; | Either audio or control. |
| server | b.server; | The name of the server used by the Bus object. The default server is localhost |
<replaceable>myBusVariable</replaceable>.free;
<replaceable>myBusVariable</replaceable> = nil;
Like when sending the "free" message to a Synth Object, you should set the variable name of a "free'd" Bus to "nil". This will prevent you from accidentally sending audio there after the Bus is released.
( // execute first: prepare the server
   var busAudioSynth =
   {
      arg bus, freqOffset = 0;

      Out.ar( 0, SinOsc.ar( freq:( In.kr(bus) + freqOffset ), mul:0.1 ) );
   };

   var busControlSynth =
   {
      arg bus, freq = 400;

      Out.kr( bus, SinOsc.kr( freq:1, mul:( freq/40 ), add:freq ) );
   };

   SynthDef( \tutorialAudioBus, busAudioSynth ).send( s );
   SynthDef( \tutorialControlBus, busControlSynth ).send( s );

   b = Bus.control( s );
)

( // execute second: create synths
   x = Synth.new( \tutorialControlBus, [\bus, b] ); // control synth
   y = Synth.after( x, \tutorialAudioBus, [\bus, b] ); // low audio synth
   z = Synth.after( x, \tutorialAudioBus, [\bus, b, \freqOffset, 200] ); // high audio synth
)

( // commands to free each Object
   x.free; x = nil; // control synth
   y.free; y = nil; // low audio synth
   z.free; z = nil; // high audio synth
   b.free; b = nil; // control bus
)
This example contains three stages: prepare the server, create the synths, destroy the synths. These three stages will become familiar as you program in SuperCollider, whether or not you use busses frequently. The example is fairly complicated, so the code is explained here:
busAudioSynth Function: Accepts two arguments, and creates an audio-rate SinOsc, routed to the left output channel. The frequency is determined by a control-rate bus given as an argument, and optionally with an offset that can be supplied as an argument.
busControlSynth Function: Accepts two arguments, and creates a control-rate SinOsc, routed to the bus given as an argument. Can also be given a frequency; the value produced by the synth is intended to be used to control pitch. The centre pitch of the oscillation is freq, and the range of oscillation is one-twentieth the size of freq (one-fourtieth both higher and lower than freq).
b = Bus.control( s ); : This should also be straight-forward. A single-channel control bus is created, and assigned to the pre-declared variable b.
x is assigned a control-rate synth, while y and z are assigned audio-rate synths. Each synth is given the variable b, which refers to our control-rate bus. z is also given an argument for \freqOffset, which makes its frequency 200 Hz higher than the synth assigned to y.
after message for now. It's explained in Section 11.3.12.1, “Ordering”.
b, x, y, and z. Because these variables are shared with everything, it's especially important to set them to nil when you're done. If this were going to be written into a real program, it would be a good idea to change the variables to something which can't be accessed by other programs.
set message to the audio-rate UGen, simply by changing the input to the bus.
{ SinOsc.ar( freq:In.kr( controlRateBus, 1 ), mul:0.2 ); }.play;
Now you've managed to spice up an otherwise-boring synth!
set message (and a single argument, which is the value). You can also get the current value, whether created by set or a UGen, by using the get message, and sending a Function with one argument.
(
   var bus = Bus.control( s );
   bus.set( 12 );
   bus.get( { arg val; val.postln; } );
   bus.free; bus = nil;
)
When running this example, you'll notice that the 12 doesn't get posted until after the program finishes with nil. This is because of the latency between when the interpreter asks the server to do something, and when the server does it. The amount of time it takes for the server to complete a command is usually very small, but as you can see, it can make an important difference to your program. This latency is also the reason that you can't call SynthDef.new( ... ) and Synth.new( ... ) at the exact same time.
get function. Since the function won't immediately be able to get the value of the bus from the server, we can't expect the value to be returned by the function. Instead, when "get" gets the value of the bus from the server, it runs the function that you gave it.
(
   var tutorialDecayPink =
   {
      arg outBus = 0, effectBus,
      direct = 0.5; // controls proportion of "direct" / "processed" sound
      var source;

      // Decaying pulses of PinkNoise.
      source = Decay2.ar( in:Impulse.ar( freq:1, phase:0.25 ),
                          attackTime:0.01,
                          decayTime:0.2,
                          mul:PinkNoise.ar
                        );

      Out.ar( outBus, (source*direct) ); // main output
      Out.ar( effectBus, (source*(1-direct)) ); // effects output
   };

   var tutorialDecaySine =
   {
      arg outBus = 0, effectBus,
      direct = 0.5; // controls proportion of "direct" / "processed" sound
      var source;

      // Decaying pulses of a modulating Sine wave.
      source = Decay2.ar( in:Impulse.ar( freq:0.3, phase: 0.25),
                          attackTime:0.3,
                          decayTime:1,
                          mul:SinOsc.ar( freq:SinOsc.kr( freq:0.2, mul:110, add:440) )
                        );

      Out.ar(outBus, (source*direct) ); // main output
      Out.ar(effectBus, (source*(1-direct)) ); // effects output
   };

   var tutorialReverb =
   {
      arg outBus = 0, inBus; // default outBus is audio interface
      var input;

      input = In.ar( inBus, 1 );

      16.do( { input = AllpassC.ar( in:input,
                                    maxdelaytime:0.04,
                                    delaytime:{ Rand(0.001,0.04) }.dup,
                                    decaytime:3
                                  )
             }
           );

      Out.ar( outBus, input );
   };

   // send synthesis information to the server
   SynthDef( \tutorialReverb, tutorialReverb ).send( s );
   SynthDef( \tutorialDecayPink, tutorialDecayPink ).send( s );
   SynthDef( \tutorialDecaySine, tutorialDecaySine ).send( s );

   // reserve an effects Bus
   b = Bus.audio( s );
)

(
   x = Synth.new( \tutorialReverb, [\inBus, b] );
   y = Synth.before( x, \tutorialDecayPink, [\effectBus, b] );
   z = Synth.before( x, \tutorialDecaySine, [\effectBus, b, \outBus, 1] );
)

// Change the balance of "wet" to "dry"
y.set( \direct, 1 ); // only direct PinkNoise
z.set( \direct, 1 ); // only direct Sine wave
y.set( \direct, 0 ); // only reverberated PinkNoise
z.set( \direct, 0 ); // only reverberated Sine wave
y.set( \direct, 0.5 ); // original PinkNoise
z.set( \direct, 0.5 ); // original Sine wave

( // commands to free each Object
   x.free; x = nil;
   y.free; y = nil;
   z.free; z = nil;
   b.free; b = nil;
)
\tutorialDecayPink and \tutorialDecaySine synths into the \tutorialReverb synth. The first two synths can be controlled to put all, none, or some of their signal into the bus (so that it goes through the \tutorialReverb synth), or straight out the audio interface (bypassing the \tutorialReverb synth). Notice that the same effects processor is operating on two different input sources.
{ SinOsc.ar( freq:SinOsc.kr( freq:1, add:500, mul:10 ), mul:0.2 ); }.play;
What happens if the server calculates the audio-rate UGen first? It wouldn't have a frequency. This is another one of those things which the interpreter takes care of automatically when we run Function rather than create a Synth. Since it's often preferable to use a synth instead of a Function, we need some way to control the order of execution. The interpreter and the server are only so good at guessing what we need, after all.
Synth Class that we can use to inform the server about our desired order of execution: "before" and "after". They represent a small extension to the "new" method, and they work like this: Synth.before(variableHoldingSynth, nameOfSynthDef, ListOfArguments);
Synth.after(variableHoldingSynth, nameOfSynthDef, ListOfArguments);
( // execute first: prepare the server
   var busAudioSynth =
   {
      arg bus, freqOffset = 0;

      Out.ar( 0, SinOsc.ar( freq:( In.kr(bus) + freqOffset ), mul:0.1 ) );
   };

   var busControlSynth =
   {
      arg bus, freq = 400;

      Out.kr( bus, SinOsc.kr( freq:1, mul:( freq/40 ), add:freq ) );
   };

   SynthDef( \tutorialAudioBus, busAudioSynth ).send( s );
   SynthDef( \tutorialControlBus, busControlSynth ).send( s );

   b = Bus.control( s );
)

( // execute second: create synths
   x = Synth.new( \tutorialControlBus, [\bus, b] ); // control synth
   y = Synth.after( x, \tutorialAudioBus, [\bus, b] ); // low audio synth
   z = Synth.after( x, \tutorialAudioBus, [\bus, b, \freqOffset, 200] ); // high audio synth
)

( // commands to free each Object
   x.free; x = nil; // control synth
   y.free; y = nil; // low audio synth
   z.free; z = nil; // high audio synth
   b.free; b = nil; // control bus
)
In this case, the control-rate synth is created before the audio-rate synths - probably the easier way to think about it. Even so, it's possible to add them in the opposite order with a little extra thought.
variableHoldingSynthmoveAfter(variableHoldingAnotherSynth);
variableHoldingSynthmoveBefore(variableHoldingAnotherSynth);
variableHoldingNewSynth = Synth.replace( variableHoldingSynthToReplace, nameOfSynthDef, ListOfArguments );The "variableHoldingNewSynth" will often be the same as the "variableHoldingSynthToReplace," but not always. When you use this Function, the synth being replaced is freed from the server (equivalent to running "free"), so that variable should always be assigned something.
variableHoldingSynth.run( false );
variableHoldingSynth.run( true );
SystemClock always operates in seconds, and it can be used to schedule musical events, but usually this isn't necessary.
TempoClock.default runs at 60 beats-per-minute by default (equal to one beat per second). Since it's accessible from anywhere within a program, any tempo changes will have an effect on the scheduling of the entire program - so be careful! If you don't want something to be effected by tempo changes, you can create a new TempoClock just for that part of the program. If you will be using this clock frequently, you can assign it to a variable like this:
var t = TempoClock.default;
thisThread.clock is not really a clock in itself, but refers to the clock which is responsible for scheduling the part of the program where the command is written. It can be a little bit tricky working with this clock, since it may be either the SystemClock or a TempoClock.
SystemClock.beats;
TempoClock.default.beats;
thisThread.clock.beats;
nameOfClocksched(beatsFromNow, FunctionToExecute);
SystemClock.sched( 5, 5 );It looks like nothing happens. The
5 does happen, but... well... it doesn't do anything. Scheduling a Function will do something:
SystemClock.sched( 5, { 5.postln; } );
When you run this, there are two things to notice:
SystemClock.sched( 5, { 5.postln; } );
nil, which has been done sometimes through this guide.
SystemClock.sched( 5, { 5.postln; nil; } );
This will print 5 in five seconds, and then stop.
var t = TempoClock.new( tempo, beats );This creates a new TempoClock. The arguments are optional, and have the following meanings:
t.stop;
t = nil;
Equivalent to the "free" method for a Synth of Bus Object. This stops the clock, discards all scheduled events, and releases the resources used to run the clock. Setting the variable to "nil" afterwards is optional, but recommended, to avoid later programming mistakes.
t.clear;Discards all scheduled events, but keeps the clock running.
t.tempo;Returns the current tempo in beats-per-second.
t.tempo_( newTempo );Allows you to change the clock's tempo. The new tempo should be in beats-per-second. To input a tempo in beats-per-minute, divide the value by 60.
t.play( aFunction );Schedules the Function to begin execution on the next beat.
Method_One.sc is an extensively-commented version of the source code. The comments not only describe the way the code works, but pose some problems and questions that you may wish to work on, to increase your knowledge of SuperCollider. The problem with the verbosity of the comments is that it can be difficult to read the code itself, as it would be written in a real program.
Method_One-optimized.sc is a less-commented version of the source code. I've also re-written part of the code, to make it more flexible for use in other programs. The differences between this, and code that I would have written for myself only, are trivial.
Method_One.flac is a recording that I produced of the program, which I produced in Ardour.
{ SinOsc.ar(); }.play;
{ [ SinOsc.ar(), SinOsc.ar() ] }.play;
{ [ SinOsc.ar(), SinOsc.ar(SinOsc.kr(1,50,300)) ] }.play;
{
   var left = SinOsc.ar();
   var right = SinOsc.ar( SinOsc.kr( 1, 50, 300 ) );

   [ left, right ]

}.play;
I define a variable holding everything I want in the left channel, then the same for the right. I still use the [ , ] array notation to create a stereo array. Remember that SuperCollider functions return the last value stated, so it might look like the stereo array is ignored, but because this array is what is returned by the function contained between { and }, it is this array that gets played by the following ".play;"
{
   var frequencyL = SinOsc.kr( freq:10, mul:200, add:400 );
   var frequencyR = SinOsc.kr( freq:1, mul:50, add:150 );

   var left = SinOsc.ar( frequencyL );
   var right = SinOsc.ar( frequencyR );

   [ left, right ]

}.play;
SinOsc.ar( [frequencyL_drone,2*frequencyL_drone,5*frequencyL_drone,13*frequencyL_drone,28*frequencyL_drone], mul:0.1 )in your program is not easy to read, and actually it doesn't work out volume-balance-wise (for me, at least): the high frequencies are too loud, and the lower ones are not loud enough. In retrospect, I should have created a variable for the "mul" of these drones, so I could adjust them easily in proportion. But, I didn't.
{
   SinOsc.ar();
}.play;
50.rand, we will get a result between 0 and 50. As a frequency, this is not useful: most audio equipment cannot produce pitches below 20 Hz, and many people have problems hearing very low frequencies. This means that we'll need to add a value to .rand's output (like 100 + 50.rand, which will yield an integer between 100 and 150). I decided to go with a value between 200 Hz and 800 Hz instead, largely because I felt like it. Try setting the freq with the .rand call.
{
   var frequency = 200 + 600.rand;
   [ SinOsc.ar( freq:frequency, mul:0.01 ), SinOsc.ar( freq:frequency, mul:0.01 ) ]
   var frequency = 200 + 600.rand;
   [ SinOsc.ar( freq:frequency, mul:0.01 ), SinOsc.ar( freq:frequency, mul:0.01 ) ]
   var frequency = 200 + 600.rand;
   [ SinOsc.ar( freq:frequency, mul:0.01 ), SinOsc.ar( freq:frequency, mul:0.01 ) ]
   var frequency = 200 + 600.rand;
   [ SinOsc.ar( freq:frequency, mul:0.01 ), SinOsc.ar( freq:frequency, mul:0.01 ) ]
   var frequency = 200 + 600.rand;
   [ SinOsc.ar( freq:frequency, mul:0.01 ), SinOsc.ar( freq:frequency, mul:0.01 ) ]
   var frequency = 200 + 600.rand;
   [ SinOsc.ar( freq:frequency, mul:0.01 ), SinOsc.ar( freq:frequency, mul:0.01 ) ]
   var frequency = 200 + 600.rand;
   [ SinOsc.ar( freq:frequency, mul:0.01 ), SinOsc.ar( freq:frequency, mul:0.01 ) ]
   var frequency = 200 + 600.rand;
   [ SinOsc.ar( freq:frequency, mul:0.01 ), SinOsc.ar( freq:frequency, mul:0.01 ) ]
   var frequency = 200 + 600.rand;
   [ SinOsc.ar( freq:frequency, mul:0.01 ), SinOsc.ar( freq:frequency, mul:0.01 ) ]
   var frequency = 200 + 600.rand;
   [ SinOsc.ar( freq:frequency, mul:0.01 ), SinOsc.ar( freq:frequency, mul:0.01 ) ]
}.play;
{
   var frequency1 = 200 + 600.rand;
   [ SinOsc.ar( freq:frequency1, mul:0.01 ), SinOsc.ar( freq:frequency1, mul:0.01 ) ]
   var frequency2 = 200 + 600.rand;
   [ SinOsc.ar( freq:frequency2, mul:0.01 ), SinOsc.ar( freq:frequency2, mul:0.01 ) ]
   var frequency3 = 200 + 600.rand;
   [ SinOsc.ar( freq:frequency3, mul:0.01 ), SinOsc.ar( freq:frequency3, mul:0.01 ) ]
   var frequency4 = 200 + 600.rand;
   [ SinOsc.ar( freq:frequency4, mul:0.01 ), SinOsc.ar( freq:frequency4, mul:0.01 ) ]
   var frequency5 = 200 + 600.rand;
   [ SinOsc.ar( freq:frequency5, mul:0.01 ), SinOsc.ar( freq:frequency5, mul:0.01 ) ]
   var frequency6 = 200 + 600.rand;
   [ SinOsc.ar( freq:frequency6, mul:0.01 ), SinOsc.ar( freq:frequency6, mul:0.01 ) ]
   var frequency7 = 200 + 600.rand;
   [ SinOsc.ar( freq:frequency7, mul:0.01 ), SinOsc.ar( freq:frequency7, mul:0.01 ) ]
   var frequency8 = 200 + 600.rand;
   [ SinOsc.ar( freq:frequency8, mul:0.01 ), SinOsc.ar( freq:frequency8, mul:0.01 ) ]
   var frequency9 = 200 + 600.rand;
   [ SinOsc.ar( freq:frequency9, mul:0.01 ), SinOsc.ar( freq:frequency9, mul:0.01 ) ]
   var frequency0 = 200 + 600.rand;
   [ SinOsc.ar( freq:frequency0, mul:0.01 ), SinOsc.ar( freq:frequency0, mul:0.01 ) ]
}.play;
{
   var frequency1 = 200 + 600.rand;
   var frequency2 = 200 + 600.rand;
   var frequency3 = 200 + 600.rand;
   var frequency4 = 200 + 600.rand;
   var frequency5 = 200 + 600.rand;
   var frequency6 = 200 + 600.rand;
   var frequency7 = 200 + 600.rand;
   var frequency8 = 200 + 600.rand;
   var frequency9 = 200 + 600.rand;
   var frequency0 = 200 + 600.rand;

   [ SinOsc.ar( freq:frequency1, mul:0.01 ), SinOsc.ar( freq:frequency1, mul:0.01 ) ]
   [ SinOsc.ar( freq:frequency2, mul:0.01 ), SinOsc.ar( freq:frequency2, mul:0.01 ) ]
   [ SinOsc.ar( freq:frequency3, mul:0.01 ), SinOsc.ar( freq:frequency3, mul:0.01 ) ]
   [ SinOsc.ar( freq:frequency4, mul:0.01 ), SinOsc.ar( freq:frequency4, mul:0.01 ) ]
   [ SinOsc.ar( freq:frequency5, mul:0.01 ), SinOsc.ar( freq:frequency5, mul:0.01 ) ]
   [ SinOsc.ar( freq:frequency6, mul:0.01 ), SinOsc.ar( freq:frequency6, mul:0.01 ) ]
   [ SinOsc.ar( freq:frequency7, mul:0.01 ), SinOsc.ar( freq:frequency7, mul:0.01 ) ]
   [ SinOsc.ar( freq:frequency8, mul:0.01 ), SinOsc.ar( freq:frequency8, mul:0.01 ) ]
   [ SinOsc.ar( freq:frequency9, mul:0.01 ), SinOsc.ar( freq:frequency9, mul:0.01 ) ]
   [ SinOsc.ar( freq:frequency0, mul:0.01 ), SinOsc.ar( freq:frequency0, mul:0.01 ) ]
}.play;
{
   var frequency1 = 200 + 600.rand;
   var frequency2 = 200 + 600.rand;
   var frequency3 = 200 + 600.rand;
   var frequency4 = 200 + 600.rand;
   var frequency5 = 200 + 600.rand;
   var frequency6 = 200 + 600.rand;
   var frequency7 = 200 + 600.rand;
   var frequency8 = 200 + 600.rand;
   var frequency9 = 200 + 600.rand;
   var frequency0 = 200 + 600.rand;

   [ SinOsc.ar( freq:frequency1, mul:0.01 ), SinOsc.ar( freq:frequency1, mul:0.01 ) ].play;
   [ SinOsc.ar( freq:frequency2, mul:0.01 ), SinOsc.ar( freq:frequency2, mul:0.01 ) ].play;
   [ SinOsc.ar( freq:frequency3, mul:0.01 ), SinOsc.ar( freq:frequency3, mul:0.01 ) ].play;
   [ SinOsc.ar( freq:frequency4, mul:0.01 ), SinOsc.ar( freq:frequency4, mul:0.01 ) ].play;
   [ SinOsc.ar( freq:frequency5, mul:0.01 ), SinOsc.ar( freq:frequency5, mul:0.01 ) ].play;
   [ SinOsc.ar( freq:frequency6, mul:0.01 ), SinOsc.ar( freq:frequency6, mul:0.01 ) ].play;
   [ SinOsc.ar( freq:frequency7, mul:0.01 ), SinOsc.ar( freq:frequency7, mul:0.01 ) ].play;
   [ SinOsc.ar( freq:frequency8, mul:0.01 ), SinOsc.ar( freq:frequency8, mul:0.01 ) ].play;
   [ SinOsc.ar( freq:frequency9, mul:0.01 ), SinOsc.ar( freq:frequency9, mul:0.01 ) ].play;
   [ SinOsc.ar( freq:frequency0, mul:0.01 ), SinOsc.ar( freq:frequency0, mul:0.01 ) ].play;
}
{ ... }.value;
or
var myFunction = { ... };
myFunction.value;
var t_c = TempoClock.default; You could put that in the main function, but I suggest putting it before the main function. This way, if we want to write another function later, then it can also access t_c.
TempoClock.new( 120/60 ). Even though you could do that ahead of time and just write "2," inputting it as "120/60" makes it clearer what tempo you intend to set.
t_c.sched( x, f );, where f is a function to execute, and x is when it should be done, measured as the number of beats from now. So we can schedule our SinOsc like this:
t_c.sched( 1, {{[ SinOsc.ar( freq:frequency1, mul:0.01 ), SinOsc.ar( freq:frequency1, mul:0.01 ) ]}.play;} );
var sinosc1 = { [ SinOsc.ar( freq:frequency1, mul:0.01 ), SinOsc.ar( freq:frequency1, mul:0.01 ) ] };
// the other nine...

   t_c.sched( 1, { sinosc1.play; } );
// the other nine...
var so1, so2, so3, so4, so5, so6, so7, so8, so9, so0; should appear anywhere before the scheduler.
t_c.sched( 1, { so1 = sinosc1.play; } );
t_c.sched( 51, { so1.free; } );. Be sure to schedule each one for 51 beats, so that they all turn off simultaneously, 5 beats after the last pitch is added.
var t_c = TempoClock.default;

{
   var frequency1 = 200 + 600.rand;
   var frequency2 = 200 + 600.rand;
   var frequency3 = 200 + 600.rand;
   var frequency4 = 200 + 600.rand;
   var frequency5 = 200 + 600.rand;
   var frequency6 = 200 + 600.rand;
   var frequency7 = 200 + 600.rand;
   var frequency8 = 200 + 600.rand;
   var frequency9 = 200 + 600.rand;
   var frequency0 = 200 + 600.rand;

   var sinosc1 = { [ SinOsc.ar( freq:frequency1, mul:0.01 ), SinOsc.ar( freq:frequency1, mul:0.01 ) ] };
   var sinosc2 = { [ SinOsc.ar( freq:frequency2, mul:0.01 ), SinOsc.ar( freq:frequency2, mul:0.01 ) ] };
   var sinosc3 = { [ SinOsc.ar( freq:frequency3, mul:0.01 ), SinOsc.ar( freq:frequency3, mul:0.01 ) ] };
   var sinosc4 = { [ SinOsc.ar( freq:frequency4, mul:0.01 ), SinOsc.ar( freq:frequency4, mul:0.01 ) ] };
   var sinosc5 = { [ SinOsc.ar( freq:frequency5, mul:0.01 ), SinOsc.ar( freq:frequency5, mul:0.01 ) ] };
   var sinosc6 = { [ SinOsc.ar( freq:frequency6, mul:0.01 ), SinOsc.ar( freq:frequency6, mul:0.01 ) ] };
   var sinosc7 = { [ SinOsc.ar( freq:frequency7, mul:0.01 ), SinOsc.ar( freq:frequency7, mul:0.01 ) ] };
   var sinosc8 = { [ SinOsc.ar( freq:frequency8, mul:0.01 ), SinOsc.ar( freq:frequency8, mul:0.01 ) ] };
   var sinosc9 = { [ SinOsc.ar( freq:frequency9, mul:0.01 ), SinOsc.ar( freq:frequency9, mul:0.01 ) ] };
   var sinosc0 = { [ SinOsc.ar( freq:frequency0, mul:0.01 ), SinOsc.ar( freq:frequency0, mul:0.01 ) ] };

   var so1, so2, so3, so4, so5, so6, so7, so8, so9, so0;

   t_c.sched( 1, { so1 = sinosc1.play; } );
   t_c.sched( 6, { so2 = sinosc2.play; } );
   t_c.sched( 11, { so3 = sinosc3.play; } );
   t_c.sched( 16, { so4 = sinosc4.play; } );
   t_c.sched( 21, { so5 = sinosc5.play; } );
   t_c.sched( 26, { so6 = sinosc6.play; } );
   t_c.sched( 31, { so7 = sinosc7.play; } );
   t_c.sched( 36, { so8 = sinosc8.play; } );
   t_c.sched( 41, { so9 = sinosc9.play; } );
   t_c.sched( 46, { so0 = sinosc0.play; } );

   t_c.sched( 51, { so1.free; } );
   t_c.sched( 51, { so2.free; } );
   t_c.sched( 51, { so3.free; } );
   t_c.sched( 51, { so4.free; } );
   t_c.sched( 51, { so5.free; } );
   t_c.sched( 51, { so6.free; } );
   t_c.sched( 51, { so7.free; } );
   t_c.sched( 51, { so8.free; } );
   t_c.sched( 51, { so9.free; } );
   t_c.sched( 51, { so0.free; } );

}.value;
var sinosc = Array.new( 10 );
sinosc.add( thing_to_add ); There is a small wrinkle to this, described in the SuperCollider documentation. It's not important to understand (for musical reasons, that is - it is explained on this help page), but when you add an element to an array, you should re-assign the array to the variable-name: sinosc = sinosc.add( thing_to_add ) Basically it works out like this: if you don't re-assign, then there is a chance that the array name only includes the elements that were in the array before the "add" command was run.
sinosc = sinosc.add( { func.value; } ); Now, ten lines that look almost identical actually are identical. Furthermore, we don't have to worry about assigning unique names, or even about index numbers, as in other programming languages. SuperCollider does this for us!
t_c.sched( 1, { so1 = sinosc[0].play; } ); Since arrays are indexed from 0 to 9, those are the index numbers of the first ten objects in the array.
x.do( f ); will send the value message to the function f x times. So, to do this ten times, we should write 10.do( { sinosc = sinosc.add( { func.value; } ); } ); and get rid of the other ones. This is very powerful for simple things that must be done multiple times, because you are definitely not going to make a copy-and-paste error, because it's easy to see what is being executed, and because it's easy to see how many times it is being executed.
10.do( something ); loop, then the last time the function is run, it receives a 9 because the function has already been executed 9 times. Since our ten-element array is indexed from 0 to 9, this works perfectly for us.
10.do( { arg index; t_c.sched( 51, { so[index].free; } ); } ); This can look confusing, especially written in one line, like it is. If it helps, you might want to write it like this instead:
10.do
({ arg index;
	t_c.sched( 51, { so[index].free; } );
});
Now it looks more like a typical function.
number_of_measures = 5 * array_index + 1 Try to write this loop by yourself, before going to the next step.
10.do( { arg index; t_c.sched( ((5*index)+1), { so = so.add( sinosc[index].play; ); } ); } );
which includes some extra parentheses to ensure that the math is computed in the right order.
sinosc[index] with what all of its elements are: { func.value; }
var t_c = TempoClock.default;

{
   var so = Array.new( 10 );

   var func =
   {
      var frequency = 200 + 600.rand;
      [ SinOsc.ar( freq:frequency, mul:0.01 ), SinOsc.ar( freq:frequency, mul:0.01 ) ];
   };

   10.do( { arg index; t_c.sched( ((5*index)+1), { so = so.add( {func.value;}.play; ); } ); } );
   10.do( { arg index; t_c.sched( 51, { so[index].free; } ); } );

}.value;
var t_c = TempoClock.default;

var secondPart =
{
   var so = Array.new( 10 );

   var func =
   {
      var frequency = 200 + 600.rand;
      [ SinOsc.ar( freq:frequency, mul:0.01 ), SinOsc.ar( freq:frequency, mul:0.01 ) ];
   };

   10.do( { arg index; t_c.sched( ((5*index)+1), { so = so.add( {func.value;}.play; ); } ); } );
   10.do( { arg index; t_c.sched( 51, { so[index].free; } ); } );

};
This Function is the perfect solution if you want ten pseudo-random pitches between 200 Hz and 800 Hz, and a five-second pause between each one. If you want nine or eleven pitches, if you want them to eb between 60 Hz and 80Hz, if you want a six-second pause between each - you would have to modify the Function. If you don't remember how it works, or if you give it to a friend, you're going to have to figure out how it works before you modify it. This is not an ideal solution.
var t_c = TempoClock.default;

var secondPart =
{
   arg number_of_SinOscs = 10;

   var so = Array.new( number_of_SinOscs );

   var func =
   {
      var frequency = 200 + 600.rand;
      [ SinOsc.ar( freq:frequency, mul:0.01 ), SinOsc.ar( freq:frequency, mul:0.01 ) ];
   };

   number_of_SinOscs.do( { arg index; t_c.sched( ((5*index)+1), { so = so.add( {func.value;}.play; ); } ); } );
   number_of_SinOscs.do( { arg index; t_c.sched( 51, { so[index].free; } ); } );

};
The "do" loop doesn't need a constant number; it's fine with a variable. What happens when you pass a bad argument, like a string? This would be an easy way to sabotage your program, and in almost any other programming context it would concern us, but this is just audio programming. If somebody is going to try to create "cheese" SinOsc's, it's their own fault for mis-using the Function.
var t_c = TempoClock.default;

var secondPart =
{
   arg number_of_SinOscs = 10,
       pitch_low = 200,
       pitch_high = 800;

   var so = Array.new( number_of_SinOscs );

   var func =
   {
      var freq = pitch_low + (pitch_high - pitch_low).rand;
      [ SinOsc.ar( freq:freq, mul:0.01),
        SinOsc.ar( freq:freq, mul:0.01) ];
   };

   number_of_SinOscs.do( { arg index; t_c.sched( ((5*index)+1), { so = so.add( {func.value;}.play; ); } ); } );
   number_of_SinOscs.do( { arg index; t_c.sched( 51, { so[index].free; } ); } );

};
Notice that I changed the name of the variables, and the indentation in the "func" sub-Function, to make it easier to read. This isn't a particularly difficult change.
{
   arg time;
   secondPart_clock.sched( (1+(time*5)), { sounds = sounds.add( func.play ); } );
});
Again, I changed the indentation, and the names of the variables in this sub-Function. Recall that the "1+" portion is designed to add a one-second pause to the start of the Function's execution. The problem comes in the next "do" loop, where we have to know how the number of beats from now will be five seconds after the last SinOsc is added. We'll have to calculate it, so I added a variable to store the value after it's calculated. This also allows us to return it, as a convenience to the Function that called this one, so that it knows how long until this Function is finished. Try adding this yourself, then testing the Function to ensure that it works. I got this:
var t_c = TempoClock.default;

var secondPart =
{
   arg number_of_SinOscs = 10,
       pitch_low = 200,
       pitch_high = 800,
       pause_length = 5;

   var so = Array.new( number_of_SinOscs );

   var when_to_stop = ( 1 + ( pause_length * number_of_SinOscs ) );

   var func =
   {
      var freq = pitch_low + (pitch_high - pitch_low).rand;
      [ SinOsc.ar( freq:freq, mul:0.01),
        SinOsc.ar( freq:freq, mul:0.01) ];
   };

   number_of_SinOscs.do(
   {
      arg time;
      t_c.sched( (1+(time*5)), { so = so.add( func.play ); } );
   });

   t_c.sched( when_to_stop,
              {
                 number_of_SinOscs.do( { arg index; so[index].free; } );
                 nil;
              });

   when_to_stop;
};
I decided to "invert" the "free-ing" of the SinOsc's. Rather than scheduling number_of_SinOscs Function-calls at some point in the future, I decided to schedule one thing: a "do" loop that does the work. The indentation looks strange, but sometimes there's not much you can do about that. The "when_to_stop" variable must be the last thing in the Function, so that the interpreter returns it to the Function's caller.
var t_c = TempoClock.new; // default tempo is one beat per secondWe could hypothetically use the "SystemClock", since we're measuring time strictly in seconds. But, using a TempoClock is preferred for two reasons:
TempoClock.new
var t_c = TempoClock.default; definition from the second part.
1 + ( 5 * 9 ) + 5 = 51. Why 5 * 9? Because although there are ten SinOsc's, there are only nine spaces between them; the last five-second space happens after the last SinOsc.
t_c.sched( 1, { sound = Synth.new( \FirstPart ); } );
t_c.sched( 61, { sound.free; } );
t_c.sched( 61, { secondPart.value; nil; } );
t_c.sched( 113, { sound = Synth.new( \FirstPart ); } );
t_c.sched( 143, { sound.free; } );
Why is the "nil" required after "secondPart"? Because that function returns a number. As you know, any scheduled function which returns a number will re-schedule itself to run that many beats after the previous execution began. Since "secondPart" returns the number of seconds it takes to finish, it will always be re-started as soon as it finishes. Including "nil" disallows this repetition.
DiskOut UGen, the Buffer UGen, and other relatively advanced concepts. The built-in DiskOut help file, available at http://supercollider.svn.sourceforge.net/viewvc/supercollider/trunk/common/build/Help/UGens/Playback%20and%20Recording/DiskOut.html, contains some help with the DiskOut UGen, and links to other useful help files. This method is not further discussed here.
SuperCollider outputs its audio signals to the JACK sound server, any other JACK-aware program has the opportunity to record, process, and use them. This portion of the tutorial will help you to record SuperCollider's output in Ardour. Due to the advanced nature of SuperCollider, the text assumes that you have a basic knowledge of how to work with Ardour. If not, you may find it helpful to refer to Chapter 7, Ardour.
JACK with the right audio interface and configuration options.
lilypond input_file.ly in a terminal emulator.
Note
evince. Frescobaldi will use Evince when you choose . The button is only visible after you create a score.
/usr/share/doc/lilypond-doc-2.14.1/index.html in the "LilyPond documentation" field.
bes b bis.
beses b bisis.
bflat b bsharp. We recommend you use Dutch names because they are faster.
, and ' (comma and apostrophe) are used to indicate register.
c e, so that LilyPond knows what you want. It's the same case if you were to input c aes (meaning "C then A-flat"): the A-flat will be notated so that it is a major third from the C; if you wanted LilyPond to notate it so that the A-flat is a minor sixth higher than the C, you would need to append an apostrophe: c aes'
e4. means "dotted quarter note on E."
~ ) after the pitch and duration.
( to begin a slur (no position indicator)
) to end a slur (no position indicator)
~ to begin a tie (which needs no end; no position indicator)
. for a "staccato" mark
> for an "accent"
- for a "tenuto" mark
^ for a "marcato" mark
_ for a "portato" mark (dot and line)
- which means to put the articulation mark wherever LilyPond thinks it makes sense
_ which means to put the articulation mark below the note-head
^ which means to put the articulation mark above the note-head
g4--, g4__, and g4^^, but although this may look incorrect, it is perfectly acceptable.
<< and >> is considered by LilyPond to happen simultaneously. This can be used in any context (and any Context - see above/below). It is possible to tell LilyPond that you want two notes to happen at the same time in the same voice (yielding a chord), at the same time on the same staff (yielding polyphony), and so on. Moreover, any score with multiple staves will use << and >> to tell LilyPond that the parts should begin at the same time, and creative use of << and >> is one of the keys to advanced notation.
<< and >> idea to indicate simultaneity, if a note has multiple pitches indicated between > and < then LilyPond assumes that they are in a chord together. Notating a single chord with single < > brackets has two advantages: firstly, it is easier to see that they are a chord and not something more complex; secondly, it allows you to enter information more clearly.
<<g'4->-5 b d>> and <g' b d>4->-5 With the first example, it is more difficult to see the chord notes, the duration, and what the 5 means. With the second example, it is easy to see that the chord notes are a G, a B, and a D, that they have quarter-note duration, and that the 5 is actually a fingering indication.
< and > for notation of simple chords: they preserve logical continuity in "relative" mode. The following note will always be notated as relative to the lowest note in the chord, regardless of how many octaves the chord covers. This is not true with << and >>, where where following notes will be notated as relative to the last note between the << and >>
\time 2/4 and \clef bass are two commands that you are likely to use quite often. They happen to do precisely what it seems like they should: \time changes the time signature and metre, and \clef changes the clef. they belong to differen contexts (\time applies for the whole Score, but \clef for only one Staff).
Voice context only makes sense if it appears on a Staff, and a Staff only makes sense if it appears in a Score.
\version version_number

\header { things like title, composer, and so on }

\score
{
	\new Staff
	{
		notes go here
	}

	\layout
	{
	}

	and so on
}
commandName = { lots of commands }
\commandName in your source file. When LilyPond processes that portion of text, it will instead see whatever you wrote in the definition.
\version "2.12.2"

\header
{
	title = "Empty Example"
}

violin = \relative c''
{
	\key c \major
	\time 4/4
	% Music follows here.

	Put your music here
}

\score
{
	\new Staff \with
		{
			instrumentName = "Violin"
		}
		\violin
	\layout { }
}
\relative and \key), and it defines the violin command. Frescobaldi places a % Music follows here. comment where you should input your notes. Notice that your notes belong in the violin section. This means that you write part of the violin command.
\score section so that the source file is easier to read. You can fix errors more easily in well-organized source files. If you complete the following tutorials, you will learn three strategies to organize sources files.
\layout section is empty in this example. Like the \score section, \layout is a command. The \layout command tells LilyPond to output a musical score. Advanced users sometimes remove the \layout command, but most source files use it.
=. The symbol appears after the note, and is followed by a comma (,), apostrophe ('), or neither, depending on the intended relative octave of the pitch.
c'='''. In this example, the absolute pitch is c''', which LilyPond knows because of the c at the left, and the ''' after the = symbol.
c'=4 ? There is a 4 after the = symbol instead of a comma or apostrophe. The absolute pitch is c, which LilyPond knows because of the c to the left of the = symbol, and because there is no comma or apostrophe to the right of the = symbol. LilyPond understands the 4 as "quarter note."
|. We recommend that you put a bar-check symbol at the end of every measure, and that you input only one measure on every line. If you follow this recommendation, you will make fewer mistakes.
\time 4/4
c4 c c c |
c4 c c c |
There are four quarter notes between each bar-check symbol, which is the right number of beats in the indicated metre.
\time 4/4
c4 c2 c4 |
c4 c2 c |
c4 c2 c4 |
This example shows three measures of the same pattern:
c4 c2 c4. The second measure is missing the last quarter-note symbol (a 4), so LilyPond outputs one quarter note followed by two half notes. The second measure is five beats, so the bar-check symbol does not coincide with the measure line after the fourth beat. LilyPond prints a warning when it reaches the bar-check symbol at the end of the second measure.
\time 4/4
c2 c c c |
c4 c c c |
The first bar has four half-notes, which is twice as many beats as are allowed in one measure. A bar-check symbol only triggers a warning if it is placed where there is no bar line. Therefore, LilyPond will not print a warning for this example, even though only two of the three bar lines has a bar-line check symbol.
\time 4/4
c4 c2 c4 |
c4 c2 c |
c4 c2 c4 |
Interpreting music...
example.ly:3:10: warning: barcheck failed at: 1/4
  c4 c2 c
	  |
The mistake in the second measure causes a warning at the bar-check symbol. LilyPond does not modify note durations, so the half note at the end of the second measure occupies the fourth beat of the second measure and the first beat of the third measure. The third measure is correct, with four beats, but the bar-check symbol causes a warning to be printed because LilyPond expects a bar line before the last quarter note, not after it.
{ and } following the right = \relative c'' portion
version
header
widely-used settings like tempoMark and "global"
individual parts
score formatting
%%%%%%%% NOTES %%%%%%%% for individual parts) to demarcate sections.
%%%% OBOE %%%% for the oboe) to show sub-sections
\header
{
title = "Symphony"
...
}
\header {
title = "Symphony"
...
}
\transposition f to \transposition g.
R2.*13 |.
R symbol means "full-bar rest" (or "full-measure rest"). LilyPond draws full-bar rests differently than rests than rests that simply take up the length of a whole bar.
| symbol is a bar-check symbol. See Section 12.4.8.2, “The Bar-Check Symbol” for more information.
R2.*6 | to the timpani and trumpets parts.
R2. | to those parts. Full-measure rests should always have a capital letter R. This tells LilyPond to properly center the rest in the bar.
r4 r r |. Put this into the trumpets and timpani parts. Remember: it's always a good idea to indicate the duration at the beginning of a measure, but it's not necessary to indicate a repeated duration.
r4 r r\fermata |.
r8 d g bes d bes |. Input this, and preview the score to see what happens.
\relative declaration. In this case, the bassoon happened to be in the right register for us by default.
g8 cis cis4 r |. Remember to indicate "cis" twice. Put it in and check that it's correct.
r8 d-. g-. bes-. d-. bes-. |
g8( cis) cis4 r |
r8_"f" and so on
r8\f and so on
r8\f d-.^"a 2" g-. bes-. d-. bes-. |
g8( cis) cis4 r |
d-.^"a 2" gives the same result as d^"a 2"-.
flute = \relative c''' and oboeI = \relative c'''
\transposition g segment from earlier. This tells LilyPond that the following notes are not in concert pitch, but rather are "in G." A transposition statement tells LilyPond, in absolute pitch, which pitch actually sounds when the player plays a written c' . In this case, the sound pitch is a perfect fourth below c' . If we wanted it to be a perfect fifth higher, then we would need to write \transposition g', but that's not accurate for this case.
\key g declartion from the "global" section (and including it in every instrument as necessary). However, since there is only one transposing instrument, we might be better off simply removing the global from the horn.
<g g'>. You can copy-and-paste this as needed.
\times x/y { notes in here }, where x is the number of notes actually space to use, and y is the number of notes to let you display.
\times 2/3 { c8 d e }, because in the space of 2 eighth notes you want to fit three instead.
\times 4/40 { ... }, which will allow you to fit forty of something into the number of beat usually occupied by four of them. This is especially useful with cadenzas, and cadenza-like passages.
<< and >> is interpreted by LilyPond as happening together. If you take a look at the "score" section at the bottom of the file, you will see that all of the parts are listed in that kind of bracket. This ensures that they all happen simultaneously.
<< { upper-voice notes } \\ { lower-voice notes } >>. Remember that the "upper voice" has upward-pointing stems, and the "lower voice" has downward-pointing stems.
c4~ c8
\grace { in here } would be considered grace notes.
\< and a diminuendo with \>.
\< or \>
\!
\markup { \italic { staccato } }
startExposition =
{
\once \override Score.RehearsalMark #'self-alignment-X = #LEFT
\once \override Score.RehearsalMark #'break-align-symbols = #'(time-signature key-signature)
\mark \markup \bold "Allegro spiritoso"
\bar "|:"
}
r4 r r\fermata |
\startExposition
R2.*4 |
%%%%%%%% NOTES %%%%%%%% for individual parts) to demarcate sections.
%%%% RIGHT HAND %%%% for the right hand) to show sub-sections
\header
{
  title = "Impromptu"
  ...
}
instead of on the same line (as
\header {
  title = "Impromptu"
  ...
}
This is simply a matter of personal taste, resulting from prior experience with C and C-like programming languages.
<as ces>4-_ Notice how only the pitches are notated inside the < > brackets, and everything else attached to the end. There is one exception to this: fingering should be indicated on the pitch associated with that finger: <as-1 ces-3>4-_ Not only does this help you to sort out what was probably intended, but it allows LilyPond to stack the fingering in the right order. When using "relative" entry mode, it is the lowest note of the chord that is taken into consideration when placing the next note.
<<as4-> ces>> Notice how everything must be notated inside the << >> brackets. This can make it more difficult to read the chord in the source file, but it also allows much greater flexibility: only some chord members can have ties; certain chord members can last for longer than others; certain chord members can "break out" into or out of polyphonic passages. This notation is rarely needed, but you may be inclined to over-use it if you are trying to exactly copy the look of a hand-engraved score. Like the "times" command for tuplets, this is one of LilyPond's deceptively powerful techniques. When using "relative" entry mode, it is the last note of the chord that is taken into consideration when placing the next note.
a16-5 will show a "5" as a fingering mark. As with all other articulation marks indicated in this way, you can use ^ or _ to instruct LilyPond to put the mark above or below the note, respectively. It is usually better to let LilyPond decide for itself by using a -.
<as-1 ces-4>4-_. It is possible to enter this as <as ces>4-1-4->, but this not only looks confusing, it may confuse LilyPond as to which digit is intended for which note.
ces!16
\< style of crescendo. In LilyPond these are handled by the same source-file notation (\< to start and \! to end explicitly). However, if you want to use text and a "spanner" (dotted or dashed line, for example) instead of the < sign, you need to tell LilyPond. This can be accomplished with the following command: \crescTextCresc.
\crescHairpin.
\dimTextDim and \dimHairpin commands do the same for a diminuendo.
<<
  {
    % upper voice notes go here
  } \\
  {
    % lower voice notes go here
  }
>>
This is used a few times in both hands in the example score file.
\ottava command is used to notate all five states of transposition:
\ottava #2
\ottava #1
\ottava #0, which also cancels another sign.
\ottava #-1
\ottava #-2
\new PianoDynamics = "dynamics" \dynamics". For the Schubert score, this looks like:
\new PianoStaff \with
 {
   instrumentName = "Piano"
 }
<<
 \new Staff = "right" \right
 \new PianoDynamics = "dynamics" \dynamics
 \new Staff = "left" { \clef bass \left }
>>
% Everything below here is for the piano dynamics.
% Define "PianoDynamics" context.
\context
{
	\type "Engraver_group"
	\name PianoDynamics
	\alias Voice
	\consists "Output_property_engraver"
	\consists "Script_engraver"
	\consists "New_dynamic_engraver"
	\consists "Dynamic_align_engraver"
	\consists "Text_engraver"
	\consists "Skip_event_swallow_translator"
	\consists "Axis_group_engraver"

	\override DynamicLineSpanner #'Y-offset = #0
	\override TextScript #'font-size = #2
	\override TextScript #'font-shape = #'italic
	\override VerticalAxisGroup #'minimum-Y-extent = #'(-1 . 1)
}

% Modify "PianoStaff" context to accept Dynamics context.
\context
{
	\PianoStaff
	\accepts PianoDynamics
}
% End of PianoDynamics code.
This creates a "PianoDynamics" context, and modifies the "PianoStaff" context so that it will accept a "PianoDynamics" context.
dynamics =
{
  % Dynamics go here.

}
This is where you will input the dynamics.
s4\p r s\> s\!, or this: s2\p s4\> s\!
JACK” for installations to install JACK.
Eyes and Ears: an Anthology of Melodies for Sight-Singing. 2004. Ben Crowell . http://www.lightandmatter.com/sight/sight.html.
Studying Rhythm. 2004. Prentice Hall .
Elementary Training for Musicains. 1984. Schott Music Corp. .
The Rhythm Book. 2009. Smith Creek Music .
Manual for Ear Training and Sight Singing. 2007. Norton .
Anthology for Sight Singing. 2006. Norton .
['key', -5, 5]
| Revision History | |||||||||
|---|---|---|---|---|---|---|---|---|---|
| Revision 0.0-0 | 27 July 2010 | ||||||||
| |||||||||
| Revision 0.1-0 | 2 August 2010 | ||||||||
| |||||||||
| Revision 0.2-0 | 3 August 2010 | ||||||||
| |||||||||
| Revision 0.3-0 | 4 August 2010 | ||||||||
| |||||||||
| Revision 0.4-0 | 5 August 2010 | ||||||||
| |||||||||
| Revision 0.5-0 | 6 August 2010 | ||||||||
| |||||||||
| Revision 0.6-0 | 7 August 2010 | ||||||||
| |||||||||
| Revision 0.7-0 | 8 August 2010 | ||||||||
| |||||||||
| Revision 0.8-0 | 27 August 2010 | ||||||||
| |||||||||
| Revision 0.9-0 | 6 September 2010 | ||||||||
| |||||||||
| Revision 14.9-0 | 23 December 2010 | ||||||||
| |||||||||
| Revision 14.9-1 | 26 December 2010 | ||||||||
| |||||||||
| Revision 14.9-2 | 2 January 2011 | ||||||||
| |||||||||
| Revision 14.9-3 | 28 January 2011 | ||||||||
| |||||||||
| Revision 14.9-4 | 27 February 2011 | ||||||||
| |||||||||
| Revision 14.9-5 | 2 May 2011 | ||||||||
| |||||||||
| Revision 15-1.0 | 21 May 2011 | ||||||||
| |||||||||
| Revision 15-1.0.1 | 3 June 2011 | ||||||||
| |||||||||
| Revision 15.9.1 | 15 June 2011 | ||||||||
| |||||||||
| Revision 15.9.2 | 26 June 2011 | ||||||||
| |||||||||
| Revision 15.9.3 | 3 July 2011 | ||||||||
| |||||||||
| Revision 15.9.4 | 9 July 2011 | ||||||||
| |||||||||
| Revision 15.9.5 | 14 September 2011 | ||||||||
| |||||||||
| Revision 16.9 | 30 December 2011 | ||||||||
| |||||||||
| Revision 16.9.1 | 23 May 2012 | ||||||||
| |||||||||
| Revision 17.9 | 18 December 2012 | ||||||||
| |||||||||
| Revision 18.9-1 | ?? June 2012 | ||||||||
| |||||||||
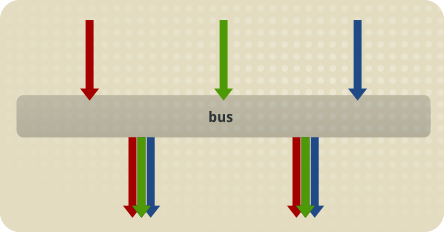
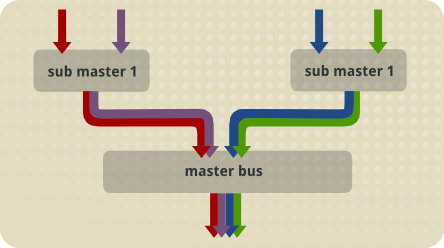
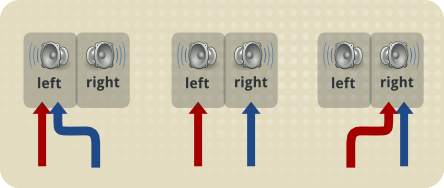
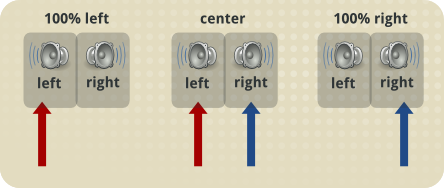
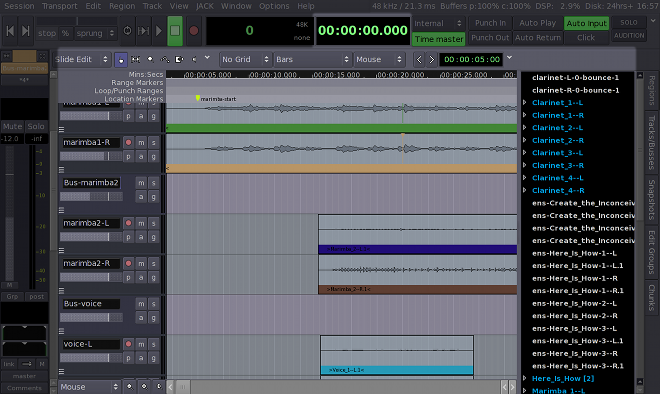
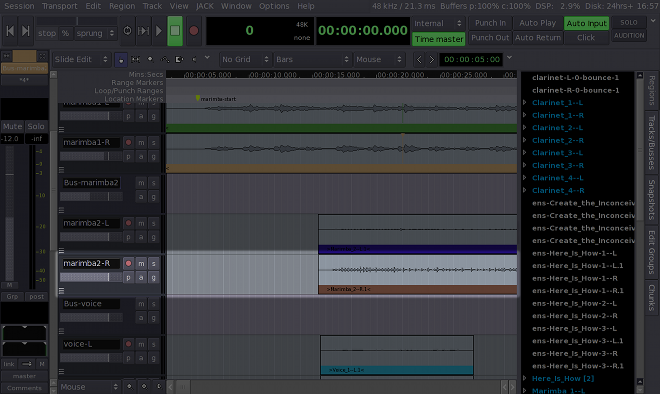

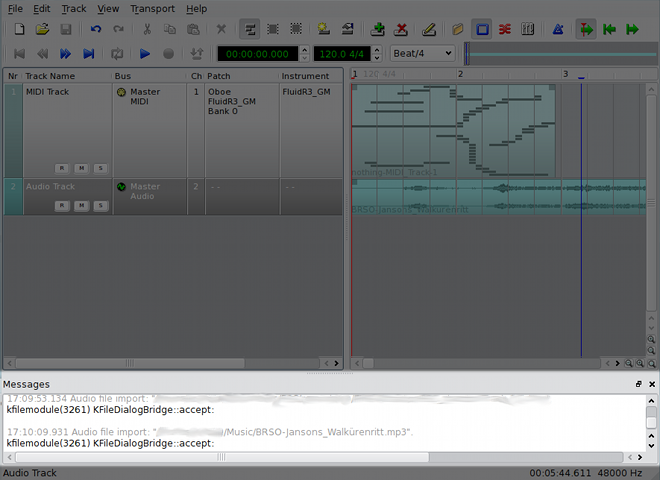
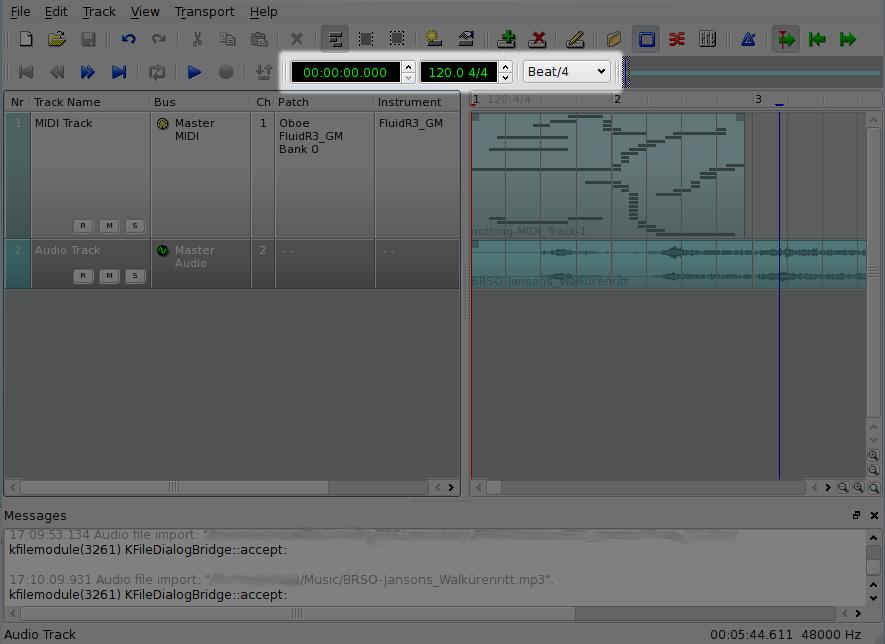
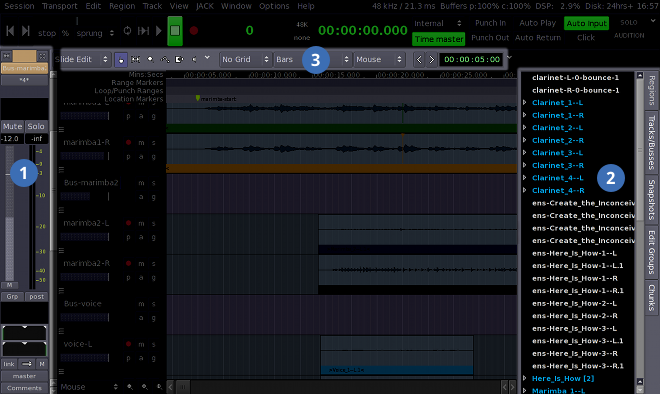
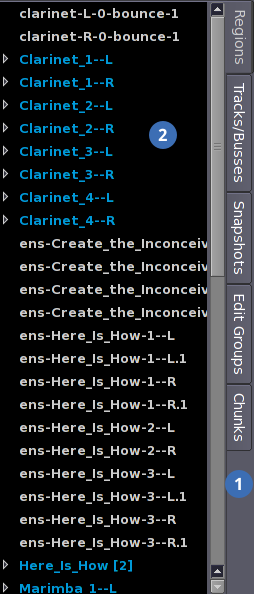
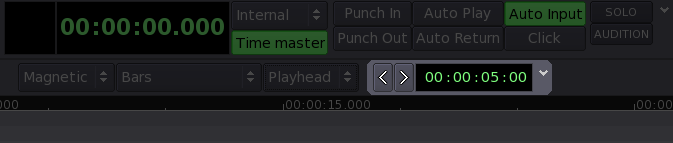

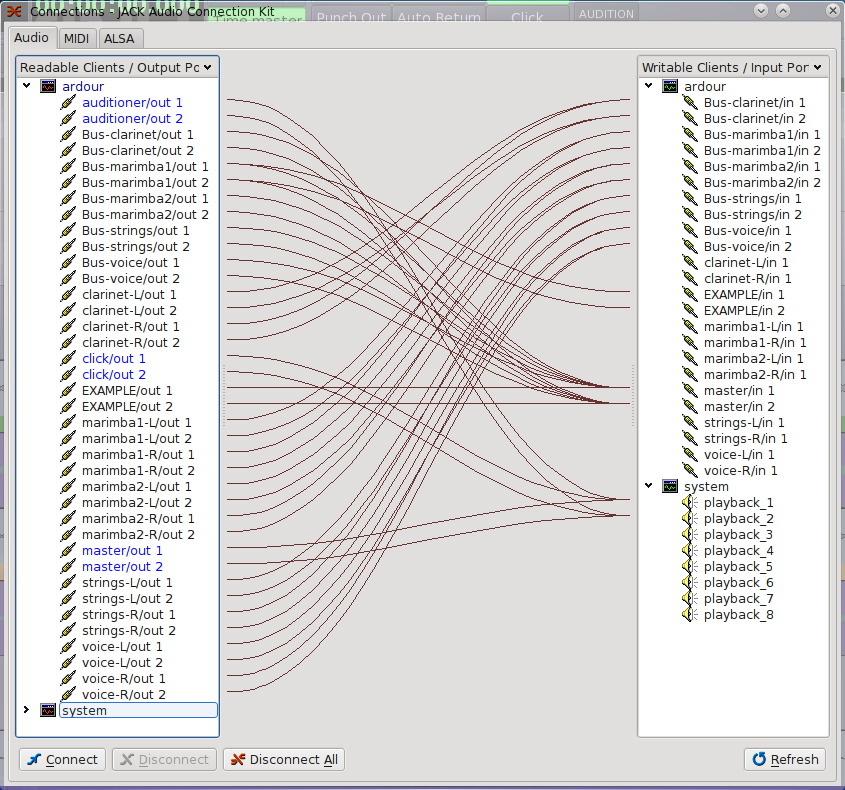