Product SiteDocumentation Site

Fedora Contributor Documentation

Software Collections Guide

A guide to Software Collections for Fedora and Enterprise Linux

Edition 1.0

Petr Kovář

Red Hat Engineering Content Services

Legal Notice

Copyright © 2014 Red Hat, Inc and others.
The text of and illustrations in this document are licensed by Red Hat under a Creative Commons Attribution–Share Alike 3.0 Unported license ("CC-BY-SA"). An explanation of CC-BY-SA is available at http://creativecommons.org/licenses/by-sa/3.0/. The original authors of this document, and Red Hat, designate the Fedora Project as the "Attribution Party" for purposes of CC-BY-SA. In accordance with CC-BY-SA, if you distribute this document or an adaptation of it, you must provide the URL for the original version.
Red Hat, as the licensor of this document, waives the right to enforce, and agrees not to assert, Section 4d of CC-BY-SA to the fullest extent permitted by applicable law.
Red Hat, Red Hat Enterprise Linux, the Shadowman logo, JBoss, MetaMatrix, Fedora, the Infinity Logo, and RHCE are trademarks of Red Hat, Inc., registered in the United States and other countries.
For guidelines on the permitted uses of the Fedora trademarks, refer to https://fedoraproject.org/wiki/Legal:Trademark_guidelines.
Linux® is the registered trademark of Linus Torvalds in the United States and other countries.
Java® is a registered trademark of Oracle and/or its affiliates.
XFS® is a trademark of Silicon Graphics International Corp. or its subsidiaries in the United States and/or other countries.
MySQL® is a registered trademark of MySQL AB in the United States, the European Union and other countries.
All other trademarks are the property of their respective owners.

Abstract

The Software Collections Guide provides an explanation of Software Collections and details how to build and package them. Developers and system administrators who have a basic understanding of software packaging with RPM packages, but who are new to the concept of Software Collections, can use this Guide to get started with Software Collections.
Preface
1. Document Conventions
1.1. Typographic Conventions
1.2. Pull-quote Conventions
1.3. Notes and Warnings
2. We want feedback
3. Acknowledgments
1. Introducing Software Collections
1.1. Why Package Software with RPM?
1.2. What Are Software Collections?
1.3. Enabling Support for Software Collections
1.4. Installing a Software Collection
1.5. Listing Installed Software Collections
1.6. Enabling a Software Collection
1.6.1. Running an Application Directly
1.6.2. Running a Shell with Multiple Software Collections Enabled
1.6.3. Running Commands Stored in a File
1.7. Listing Enabled Software Collections
1.8. Uninstalling a Software Collection
2. Packaging Software Collections
2.1. Creating Your Own Software Collections
2.2. The File System Hierarchy
2.3. The Software Collection Root Directory
2.4. The Software Collection Prefix
2.5. Software Collection Package Names
2.6. Software Collection Scriptlets
2.7. Package Layout
2.7.1. Metapackage
2.7.2. Creating a Metapackage
2.8. Software Collection Macros
2.8.1. Macros Specific to a Software Collection
2.8.2. Macros Not Specific to a Software Collection
2.9. Converting a Conventional Spec File
2.10. Uninstalling All Software Collection Directories
2.11. Making a Software Collection Depend on Another Software Collection
2.12. Building a Software Collection
2.12.1. Rebuilding a Software Collection without build Subpackages
3. Advanced Topics
3.1. Software Collection Automatic Provides and Requires and Filtering Support
3.2. Software Collection Macro Files Support
3.3. Packaging Wrappers for Software Collections
3.4. Software Collection Initscript Support
3.5. Software Collection Library Support
3.5.1. Using a Library Outside of the Software Collection
3.5.2. Prefixing the Library Major soname with the Software Collection Name
3.5.3. Software Collection Library Support in Fedora and Enterprise Linux 7
3.6. Software Collection .pc Files Support
3.7. Software Collection MANPATH Support
3.8. Software Collection cronjob Support
3.9. Software Collection Log File Support
3.10. Software Collection logrotate Support
3.11. Software Collection Lock File Support
3.12. Software Collection Configuration Files Support
3.13. Software Collection Kernel Module Support
3.14. Software Collection SELinux Support
3.14.1. SELinux Support in Fedora and Enterprise Linux 7
3.14.2. SELinux Support in Enterprise Linux 5
4. Extending Software Collections
4.1. Providing an scldevel Subpackage
4.1.1. Using an scldevel Subpackage in a Dependent Software Collection
5. Troubleshooting Software Collections
5.1. Error: line XX: Unknown tag: %scl_package software_collection_name
5.2. scl command does not exist
5.3. Unable to open /etc/scl/prefixes/software_collection_name
5.4. scl_source: command not found
6. Getting More Information
6.1. Installed Documentation
6.2. Accessing Online Resources
A. Revision History

Preface

1. Document Conventions

This manual uses several conventions to highlight certain words and phrases and draw attention to specific pieces of information.

1.1. Typographic Conventions

Four typographic conventions are used to call attention to specific words and phrases. These conventions, and the circumstances they apply to, are as follows.
Mono-spaced Bold
Used to highlight system input, including shell commands, file names and paths. Also used to highlight keys and key combinations. For example:
To see the contents of the file my_next_bestselling_novel in your current working directory, enter the cat my_next_bestselling_novel command at the shell prompt and press Enter to execute the command.
The above includes a file name, a shell command and a key, all presented in mono-spaced bold and all distinguishable thanks to context.
Key combinations can be distinguished from an individual key by the plus sign that connects each part of a key combination. For example:
Press Enter to execute the command.
Press Ctrl+Alt+F2 to switch to a virtual terminal.
The first example highlights a particular key to press. The second example highlights a key combination: a set of three keys pressed simultaneously.
If source code is discussed, class names, methods, functions, variable names and returned values mentioned within a paragraph will be presented as above, in mono-spaced bold. For example:
File-related classes include filesystem for file systems, file for files, and dir for directories. Each class has its own associated set of permissions.
Proportional Bold
This denotes words or phrases encountered on a system, including application names; dialog-box text; labeled buttons; check-box and radio-button labels; menu titles and submenu titles. For example:
Choose SystemPreferencesMouse from the main menu bar to launch Mouse Preferences. In the Buttons tab, select the Left-handed mouse check box and click Close to switch the primary mouse button from the left to the right (making the mouse suitable for use in the left hand).
To insert a special character into a gedit file, choose ApplicationsAccessoriesCharacter Map from the main menu bar. Next, choose SearchFind… from the Character Map menu bar, type the name of the character in the Search field and click Next. The character you sought will be highlighted in the Character Table. Double-click this highlighted character to place it in the Text to copy field and then click the Copy button. Now switch back to your document and choose EditPaste from the gedit menu bar.
The above text includes application names; system-wide menu names and items; application-specific menu names; and buttons and text found within a GUI interface, all presented in proportional bold and all distinguishable by context.
Mono-spaced Bold Italic or Proportional Bold Italic
Whether mono-spaced bold or proportional bold, the addition of italics indicates replaceable or variable text. Italics denotes text you do not input literally or displayed text that changes depending on circumstance. For example:
To connect to a remote machine using ssh, type ssh username@domain.name at a shell prompt. If the remote machine is example.com and your username on that machine is john, type ssh john@example.com.
The mount -o remount file-system command remounts the named file system. For example, to remount the /home file system, the command is mount -o remount /home.
To see the version of a currently installed package, use the rpm -q package command. It will return a result as follows: package-version-release.
Note the words in bold italics above: username, domain.name, file-system, package, version and release. Each word is a placeholder, either for text you enter when issuing a command or for text displayed by the system.
Aside from standard usage for presenting the title of a work, italics denotes the first use of a new and important term. For example:
Publican is a DocBook publishing system.

1.2. Pull-quote Conventions

Terminal output and source code listings are set off visually from the surrounding text.
Output sent to a terminal is set in mono-spaced roman and presented thus:
books        Desktop   documentation  drafts  mss    photos   stuff  svn
books_tests  Desktop1  downloads      images  notes  scripts  svgs
Source-code listings are also set in mono-spaced roman but add syntax highlighting as follows:
package org.jboss.book.jca.ex1;

import javax.naming.InitialContext;

public class ExClient
{
   public static void main(String args[]) 
       throws Exception
   {
      InitialContext iniCtx = new InitialContext();
      Object         ref    = iniCtx.lookup("EchoBean");
      EchoHome       home   = (EchoHome) ref;
      Echo           echo   = home.create();

      System.out.println("Created Echo");

      System.out.println("Echo.echo('Hello') = " + echo.echo("Hello"));
   }
}

1.3. Notes and Warnings

Finally, we use three visual styles to draw attention to information that might otherwise be overlooked.

Note

Notes are tips, shortcuts or alternative approaches to the task at hand. Ignoring a note should have no negative consequences, but you might miss out on a trick that makes your life easier.

Important

Important boxes detail things that are easily missed: configuration changes that only apply to the current session, or services that need restarting before an update will apply. Ignoring a box labeled “Important” will not cause data loss but may cause irritation and frustration.

Warning

Warnings should not be ignored. Ignoring warnings will most likely cause data loss.

2. We want feedback

If you find errors or have suggestions for improvement, we want your advice. Submit a report in Bugzilla against the product Fedora Documentation and the component software-collections-guide. The following link automatically loads this information for you: http://bugzilla.redhat.com/.
In Bugzilla:
  1. Provide a short summary of the error or your suggestion in the Summary field.
  2. Copy the following template into the Description field and give us the details of the error or suggestion as specifically as you can. If possible, include some surrounding text so we know where the error occurs or the suggestion fits.
    Document URL:
    
    
    Section number and name:
    
    
    Error or suggestion:
    
    
    Additional information:


  3. Click the Submit Bug button.

3. Acknowledgments

The author of this book would like to thank the following people for their valuable contributions: Jindřich Nový, Marcela Mašláňová, Bohuslav Kabrda, Honza Horák, Jan Zelený, Martin Čermák, Jitka Plesníková, Langdon White, Florian Nadge, Stephen Wadeley, Douglas Silas, Tomáš Čapek, and Vít Ondruch, among many others.

Chapter 1. Introducing Software Collections

This chapter introduces you to the concept and usage of Software Collections or SCLs for short.

1.1. Why Package Software with RPM?

The RPM Package Manager (RPM) is a package management system that runs on Fedora and Enterprise Linux. RPM makes it easier for you to distribute, manage, and update software that you create for Fedora or Enterprise Linux. Many software vendors distribute their software via a conventional archive file (such as a tarball). However, there are several advantages in packaging software into RPM packages. These advantages are outlined below.

With RPM, you can:

Install, reinstall, remove, upgrade and verify packages.
Users can use standard package management tools (for example Yum or PackageKit) to install, reinstall, remove, upgrade and verify your RPM packages.
Use a database of installed packages to query and verify packages.
Because RPM maintains a database of installed packages and their files, users can easily query and verify packages on their system.
Use metadata to describe packages, their installation instructions, and so on.
Each RPM package includes metadata that describes the package's components, version, release, size, project URL, installation instructions, and so on.
Package pristine software sources into source and binary packages.
RPM allows you to take pristine software sources and package them into source and binary packages for your users. In source packages, you have the pristine sources along with any patches that were used, plus complete build instructions. This design eases the maintenance of the packages as new versions of your software are released.
Add packages to Yum repositories.
You can add your package to a Yum repository that enables clients to easily find and deploy your software.
Digitally sign your packages.
Using a GPG signing key, you can digitally sign your package so that users are able to verify the authenticity of the package.
For in-depth information on what is RPM and how to use it, refer to the Fedora 18 System Administrator's Guide.

1.2. What Are Software Collections?

With Software Collections, you can build and concurrently install multiple versions of the same software components on your system. Software Collections have no impact on the system versions of the packages installed by any of the conventional RPM package management utilities.

Software Collections:

Do not overwrite system files
Software Collections are distributed as a set of several components, which provide their full functionality without overwriting system files.
Are designed to avoid conflicts with system files
Software Collections make use of a special file system hierarchy to avoid possible conflicts between a single Software Collection and the base system installation.
Require no changes to the RPM package manager
Software Collections require no changes to the RPM package manager present on the host system.
Need only minor changes to the spec file
To convert a conventional package to a single Software Collection, you only need to make minor changes to the package spec file.
Allow you to build a conventional package and a Software Collection package with a single spec file
With a single spec file, you can build both the conventional package and the Software Collection package.
Allow you to use a spec file from one Software Collection to build a different Software Collection
You can use a single spec file from one Software Collection to build a different Software Collection.
Uniquely name all included packages
With Software Collection's namespace, all packages included in the Software Collection are uniquely named.
Do not conflict with updated packages
Software Collection's namespace ensures that updating packages on your system causes no conflicts.
Can depend on other Software Collections
Because one Software Collection can depend on another, you can define multiple levels of dependencies.

1.3. Enabling Support for Software Collections

To enable support for Software Collections on your system so that you can enable and build Software Collections, you need to have installed the packages scl-utils and scl-utils-build.
If the packages scl-utils and scl-utils-build are not already installed on your system, you can install them by typing the following at a shell prompt as root:
yum install scl-utils scl-utils-build
The scl-utils package provides the scl tool that lets you enable Software Collections on your system. For more information on enabling Software Collections, refer to Section 1.6, “Enabling a Software Collection”.
The scl-utils-build package provides macros that are essential for building Software Collections. For more information on building Software Collections, refer to Section 2.12, “Building a Software Collection”.

1.4. Installing a Software Collection

To ensure that a Software Collection is on your system, install the so-called metapackage of the Software Collection. Thanks to Software Collections being fully compatible with the RPM Package Manager, you can use conventional tools like Yum or PackageKit for this task.
For example, to install a Software Collection with the metapackage named software_collection_1, run the following command:
 yum install software_collection_1 
This command will automatically install all the packages in the Software Collection that are essential for the user to perform most common tasks with the Software Collection.
Software Collections allow you to only install a subset of packages you intend to use. For example, to use the Ruby interpreter from the ruby193 Software Collection, you only need to install a package ruby193-ruby from that Software Collection.
If you install an application that depends on a Software Collection, that Software Collection will be installed along with the rest of the application's dependencies.
For detailed information on Software Collection metapackages, see Section 2.7.1, “Metapackage”.
For detailed information on Yum and PackageKit usage, see the Fedora 18 System Administrator's Guide.

1.5. Listing Installed Software Collections

To get a list of Software Collections that are currently installed on the system, run the following command:
 scl --list 

1.6. Enabling a Software Collection

The scl tool is used to enable a Software Collection and to run applications in the Software Collection environment.
General usage of the scl tool can be described using the following syntax:
 scl action software_collection_1 software_collection_2 command 
When executing the command, the scl tool creates a child process (subshell) of the current shell. Running the command again then creates a subshell of the subshell.
See Section 1.7, “Listing Enabled Software Collections” for information on how to list enabled Software Collections for the current subshell.
Note that you have to disable an enabled Software Collection first to be able to enable it again. To disable the Software Collection, exit the subshell created when enabling the Software Collections.
When using the scl tool to enable a Software Collection, you can only perform one action with the enabled Software Collection at a time. The enabled Software Collection must be disabled first before performing another action.

1.6.1. Running an Application Directly

For example, to directly run Perl with the --version option in the Software Collection named software_collection_1, execute the following command:
 scl enable software_collection_1 'perl --version' 
Alternatively, you can create a wrapper script that shortens the commands for running applications in the Software Collection environment. For more information on wrappers, see Section 3.3, “Packaging Wrappers for Software Collections”.

1.6.2. Running a Shell with Multiple Software Collections Enabled

To run the Bash shell in the environment with multiple Software Collections enabled, execute the following command:
 scl enable software_collection_1 software_collection_2 bash 
The command above enables two Software Collections, named software_collection_1 and software_collection_2.

1.6.3. Running Commands Stored in a File

To execute a number of commands, which are stored in a file, in the Software Collection environment, run the following command:
 cat cmd | scl enable software_collection_1 - 
The command above executes commands, which are stored in the cmd file, in the environment of the Software Collection named software_collection_1.

1.7. Listing Enabled Software Collections

To get a list of Software Collections that are enabled in the current session, print the $X_SCLS environment variable by running the following command:
echo $X_SCLS 

1.8. Uninstalling a Software Collection

You can use conventional tools like Yum or PackageKit when uninstalling a Software Collection because Software Collections are fully compatible with the RPM Package Manager. For example, to uninstall all packages and subpackages that are part of a Software Collection named software_collection_1, run the following command:
 yum remove software_collection_1\* 
You can also use the yum remove command to remove the scl utility.
For detailed information on Yum and PackageKit usage, refer to the Fedora 18 System Administrator's Guide.

Chapter 2. Packaging Software Collections

This chapter introduces you to packaging Software Collections.

2.1. Creating Your Own Software Collections

In general, you can use one of the following two approaches to deploy an application that depends on an existing Software Collection:
  • install all required Software Collections and packages manually and then deploy your application, or
  • create a new Software Collection for your application.

When creating a new Software Collection for your application:

Create a Software Collection metapackage
Each Software Collection includes a metapackage, which installs a subset of the Software Collection's packages that are essential for the user to perform most common tasks with the Software Collection. See Section 2.7.1, “Metapackage” for more information on creating metapackages.
Consider specifying the location of the Software Collection root directory
You are advised to specify the location of the Software Collection root directory by setting the %_scl_prefix macro in the Software Collection spec file. For more information, see Section 2.3, “The Software Collection Root Directory”.
Consider prefixing the name of your Software Collection packages
You are advised to prefix the name of your Software Collection packages with the vendor and Software Collection's name. For more information, see Section 2.4, “The Software Collection Prefix”.
Specify all Software Collections and other packages required by your application as dependencies
Ensure that all Software Collections and other packages required by your application are specified as dependencies of your Software Collection. For more information, see Section 2.11, “Making a Software Collection Depend on Another Software Collection”.
Convert existing conventional packages or create new Software Collection packages
Ensure that all macros in your Software Collection package spec files use conditionals. See Section 2.9, “Converting a Conventional Spec File” for more information on how to convert an existing package spec file.
Build your Software Collection
After you create the Software Collection metapackage and convert or create packages for your Software Collection, you can build the Software Collection with the rpmbuild utility. For more information, see Section 2.12, “Building a Software Collection”.

2.2. The File System Hierarchy

The root directory of Software Collections is normally located in the /opt/ directory to avoid possible conflicts between Software Collections and the base system installation. The use of the /opt/ directory is recommended by the Filesystem Hierarchy Standard (FHS).
Below is an example of the file system hierarchy layout with two Software Collections, software_collection_1 and software_collection_2:
The Software Collection File System Hierarchy

Figure 2.1. The Software Collection File System Hierarchy

As you can see above, each of the Software Collections directories contains the Software Collection root directory, and one or more Software Collection scriptlets. For more information on the Software Collection scriptlets, refer to Section 2.6, “Software Collection Scriptlets”.

2.3. The Software Collection Root Directory

You can change the location of the root directory by setting the %_scl_prefix macro in the spec file, as in the following example:
%global _scl_prefix /opt/provider
where provider is the provider (vendor) name registered, where applicable, with the Linux Foundation and the subordinated Linux Assigned Names and Numbers Authority (LANANA), in conformance with the Filesystem Hierarchy Standard.
Each organization or project that builds and distributes Software Collections should use its own provider name, which conforms to the Filesystem Hierarchy Standard (FHS) and avoids possible conflicts between Software Collections and the base system installation.
You are advised to make the file system hierarchy conform to the following layout:
/opt/provider/prefix-application-version/
For more information on the Filesystem Hierarchy Standard, see http://www.pathname.com/fhs/.
For more information on the Linux Assigned Names and Numbers Authority, see http://www.lanana.org/.

2.4. The Software Collection Prefix

When naming your Software Collection, you are advised to prefix the name of your Software Collection as described below in order to avoid possible name conflicts with the system versions of the packages that are part of your Software Collection.
The Software Collection prefix consists of two parts:
  • the provider part, which defines the provider's name, and
  • the name of the Software Collection itself.
These two parts of the Software Collection prefix are separated by an underscore (_), as in the following example:
myorganization_ruby193
In this example, myorganization is the provider's name, and ruby193 is the name of the Software Collection.
While it is ultimately a vendor's or distributor's decision whether to specify the provider's name in the prefix or not, specifying it is highly recommended. A notable exception are Software Collections provided by Red Hat, they do not specify the provider's name in their prefixes.

2.5. Software Collection Package Names

The Software Collection package name consists of two parts:
These two parts of the Software Collection package name are separated by a dash (-), as in the following example:
myorganization_ruby193-foreman-1.1
In this example, myorganization_ruby193 is the prefix, and foreman-1.1 is the name and version number of the application.

2.6. Software Collection Scriptlets

The Software Collection scriptlets are simple shell scripts that change the current system environment so that the group of packages in the Software Collection is preferred over the corresponding group of conventional packages installed on the system.
To utilize the Software Collection scriptlets, use the scl tool that is part of the scl-utils package. For more information on scl, refer to Section 1.6, “Enabling a Software Collection”.
A single Software Collection can include multiple Software Collection scriptlets. These scriptlets are located in the 
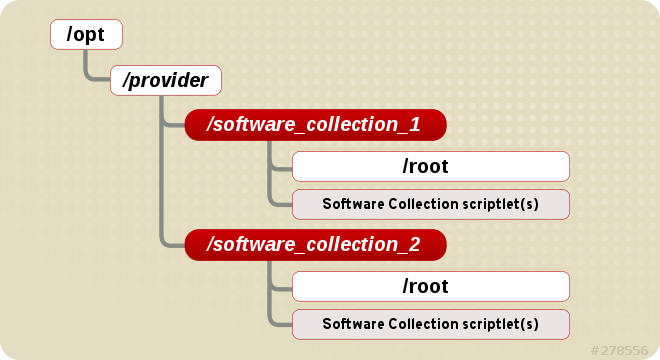
/opt/provider/software_collection/ directory in your Software Collection package. If you only need to distribute a single scriptlet in your Software Collection, it is highly recommended that you use enable as the name for that scriptlet. When the user runs a command in the Software Collection environment by executing scl enable software_collection command, the /opt/provider/software_collection/enable scriptlet is then used to update search paths, and so on.
Note that Software Collection scriptlets can only set the system environment in a subshell that is created by running the scl enable command. The subshell is only active for the time the command is being performed.

2.7. Package Layout

Each Software Collection's layout consists of the metapackage, which installs a subset of other packages, and a number of the Software Collection's packages, which are installed within the Software Collection namespace.

2.7.1. Metapackage

Each Software Collection includes a metapackage, which installs a subset of the Software Collection's packages that are essential for the user to perform most common tasks with the Software Collection. For example, the essential packages can provide the Perl language interpreter, but no Perl extension modules. The metapackage contains a basic file system hierarchy and delivers a number of the Software Collection's scriptlets.
The purpose of the metapackage is to make sure that all essential packages in the Software Collection are properly installed and that it is possible to enable the Software Collection.
The metapackage produces the following packages that are also part of the Software Collection:
The main package: %scl
The main package in the Software Collection contains dependencies of the base packages, which are included in the Software Collection. The main package does not contain any files.
When specifying dependencies for your Software Collection's packages, ensure that no other package in your Software Collection depends on the main package. The purpose of the main package is to install only those packages that are essential for the user to perform most common tasks with the Software Collection.
Normally, the main package does not specify any build time dependencies (for instance, packages that are only build time dependencies of another Software Collection's packages).
For example, if the name of the Software Collection is myorganization_ruby193, then the main package macro is expanded to:
myorganization_ruby193
The runtime subpackage: name-runtime
The runtime subpackage in the Software Collection owns the Software Collection's file system and delivers the Software Collection's scriptlets.
For example, if the name of the Software Collection is myorganization_ruby193, then the runtime subpackage macro is expanded to:
myorganization_ruby193-runtime
The build subpackage: name-build
The build subpackage in the Software Collection delivers the Software Collection's build configuration. The build subpackage is optional and can be excluded from the Software Collection.
For example, if the name of the Software Collection is myorganization_ruby193, then the build subpackage macro is expanded to:
myorganization_ruby193-build
The scldevel subpackage: name-scldevel
The scldevel subpackage in the %scl Software Collection contains development files, which are useful when developing packages of another Software Collection that depends on the %scl Software Collection. The scldevel subpackage is optional and can be excluded from the %scl Software Collection.
For example, if the name of the Software Collection is myorganization_ruby193, then the scldevel subpackage macro is expanded to:
myorganization_ruby193-scldevel
For more information about the scldevel subpackage, see Section 4.1, “Providing an scldevel Subpackage”.

2.7.2. Creating a Metapackage

When creating a new metapackage:

  • You are advised to add Requires: scl-utils-build to the build subpackage.
  • Add any macros you need to use to the macros.%{scl}-config file in the build subpackage.
  • You are not required to use conditionals for Software Collection-specific macros in the metapackage.
  • Consider specifying all packages in your Software Collection that are essential for the Software Collection run time as dependencies of the metapackage. That way you can ensure that the packages are installed with the Software Collection metapackage.
  • Include any path redefinition that the packages in your Software Collection may require in the enable scriptlet.
    For example, to run Software Collection binary files, add PATH=%{_bindir}\${PATH:+:\${PATH}} to the enable scriptlet.
  • Always make sure that the metapackage contains the %setup macro in the %prep section, otherwise building the Software Collection will fail. If you do not need to use a particular option with the %setup macro, add the %setup -c -T command to the %prep section.
    This is because the %setup macro defines and creates the %buildsubdir directory, which is normally used for storing temporary files at build time. If you do not define %setup in your Software Collection packages, files in the %buildsubdir directory will be overwritten, causing the build to fail.

Example of the Metapackage

To get an idea of what a typical Software Collection metapackage looks like, see the following example:
%global scl software_collection
%scl_package %scl
%global _scl_prefix /opt/myorganization

Summary: Package that installs %scl
Name: %scl_name
Version: 1
Release: 1%{?dist}
License: GPLv2+
Requires: %{scl_prefix}less
BuildRequires: scl-utils-build

%description
This is the main package for %scl Software Collection.

%package runtime
Summary: Package that handles %scl Software Collection.
Requires: scl-utils

%description runtime
Package shipping essential scripts to work with %scl Software Collection.

%package build
Summary: Package shipping basic build configuration
Requires: scl-utils-build

%description build
Package shipping essential configuration macros to build %scl Software Collection.

%package scldevel
Summary: Package shipping development files for %scl

%description scldevel
Package shipping development files, especially useful for development of
packages depending on %scl Software Collection.

%prep
%setup -c -T

%install
%scl_install

cat >> %{buildroot}%{_scl_scripts}/enable << EOF
export PATH=%{_bindir}\${PATH:+:\${PATH}}
export LD_LIBRARY_PATH=%{_libdir}\${LD_LIBRARY_PATH:+:\${LD_LIBRARY_PATH}}
export MANPATH=%{_mandir}:\$MANPATH
export PKG_CONFIG_PATH=%{_libdir}/pkgconfig\${PKG_CONFIG_PATH:+:\${PKG_CONFIG_PATH}}
EOF

cat >> %{buildroot}%{_root_sysconfdir}/rpm/macros.%{scl_name_base}-scldevel << EOF
%%scl_%{scl_name_base} %{scl}
%%scl_prefix_%{scl_name_base} %{scl_prefix}
EOF

# Install the generated man page
mkdir -p %{buildroot}%{_mandir}/man7/
install -p -m 644 %{scl_name}.7 %{buildroot}%{_mandir}/man7/

%files

%files runtime -f filesystem
%scl_files

%files build
%{_root_sysconfdir}/rpm/macros.%{scl}-config

%files scldevel
%{_root_sysconfdir}/rpm/macros.%{scl_name_base}-scldevel

%changelog
* Fri Aug 30 2013 John Doe &lt;jdoe@example.com&gt; 1-1
- Initial package

2.8. Software Collection Macros

The Software Collection packaging macro scl defines where to relocate the Software Collection's file structure. The relocated file structure is a file system used exclusively by the Software Collection.
The %scl_package macro defines files ownership for the Software Collection's metapackage and provides additional packaging macros to use in the Software Collection environment.
To be able to build a conventional package and a Software Collection package with a single spec file, prefix the Software Collection macros with %{?scl:macro}, as in the following example:
%{?scl:Requires:%scl_runtime}
In the example above, the %scl_runtime macro is the value of the Requires tag. Both the macro and the tag use the %{?scl: prefix.

2.8.1. Macros Specific to a Software Collection

The table below shows a list of all macros specific to a particular Software Collection. All the macros have default values that you will not need to change in most cases.

Table 2.1. Software Collection Specific Macros

Macro
Description
Example value
%scl_name
name of the Software Collection
software_collection_1
%scl_prefix
name of the Software Collection with a dash appended at the end
software_collection_1-
%pkg_name
name of the original package
perl
%_scl_prefix
root of the Software Collection (not package's root)
/opt/provider/
%_scl_scripts
location of Software Collection's scriptlets
/opt/provider/software_collection_1/
%_scl_root
installation root (install-root) of the package
/opt/provider/software_collection_1/root/
%scl_require_package software_collection_1 package_2
depend on a particular package from a specific Software Collection
software_collection_1-package_2

2.8.2. Macros Not Specific to a Software Collection

The table below shows a list of macros that are not specific to a particular Software Collection. Because these macros are not relocated and do not point to the Software Collection file system, they allow you to point to the system root file system. These macros use _root as a prefix.
All the macros have default values that you will not need to change in most cases.

Table 2.2. Software Collection Non-Specific Macros

Macro
Description
Relocated
Example value
%_root_prefix
Software Collection's %_prefix macro
no
/usr/
%_root_exec_prefix
Software Collection's %_exec_prefix macro
no
/usr/
%_root_bindir
Software Collection's %_bindir macro
no
/usr/bin/
%_root_sbindir
Software Collection's %_sbindir macro
no
/usr/sbin/
%_root_datadir
Software Collection's %_datadir macro
no
/usr/share/
%_root_sysconfdir
Software Collection's %_sysconfdir macro
no
/etc/
%_root_libexecdir
Software Collection's %_libexecdir macro
no
/usr/libexec/
%_root_sharedstatedir
Software Collection's %_sharedstatedir macro
no
/usr/com/
%_root_localstatedir
Software Collection's %_localstatedir macro
no
/usr/var/
%_root_includedir
Software Collection's %_includedir macro
no
/usr/include/
%_root_infodir
Software Collection's %_infodir macro
no
/usr/share/info/
%_root_mandir
Software Collection's %_mandir macro
no
/usr/share/man/
%_root_initddir
Software Collection's %_initddir macro
no
/etc/rc.d/init.d/
%_root_libdir
Software Collection's %_libdir macro, this macro does not work if Software Collection's metapackage is platform-independent
no
/usr/lib/

2.9. Converting a Conventional Spec File

The following steps show how to convert a conventional spec file into a Software Collection spec file so that the Software Collection spec file can be used in both the conventional package and the Software Collection.

Procedure 2.1. Converting a conventional spec file into a Software Collection spec file

  1. Add the %scl_package macro to the spec file. Place the macro in front of the spec file preamble as follows:
    %{?scl:%scl_package package_name}
  2. You are advised to define the %pkg_name macro in the spec file in case the package is not built for the Software Collection:
    %{!?scl:%global pkg_name %{name}}
    Consequently, you can use the %pkg_name macro to define the original name of the package wherever it is needed in the spec file that you can then use for building both the conventional package and the Software Collection.
  3. Change the Name tag in the spec file preamble as follows:
    Name: %{?scl_prefix}package_name
  4. If you are building or linking with other Software Collection packages, then prefix the names of those Software Collection packages in the Requires and BuildRequires tags with %{?scl_prefix} as follows:
    Requires: %{?scl_prefix}ifconfig
    When depending on the system versions of packages, you should avoid using versioned Requires or BuildRequires. If you need to depend on a package that could be updated by the system, consider including that package in your Software Collection, or remember to rebuild your Software Collection when the system package updates.
  5. To check that all essential Software Collection's packages are dependencies of the main metapackage, add the following macro after the BuildRequires or Requires tags in the spec file:
    %{?scl:Requires: %scl_runtime}
  6. Prefix the Obsoletes, Conflicts and BuildConflicts tags with %{?scl_prefix}. This is to ensure that the Software Collection can be used to deploy new packages to older systems without having the packages specified, for example, by Obsolete removed from the base system installation. For example:
    Obsoletes: %{?scl_prefix}lesspipe < 1.0
  7. Prefix the Provides tag with %{?scl_prefix}, as in the following example:
    Provides: %{?scl_prefix}more
  8. For any subpackages that define their name with the -n option, prefix their name with %{?scl_prefix}, as in the following example:
    %package -n %{?scl_prefix}more
  9. Add or edit the %setup macro in the %prep section of the spec file so that the macro can deal with a different package name in the Software Collection environment:
    %setup -q -n %{pkg_name}-%{version}
    Note that the %setup macro is required and that you must always use the macro with the -n option to successfully build your Software Collection.

Example of the Converted Spec File

To see what the diff file comparing a conventional spec file with a converted spec file looks like, see the following example:
--- a/less.spec
+++ b/less.spec
@@ -1,10 +1,13 @@
+%{?scl:%scl_package less}
+%{!?scl:%global pkg_name %{name}}
+
 Summary: A text file browser similar to more, but better
-Name: less
+Name: %{?scl_prefix}less
 Version: 444
 Release: 7%{?dist}
 License: GPLv3+
 Group: Applications/Text
-Source: http://www.greenwoodsoftware.com/less/%{name}-%{version}.tar.gz
+Source: http://www.greenwoodsoftware.com/less/%{pkg_name}-%{version}.tar.gz
 Source1: lesspipe.sh
 Source2: less.sh
 Source3: less.csh
@@ -19,6 +22,7 @@ URL: http://www.greenwoodsoftware.com/less/
 Requires: groff
 BuildRequires: ncurses-devel
 BuildRequires: autoconf automake libtool
-Obsoletes: lesspipe < 1.0
+Obsoletes: %{?scl_prefix}lesspipe < 1.0
+%{?scl:Requires: %scl_runtime}
 
 %description
 The less utility is a text file browser that resembles more, but has
@@ -31,7 +35,7 @@ You should install less because it is a basic utility for viewing text
 files, and you'll use it frequently.
 
 %prep
-%setup -q
+%setup -q -n %{pkg_name}-%{version}
 %patch1 -p1 -b .Foption
 %patch2 -p1 -b .search
 %patch4 -p1 -b .time
@@ -51,16 +55,16 @@ make CC="gcc $RPM_OPT_FLAGS -D_GNU_SOURCE -D_LARGEFILE_SOURCE -D_LARGEFILE64_SOU
 %install
 rm -rf $RPM_BUILD_ROOT
 make DESTDIR=$RPM_BUILD_ROOT install
-mkdir -p $RPM_BUILD_ROOT/etc/profile.d
+mkdir -p $RPM_BUILD_ROOT%{_sysconfdir}/profile.d
 install -p -c -m 755 %{SOURCE1} $RPM_BUILD_ROOT/%{_bindir}
-install -p -c -m 644 %{SOURCE2} $RPM_BUILD_ROOT/etc/profile.d
-install -p -c -m 644 %{SOURCE3} $RPM_BUILD_ROOT/etc/profile.d
-ls -la $RPM_BUILD_ROOT/etc/profile.d
+install -p -c -m 644 %{SOURCE2} $RPM_BUILD_ROOT%{_sysconfdir}/profile.d
+install -p -c -m 644 %{SOURCE3} $RPM_BUILD_ROOT%{_sysconfdir}/profile.d
+ls -la $RPM_BUILD_ROOT%{_sysconfdir}/profile.d
 
 %files
 %defattr(-,root,root,-)
 %doc LICENSE
-/etc/profile.d/*
+%{_sysconfdir}/profile.d/*
 %{_bindir}/*
 %{_mandir}/man1/*

2.10. Uninstalling All Software Collection Directories

Keep in mind that the yum remove command does not uninstall directories provided by those Software Collection packages and subpackages that are removed after the Software Collection runtime subpackage is removed.
To ensure that all directories are uninstalled, make those packages and subpackages depend on the runtime subpackage. To do so, add the following line to the spec file of each of those packages and subpackages:
%{?scl:Requires: %{scl}-runtime}
Adding the above line ensures that all directories provided by those packages and subpackages are removed correctly as long as the runtime subpackage does not depend on any of those packages and subpackages.

2.11. Making a Software Collection Depend on Another Software Collection

To make one Software Collection depend on a package from another Software Collection, you need to adjust the BuildRequires and Requires tags in the dependent Software Collection's spec file so that these tags properly define the dependency.
For example, to define dependencies on two Software Collections named software_collection_1 and software_collection_2, add the following three lines to your application's spec file:
BuildRequires: scl-utils-build
Requires: %scl_require software_collection_1
Requires: %scl_require software_collection_2
Ensure that the spec file also contains the %scl_package macro in front of the spec file preamble, for example:
%{?scl:%scl_package less}
Note that the %scl_package macro must be included in every spec file of your Software Collection.
You can also use the %scl_require_package macro to define dependencies on a particular package from a specific Software Collection, as in the following example:
BuildRequires: scl-utils-build
Requires: %scl_require_package software_collection_1 package_name

2.12. Building a Software Collection

To build a Software Collection on your system, run the following command:
 rpmbuild -ba package.spec --define 'scl name' 
The difference between the command shown above and the standard command to build conventional packages (rpmbuild -ba package.spec) is that you have to append the --define option to the rpmbuild command when building a Software Collection.
The --define option defines the scl macro, which uses the Software Collection configured in the Software Collection spec file (package.spec).
Alternatively, to be able to use the standard command rpmbuild -ba package.spec to build the Software Collection, specify the following in the package.spec file:
BuildRequires: software_collection-build
where software_collection is the name of the Software Collection.

2.12.1. Rebuilding a Software Collection without build Subpackages

If you wish to rebuild a Software Collection that is distributed without build subpackages (software_collection-build) and you do not want or cannot use the rpmbuild -ba package.spec --define 'scl name' command to build the Software Collection, you can have the build subpackages created by rebuilding the Software Collection metapackage. Note that you need to have the scl-utils-build package installed on your system, otherwise rebuilding the Software Collection metapackage with the rpmbuild command will fail.

Chapter 3. Advanced Topics

This chapter discusses advanced topics on packaging Software Collections.

3.1. Software Collection Automatic Provides and Requires and Filtering Support

Important

The functionality described in this section is not available in Enterprise Linux 5 and 6.
RPM in Fedora and Enterprise Linux 7 features support for automatic Provides and Requires and filtering. For example, for all Python libraries, RPM automatically adds the following Requires:
Requires: python(abi) = (version)
As explained in Section 2.9, “Converting a Conventional Spec File”, you should prefix this Requires with %{?scl_prefix} when converting your conventional RPM package:
Requires: %{?scl_prefix}python(abi) = (version))
Keep in mind that the scripts searching for these dependencies must sometimes be rewritten for your Software Collection, as the original RPM scripts are not extensible enough, and, in some cases, filtering is not usable. For example, to rewrite automatic Python Provides and Requires, add the following lines in the macros.%{scl}-config macro file:
%__python_provides /usr/lib/rpm/pythondeps-scl.sh --provides %{_scl_root} %{scl_prefix}
%__python_requires /usr/lib/rpm/pythondeps-scl.sh --requires %{_scl_root} %{scl_prefix}
The /usr/lib/rpm/pythondeps-scl.sh file is based on a pythondeps.sh file from the conventional package and adjusts search paths.
If there are Provides or Requires that you need to adjust, for example, a pkg_config Provides, there are two ways to do it:
  • Add the following lines in the macros.%{scl}-config macro file so that it applies to all packages in the Software Collection:
    %_use_internal_dependency_generator 0
    %__deploop() while read FILE; do /usr/lib/rpm/rpmdeps -%{1} ${FILE}; done | /bin/sort -u
    %__find_provides /bin/sh -c "%{?__filter_prov_cmd} %{__deploop P} %{?__filter_from_prov}"
    %__find_requires /bin/sh -c "%{?__filter_req_cmd}  %{__deploop R} %{?__filter_from_req}"
    
    # Handle pkgconfig's virtual Provides and Requires
    %__filter_from_req | %{__sed} -e 's|pkgconfig|%{?scl_prefix}pkgconfig|g'
    %__filter_from_prov | %{__sed} -e 's|pkgconfig|%{?scl_prefix}pkgconfig|g'
  • Or, alternatively, add the following lines after tag definitions in every spec file for which you want to filter Provides or Requires:
    %{?scl:%filter_from_provides s|pkgconfig|%{?scl_prefix}pkgconfig|g}
    %{?scl:%filter_from_requires s|pkgconfig|%{?scl_prefix}pkgconfig|g}
    %{?scl:%filter_setup}

Important

When using filters, you need to pay attention to the automatic dependencies you change. For example, if the conventional package contains Requires: pkgconfig(package_1) and Requires: pkgconfig(package_2), and only package_2 is included in the Software Collection, ensure that you do not filter the Requires tag for package_1.

3.2. Software Collection Macro Files Support

In some cases, you may need to ship macro files with your Software Collection packages. They are located in the %{?scl:%{_root_sysconfdir}}%{!?scl:%{_sysconfdir}}/rpm/ directory, which corresponds to the /etc/rpm/ directory for conventional packages. When shipping macro files, ensure that:
  • You rename the macro files by appending .%{scl} to their names so that they do not conflict with the files from the base system installation.
  • The macros in the macro files are either not expanded, or they are using conditionals, as in the following example:
    %__python2 %{_bindir}/python
    %python2_sitelib %(%{?scl:scl enable %scl '}%{__python2} -c "from distutils.sysconfig import get_python_lib; print(get_python_lib())"%{?scl:'})
As another example, there may be a situation where you need to create a Software Collection mypython that depends on a Software Collection python26. The python26 Software Collection defines the %{__python2} macro as in the above sample. This macro will evaluate to /opt/provider/mypython/root/usr/bin/python2, but the python2 binary is only available in the python26 Software Collection (/opt/provider/python26/root/usr/bin/python2).
To be able to build software in the mypython Software Collection environment, ensure that:
  • The macros.python.python26 macro file, which is a part of the python26-python-devel package, contains the following line:
    %__python26_python2 /opt/provider/python26/root/usr/bin/python2
  • And the macro file in the python26-build subpackage, and also the build subpackage in any depending Software Collection, contains the following line:
    %scl_package_override() {%global __python2 %__python26_python2}
    
This will redefine the %{__python2} macro only if the build subpackage from a corresponding Software Collection is present, which usually means that you want to build software for that Software Collection.

3.3. Packaging Wrappers for Software Collections

Using wrappers is an easy way to shorten commands that the user runs in the Software Collection environment.
The following is an example of a wrapper from a Ruby-based Software Collection named rubyscl that is installed as /usr/bin/rubyscl-ruby and allows the user to run rubyscl-ruby command instead of scl enable rubyscl 'ruby command':
#!/bin/bash

COMMAND="ruby $@"
scl enable rubyscl "$COMMAND"
It is important to package these wrappers as subpackages of the Software Collection package that will use them. That way, you can make installation of these wrappers optional, allowing the user not to install them, for example, on systems with read-only access to the /usr/bin/ directory where the wrappers would otherwise be installed.

3.4. Software Collection Initscript Support

Ensure that users can directly manage any services provided by the Software Collection or one of the associated applications with the system default tools, like service or chkconfig.
To avoid possible name conflicts with the system versions of the services that are part of the Software Collection, make sure to adjust the %install section of the spec file as follows:

%install
install -p -c -m 644 %{SOURCE2} $RPM_BUILD_ROOT%{?scl:%_root_sysconfdir}%{!?scl:%_sysconfdir}/rc.d/init.d/%{?scl_prefix}service_name
With this configuration in place, you can then refer to the version of the service included in the Software Collection as follows:
%{?scl_prefix}service_name

3.5. Software Collection Library Support

In case you distribute libraries that you intend to use only in the Software Collection environment or in addition to the libraries available on the system, update the LD_LIBRARY_PATH environment variable in the enable scriptlet as follows:
export LD_LIBRARY_PATH=%{_libdir}${LD_LIBRARY_PATH:+:${LD_LIBRARY_PATH}}
The configuration ensures that the version of the library in the Software Collection is preferred over the version of the library available on the system if the Software Collection is enabled.

Note

In case you distribute a private shared library in the Software Collection, consider using the DT_RUNPATH attribute instead of the LD_LIBRARY_PATH environment variable to make the private shared library accessible in the Software Collection environment.

3.5.1. Using a Library Outside of the Software Collection

If you distribute libraries that you intend to use outside of the Software Collection environment, you can use the directory /etc/ld.so.conf.d/ for this purpose.

Warning

Do not use /etc/ld.so.conf.d/ for libraries already available on the system. Using /etc/ld.so.conf.d/ is only recommended for a library that is not available on the system, as otherwise the version of the library in the Software Collection might get preference over the system version of the library. That could lead to undesired behavior of the system versions of the applications, including unexpected termination and data loss.

Procedure 3.1. Using /etc/ld.so.conf.d/ for libraries in the Software Collection

  1. Create a file named %{?scl_prefix}libs.conf and adjust the spec file configuration accordingly:
    SOURCE2: %{?scl_prefix}libs.conf
    
  2. In the %{?scl_prefix}libs.conf file, include a list of directories where the versions of the libraries associated with the Software Collection are located. For example:
    /opt/provider/software_collection_1/root/usr/lib64/
    
    In the example above, the /usr/lib64/ directory that is part of the Software Collection software_collection_1 is included in the list.
  3. Edit the %install section of the spec file, so the %{?scl_prefix}libs.conf file is installed as follows:
    %install
    install -p -c -m 644 %{SOURCE2} $RPM_BUILD_ROOT%{?scl:%_root_sysconfdir}%{!?scl:%_sysconfdir}/ld.so.conf.d/
    

3.5.2. Prefixing the Library Major soname with the Software Collection Name

When using libraries included in the Software Collection, always remember that a library with the same major soname can already be available on the system as a part of the base system installation. It is thus important not to forget to use the scl enable command when building an application against a library included in the Software Collection. Failing to do so may result in the application being executed in an incorrect environment, linked against the incorrect system version of the library.

Warning

Keep in mind that executing your application in an incorrect environment (for example in the system environment instead of the Software Collection environment) as well as linking your application against an incorrect library can lead to undesired behavior of your application, including unexpected termination and data loss.
To ensure that your application is not linked against an incorrect library even if the LD_LIBRARY_PATH environment variable has not been set properly, change the major soname of the library included in the Software Collection. The recommended way to change the major soname is to prefix the major soname version number with the Software Collection name.
Below is an example of the MySQL client library with the mysql55- prefix:
$ rpm -ql mysql55-mysql-libs | grep 'lib.*so'
/opt/provider/mysql55/root/usr/lib64/mysql/libmysqlclient.so.mysql55-18
/opt/provider/mysql55/root/usr/lib64/mysql/libmysqlclient.so.mysql55-18.0.0
On the same system, the system version of the MySQL client library is listed below:
$ rpm -ql mysql-libs | grep 'lib.*so'
/usr/lib64/mysql/libmysqlclient.so.18
/usr/lib64/mysql/libmysqlclient.so.18.0.0
The rpmbuild utility generates an automatic Provides tag for packages that include a versioned shared library. If you do not prefix the soname as described above, then an example of the Provides in case of the mysql package is libmysqlclient.so.18()(64bit). With this Provides, RPM can choose the incorrect RPM package, resulting in the application missing the requirement.
If you prefix the soname as described above, then an example of the generated Provides in case of mysql is libmysqlclient.so.mysql55-18()(64bit). With this Provides, RPM chooses the correct RPM dependencies and the application's requirements are satisfied.
In general, unless absolutely necessary, Software Collection packages should not provide any symbols that are already provided by packages from the base system installation. One exception to that rule is when you want to use the symbols in the packages from the base system installation.

3.5.3. Software Collection Library Support in Fedora and Enterprise Linux 7

When building your Software Collection for Fedora or Enterprise Linux 7, use the %__provides_exclude_from macro to prevent scanning certain files for automatically generated RPM symbols.
For example, to prevent scanning .so files in the %{_libdir} directory, add the following lines before the BuildRequires or Requires tags in your Software Collection spec file:
%if %{?scl:1}%{!?scl:0}
  # Do not scan .so files in %{_libdir}
  %global __provides_exclude_from ^%{_libdir}/.*.so.*$
%endif
The functionality is part of RPM support for automatic Provides and Requires, see Section 3.1, “Software Collection Automatic Provides and Requires and Filtering Support” for more information.

3.6. Software Collection .pc Files Support

The .pc files are special metadata files used by the pkg-config program to store information about libraries available on the system.
In case you distribute .pc files that you intend to use only in the Software Collection environment or in addition to the .pc files installed on the system, update the PKG_CONFIG_PATH environment variable. Depending on what is defined in your .pc files, update the PKG_CONFIG_PATH environment variable for the %{_libdir} macro (which expands to the library directory, typically /usr/lib/ or /usr/lib64/), or for the %{_datadir} macro (which expands to the share directory, typically /usr/share/).
If the library directory is defined in your .pc files, update the PKG_CONFIG_PATH environment variable by adjusting the %install section of the Software Collection spec file as follows:
%install
cat >> %{buildroot}%{_scl_scripts}/enable << EOF
export PKG_CONFIG_PATH=%{_libdir}/pkgconfig:\$PKG_CONFIG_PATH
EOF
If the share directory is defined in your .pc files, update the PKG_CONFIG_PATH environment variable by adjusting the %install section of the Software Collection spec file as follows:
%install
cat >> %{buildroot}%{_scl_scripts}/enable << EOF
export PKG_CONFIG_PATH=%{_datadir}/pkgconfig:\$PKG_CONFIG_PATH
EOF
The two examples above both configure the enable scriptlet so that it ensures that the .pc files in the Software Collection are preferred over the .pc files available on the system if the Software Collection is enabled.
The Software Collection can provide a wrapper script that is visible to the system to enable the Software Collection, for example in the /usr/bin/ directory. In this case, ensure that the .pc files are visible to the system even if the Software Collection is disabled.
To allow your system to use .pc files from the disabled Software Collection, update the PKG_CONFIG_PATH environment variable with the paths to the .pc files associated with the Software Collection. Depending on what is defined in your .pc files, update the PKG_CONFIG_PATH environment variable for the %{_libdir} macro (which expands to the library directory), or for the %{_datadir} macro (which expands to the share directory).

Procedure 3.2. Updating the PKG_CONFIG_PATH environment variable for %{_libdir}

  1. To update the PKG_CONFIG_PATH environment variable for the %{_libdir} macro, create a custom script /etc/profile.d/name.sh. The script is preloaded when a shell is started on the system.
    For example, create the following file:
    %{?scl_prefix}pc-libdir.sh
  2. Use the pc-libdir.sh short script that modifies the PKG_CONFIG_PATH variable to refer to your .pc files:
    export PKG_CONFIG_PATH=%{_libdir}/pkgconfig:/opt/provider/software_collection/path/to/your/pc_files
  3. Add the file to your Software Collection package's spec file:
    SOURCE2: %{?scl_prefix}pc-libdir.sh
  4. Install this file into the system /etc/profile.d/ directory by adjusting the %install section of the Software Collection package's spec file:
    %install
    install -p -c -m 644 %{SOURCE2} $RPM_BUILD_ROOT%{?scl:%_root_sysconfdir}%{!?scl:%_sysconfdir}/profile.d/

Procedure 3.3. Updating the PKG_CONFIG_PATH environment variable for %{_datadir}

  1. To update the PKG_CONFIG_PATH environment variable for the %{_datadir} macro, create a custom script /etc/profile.d/name.sh. The script is preloaded when a shell is started on the system.
    For example, create the following file:
    %{?scl_prefix}pc-datadir.sh
  2. Use the pc-datadir.sh short script that modifies the PKG_CONFIG_PATH variable to refer to your .pc files:
    export PKG_CONFIG_PATH=%{_datadir}/pkgconfig:/opt/provider/software_collection/path/to/your/pc_files
  3. Add the file to your Software Collection package's spec file:
    SOURCE2: %{?scl_prefix}pc-datadir.sh
  4. Install this file into the system /etc/profile.d/ directory by adjusting the %install section of the Software Collection package's spec file:
    %install
    install -p -c -m 644 %{SOURCE2} $RPM_BUILD_ROOT%{?scl:%_root_sysconfdir}%{!?scl:%_sysconfdir}/profile.d/

3.7. Software Collection MANPATH Support

To allow the man command on the system to display manual pages from the enabled Software Collection, update the MANPATH environment variable with the paths to the manual pages that are associated with the Software Collection.
To update the MANPATH environment variable, add the following to the %install section of the Software Collection spec file:
%install
cat >> %{buildroot}%{_scl_scripts}/enable << EOF
export MANPATH=%{_mandir}:\${MANPATH}
EOF
This configures the enable scriptlet to update the MANPATH environment variable. The manual pages associated with the Software Collection are then not visible as long as the Software Collection is not enabled.
The Software Collection can provide a wrapper script that is visible to the system to enable the Software Collection, for example in the /usr/bin/ directory. In this case, ensure that the manual pages are visible to the system even if the Software Collection is disabled.
To allow the man command on the system to display manual pages from the disabled Software Collection, update the MANPATH environment variable with the paths to the manual pages associated with the Software Collection.

Procedure 3.4. Updating the MANPATH environment variable for the disabled Software Collection

  1. To update the MANPATH environment variable, create a custom script /etc/profile.d/name.sh. The script is preloaded when a shell is started on the system.
    For example, create the following file:
    %{?scl_prefix}manpage.sh
  2. Use the manpage.sh short script that modifies the MANPATH variable to refer to your man path directory:
    export MANPATH=/opt/provider/software_collection/path/to/your/man_pages:${MANPATH}
  3. Add the file to your Software Collection package's spec file:
    SOURCE2: %{?scl_prefix}manpage.sh
  4. Install this file into the system /etc/profile.d/ directory by adjusting the %install section of the Software Collection package's spec file:
    %install
    install -p -c -m 644 %{SOURCE2} $RPM_BUILD_ROOT%{?scl:%_root_sysconfdir}%{!?scl:%_sysconfdir}/profile.d/

3.8. Software Collection cronjob Support

With your Software Collection, you can run periodic tasks on the system either with a dedicated service or with cronjobs. If you intend to use a dedicated service, refer to Section 3.4, “Software Collection Initscript Support” on how to work with initscripts in the Software Collection environment.

Procedure 3.5. Running periodic tasks with cronjobs

  1. To use cronjobs for running periodic tasks, place a crontab file for your Software Collection in the /etc/cron.d/ directory with the Software Collection's name.
    For example, create the following file:
    %{?scl_prefix}crontab
  2. Ensure that the contents of the crontab file follow the standard crontab file format, as in the following example:
    0 1 * * Sun root scl enable software_collection '/opt/provider/software_collection/root/usr/bin/cron_job_name'
    where software_collection is the name of your Software Collection, and /opt/provider/software_collection/root/usr/bin/cron_job_name is the command you want to periodically run.
  3. Add the file to your spec file of the Software Collection package:
    SOURCE2: %{?scl_prefix}crontab
  4. Install the file into the system directory /etc/cron.d/ by adjusting the %install section of the Software Collection package's spec file:
    %install
    install -p -c -m 644 %{SOURCE2} $RPM_BUILD_ROOT%{?scl:%_root_sysconfdir}%{!?scl:%_sysconfdir}/cron.d/
    

3.9. Software Collection Log File Support

By default, programs packaged in a Software Collection create log files in the /opt/provider/software_collection/root/var/log/ directory. Consider creating the log files outside of the Software Collection file system hierarchy, that is in the /var/log/ system directory. When using the system directory, all log files are stored in the same location, which makes it easier for users to locate and manage them.

3.10. Software Collection logrotate Support

With your Software Collection or an application associated with your Software Collection, you can manage log files with the logrotate program.

Procedure 3.6. Managing log files with logrotate

  1. To manage your log files with logrotate, place a custom logrotate file for your Software Collection in the system directory for the logrotate jobs /etc/logrotate.d/.
    For example, create the following file:
    %{?scl_prefix}logrotate
  2. Ensure that the contents of the logrotate file follow the standard logrotate file format as follows:
    /opt/provider/software_collection/var/log/your_application_name.log {
          missingok
          notifempty
          size 30k
          yearly
          create 0600 root root
      }
  3. Add the file to your spec file of the Software Collection package:
    SOURCE2: %{?scl_prefix}logrotate
  4. Install the file into the system directory /etc/logrotate.d/ by adjusting the %install section of the Software Collection package's spec file:
    %install
    install -p -c -m 644 %{SOURCE2} $RPM_BUILD_ROOT%{?scl:%_root_sysconfdir}%{!?scl:%_sysconfdir}/logrotate.d/

3.11. Software Collection Lock File Support

If you store your Software Collection's lock files within the /opt/provider/software_collection/ file system hierarchy, you can avoid any possible conflicts with the system versions of the applications or services that can be on the system.
If you want to prevent Software Collection's applications or services from running while the system version of the respective application or service is running, make sure that your applications or services, which require a lock, write the lock to the system directory /var/lock/ instead of the Software Collection's directory /opt/provider/software_collection/var/lock/. In this way, your applications or services' lock file will not be overwritten. The lock file will not be renamed and the name stays the same as the system version.
If you want your Software Collection's version of the application or service to run concurrently with the system version (when the Software Collection version's resources will not conflict with the system version's resources), ensure that the applications or services write the lock to the Software Collection's directory /opt/provider/software_collection/var/lock/.

3.12. Software Collection Configuration Files Support

If you store your Software Collection's configuration files within the /opt/provider/software_collection/ file system hierarchy, you can avoid any possible conflicts with the system versions of the configuration files that can be present on the system.
If you cannot store the configuration files within /opt/provider/software_collection/, then ensure that you properly configure an alternative location for the configuration files. For many programs, this can be usually done at build or installation time.

3.13. Software Collection Kernel Module Support

Because Linux kernel modules are normally tied to a particular version of the Linux kernel, you must be careful when you package kernel modules into a Software Collection. This is because the package management system on Fedora and Enterprise Linux does not automatically update or install an updated version of the kernel module if an updated version of the Linux kernel is installed. To make packaging the kernel modules into the Software Collection easier, see the following recommendations. Ensure that:
  1. the name of your kernel module package includes the kernel version,
  2. the tag Requires, which can be found in your kernel module spec file, includes the kernel version and revision (in the format kernel-version-revision).

3.14. Software Collection SELinux Support

Because Software Collections are designed to install the Software Collection packages in an alternate directory, set up the necessary SELinux labels so that SELinux is aware of the alternate directory.
If the file system hierarchy of your Software Collection package imitates the file system hierarchy of the corresponding conventional package, you can run the semanage fcontext and restorecon commands to set up the SELinux labels.
For example, if the /opt/provider/software_collection_1/root/usr/ directory in your Software Collection package imitates the /usr/ directory of your conventional package, set up the SELinux labels as follows:
semanage fcontext -a -e /usr /opt/provider/software_collection_1/root/usr
restorecon -R -v /opt/provider/software_collection_1/root/usr
The commands above ensure that all directories and files in the /opt/provider/software_collection_1/root/usr/ directory are labeled by SELinux as if they were located in the /usr/ directory.

3.14.1. SELinux Support in Fedora and Enterprise Linux 7

When packaging a Software Collection for Fedora or Enterprise Linux 7, add the following commands to the %post section in the Software Collection metapackage to set up the SELinux labels:
semanage fcontext -a -e /usr /opt/provider/software_collection_1/root/usr
restorecon -R -v /opt/provider/software_collection_1/root/usr
selinuxenabled && load_policy || :
The last command ensures that the newly created SELinux policy is properly loaded, and that the files installed by a package in the Software Collection are created with the correct SELinux context. By using this command in the metapackage, you do not need to include the restorecon command in all packages in the Software Collection.
Note that the semanage fcontext command is provided by the policycoreutils-python package, therefore it is important that you include policycoreutils-python in Requires for the Software Collection metapackage.

3.14.2. SELinux Support in Enterprise Linux 5

Keep in mind that the semanage -e command, which substitutes the source path for the destination path during labeling, is not supported in Enterprise Linux 5.

Chapter 4. Extending Software Collections

This chapter describes extending Software Collections.

4.1. Providing an scldevel Subpackage

Providing an scldevel subpackage in your Software Collection's metapackage can make it easier for users to create a dependent Software Collection. This section describes creating an scldevel subpackage for Ruby-based Software Collections, ruby193 and ruby200.

Procedure 4.1. Providing your own scldevel subpackage

  1. In your Software Collection's metapackage, add the scldevel subpackage by defining its name, summary, and description:
    %package scldevel
    Summary: Package shipping development files for %scl
    Provides: scldevel(%{scl_name_base})
    
    %description scldevel
    Package shipping development files, especially useful for development of
    packages depending on %scl Software Collection.
    You are advised to use the virtual Provides: scldevel(%{scl_name_base}) during the build of packages of dependent Software Collections. This will ensure availability of a version of the %{scl_name_base} Software Collection and its macros, as specified in the following step.
  2. In the %install section of your Software Collection's metapackage, create the macros.%{scl_name_base}-scldevel file that is part of the scldevel subpackage and contains:
    cat >> %{buildroot}%{_root_sysconfdir}/rpm/macros.%{scl_name_base}-scldevel << EOF
    %%scl_%{scl_name_base} %{scl}
    %%scl_prefix_%{scl_name_base} %{scl_prefix}
    EOF
    Note that between all Software Collections that share the same %{scl_name_base} name, the provided macros.%{scl_name_base}-scldevel files must conflict. This is to disallow installing multiple versions of the %{scl_name_base} Software Collections. For example, in Red Hat Software Collections, the ruby193-scldevel subpackage cannot be installed when there is the ruby200-scldevel subpackage installed.

4.1.1. Using an scldevel Subpackage in a Dependent Software Collection

To use your scldevel subpackage in a Software Collection that depends on a Software Collection ruby200, update the metapackage of the dependent Software Collection as described below.

Procedure 4.2. Using your own scldevel subpackage in a dependent Software Collection

  1. Consider adding the following at the beginning of the metapackage's spec file:
    %{!?scl_ruby:%global scl_ruby ruby200}
    %{!?scl_prefix_ruby:%global scl_prefix_ruby %{scl_ruby}-}
    These two lines are optional. They are only meant as a visual hint that the dependent Software Collection has been designed to depend on the ruby200 Software Collection. If there is no other scldevel subpackage available in the build root, then the ruby200-scldevel subpackage is used as a build requirement.
    You can substitute these lines with the following line:
    %{?scl_prefix_ruby}
  2. Add the following build requirement to the metapackage:
    BuildRequires: %{scl_prefix_ruby}scldevel
    By specifying this build requirement, you ensure that the scldevel subpackage is in the build root and that the default values are not in use. Omitting this package could result in broken requires at the subsequent packages' build time.
  3. Ensure that the %package runtime part of the metapackage's spec file includes the following lines:
    %package runtime
    Summary: Package that handles %scl Software Collection.
    Requires: scl-utils
    Requires: %{scl_prefix_ruby}runtime
  4. Ensure that the %package build part of the metapackage's spec file includes the following lines:
    %package build
    Summary: Package shipping basic build configuration
    Requires: %{scl_prefix_ruby}scldevel
    Specifying Requires: %{scl_prefix_ruby}scldevel ensures that macros are available in all packages of the Software Collection.

Chapter 5. Troubleshooting Software Collections

This chapter helps you troubleshoot some of the common issues you can encounter when building your Software Collections.

5.1. Error: line XX: Unknown tag: %scl_package software_collection_name

You can encounter this error message when building a Software Collection package. It is usually caused by a missing package scl-utils-build. To install the scl-utils-build package, run the following command:
# yum install scl-utils-build

5.2. scl command does not exist

This error message is usually caused by a missing package scl-utils. To install the scl-utils package, run the following command:
# yum install scl-utils

5.3. Unable to open /etc/scl/prefixes/software_collection_name

This error message can be caused by using incorrect arguments with the scl command you are calling. Check the scl command is correct and that you have not mistyped any of the arguments.
The same error message can also be caused by a missing Software Collection. Ensure that the software_collection_name Software Collection is properly installed on the system. For more information, see Section 1.5, “Listing Installed Software Collections”.

5.4. scl_source: command not found

This error message is usually caused by having an old version of the scl-utils package installed. To update the scl-utils package, run the following command:
# yum update scl-utils

Chapter 6. Getting More Information

For more information on Software Collection packaging and Fedora, refer to the resources listed below.

6.1. Installed Documentation

  • scl(1) – The manual page for the scl tool for enabling Software Collections and running programs in Software Collection's environment.
  • scl --help – General usage information for the scl tool for enabling Software Collections and running programs in Software Collection's environment.
  • rpmbuild(8) – The manual page for the rpmbuild utility for building both binary and source packages.

6.2. Accessing Online Resources

The following is a brief list of resources that are directly or indirectly relevant to this book:
  • SoftwareCollections.org – The SoftwareCollections.org website is the home for projects creating Software Collections (SCLs) for Red Hat Enterprise Linux, Fedora, CentOS, and Scientific Linux. This is where you create and host SCLs, as well as connect with other developers working on Software Collections. SoftwareCollections.org is also the central repository for users to find third-party Software Collections for their systems.
  • spec2scl – The spec2scl tool can help you convert conventional RPM spec files to SCL-style spec files. Install it on Fedora by running the yum install spec2scl command.
  • Fedora 20 Installation Guide – The Installation Guide for Fedora 20 provides more details on getting, installing, and updating the system.
  • Fedora 18 System Administrator's Guide – The System Administrator's Guide for Fedora 18 documents relevant information regarding the deployment, configuration, and administration of Fedora.

Appendix A. Revision History

Revision History
Revision 1-4Fri Jul 11 2014Petr Kovář
1-4 release of the Software Collections Guide.
Revision 1-3Sun Mar 23 2014Petr Kovář
1-3 release of the Software Collections Guide.
Revision 1-2Wed Sep 18 2013Petr Kovář
1-2 release of the Software Collections Guide.
Revision 1-1Mon Feb 18 2013Petr Kovář
1-1 release of the Software Collections Guide.
Revision 1-0Tue Jun 19 2012Petr Kovář
1-0 release of the Software Collections Guide.
Revision 0.0-0Thu Feb 23 2012Petr Kovář
Initial creation of book.