Detected network connections will be listed in the left-hand pane. To read more details about a connection, select it with your mouse and they will appear to the right. To activate or deactivate a network connection, move the switch in the top-right of the screen to either ON or OFF.
9.9.1. Edit Network Connections
You can also use Network Manager to change your network configuration after you have completed the installation.
To configure the selected network connection manually, click the Configure button. A Network Manager dialog appears that allows you to configure the selected connection. The configuration options presented will depend on whether the connection is wired, wireless, mobile broadband, VPN, or DSL. A full description of all configurations possible with NetworkManager is beyond the scope of this guide. This section only details the most typical scenario of how to configure wired connections during installation. Configuration of other types of network is broadly similar, although the specific parameters that you must configure are necessarily different.
When you have finished editing network settings, click Save to save the new configuration. If you reconfigured a device that was already active during installation, you must restart the device in order to use the new configuration in the installer environment. Use the ON/OFF switch on the Network Configuration screen to restart the device.
When configuring a wireless connection that you also intend to use during the installation, you will not be prompted for a password as you would on an installed system. You must specify a password in the Wireless Security tab in NetworkManager. Once you have saved the configuration, the installer will establish the wireless connection.
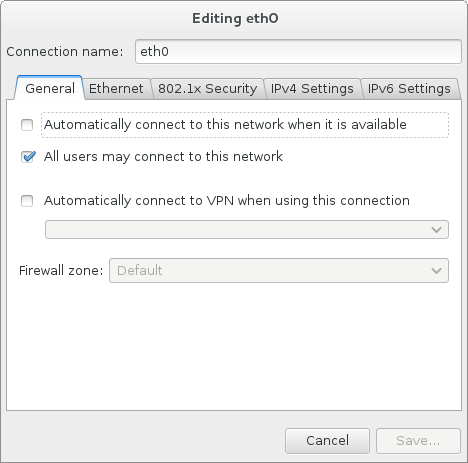
9.9.1.1. Options common to all types of connection
Certain configuration options are common to all connection types.
Specify a name for the connection in the Connection name name field.
The following options are available in the General tab:
- Automatically connect to this network when it is available
Check this box to start the connection automatically when the system boots.
- All users may connect to this network
Check this box to control whether a network configuration is available system-wide or not. During installation, ensure that it remains checked for any network interface that you configure.
The VPN and Firewall Zone options in the General tab are not available during installation.
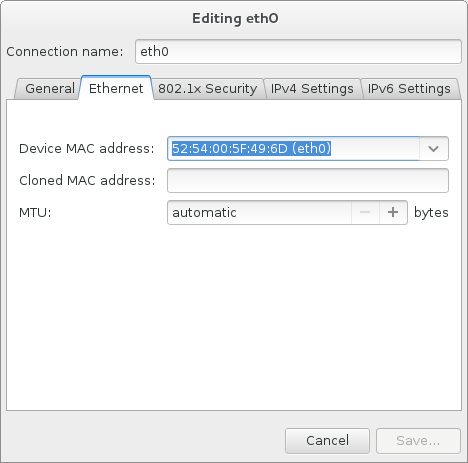
9.9.1.2. The Ethernet tab
Use the Ethernet tab to specify or change the media access control (MAC) address for the network adapter. The Device MAC address drop-down menu allows you to choose from a list of actual MAC addresses of deviced available on the system, while the Cloned MAC Address field allows you to set an arbitrary address for this connection if necessary. Leave this field blank to use the device address.
The MTU (maximum transmission unit) field sets the maximum unit size (in bytes) that can pass through the interface either manually or automatically.
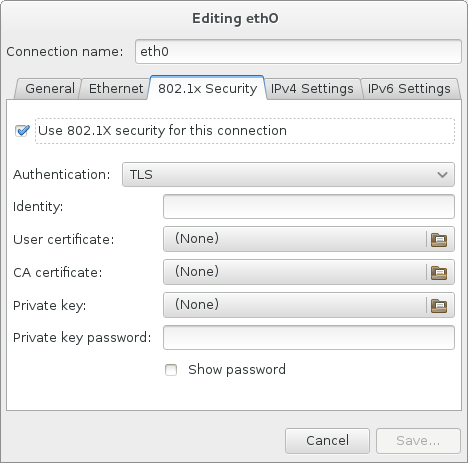
9.9.1.3. The 802.1x Security tab
Use the 802.1x Security tab to configure 802.1X port-based network access control (PNAC). Select Use 802.1X security for this connection to enable access control, then specify details of your network. The configuration options include:
- Authentication
Choose one of the following methods of authentication:
MD5 for the MD5 Message-Digest Algorithm
TLS for Transport Layer Security
FAST for Flexible Authentication via Secure Tunneling
Tunneled TLS for Tunneled Transport Layer Security, otherwise known as TTLS, or EAP-TTLS
Protected EAP (PEAP) for Protected Extensible Authentication Protocol
- Identity
Provide the identity of this server.
- User certificate
Browse to a personal X.509 certificate file encoded with Distinguished Encoding Rules (DER) or Privacy Enhanced Mail (PEM).
- CA certificate
Browse to a X.509 certificate authority certificate file encoded with Distinguished Encoding Rules (DER) or Privacy Enhanced Mail (PEM).
- Private key
Browse to a private key file encoded with Distinguished Encoding Rules (DER), Privacy Enhanced Mail (PEM), or the Personal Information Exchange Syntax Standard (PKCS#12).
- Private key password
The password for the private key specified in the Private key field. Select Show password to make the password visible as you type it.
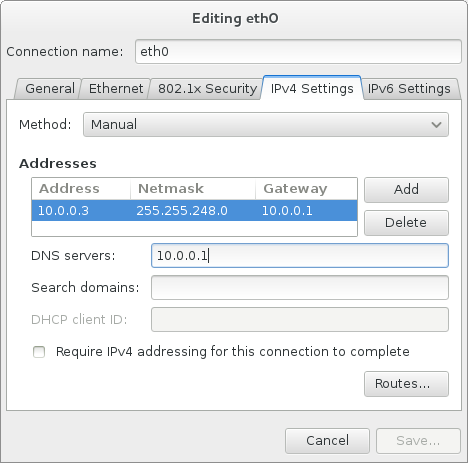
9.9.1.4. The IPv4 Settings tab
Use the IPv4 Settings tab tab to configure the IPv4 parameters for the previously selected network connection.
Use the Method drop-down menu to specify which settings the system should attempt to obtain from a Dynamic Host Configuration Protocol (DHCP) service running on the network. Choose from the following options:
- Automatic (DHCP)
IPv4 parameters are configured by the DHCP service on the network.
- Automatic (DHCP) addresses only
The IPv4 address, netmask, and gateway address are configured by the DHCP service on the network, but DNS servers and search domains must be configured manually.
- Manual
IPv4 parameters are configured manually for a static configuration.
- Link-Local Only
A link-local address in the 169.254/16 range is assigned to the interface.
- Shared to other computers
The system is configured to provide network access to other computers. The interface is assigned an address in the 10.42.x.1/24 range, a DHCP server and DNS server are started, and the interface is connected to the default network connection on the system with network address translation (NAT).
- Disabled
IPv4 is disabled for this connection.
If you selected a method that requires you to supply manual parameters, enter details of the IP address for this interface, the netmask, and the gateway in the Addresses field. Use the Add and Delete buttons to add or remove addresses. Enter a comma-separated list of DNS servers in the DNS servers field, and a comma-separated list of domains in the Search domains field for any domains that you want to include in name server lookups.
Optionally, enter a name for this network connection in the DHCP client ID field. This name must be unique on the subnet. When you assign a meaningful DHCP client ID to a connection, it is easy to identify this connection when troubleshooting network problems.
Deselect the Require IPv4 addressing for this connection to complete check box to allow the system to make this connection on an IPv6-enabled network if IPv4 configuration fails but IPv6 configuration succeeds.
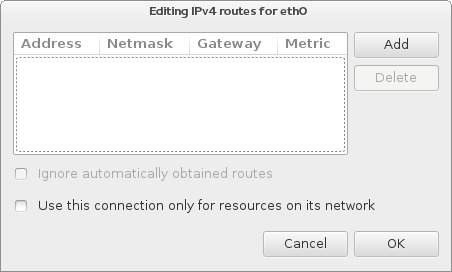
9.9.1.4.1. Editing IPv4 routes
Fedora configures a number of routes automatically based on the IP addresses of a device. To edit additional routes, click the Routes button. The Editing IPv4 routes dialog appears.
Click Add to add the IP address, netmask, gateway address, and metric for a new static route.
Select Ignore automatically obtained routes to make the interface use only the routes specified for it here.
Select Use this connection only for resources on its network to prevent this connection from becoming the default route. Enabling this option means that this route will only be used when necessary to access certain resources, such as intranet pages which require a local or VPN connection. Another (default) route will be used for publicly available resources if possible. Note that unlike the additional routes configured in this dialog, this setting will be transferred to the installed system.
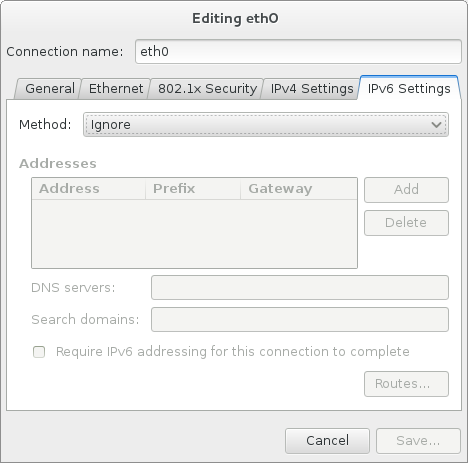
9.9.1.5. The IPv6 Settings tab
Use the IPv6 Settings tab tab to configure the IPv6 parameters for the previously selected network connection.
Use the Method drop-down menu to specify which settings the system should attempt to obtain from a Dynamic Host Configuration Protocol (DHCP) service running on the network. Choose from the following options:
- Ignore
IPv6 is ignored for this connection.
- Automatic
NetworkManager uses router advertisement (RA) to create an automatic, stateless configuration.
- Automatic, addresses only
NetworkManager uses RA to create an automatic, stateless configuration, but DNS servers and search domains are ignored and must be configured manually.
- Automatic, DHCP only
NetworkManager does not use RA, but requests information from DHCPv6 directly to create a stateful configuration.
- Manual
IPv6 parameters are configured manually for a static configuration.
- Link-Local Only
A link-local address with the fe80::/10 prefix is assigned to the interface.
If you selected a method that requires you to supply manual parameters, enter details of the IP address for this interface, the netmask, and the gateway in the Addresses field. Use the Add and Delete buttons to add or remove addresses. Enter a comma-separated list of DNS servers in the DNS servers field, and a comma-separated list of domains in the Search domains field for any domains that you want to include in name server lookups.
Optionally, enter a name for this network connection in the DHCP client ID field. This name must be unique on the subnet. When you assign a meaningful DHCP client ID to a connection, it is easy to identify this connection when troubleshooting network problems.
Deselect the Require IPv6 addressing for this connection to complete check box to allow the system to make this connection on an IPv4-enabled network if IPv6 configuration fails but IPv4 configuration succeeds.
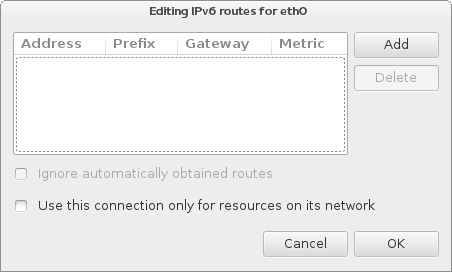
9.9.1.5.1. Editing IPv6 routes
Fedora configures a number of routes automatically based on the IP addresses of a device. To edit additional routes, click the Routes button. The Editing IPv6 routes dialog appears.
Click Add to add the IP address, netmask, gateway address, and metric for a new static route.
Select Use this connection only for resources on its network to restrict connections only to the local network.