Edition 20.0
Abstract
sepolicy Suitesystemd Access ControlMono-spaced Bold
To see the contents of the filemy_next_bestselling_novelin your current working directory, enter thecat my_next_bestselling_novelcommand at the shell prompt and press Enter to execute the command.
Press Enter to execute the command.Press Ctrl+Alt+F2 to switch to a virtual terminal.
mono-spaced bold. For example:
File-related classes includefilesystemfor file systems,filefor files, anddirfor directories. Each class has its own associated set of permissions.
Choose → → from the main menu bar to launch Mouse Preferences. In the Buttons tab, select the Left-handed mouse check box and click to switch the primary mouse button from the left to the right (making the mouse suitable for use in the left hand).To insert a special character into a gedit file, choose → → from the main menu bar. Next, choose → from the Character Map menu bar, type the name of the character in the Search field and click . The character you sought will be highlighted in the Character Table. Double-click this highlighted character to place it in the Text to copy field and then click the button. Now switch back to your document and choose → from the gedit menu bar.
Mono-spaced Bold Italic or Proportional Bold Italic
To connect to a remote machine using ssh, typessh username@domain.nameat a shell prompt. If the remote machine isexample.comand your username on that machine is john, typessh john@example.com.Themount -o remount file-systemcommand remounts the named file system. For example, to remount the/homefile system, the command ismount -o remount /home.To see the version of a currently installed package, use therpm -q packagecommand. It will return a result as follows:package-version-release.
Publican is a DocBook publishing system.
mono-spaced roman and presented thus:
books        Desktop   documentation  drafts  mss    photos   stuff  svn
books_tests  Desktop1  downloads      images  notes  scripts  svgs
mono-spaced roman but add syntax highlighting as follows:
package org.jboss.book.jca.ex1;
import javax.naming.InitialContext;
public class ExClient
{
public static void main(String args[])
throws Exception
{
InitialContext iniCtx = new InitialContext();
Object ref = iniCtx.lookup("EchoBean");
EchoHome home = (EchoHome) ref;
Echo echo = home.create();
System.out.println("Created Echo");
System.out.println("Echo.echo('Hello') = " + echo.echo("Hello"));
}
}Note
Important
Warning
Fedora and the component security-guide. The following link automatically loads this information for you: http://bugzilla.redhat.com/.
Summary field.
Description field and give us the details of the error or suggestion as specifically as you can. If possible, include some surrounding text so we know where the error occurs or the suggestion fits.
Document URL:


Section number and name:


Error or suggestion:


Additional information:
Warning
nmap command followed by the hostname or IP address of the machine to scan.
nmap foo.example.comStarting Nmap 4.68 ( http://nmap.org ) Interesting ports on foo.example.com: Not shown: 1710 filtered ports PORT STATE SERVICE 22/tcp open ssh 53/tcp open domain 70/tcp closed gopher 80/tcp open http 113/tcp closed auth
Note
Note
Table 1.1. Common Exploits
| Exploit | Description | Notes | |||
|---|---|---|---|---|---|
| Null or Default Passwords | Leaving administrative passwords blank or using a default password set by the product vendor. This is most common in hardware such as routers and firewalls, though some services that run on Linux can contain default administrator passwords. |
| |||
| Default Shared Keys | Secure services sometimes package default security keys for development or evaluation testing purposes. If these keys are left unchanged and are placed in a production environment on the Internet, all users with the same default keys have access to that shared-key resource, and any sensitive information that it contains. |
| |||
| IP Spoofing | A remote machine acts as a node on your local network, finds vulnerabilities with your servers, and installs a backdoor program or trojan horse to gain control over your network resources. |
| |||
| Eavesdropping | Collecting data that passes between two active nodes on a network by eavesdropping on the connection between the two nodes. |
| |||
| Service Vulnerabilities | An attacker finds a flaw or loophole in a service run over the Internet; through this vulnerability, the attacker compromises the entire system and any data that it may hold, and could possibly compromise other systems on the network. |
| |||
| Application Vulnerabilities | Attackers find faults in desktop and workstation applications (such as e-mail clients) and execute arbitrary code, implant trojan horses for future compromise, or crash systems. Further exploitation can occur if the compromised workstation has administrative privileges on the rest of the network. |
| |||
| Denial of Service (DoS) Attacks | Attacker or group of attackers coordinate against an organization's network or server resources by sending unauthorized packets to the target host (either server, router, or workstation). This forces the resource to become unavailable to legitimate users. |
|
Note
/mnt/cdrom, use the following command to import it into the keyring (a database of trusted keys on the system):
rpm --import /mnt/cdrom/RPM-GPG-KEYrpm -qa gpg-pubkey*gpg-pubkey-db42a60e-37ea5438rpm -qi command followed by the output from the previous command, as in this example:
rpm -qi gpg-pubkey-db42a60e-37ea5438rpm -K /tmp/updates/*.rpmgpg OK. If it doesn't, make sure you are using the correct Fedora public key, as well as verifying the source of the content. Packages that do not pass GPG verifications should not be installed, as they may have been altered by a third party.
rpm -Uvh /tmp/updates/*.rpmrpm -ivh /tmp/updates/<kernel-package>rpm -e <old-kernel-package>Note
Important
Note
glibc, which are used by a number of applications and services. Applications utilizing a shared library typically load the shared code when the application is initialized, so any applications using the updated library must be halted and relaunched.
lsof command as in the following example:
lsof /lib/libwrap.so*tcp_wrappers package is updated.
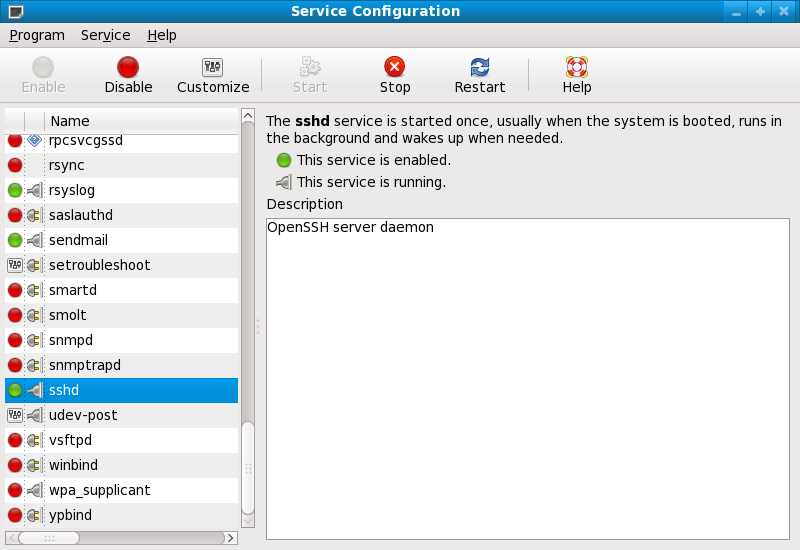
sshd, vsftpd, and xinetd.
/usr/bin/systemctl command as in the following example:
/usr/bin/systemctl restart <service-name>sshd.
xinetd Servicesxinetd super service only run when a there is an active connection. Examples of services controlled by xinetd include Telnet, IMAP, and POP3.
xinetd each time a new request is received, connections that occur after an upgrade are handled by the updated software. However, if there are active connections at the time the xinetd controlled service is upgraded, they are serviced by the older version of the software.
xinetd controlled service, upgrade the package for the service then halt all processes currently running. To determine if the process is running, use the ps command and then use the kill or killall command to halt current instances of the service.
imap packages are released, upgrade the packages, then type the following command as root into a shell prompt:
ps -aux | grep imapkill <PID>kill -9 <PID>ps command) for an IMAP session.
killall imapd| Encrypt all data transmitted over the network. Encrypting authentication information, such as passwords and cookies, is particularly important. |
| Minimize the amount of software installed and running in order to minimize vulnerability. |
| Use security-enhancing software and tools whenever available (e.g. SELinux and IPTables). |
| Run each network service on a separate server whenever possible. This minimizes the risk that a compromise of one service could lead to a compromise of others. |
| Maintain user accounts. Create a good password policy and enforce its use. Delete unused user accounts. |
| Review system and application logs on a routine basis. Send logs to a dedicated, centralized log server. This prevents intruders from easily avoiding detection by modifying the local logs. |
Never log in directly as root, unless absolutely necessary. Administrators should use sudo to execute commands as root when required. The accounts capable of using sudo are specified in /etc/sudoers, which is edited with the visudo utility. By default, relevant logs are written to /var/log/secure. |
cat command.
/etc/passwd file, which makes the system vulnerable to offline password cracking attacks. If an intruder can gain access to the machine as a regular user, he can copy the /etc/passwd file to his own machine and run any number of password cracking programs against it. If there is an insecure password in the file, it is only a matter of time before the password cracker discovers it.
/etc/shadow, which is readable only by the root user.
otrattw,tghwg.
7 for t and the at symbol (@) for a:
o7r@77w,7ghwg.
H.
o7r@77w,7gHwg.
passwd, which is Pluggable Authentication Manager (PAM) aware and therefore checks to see if the password is too short or otherwise easy to crack. This check is performed using the pam_cracklib.so PAM module. Since PAM is customizable, it is possible to add more password integrity checkers, such as pam_passwdqc (available from http://www.openwall.com/passwdqc/) or to write a new module. For a list of available PAM modules, refer to http://www.kernel.org/pub/linux/libs/pam/modules.html. For more information about PAM, refer to Section 3.5, “Pluggable Authentication Modules (PAM)”.
Warning
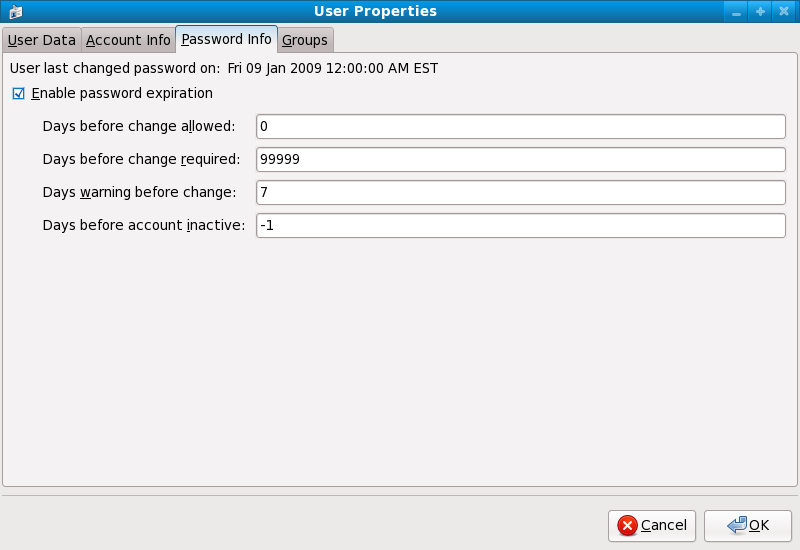
chage command or the graphical User Manager (system-config-users) application.
-M option of the chage command specifies the maximum number of days the password is valid. For example, to set a user's password to expire in 90 days, use the following command:
chage -M 90 <username>99999 after the -M option (this equates to a little over 273 years).
chage command in interactive mode to modify multiple password aging and account details. Use the following command to enter interactive mode:
chage <username>[root@myServer ~]# chage davido Changing the aging information for davido Enter the new value, or press ENTER for the default Minimum Password Age [0]: 10 Maximum Password Age [99999]: 90 Last Password Change (YYYY-MM-DD) [2006-08-18]: Password Expiration Warning [7]: Password Inactive [-1]: Account Expiration Date (YYYY-MM-DD) [1969-12-31]: [root@myServer ~]#
system-config-users at a shell prompt.
sudo or su. A setuid program is one that operates with the user ID (UID) of the program's owner rather than the user operating the program. Such programs are denoted by an s in the owner section of a long format listing, as in the following example:
-rwsr-xr-x 1 root root 47324 May 1 08:09 /bin/suNote
s may be upper case or lower case. If it appears as upper case, it means that the underlying permission bit has not been set.
pam_console.so, some activities normally reserved only for the root user, such as rebooting and mounting removable media are allowed for the first user that logs in at the physical console (refer to Section 3.5, “Pluggable Authentication Modules (PAM)” for more information about the pam_console.so module.) However, other important system administration tasks, such as altering network settings, configuring a new mouse, or mounting network devices, are not possible without administrative privileges. As a result, system administrators must decide how much access the users on their network should receive.
Table 3.1. Methods of Disabling the Root Account
| Method | Description | Effects | Does Not Affect | |||||||||||||||
|---|---|---|---|---|---|---|---|---|---|---|---|---|---|---|---|---|---|---|
| Changing the root shell. | Edit the /etc/passwd file and change the shell from /bin/bash to /sbin/nologin. |
|
| |||||||||||||||
| Disabling root access via any console device (tty). | An empty /etc/securetty file prevents root login on any devices attached to the computer. |
|
| |||||||||||||||
| Disabling root SSH logins. | Edit the /etc/ssh/sshd_config file and set the PermitRootLogin parameter to no. |
|
| |||||||||||||||
| Use PAM to limit root access to services. | Edit the file for the target service in the /etc/pam.d/ directory. Make sure the pam_listfile.so is required for authentication.
[a] |
|
| |||||||||||||||
[a]
Refer to Section 3.1.4.2.4, “Disabling Root Using PAM” for details.
| ||||||||||||||||||
/sbin/nologin in the /etc/passwd file. This prevents access to the root account through commands that require a shell, such as the su and the ssh commands.
Important
sudo command, can still access the root account.
/etc/securetty file. This file lists all devices the root user is allowed to log into. If the file does not exist at all, the root user can log in through any communication device on the system, whether via the console or a raw network interface. This is dangerous, because a user can log in to his machine as root via Telnet, which transmits the password in plain text over the network. By default, Fedora's /etc/securetty file only allows the root user to log in at the console physically attached to the machine. To prevent root from logging in, remove the contents of this file by typing the following command:
echo > /etc/securettyWarning
/etc/securetty file does not prevent the root user from logging in remotely using the OpenSSH suite of tools because the console is not opened until after authentication.
/etc/ssh/sshd_config). Change the line that reads:
PermitRootLogin yesPermitRootLogin nokill -HUP `cat /var/run/sshd.pid`/lib/security/pam_listfile.so module, allows great flexibility in denying specific accounts. The administrator can use this module to reference a list of users who are not allowed to log in. Below is an example of how the module is used for the vsftpd FTP server in the /etc/pam.d/vsftpd PAM configuration file (the \ character at the end of the first line in the following example is not necessary if the directive is on one line):
auth required /lib/security/pam_listfile.so item=user \
sense=deny file=/etc/vsftpd.ftpusers onerr=succeed
/etc/vsftpd.ftpusers file and deny access to the service for any listed user. The administrator can change the name of this file, and can keep separate lists for each service or use one central list to deny access to multiple services.
/etc/pam.d/pop and /etc/pam.d/imap for mail clients, or /etc/pam.d/ssh for SSH clients.
su or sudo.
su Commandsu command, they are prompted for the root password and, after authentication, is given a root shell prompt.
su command, the user is the root user and has absolute administrative access to the system
[12]. In addition, once a user has become root, it is possible for them to use the su command to change to any other user on the system without being prompted for a password.
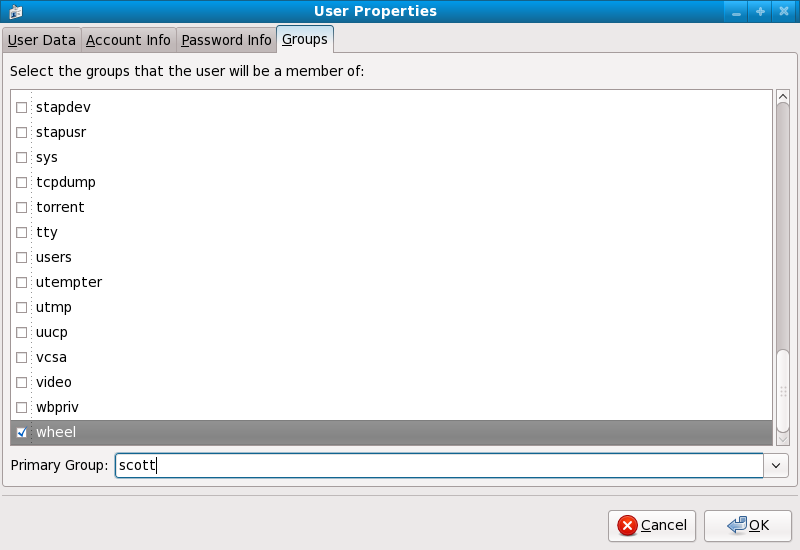
usermod -G wheel <username>wheel group.
system-config-users at a shell prompt.
su (/etc/pam.d/su) in a text editor and remove the comment # from the following line:
auth required /lib/security/$ISA/pam_wheel.so use_uid
wheel can use this program.
Note
wheel group by default.
sudo Commandsudo command offers another approach to giving users administrative access. When trusted users precede an administrative command with sudo, they are prompted for their own password. Then, when they have been authenticated and assuming that the command is permitted, the administrative command is executed as if they were the root user.
sudo command is as follows:
sudo <command>mount.
Important
sudo command should take extra care to log out before walking away from their machines since sudoers can use the command again without being asked for a password within a five minute period. This setting can be altered via the configuration file, /etc/sudoers.
sudo command allows for a high degree of flexibility. For instance, only users listed in the /etc/sudoers configuration file are allowed to use the sudo command and the command is executed in the user's shell, not a root shell. This means the root shell can be completely disabled, as shown in Section 3.1.4.2.1, “Disabling the Root Shell”.
sudo command also provides a comprehensive audit trail. Each successful authentication is logged to the file /var/log/messages and the command issued along with the issuer's user name is logged to the file /var/log/secure.
sudo command is that an administrator can allow different users access to specific commands based on their needs.
sudo configuration file, /etc/sudoers, should use the visudo command.
visudo and add a line similar to the following in the user privilege specification section:
juan ALL=(ALL) ALLjuan, can use sudo from any host and execute any command.
sudo:
%users localhost=/sbin/shutdown -h now/sbin/shutdown -h now as long as it is issued from the console.
sudoers has a detailed listing of options for this file.
Note
Important
cupsd — The default print server for Fedora.
lpd — An alternative print server.
xinetd — A super server that controls connections to a range of subordinate servers, such as gssftp and telnet.
sendmail — The Sendmail Mail Transport Agent (MTA) is enabled by default, but only listens for connections from the localhost.
sshd — The OpenSSH server, which is a secure replacement for Telnet.
cupsd running. The same is true for portmap. If you do not mount NFSv3 volumes or use NIS (the ypbind service), then portmap should be disabled.
netdump, transmit the contents of memory over the network unencrypted. Memory dumps can contain passwords or, even worse, database entries and other sensitive information.
finger and rwhod reveal information about users of the system.
rlogin, rsh, telnet, and vsftpd.
rlogin, rsh, and telnet) should be avoided in favor of SSH. Refer to Section 3.1.7, “Security Enhanced Communication Tools” for more information about sshd.
finger
authd (this was called identd in previous Fedora releases.)
netdump
netdump-server
nfs
rwhod
sendmail
smb (Samba)
yppasswdd
ypserv
ypxfrd
Important
system-config-firewall). This tool creates broad iptables rules for a general-purpose firewall using a control panel interface.
iptables is probably a better option. Refer to Section 3.7, “Using Firewalls” for more information.
telnet and rsh. OpenSSH includes a network service called sshd and three command line client applications:
ssh — A secure remote console access client.
scp — A secure remote copy command.
sftp — A secure pseudo-ftp client that allows interactive file transfer sessions.
Important
sshd service is inherently secure, the service must be kept up-to-date to prevent security threats. Refer to Section 1.5, “Security Updates” for more information.
xinetd, a super server that provides additional access, logging, binding, redirection, and resource utilization control.
Note
xinetd to create redundancy within service access controls. Refer to Section 3.7, “Using Firewalls” for more information about implementing firewalls with iptables commands.
hosts_options man page for information about the TCP Wrapper functionality and control language.
banner option.
vsftpd. To begin, create a banner file. It can be anywhere on the system, but it must have same name as the daemon. For this example, the file is called /etc/banners/vsftpd and contains the following line:
220-Hello, %c
220-All activity on ftp.example.com is logged.
220-Inappropriate use will result in your access privileges being removed.
%c token supplies a variety of client information, such as the username and hostname, or the username and IP address to make the connection even more intimidating.
/etc/hosts.allow file:
vsftpd : ALL : banners /etc/banners/ spawn directive.
/etc/hosts.deny file to deny any connection attempts from that network, and to log the attempts to a special file:
ALL : 206.182.68.0 : spawn /bin/ 'date' %c %d >> /var/log/intruder_alert %d token supplies the name of the service that the attacker was trying to access.
spawn directive in the /etc/hosts.allow file.
Note
spawn directive executes any shell command, it is a good idea to create a special script to notify the administrator or execute a chain of commands in the event that a particular client attempts to connect to the server.
severity option.
emerg flag in the log files instead of the default flag, info, and deny the connection.
/etc/hosts.deny:
in.telnetd : ALL : severity emerg authpriv logging facility, but elevates the priority from the default value of info to emerg, which posts log messages directly to the console.
xinetd to set a trap service and using it to control resource levels available to any given xinetd service. Setting resource limits for services can help thwart Denial of Service (DoS) attacks. Refer to the man pages for xinetd and xinetd.conf for a list of available options.
xinetd is its ability to add hosts to a global no_access list. Hosts on this list are denied subsequent connections to services managed by xinetd for a specified period or until xinetd is restarted. You can do this using the SENSOR attribute. This is an easy way to block hosts attempting to scan the ports on the server.
SENSOR is to choose a service you do not plan on using. For this example, Telnet is used.
/etc/xinetd.d/telnet and change the flags line to read:
flags = SENSOR
deny_time = 30
deny_time attribute are FOREVER, which keeps the ban in effect until xinetd is restarted, and NEVER, which allows the connection and logs it.
disable = no
SENSOR is a good way to detect and stop connections from undesirable hosts, it has two drawbacks:
SENSOR is running can mount a Denial of Service attack against particular hosts by forging their IP addresses and connecting to the forbidden port.
xinetd is its ability to set resource limits for services under its control.
cps = <number_of_connections> <wait_period> — Limits the rate of incoming connections. This directive takes two arguments:
<number_of_connections> — The number of connections per second to handle. If the rate of incoming connections is higher than this, the service is temporarily disabled. The default value is fifty (50).
<wait_period> — The number of seconds to wait before re-enabling the service after it has been disabled. The default interval is ten (10) seconds.
instances = <number_of_connections> — Specifies the total number of connections allowed to a service. This directive accepts either an integer value or UNLIMITED.
per_source = <number_of_connections> — Specifies the number of connections allowed to a service by each host. This directive accepts either an integer value or UNLIMITED.
rlimit_as = <number[K|M]> — Specifies the amount of memory address space the service can occupy in kilobytes or megabytes. This directive accepts either an integer value or UNLIMITED.
rlimit_cpu = <number_of_seconds> — Specifies the amount of time in seconds that a service may occupy the CPU. This directive accepts either an integer value or UNLIMITED.
xinetd service from overwhelming the system, resulting in a denial of service.
portmap service is a dynamic port assignment daemon for RPC services such as NIS and NFS. It has weak authentication mechanisms and has the ability to assign a wide range of ports for the services it controls. For these reasons, it is difficult to secure.
Note
portmap only affects NFSv2 and NFSv3 implementations, since NFSv4 no longer requires it. If you plan to implement an NFSv2 or NFSv3 server, then portmap is required, and the following section applies.
portmap service since it has no built-in form of authentication.
portmap service, it is a good idea to add iptables rules to the server and restrict access to specific networks.
portmap service) from the 192.168.0.0/24 network. The second allows TCP connections to the same port from the localhost. This is necessary for the sgi_fam service used by Nautilus. All other packets are dropped.
iptables -A INPUT -p tcp -s! 192.168.0.0/24 --dport 111 -j DROP
iptables -A INPUT -p tcp -s 127.0.0.1  --dport 111 -j ACCEPT
iptables -A INPUT -p udp -s! 192.168.0.0/24 --dport 111 -j DROP
Note
ypserv, which is used in conjunction with portmap and other related services to distribute maps of usernames, passwords, and other sensitive information to any computer claiming to be within its domain.
/usr/sbin/rpc.yppasswdd — Also called the yppasswdd service, this daemon allows users to change their NIS passwords.
/usr/sbin/rpc.ypxfrd — Also called the ypxfrd service, this daemon is responsible for NIS map transfers over the network.
/usr/sbin/yppush — This application propagates changed NIS databases to multiple NIS servers.
/usr/sbin/ypserv — This is the NIS server daemon.
portmap service as outlined in Section 3.2.2, “Securing Portmap”, then address the following issues, such as network planning.
/etc/passwd map:
ypcat -d <NIS_domain> -h <DNS_hostname> passwd
/etc/shadow file by typing the following command:
ypcat -d <NIS_domain> -h <DNS_hostname> shadow
Note
/etc/shadow file is not stored within an NIS map.
o7hfawtgmhwg.domain.com. Similarly, create a different randomized NIS domain name. This makes it much more difficult for an attacker to access the NIS server.
/var/yp/securenets File/var/yp/securenets file is blank or does not exist (as is the case after a default installation), NIS listens to all networks. One of the first things to do is to put netmask/network pairs in the file so that ypserv only responds to requests from the appropriate network.
/var/yp/securenets file:
255.255.255.0 192.168.0.0
Warning
/var/yp/securenets file.
rpc.yppasswdd — the daemon that allows users to change their login passwords. Assigning ports to the other two NIS server daemons, rpc.ypxfrd and ypserv, allows for the creation of firewall rules to further protect the NIS server daemons from intruders.
/etc/sysconfig/network:
YPSERV_ARGS="-p 834" YPXFRD_ARGS="-p 835"
iptables -A INPUT -p ALL -s! 192.168.0.0/24  --dport 834 -j DROP
iptables -A INPUT -p ALL -s! 192.168.0.0/24  --dport 835 -j DROP
Note
/etc/shadow map is sent over the network. If an intruder gains access to an NIS domain and sniffs network traffic, they can collect usernames and password hashes. With enough time, a password cracking program can guess weak passwords, and an attacker can gain access to a valid account on the network.
Important
portmap service as outlined in Section 3.2.2, “Securing Portmap”. NFS traffic now utilizes TCP in all versions, rather than UDP, and requires it when using NFSv4. NFSv4 now includes Kerberos user and group authentication, as part of the RPCSEC_GSS kernel module. Information on portmap is still included, since Fedora supports NFSv2 and NFSv3, both of which utilize portmap.
/etc/exports file. Be careful not to add extraneous spaces when editing this file.
/etc/exports file shares the directory /tmp/nfs/ to the host bob.example.com with read/write permissions.
/tmp/nfs/ bob.example.com(rw)
/etc/exports file, on the other hand, shares the same directory to the host bob.example.com with read-only permissions and shares it to the world with read/write permissions due to a single space character after the hostname.
/tmp/nfs/ bob.example.com (rw)
showmount command to verify what is being shared:
showmount -e <hostname>
no_root_squash Optionnfsnobody user, an unprivileged user account. This changes the owner of all root-created files to nfsnobody, which prevents uploading of programs with the setuid bit set.
no_root_squash is used, remote root users are able to change any file on the shared file system and leave applications infected by trojans for other users to inadvertently execute.
MOUNTD_PORT — TCP and UDP port for mountd (rpc.mountd)
STATD_PORT — TCP and UDP port for status (rpc.statd)
LOCKD_TCPPORT — TCP port for nlockmgr (rpc.lockd)
LOCKD_UDPPORT — UDP port nlockmgr (rpc.lockd)
rpcinfo -p command on the NFS server to see which ports and RPC programs are being used.
chown root <directory_name>
chmod 755 <directory_name>
/etc/httpd/conf/httpd.conf):
FollowSymLinks/.
IndexesUserDirUserDir directive is disabled by default because it can confirm the presence of a user account on the system. To enable user directory browsing on the server, use the following directives:
UserDir enabled
UserDir disabled root
/root/. To add users to the list of disabled accounts, add a space-delimited list of users on the UserDir disabled line.
Important
IncludesNoExec directive. By default, the Server-Side Includes (SSI) module cannot execute commands. It is recommended that you do not change this setting unless absolutely necessary, as it could, potentially, enable an attacker to execute commands on the system.
gssftpd — A Kerberos-aware xinetd-based FTP daemon that does not transmit authentication information over the network.
tux) — A kernel-space Web server with FTP capabilities.
vsftpd — A standalone, security oriented implementation of the FTP service.
vsftpd FTP service.
vsftpd, add the following directive to the /etc/vsftpd/vsftpd.conf file:
ftpd_banner=<insert_greeting_here>
/etc/banners/. The banner file for FTP connections in this example is /etc/banners/ftp.msg. Below is an example of what such a file may look like:
######### # Hello, all activity on ftp.example.com is logged. #########
Note
220 as specified in Section 3.2.1.1.1, “TCP Wrappers and Connection Banners”.
vsftpd, add the following directive to the /etc/vsftpd/vsftpd.conf file:
banner_file=/etc/banners/ftp.msg
/var/ftp/ directory activates the anonymous account.
vsftpd package. This package establishes a directory tree for anonymous users and configures the permissions on directories to read-only for anonymous users.
Warning
/var/ftp/pub/.
mkdir /var/ftp/pub/upload
chmod 730 /var/ftp/pub/upload
drwx-wx--- 2 root ftp 4096 Feb 13 20:05 upload
Warning
vsftpd, add the following line to the /etc/vsftpd/vsftpd.conf file:
anon_upload_enable=YES
vsftpd, add the following directive to /etc/vsftpd/vsftpd.conf:
local_enable=NO
sudo privileges, the easiest way is to use a PAM list file as described in Section 3.1.4.2.4, “Disabling Root Using PAM”. The PAM configuration file for vsftpd is /etc/pam.d/vsftpd.
vsftpd, add the username to /etc/vsftpd.ftpusers
/etc/mail/sendmail.mc, the effectiveness of such attacks is limited.
confCONNECTION_RATE_THROTTLE — The number of connections the server can receive per second. By default, Sendmail does not limit the number of connections. If a limit is set and reached, further connections are delayed.
confMAX_DAEMON_CHILDREN — The maximum number of child processes that can be spawned by the server. By default, Sendmail does not assign a limit to the number of child processes. If a limit is set and reached, further connections are delayed.
confMIN_FREE_BLOCKS — The minimum number of free blocks which must be available for the server to accept mail. The default is 100 blocks.
confMAX_HEADERS_LENGTH — The maximum acceptable size (in bytes) for a message header.
confMAX_MESSAGE_SIZE — The maximum acceptable size (in bytes) for a single message.
/var/spool/mail/, on an NFS shared volume.
Note
SECRPC_GSS kernel module does not utilize UID-based authentication. However, it is still considered good practice not to put the mail spool directory on NFS shared volumes.
/etc/passwd file should be set to /sbin/nologin (with the possible exception of the root user).
netstat -an or lsof -i. This method is less reliable since these programs do not connect to the machine from the network, but rather check to see what is running on the system. For this reason, these applications are frequent targets for replacement by attackers. Crackers attempt to cover their tracks if they open unauthorized network ports by replacing netstat and lsof with their own, modified versions.
nmap.
nmap -sT -O localhost
Starting Nmap 4.68 ( http://nmap.org ) at 2009-03-06 12:08 EST
Interesting ports on localhost.localdomain (127.0.0.1):
Not shown: 1711 closed ports
PORT      STATE SERVICE
22/tcp    open  ssh
25/tcp    open  smtp
111/tcp   open  rpcbind
113/tcp   open  auth
631/tcp   open  ipp
834/tcp   open  unknown
2601/tcp  open  zebra
32774/tcp open  sometimes-rpc11
Device type: general purpose
Running: Linux 2.6.X
OS details: Linux 2.6.17 - 2.6.24
Uptime: 4.122 days (since Mon Mar  2 09:12:31 2009)
Network Distance: 0 hops
OS detection performed. Please report any incorrect results at http://nmap.org/submit/ .
Nmap done: 1 IP address (1 host up) scanned in 1.420 seconds
portmap due to the presence of the sunrpc service. However, there is also a mystery service on port 834. To check if the port is associated with the official list of known services, type:
cat /etc/services | grep 834
netstat or lsof. To check for port 834 using netstat, use the following command:
netstat -anp | grep 834
tcp 0 0 0.0.0.0:834 0.0.0.0:* LISTEN 653/ypbind
netstat is reassuring because a cracker opening a port surreptitiously on a hacked system is not likely to allow it to be revealed through this command. Also, the [p] option reveals the process ID (PID) of the service that opened the port. In this case, the open port belongs to ypbind (NIS), which is an RPC service handled in conjunction with the portmap service.
lsof command reveals similar information to netstat since it is also capable of linking open ports to services:
lsof -i | grep 834
ypbind      653        0    7u  IPv4       1319                 TCP *:834 (LISTEN)
ypbind      655        0    7u  IPv4       1319                 TCP *:834 (LISTEN)
ypbind      656        0    7u  IPv4       1319                 TCP *:834 (LISTEN)
ypbind      657        0    7u  IPv4       1319                 TCP *:834 (LISTEN)
lsof, netstat, nmap, and services for more information.
Note
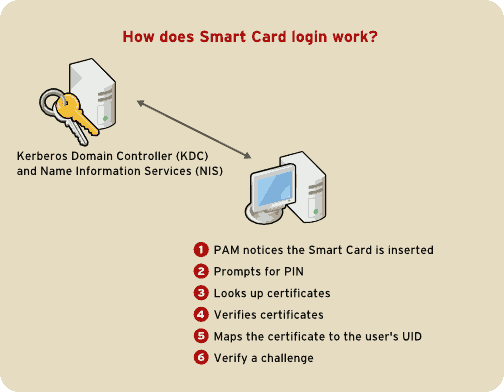
nss-tools package loaded.
certutil -A -d /etc/pki/nssdb -n "root ca cert" -t "CT,C,C" -i ./ca_cert_in_base64_format.crt
/etc/pam_pkcs11/pam_pkcs11.conf file, and locate the following line:
enable_ocsp = false;
enable_ocsp = true;
/etc/pam_pkcs11/cn_map.
cn_map file:
pklogin_finder debug
pklogin_finder tool in debug mode while an enrolled smart card is plugged in, it attempts to output information about the validity of certificates, and if it is successful in attempting to map a login ID from the certificates that are on the card.
Note
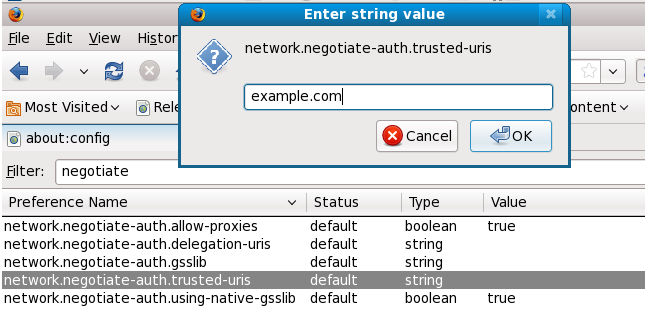
about:config to display the list of current configuration options.
negotiate to restrict the list of options.
Note
kinit to retrieve Kerberos tickets. To display the list of available tickets, type klist. The following shows an example output from these commands:
[user@host ~] $ kinit
Password for user@EXAMPLE.COM:

[user@host ~] $ klist
Ticket cache: FILE:/tmp/krb5cc_10920
Default principal: user@EXAMPLE.COM

Valid starting     Expires            Service principal
10/26/06 23:47:54  10/27/06 09:47:54  krbtgt/USER.COM@USER.COM
        renew until 10/26/06 23:47:54

Kerberos 4 ticket cache: /tmp/tkt10920
klist: You have no tickets cachedexport NSPR_LOG_MODULES=negotiateauth:5 export NSPR_LOG_FILE=/tmp/moz.log
/tmp/moz.log, and may give a clue to the problem. For example:
-1208550944[90039d0]: entering nsNegotiateAuth::GetNextToken()
-1208550944[90039d0]: gss_init_sec_context() failed: Miscellaneous failure
No credentials cache found
kinit.
kinit successfully from your machine but you are unable to authenticate, you might see something like this in the log file:
-1208994096[8d683d8]: entering nsAuthGSSAPI::GetNextToken()
-1208994096[8d683d8]: gss_init_sec_context() failed: Miscellaneous failure
Server not found in Kerberos database
/etc/krb5.conf file. For example:
.example.com = EXAMPLE.COM
example.com = EXAMPLE.COM
yum install pam_yubico
/etc/pam.d/gdm-password and locate the following line:
auth substack password-auth
auth sufficient pam_yubico.so id=16
/etc/yubikey_mapping or by individual user in ~/.yubico/authorized_yubikeys. The following is the syntax:
username:yubikey_token:another_yubikey_token
Note
/etc/pam.d/ directory contains the PAM configuration files for each PAM-aware application. In earlier versions of PAM, the /etc/pam.conf file was used, but this file is now deprecated and is only used if the /etc/pam.d/ directory does not exist.
/etc/pam.d/ directory. Each file in this directory has the same name as the service to which it controls access.
/etc/pam.d/ directory. For example, the login program defines its service name as login and installs the /etc/pam.d/login PAM configuration file.
<module interface> <control flag> <module name> <module arguments>
auth — This module interface authenticates use. For example, it requests and verifies the validity of a password. Modules with this interface can also set credentials, such as group memberships or Kerberos tickets.
account — This module interface verifies that access is allowed. For example, it may check if a user account has expired or if a user is allowed to log in at a particular time of day.
password — This module interface is used for changing user passwords.
session — This module interface configures and manages user sessions. Modules with this interface can also perform additional tasks that are needed to allow access, like mounting a user's home directory and making the user's mailbox available.
Note
pam_unix.so provides all four module interfaces.
auth required pam_unix.so
pam_unix.so module's auth interface.
reboot command normally uses several stacked modules, as seen in its PAM configuration file:
[root@MyServer ~]# cat /etc/pam.d/reboot
#%PAM-1.0
auth	sufficient	pam_rootok.so
auth	required	pam_console.so
#auth	include		system-auth
account	required	pam_permit.so
auth sufficient pam_rootok.so — This line uses the pam_rootok.so module to check whether the current user is root, by verifying that their UID is 0. If this test succeeds, no other modules are consulted and the command is executed. If this test fails, the next module is consulted.
auth required pam_console.so — This line uses the pam_console.so module to attempt to authenticate the user. If this user is already logged in at the console, pam_console.so checks whether there is a file in the /etc/security/console.apps/ directory with the same name as the service name (reboot). If such a file exists, authentication succeeds and control is passed to the next module.
#auth include system-auth — This line is commented and is not processed.
account required pam_permit.so — This line uses the pam_permit.so module to allow the root user or anyone logged in at the console to reboot the system.
required — The module result must be successful for authentication to continue. If the test fails at this point, the user is not notified until the results of all module tests that reference that interface are complete.
requisite — The module result must be successful for authentication to continue. However, if a test fails at this point, the user is notified immediately with a message reflecting the first failed required or requisite module test.
sufficient — The module result is ignored if it fails. However, if the result of a module flagged sufficient is successful and no previous modules flagged required have failed, then no other results are required and the user is authenticated to the service.
optional — The module result is ignored. A module flagged as optional only becomes necessary for successful authentication when no other modules reference the interface.
Important
required modules are called is not critical. Only the sufficient and requisite control flags cause order to become important.
pam.d man page, and the PAM documentation, located in the /usr/share/doc/pam/ directory, describe this newer syntax in detail.
/lib64/security/ directory, the directory name is omitted because the application is linked to the appropriate version of libpam, which can locate the correct version of the module.
pam_userdb.so module uses information stored in a Berkeley DB file to authenticate the user. Berkeley DB is an open source database system embedded in many applications. The module takes a db argument so that Berkeley DB knows which database to use for the requested service.
pam_userdb.so line in a PAM configuration. The <path-to-file> is the full path to the Berkeley DB database file:
auth required pam_userdb.so db=<path-to-file>
/var/log/secure file.
#%PAM-1.0
auth		required  pam_securetty.so
auth		required  pam_unix.so nullok
auth		required  pam_nologin.so
account		required  pam_unix.so
password	required  pam_cracklib.so retry=3
password	required  pam_unix.so shadow nullok use_authtok
session	required  pam_unix.so
#) at the beginning of the line.
auth required pam_securetty.so — This module ensures that if the user is trying to log in as root, the tty on which the user is logging in is listed in the /etc/securetty file, if that file exists.
Login incorrect message.
auth required pam_unix.so nullok — This module prompts the user for a password and then checks the password using the information stored in /etc/passwd and, if it exists, /etc/shadow.
nullok instructs the pam_unix.so module to allow a blank password.
auth required pam_nologin.so — This is the final authentication step. It checks whether the /etc/nologin file exists. If it exists and the user is not root, authentication fails.
Note
auth modules are checked, even if the first auth module fails. This prevents the user from knowing at what stage their authentication failed. Such knowledge in the hands of an attacker could allow them to more easily deduce how to crack the system.
account required pam_unix.so — This module performs any necessary account verification. For example, if shadow passwords have been enabled, the account interface of the pam_unix.so module checks to see if the account has expired or if the user has not changed the password within the allowed grace period.
password required pam_cracklib.so retry=3 — If a password has expired, the password component of the pam_cracklib.so module prompts for a new password. It then tests the newly created password to see whether it can easily be determined by a dictionary-based password cracking program.
retry=3 specifies that if the test fails the first time, the user has two more chances to create a strong password.
password required pam_unix.so shadow nullok use_authtok — This line specifies that if the program changes the user's password, it should use the password interface of the pam_unix.so module to do so.
shadow instructs the module to create shadow passwords when updating a user's password.
nullok instructs the module to allow the user to change their password from a blank password, otherwise a null password is treated as an account lock.
use_authtok, provides a good example of the importance of order when stacking PAM modules. This argument instructs the module not to prompt the user for a new password. Instead, it accepts any password that was recorded by a previous password module. In this way, all new passwords must pass the pam_cracklib.so test for secure passwords before being accepted.
session required pam_unix.so — The final line instructs the session interface of the pam_unix.so module to manage the session. This module logs the user name and the service type to /var/log/secure at the beginning and end of each session. This module can be supplemented by stacking it with other session modules for additional functionality.
/usr/share/doc/pam/ directory.
pam_timestamp.so module. It is important to understand how this mechanism works, because a user who walks away from a terminal while pam_timestamp.so is in effect leaves the machine open to manipulation by anyone with physical access to the console.
pam_timestamp.so module creates a timestamp file. By default, this is created in the /var/run/sudo/ directory. If the timestamp file already exists, graphical administrative programs do not prompt for a password. Instead, the pam_timestamp.so module freshens the timestamp file, reserving an extra five minutes of unchallenged administrative access for the user.
/var/run/sudo/<user> file. For the desktop, the relevant file is unknown:root. If it is present and its timestamp is less than five minutes old, the credentials are valid.
ssh, use the /sbin/pam_timestamp_check -k root command to destroy the timestamp file.
/sbin/pam_timestamp_check -k root command from the same terminal window from which you launched the privileged application.
pam_timestamp.so module in order to use the /sbin/pam_timestamp_check -k command. Do not log in as root to use this command.
/sbin/pam_timestamp_check -k root </dev/null >/dev/null 2>/dev/null
pam_timestamp_check man page for more information about destroying the timestamp file using pam_timestamp_check.
pam_timestamp.so module accepts several directives. The following are the two most commonly used options:
timestamp_timeout — Specifies the period (in seconds) for which the timestamp file is valid. The default value is 300 (five minutes).
timestampdir — Specifies the directory in which the timestamp file is stored. The default value is /var/run/sudo/.
pam_console.so.
pam_console.so module is called by login or the graphical login programs, gdm, kdm, and xdm. If this user is the first user to log in at the physical console — referred to as the console user — the module grants the user ownership of a variety of devices normally owned by root. The console user owns these devices until the last local session for that user ends. After this user has logged out, ownership of the devices reverts back to the root user.
pam_console.so by editing the following files:
/etc/security/console.perms
/etc/security/console.perms.d/50-default.perms
50-default.perms file, you should create a new file (for example, xx-name.perms) and enter the required modifications. The name of the new default file must begin with a number higher than 50 (for example, 51-default.perms). This will override the defaults in the 50-default.perms file.
Warning
<console> and <xconsole> directives in the /etc/security/console.perms to the following values:
<console>=tty[0-9][0-9]* vc/[0-9][0-9]* :0\.[0-9] :0
<xconsole>=:0\.[0-9] :0
<xconsole> directive entirely and change the <console> directive to the following value:
<console>=tty[0-9][0-9]* vc/[0-9][0-9]*
/etc/security/console.apps/ directory.
/sbin and /usr/sbin.
/sbin/halt
/sbin/reboot
/sbin/poweroff
pam_console.so module as a requirement for use.
pam — Good introductory information on PAM, including the structure and purpose of the PAM configuration files.
/etc/pam.conf and individual configuration files in the /etc/pam.d/ directory. By default, Fedora uses the individual configuration files in the /etc/pam.d/ directory, ignoring /etc/pam.conf even if it exists.
pam_console — Describes the purpose of the pam_console.so module. It also describes the appropriate syntax for an entry within a PAM configuration file.
console.apps — Describes the format and options available in the /etc/security/console.apps configuration file, which defines which applications are accessible by the console user assigned by PAM.
console.perms — Describes the format and options available in the /etc/security/console.perms configuration file, which specifies the console user permissions assigned by PAM.
pam_timestamp — Describes the pam_timestamp.so module.
/usr/share/doc/pam — Contains a System Administrators' Guide, a Module Writers' Manual, and the Application Developers' Manual, as well as a copy of the PAM standard, DCE-RFC 86.0.
/usr/share/doc/pam/txts/README.pam_timestamp — Contains information about the pam_timestamp.so PAM module.
Note
/etc/passwd or /etc/shadow, to a Kerberos password database can be tedious, as there is no automated mechanism to perform this task. Refer to Question 2.23 in the online Kerberos FAQ:
kinit. The default keytab file is /etc/krb5.keytab. The KDC administration server, /usr/kerberos/sbin/kadmind, is the only service that uses any other file (it uses /var/kerberos/krb5kdc/kadm5.keytab).
kinit command allows a principal who has already logged in to obtain and cache the initial ticket-granting ticket (TGT). Refer to the kinit man page for more information.
root[/instance]@REALM. For a typical user, the root is the same as their login ID. The instance is optional. If the principal has an instance, it is separated from the root with a forward slash ("/"). An empty string ("") is considered a valid instance (which differs from the default NULL instance), but using it can be confusing. All principals in a realm have their own key, which for users is derived from a password or is randomly set for services.
kinit program after the user logs in.
kinit program on the client then decrypts the TGT using the user's key, which it computes from the user's password. The user's key is used only on the client machine and is not transmitted over the network.
Warning
Note
ntpd. Refer to /usr/share/doc/ntp/index.html for details on setting up Network Time Protocol servers.
/usr/share/doc/krb5-server for more information.
pam_krb5 module (provided in the pam_krb5 package) is installed. The pam_krb5 package contains sample configuration files that allow services such as login and gdm to authenticate users as well as obtain initial credentials using their passwords. If access to network servers is always performed using Kerberos-aware services or services that use GSS-API, such as IMAP, the network can be considered reasonably safe.
Important
ntp package for this purpose. Refer to /usr/share/doc/ntp/index.html for details about how to set up Network Time Protocol servers, and http://www.ntp.org for more information about NTP.
krb5-libs, krb5-server, and krb5-workstation packages on the dedicated machine which runs the KDC. This machine needs to be very secure — if possible, it should not run any services other than the KDC.
/etc/krb5.conf and /var/kerberos/krb5kdc/kdc.conf configuration files to reflect the realm name and domain-to-realm mappings. A simple realm can be constructed by replacing instances of EXAMPLE.COM and example.com with the correct domain name — being certain to keep uppercase and lowercase names in the correct format — and by changing the KDC from kerberos.example.com to the name of the Kerberos server. By convention, all realm names are uppercase and all DNS hostnames and domain names are lowercase. For full details about the formats of these configuration files, refer to their respective man pages.
kdb5_util utility from a shell prompt:
/usr/sbin/kdb5_util create -s
create command creates the database that stores keys for the Kerberos realm. The -s switch forces creation of a stash file in which the master server key is stored. If no stash file is present from which to read the key, the Kerberos server (krb5kdc) prompts the user for the master server password (which can be used to regenerate the key) every time it starts.
/var/kerberos/krb5kdc/kadm5.acl file. This file is used by kadmind to determine which principals have administrative access to the Kerberos database and their level of access. Most organizations can get by with a single line:
*/admin@EXAMPLE.COM *
kadmind has been started on the server, any user can access its services by running kadmin on any of the clients or servers in the realm. However, only users listed in the kadm5.acl file can modify the database in any way, except for changing their own passwords.
Note
kadmin utility communicates with the kadmind server over the network, and uses Kerberos to handle authentication. Consequently, the first principal must already exist before connecting to the server over the network to administer it. Create the first principal with the kadmin.local command, which is specifically designed to be used on the same host as the KDC and does not use Kerberos for authentication.
kadmin.local command at the KDC terminal to create the first principal:
/usr/kerberos/sbin/kadmin.local -q "addprinc username/admin"
/sbin/service krb5kdc start
/sbin/service kadmin start
addprinc command within kadmin. kadmin and kadmin.local are command line interfaces to the KDC. As such, many commands — such as addprinc — are available after launching the kadmin program. Refer to the kadmin man page for more information.
kinit to obtain a ticket and store it in a credential cache file. Next, use klist to view the list of credentials in the cache and use kdestroy to destroy the cache and the credentials it contains.
Note
kinit attempts to authenticate using the same system login username. If that username does not correspond to a principal in the Kerberos database, kinit issues an error message. If that happens, supply kinit with the name of the correct principal as an argument on the command line (kinit <principal>).
krb5.conf configuration file. While ssh and slogin are the preferred method of remotely logging in to client systems, Kerberized versions of rsh and rlogin are still available, though deploying them requires that a few more configuration changes be made.
krb5-libs and krb5-workstation packages on all of the client machines. Supply a valid /etc/krb5.conf file for each client (usually this can be the same krb5.conf file used by the KDC).
ssh or Kerberized rsh or rlogin, it must have its own host principal in the Kerberos database. The sshd, kshd, and klogind server programs all need access to the keys for the host service's principal. Additionally, in order to use the kerberized rsh and rlogin services, that workstation must have the xinetd package installed.
kadmin, add a host principal for the workstation on the KDC. The instance in this case is the hostname of the workstation. Use the -randkey option for the kadmin's addprinc command to create the principal and assign it a random key:
addprinc -randkey host/blah.example.com
kadmin on the workstation itself, and using the ktadd command within kadmin:
ktadd -k /etc/krb5.keytab host/blah.example.com
ssh — OpenSSH uses GSS-API to authenticate users to servers if the client's and server's configuration both have GSSAPIAuthentication enabled. If the client also has GSSAPIDelegateCredentials enabled, the user's credentials are made available on the remote system.
rsh and rlogin — To use the kerberized versions of rsh and rlogin, enable klogin, eklogin, and kshell.
krb5-telnet must be enabled.
ftp. Be certain to set the instance to the fully qualified hostname of the FTP server, then enable gssftp.
cyrus-imap package uses Kerberos 5 if it also has the cyrus-sasl-gssapi package installed. The cyrus-sasl-gssapi package contains the Cyrus SASL plugins which support GSS-API authentication. Cyrus IMAP should function properly with Kerberos as long as the cyrus user is able to find the proper key in /etc/krb5.keytab, and the root for the principal is set to imap (created with kadmin).
cyrus-imap can be found in the dovecot package, which is also included in Fedora. This package contains an IMAP server but does not, to date, support GSS-API and Kerberos.
gserver uses a principal with a root of cvs and is otherwise identical to the CVS pserver.
foo.example.org → EXAMPLE.ORG
foo.example.com → EXAMPLE.COM
foo.hq.example.com → HQ.EXAMPLE.COM
krb5.conf. For example:
[domain_realm]
.example.com = EXAMPLE.COM
example.com = EXAMPLE.COM
kadmind (it is also your realm's admin server), and one or more KDCs (slave KDCs) keep read-only copies of the database and run kpropd.
krb5.conf and kdc.conf files are copied to the slave KDC.
kadmin.local from a root shell on the master KDC and use its add_principal command to create a new entry for the master KDC's host service, and then use its ktadd command to simultaneously set a random key for the service and store the random key in the master's default keytab file. This key will be used by the kprop command to authenticate to the slave servers. You will only need to do this once, regardless of how many slave servers you install.
#kadmin.local -r EXAMPLE.COMAuthenticating as principal root/admin@EXAMPLE.COM with password.kadmin:add_principal -randkey host/masterkdc.example.comPrincipal "host/host/masterkdc.example.com@EXAMPLE.COM" created.kadmin:ktadd host/masterkdc.example.comEntry for principal host/masterkdc.example.com with kvno 3, encryption type Triple DES cbc mode with HMAC/sha1 added to keytab WRFILE:/etc/krb5.keytab. Entry for principal host/masterkdc.example.com with kvno 3, encryption type ArcFour with HMAC/md5 added to keytab WRFILE:/etc/krb5.keytab. Entry for principal host/masterkdc.example.com with kvno 3, encryption type DES with HMAC/sha1 added to keytab WRFILE:/etc/krb5.keytab. Entry for principal host/masterkdc.example.com with kvno 3, encryption type DES cbc mode with RSA-MD5 added to keytab WRFILE:/etc/krb5.keytab.kadmin:quit
kadmin from a root shell on the slave KDC and use its add_principal command to create a new entry for the slave KDC's host service, and then use kadmin's ktadd command to simultaneously set a random key for the service and store the random key in the slave's default keytab file. This key is used by the kpropd service when authenticating clients.
#kadmin -p jimbo/admin@EXAMPLE.COM -r EXAMPLE.COMAuthenticating as principal jimbo/admin@EXAMPLE.COM with password.Password for jimbo/admin@EXAMPLE.COM:kadmin:add_principal -randkey host/slavekdc.example.comPrincipal "host/slavekdc.example.com@EXAMPLE.COM" created.kadmin:ktadd host/slavekdc.example.com@EXAMPLE.COMEntry for principal host/slavekdc.example.com with kvno 3, encryption type Triple DES cbc mode with HMAC/sha1 added to keytab WRFILE:/etc/krb5.keytab. Entry for principal host/slavekdc.example.com with kvno 3, encryption type ArcFour with HMAC/md5 added to keytab WRFILE:/etc/krb5.keytab. Entry for principal host/slavekdc.example.com with kvno 3, encryption type DES with HMAC/sha1 added to keytab WRFILE:/etc/krb5.keytab. Entry for principal host/slavekdc.example.com with kvno 3, encryption type DES cbc mode with RSA-MD5 added to keytab WRFILE:/etc/krb5.keytab.kadmin:quit
kprop service with a new realm database. To restrict access, the kprop service on the slave KDC will only accept updates from clients whose principal names are listed in /var/kerberos/krb5kdc/kpropd.acl. Add the master KDC's host service's name to that file.
# echo host/masterkdc.example.com@EXAMPLE.COM > /var/kerberos/krb5kdc/kpropd.acl
/var/kerberos/krb5kdc/.k5.REALM, either copy it to the slave KDC using any available secure method, or create a dummy database and identical stash file on the slave KDC by running kdb5_util create -s (the dummy database will be overwritten by the first successful database propagation) and supplying the same password.
kprop service. Then, double-check that the kadmin service is disabled.
kprop command will read (/var/kerberos/krb5kdc/slave_datatrans), and then use the kprop command to transmit its contents to the slave KDC.
# /usr/sbin/kdb5_util dump /var/kerberos/krb5kdc/slave_datatrans# kprop slavekdc.example.com
kinit, verify that a client system whose krb5.conf lists only the slave KDC in its list of KDCs for your realm is now correctly able to obtain initial credentials from the slave KDC.
kprop command to transmit the database to each slave KDC in turn, and configure the cron service to run the script periodically.
A.EXAMPLE.COM to access a service in the B.EXAMPLE.COM realm, both realms must share a key for a principal named krbtgt/B.EXAMPLE.COM@A.EXAMPLE.COM, and both keys must have the same key version number associated with them.
# kadmin -r A.EXAMPLE.COMkadmin: add_principal krbtgt/B.EXAMPLE.COM@A.EXAMPLE.COMEnter password for principal "krbtgt/B.EXAMPLE.COM@A.EXAMPLE.COM": Re-enter password for principal "krbtgt/B.EXAMPLE.COM@A.EXAMPLE.COM": Principal "krbtgt/B.EXAMPLE.COM@A.EXAMPLE.COM" created. quit # kadmin -r B.EXAMPLE.COMkadmin: add_principal krbtgt/B.EXAMPLE.COM@A.EXAMPLE.COMEnter password for principal "krbtgt/B.EXAMPLE.COM@A.EXAMPLE.COM": Re-enter password for principal "krbtgt/B.EXAMPLE.COM@A.EXAMPLE.COM": Principal "krbtgt/B.EXAMPLE.COM@A.EXAMPLE.COM" created. quit
get_principal command to verify that both entries have matching key version numbers (kvno values) and encryption types.
Dumping the Database Doesn't Do It
add_principal command's -randkey option to assign a random key instead of a password, dump the new entry from the database of the first realm, and import it into the second. This will not work unless the master keys for the realm databases are identical, as the keys contained in a database dump are themselves encrypted using the master key.
A.EXAMPLE.COM realm are now able to authenticate to services in the B.EXAMPLE.COM realm. Put another way, the B.EXAMPLE.COM realm now trusts the A.EXAMPLE.COM realm, or phrased even more simply, B.EXAMPLE.COM now trusts A.EXAMPLE.COM.
B.EXAMPLE.COM realm may trust clients from the A.EXAMPLE.COM to authenticate to services in the B.EXAMPLE.COM realm, but the fact that it does has no effect on whether or not clients in the B.EXAMPLE.COM realm are trusted to authenticate to services in the A.EXAMPLE.COM realm. To establish trust in the other direction, both realms would need to share keys for the krbtgt/A.EXAMPLE.COM@B.EXAMPLE.COM service (take note of the reversed in order of the two realms compared to the example above).
A.EXAMPLE.COM can authenticate to services in B.EXAMPLE.COM, and clients from B.EXAMPLE.COM can authenticate to services in C.EXAMPLE.COM, then clients in A.EXAMPLE.COM can also authenticate to services in C.EXAMPLE.COM, even if C.EXAMPLE.COM doesn't directly trust A.EXAMPLE.COM. This means that, on a network with multiple realms which all need to trust each other, making good choices about which trust relationships to set up can greatly reduce the amount of effort required.
service/server.example.com@EXAMPLE.COM
EXAMPLE.COM is the name of the realm.
domain_realm section of /etc/krb5.conf to map either a hostname (server.example.com) or a DNS domain name (.example.com) to the name of a realm (EXAMPLE.COM).
A.EXAMPLE.COM, B.EXAMPLE.COM, and EXAMPLE.COM. When a client in the A.EXAMPLE.COM realm attempts to authenticate to a service in B.EXAMPLE.COM, it will, by default, first attempt to get credentials for the EXAMPLE.COM realm, and then to use those credentials to obtain credentials for use in the B.EXAMPLE.COM realm.
A.EXAMPLE.COM, authenticating to a service in B.EXAMPLE.COMA.EXAMPLE.COM → EXAMPLE.COM → B.EXAMPLE.COM A.EXAMPLE.COM and EXAMPLE.COM share a key for krbtgt/EXAMPLE.COM@A.EXAMPLE.COM
EXAMPLE.COM and B.EXAMPLE.COM share a key for krbtgt/B.EXAMPLE.COM@EXAMPLE.COM
SITE1.SALES.EXAMPLE.COM, authenticating to a service in EVERYWHERE.EXAMPLE.COMSITE1.SALES.EXAMPLE.COM → SALES.EXAMPLE.COM → EXAMPLE.COM → EVERYWHERE.EXAMPLE.COM SITE1.SALES.EXAMPLE.COM and SALES.EXAMPLE.COM share a key for krbtgt/SALES.EXAMPLE.COM@SITE1.SALES.EXAMPLE.COM
SALES.EXAMPLE.COM and EXAMPLE.COM share a key for krbtgt/EXAMPLE.COM@SALES.EXAMPLE.COM
EXAMPLE.COM and EVERYWHERE.EXAMPLE.COM share a key for krbtgt/EVERYWHERE.EXAMPLE.COM@EXAMPLE.COM
DEVEL.EXAMPLE.COM and PROD.EXAMPLE.ORG DEVEL.EXAMPLE.COM → EXAMPLE.COM → COM → ORG → EXAMPLE.ORG → PROD.EXAMPLE.ORG DEVEL.EXAMPLE.COM and EXAMPLE.COM share a key for krbtgt/EXAMPLE.COM@DEVEL.EXAMPLE.COM
EXAMPLE.COM and COM share a key for krbtgt/COM@EXAMPLE.COM
COM and ORG share a key for krbtgt/ORG@COM
ORG and EXAMPLE.ORG share a key for krbtgt/EXAMPLE.ORG@ORG
EXAMPLE.ORG and PROD.EXAMPLE.ORG share a key for krbtgt/PROD.EXAMPLE.ORG@EXAMPLE.ORG
capaths section of /etc/krb5.conf, so that clients which have credentials for one realm will be able to look up which realm is next in the chain which will eventually lead to the being able to authenticate to servers.
capaths section is relatively straightforward: each entry in the section is named after a realm in which a client might exist. Inside of that subsection, the set of intermediate realms from which the client must obtain credentials is listed as values of the key which corresponds to the realm in which a service might reside. If there are no intermediate realms, the value "." is used.
[capaths]
A.EXAMPLE.COM = {
B.EXAMPLE.COM = .
C.EXAMPLE.COM = B.EXAMPLE.COM
D.EXAMPLE.COM = B.EXAMPLE.COM
D.EXAMPLE.COM = C.EXAMPLE.COM
}
A.EXAMPLE.COM realm can obtain cross-realm credentials for B.EXAMPLE.COM directly from the A.EXAMPLE.COM KDC.
C.EXAMPLE.COM realm, they will first need to obtain necessary credentials from the B.EXAMPLE.COM realm (this requires that krbtgt/B.EXAMPLE.COM@A.EXAMPLE.COM exist), and then use those credentials to obtain credentials for use in the C.EXAMPLE.COM realm (using krbtgt/C.EXAMPLE.COM@B.EXAMPLE.COM).
D.EXAMPLE.COM realm, they will first need to obtain necessary credentials from the B.EXAMPLE.COM realm, and then credentials from the C.EXAMPLE.COM realm, before finally obtaining credentials for use with the D.EXAMPLE.COM realm.
Note
A.EXAMPLE.COM realm can obtain cross-realm credentials from B.EXAMPLE.COM realm directly. Without the "." indicating this, the client would instead attempt to use a hierarchical path, in this case:
A.EXAMPLE.COM → EXAMPLE.COM → B.EXAMPLE.COM
/usr/share/doc/krb5-server/ directory.
/usr/share/doc/krb5-workstation/ directory.
man kerberos — An introduction to the Kerberos system which describes how credentials work and provides recommendations for obtaining and destroying Kerberos tickets. The bottom of the man page references a number of related man pages.
man kinit — Describes how to use this command to obtain and cache a ticket-granting ticket.
man kdestroy — Describes how to use this command to destroy Kerberos credentials.
man klist — Describes how to use this command to list cached Kerberos credentials.
man kadmin — Describes how to use this command to administer the Kerberos V5 database.
man kdb5_util — Describes how to use this command to create and perform low-level administrative functions on the Kerberos V5 database.
man krb5kdc — Describes available command line options for the Kerberos V5 KDC.
man kadmind — Describes available command line options for the Kerberos V5 administration server.
man krb5.conf — Describes the format and options available within the configuration file for the Kerberos V5 library.
man kdc.conf — Describes the format and options available within the configuration file for the Kerberos V5 AS and KDC.
firewalld provides a dynamically managed firewall with support for network zones to assign a level of trust to a network and its associated connections and interfaces. It has support for IPv4 and IPv6 firewall settings. It supports Ethernet bridges and has a separation of runtime and permanent configuration options. It also has an interface for services or applications to add firewall rules directly.
firewalld, which in turn uses iptables tool to communicate with Netfilter in the kernel which implements packet filtering.
firewall. The firewall icon will appear. Press enter once it is highlighted. The firewall-config tool appears. You will be prompted for your user password.
firewalld is dynamic rather than static because changes to the configuration can be made at anytime and are immediately implemented, there is no need to save or apply the changes. No unintended disruption of existing network connections occurs as no part of the firewall has to be reloaded.
man firewall-cmd(1). Permanent changes need to be made as explained in man firewalld(1).
firewalld is stored in various XML files in /usr/lib/firewalld/ and /etc/firewalld/. This allows a great deal of flexibility as the files can be edited, written to, backed up, used as templates for other installations and so on.
firewalld using D-bus.
firewalld and the iptables service are:
/etc/sysconfig/iptables while firewalld stores it in various XML files in /usr/lib/firewalld/ and /etc/firewalld/. Note that the /etc/sysconfig/iptables file does not exist as firewalld is installed be default on Fedora.
/etc/sysconfig/iptables while with firewalld there is no re-creating of all the rules; only the differences are applied. Consequently, firewalld can change the settings during run time without existing connections being lost.
firewalld to which zone an interface belongs. An interface's assigned zone can be changed by NetworkManager or via the firewall-config tool which can open the relevant NetworkManager window for you.
/etc/firewalld/ are a range of preset settings which can be quickly applied to a network interface. They are listed here with a brief explanation:
drop (immutable) block (immutable) IPv4 and icmp6-adm-prohibited for IPv6. Only network connections initiated from within the system are possible.
publicexternaldmzworkhomeinternaltrusted (immutable)firewalld is set to be the public zone.
firewalld.service(5) man page. The services are specified by means of individual XML configuration files which are named in the following format: service-name.xml.
firewall. The firewall icon will appear. Press enter once it is highlighted. The firewall-config tool appears. You will be prompted for your user password.
You can now view the list of services under the Services tab.
~]# ls /usr/lib/firewalld/services/
Files in /usr/lib/firewalld/services/ must not be edited. Only the files in /etc/firewalld/services/ should be edited.
~]# ls /etc/firewalld/services/
/etc/firewalld/services/. If a service has not be added or changed by the user, then no corresponding XML file will be found in /etc/firewalld/services/. The files /usr/lib/firewalld/services/ can be used as templates if you wish to add or change a service. As root, issue a command in the following format:
~]# cp /usr/lib/firewalld/services/[service].xml /etc/firewalld/services/[service].xml
You may then edit the newly created file. firewalld will prefer files in /etc/firewalld/services/ but will fall back to /usr/lib/firewalld/services/ should a file be deleted, but only after a reload.
firewalld has a so called direct interface, which enables directly passing rules to iptables, ip6tables and ebtables. It is intended for use by applications and not users. It is dangerous to use the direct interface if you are not very familiar with iptables as you could inadvertently cause a breach in the firewall. firewalld still tracks what has been added, so it is still possible to query firewalld and see the changes made by an application using the direct interface mode. The direct interface is used by adding the --direct option to firewall-cmd.
firewalld using D-BUS.
firewalld and the graphical user interface configuration tool firewall-config are installed by default but firewall-applet is not. This can be checked by running the following command as root:
~]# yum install firewalld firewall-config
firewalld, run the following commands as root:
~]# systemctl disable firewalld # systemctl stop firewalld
firewalld, first disable firewalld by running the following command as root:
~]# systemctl disable firewalld # systemctl stop firewalld
~]# yum install iptables-services
# touch /etc/sysconfig/iptables# touch /etc/sysconfig/ip6tables# systemctl start iptables# systemctl start ip6tables# systemctl enable iptables# systemctl enable ip6tables
firewalld, enter the following command as root:
~]# systemctl start firewalld
firewalld is running, enter the following command:
~]$ systemctl status firewalld
firewalld.service - firewalld - dynamic firewall daemon
	  Loaded: loaded (/usr/lib/systemd/system/firewalld.service; enabled)
	  Active: active (running) since Sat 2013-04-06 22:56:59 CEST; 2 days ago
	Main PID: 688 (firewalld)
	  CGroup: name=systemd:/system/firewalld.service
~]$ firewall-cmd --state
running
firewalld, run the following command as root:
~]# yum install firewalld
To install the graphical user interface tool firewall-config, run the following command as root:
~]# yum install firewall-config
To install the optional firewall-applet, run the following command as root:
~]# yum install firewall-applet
firewall. The firewall icon will appear. Press enter once it is highlighted. The firewall-config tool appears. You will be prompted for your user password.
~]# firewall-config
The Firewall Configuration window opens. Note, this command can be run as normal user but you will then be prompted for the root password from time to time.
firewalld.
Note
IPv4 or IPv6.
IPv4 addresses to a single external address, start the firewall-config tool and select the network zone whose addresses are to be translated. Select the Masquerading tab and select the check box to enable the translation of IPv4 addresses to a single address.
IPv4 address, select the Forward to another port check box. Enter the destination IP address and port or port range. The default is to send to the same port if the port field is left empty. Click OK to apply the changes.
ICMP filter, start the firewall-config tool and select the network zone whose messages are to be filtered. Select the ICMP Filter tab and select the check box for each type of ICMP message you want to filter. Clear the check box to disable a filter. This setting is per direction and the default allows everything.
ICMP filter, start the firewall-config tool and then select mode from the drop-down selection menu labeled Current View. An button appears on the right hand side of the ICMP Filter tab.
firewalld application which is installed by default. You can verify that it is installed by checking the version or displaying the help output. Enter the following command to check the version:
~]$ firewall-cmd -V, --version
Enter the following command to view the help output:
~]$ firewall-cmd -h, --help
man firewall-cmd(1).
Note
--permanent option to all commands apart from the --direct commands (which are by their nature temporary). Note that this not only means the change will be permanent but that the change will only take effect after firewall reload, service restart, or after system reboot. Settings made with firewall-cmd without the --permanent option take effect immediately, but are only valid till next firewall reload, system boot, or firewalld service restart. Reloading the firewall does not in itself break connections, but be aware you are discarding temporary changes by doing so.
firewalld, enter the following command:
~]$ firewall-cmd --state
~]$  firewall-cmd --get-active-zones
    public: em1 wlan0
~]$  firewall-cmd --get-zone-of-interface=em1
public
~]# firewall-cmd --zone=public --list-interfaces
     em1 wlan0
This information is obtained from NetworkManager and only shows interfaces not connections.
~]# firewall-cmd --zone=public --list-all
public
  interfaces:
  services: mdns dhcpv6-client ssh
  ports:
  forward-ports:
  icmp-blocks: source-quench
~]# firewall-cmd --get-service
    cluster-suite pop3s bacula-client smtp ipp radius bacula ftp mdns samba dhcpv6-client dns openvpn imaps samba-client http https ntp vnc-server telnet libvirt ssh ipsec ipp-client amanda-client tftp-client nfs tftp libvirt-tls
This will list the names of the services in /usr/lib/firewalld/services/. Note that the configuration files themselves are named service-name.xml.
~]# firewall-cmd --get-service --permanent
~]$  nmcli -f NAME,DEVICES,ZONE con status
NAME                      DEVICES    ZONE
my-little-wifi            wlan0      home
VPN connection 1          wlan0      work
System em1                em1        --
-- means the interface is assigned to the default zone.
~]# firewall-cmd --panic-on
All incoming and outgoing packets will be dropped. Active connections will be terminated after a period of inactivity; the time taken depends on the individual session time out values.
~]# firewall-cmd --panic-off
After disabling panic mode, established connections might work again if panic mode was enabled for a short period of time.
~]$ firewall-cmd --query-panic && echo "enabled" || echo "Not enabled"
~]# firewall-cmd --reload
~]# firewall-cmd --complete-reload
This command should normally only be used in case of severe firewall problems. For example, if there are state information problems and no connection can be established but the firewall rules are correct.
~]# firewall-cmd --zone=public --add-interface=em1
To make this setting permanent, add the --permanent option and reload the firewall.
ifcfg-em1 configuration file, for example to add em1 to the work zone, as root use an editor to add the following line to ifcfg-em1:
ZONE=workNote that if you omit the
ZONE option, or use ZONE=, or ZONE='', then the default zone will be used.
/etc/firewalld/firewalld.conf and edit the file as follows:
 # default zone
 # The default zone used if an empty zone string is used.
 # Default: public
 DefaultZone=home
~]# firewall-cmd --reload
This will reload the firewall without losing state information (TCP sessions will not be interrupted).
~]# firewall-cmd --set-default-zone=public
This change will take immediate effect and in this case it is not necessary to reload the firewall.
~]# firewall-cmd --zone=dmz --list-ports
TCP traffic to port 8080 to the dmz zone, enter the following command as root:
~]# firewall-cmd --zone=dmz --add-port=8080/tcp
To make this setting permanent, add the --permanent option and reload the firewall.
~]# firewall-cmd --zone=public --add-port=5060-5061/udp
To make this setting permanent, add the --permanent option and reload the firewall.
SMTP to the work zone, enter the following command as root:
~]# firewall-cmd --zone=work --add-service=smtp
To make this setting permanent, add the --permanent option and reload the firewall.
SMTP from the work zone, enter the following command as root:
~]# firewall-cmd --zone=work --remove-service=smtp
Add the --permanent option to make the change persist after system boot. If using this option and you wish to make the change immediate, reload the firewall, by entering the following command as root:
~]# firewall-cmd --reload
Note, this will not break established connections. If that is your intention, you could use the --complete-reload option but this will break all established connections not just for the service you have removed.
~]# ls /usr/lib/firewalld/zones/
block.xml  drop.xml      home.xml      public.xml   work.xml
dmz.xml    external.xml  internal.xml  trusted.xml
These files must not be edited. They are used by default if no equivalent file exists in the /etc/firewalld/zones/ directory.
~]# ls /etc/firewalld/zones/
external.xml  public.xml  public.xml.old
~]# cp /usr/lib/firewalld/zones/work.xml /etc/firewalld/zones/
You can now edit the file in the /etc/firewalld/zones/ directory. If you delete the file, firewalld will fall back to using the default file in /usr/lib/firewalld/zones/.
SMTP to the work zone, use an editor with root privileges to edit the /etc/firewalld/zones/work.xml file to include the following line:
<service name="smtp"/>
~]# ls /etc/firewalld/zones/
external.xml  public.xml  work.xml
SMTP from the work zone, use an editor with root privileges to edit the /etc/firewalld/zones/work.xml file to remove the following line:
<service name="smtp"/>If no other changes have been made to the
work.xml file, it can be removed and firewalld will use the default /usr/lib/firewalld/zones/work.xml configuration file after the next reload or system boot.
~]# firewall-cmd --zone=external --query-masquerade && echo "enabled" || echo "Not enabled"
If zone is omitted, the default zone will be used.
~]# firewall-cmd --zone=external --add-masquerade
To make this setting permanent, add the --permanent option and reload the firewall.
~]# firewall-cmd --zone=external --remove-masquerade
To make this setting permanent, add the --permanent option and reload the firewall.
~]# firewall-cmd --zone=external --add-masquerade
~]# firewall-cmd --zone=external --add-forward-port=port=22:proto=tcp:toport=3753
In this example, the packets intended for port 22 are now forwarded to port 3753. The original destination port is specified with the port option. This option can be a port, or port range, together with a protocol. The protocol, if specified, must be one of either tcp or udp. The new local port, the port or range of ports to which the traffic is being forwarded to, is specified with the toport option. To make this setting permanent, add the --permanent option and reload the firewall.
IPv4 address, usually an internal address, without changing the destination port, enter the following command as root:
~]# firewall-cmd --zone=external --add-forward-port=port=22:proto=tcp:toaddr=192.0.2.55
In this example, the packets intended for port 22 are now forwarded to the same port at the address given with the toaddr. The original destination port is specified with the port. This option can be a port, or port range, together with a protocol. The protocol, if specified, must be one of either tcp or udp. The new destination port, the port or range of ports to which the traffic is being forwarded to, is specified with the toport. To make this setting permanent, add the --permanent option and reload the firewall.
IPv4 address, usually an internal address, enter the following command as root:
~]# firewall-cmd --zone=external --add-forward-port=port=22:proto=tcp:toport=2055:toaddr=192.0.2.55
In this example, the packets intended for port 22 are now forwarded to port 2055 at the address given with the toaddr. The original destination port is specified with the port. This option can be a port, or port range, together with a protocol. The protocol, if specified, must be one of either tcp or udp. The new destination port, the port or range of ports to which the traffic is being forwarded to, is specified with the toport. To make this setting permanent, add the --permanent option and reload the firewall.
/etc/firewalld/ directory. Do not edit the files in the /usr/lib/firewalld/ directory, they are for the default settings. You will need root user permissions to view and edit the XML files. The XML files are explained in three man pages:
firewalld.icmptype(5) man page — Describes XML configuration files for ICMP filtering.
firewalld.service(5) man page — Describes XML configuration files for firewalld service.
firewalld.zone(5) man page — Describes XML configuration files for firewalld zone configuration.
--direct option with the firewall-cmd tool. A few examples are presented here, please see the firewall-cmd(1) man page for more information.
firewalld using D-BUS.
~]# firewall-cmd --direct --add-rule ipv4 filter IN_ZONE_public_allow 0 -m tcp -p tcp --dport 666 -j ACCEPT
~]# firewall-cmd --direct --remove-rule ipv4 filter IN_ZONE_public_allow -m tcp -p tcp --dport 666 -j ACCEPT
~]# firewall-cmd --direct --get-rules ipv4 filter IN_ZONE_public_allow
firewalld.
firewalld(1) man page — Describes command options for firewalld.
firewalld.conf(5) man page — Contains information to configure firewalld.
firewall-cmd(1) man page — Describes command options for the firewalld command line client.
firewalld.icmptype(5) man page — Describes XML configuration files for ICMP filtering.
firewalld.service(5) man page — Describes XML configuration files for firewalld serivice.
firewalld.zone(5) man page — Describes XML configuration files for firewalld zone configuration.
NetworkManager-openconnect, and openconnect RPM packages be installed. The server side requires the ocserv RPM package. The available applications are listed below.
/usr/sbin/openconnect — It is the client tunnel establishment tool. Refer to the openconnect(8) man page for more information.
/usr/sbin/ocserv — it is the openconnect server application. Refer to the ocserv(8) man page for more information.
/etc/ocserv/ocserv.conf — ocserv's daemon configuration file used to configure various aspects of the connection, including authentication methods and encryption algorithms used in the connection. Refer to the ocserv(8) man page for a complete listing of available directives.
openconnect application with the appropriate command line parameters.
/etc/ssh/sshd_config uncomment and modify the following lines so that appear as such:
PubkeyAuthentication yes
AuthorizedKeysFile	.ssh/authorized_keys
The first line tells the SSH program to allow public key authentication. The second line points to a file in the home directory where the public key of authorized key pairs exists on the system.
ssh-keygen will generate an RSA 2048-bit key set for logging into the system. The keys are stored, by default, in the ~/.ssh directory. You can utilize the switch -b to modify the bit-strength of the key. A 2048-bit certificate only provides 112 bits of security. To get 128 bits of security requires a 3072-bit certificate and to get 256 bits of security one must use a 15,360-bit certificate. Elliptical certificates (ECDSA) and elliptical ciphers can increase the security to 256 bits with smaller certificates.
~/.ssh directory you should see the two keys you just created. If you accepted the defaults when running the ssh-keygen then your keys are named id_rsa and id_rsa.pub, the private and public keys. You should always protect the private key from exposure. The public key, however, needs to be transfered over to the system you are going to login to. Once you have it on your system the easiest way to add the key to the approved list is by:
$ cat id_rsa.pub >> ~/.ssh/authorized_keysThis will append the public key to the authorized_key file. The SSH application will check this file when you attempt to login to the computer.
/etc/crypto-policies/config, and run update-crypto-policies. At this point applications that are utilize the default set of ciphers in the GnuTLS and OpenSSL libraries will follow the policy requirements.
LEGACY, which ensures compatibility with legacy systems - 64-bit security, (2) DEFAULT, a reasonable default for today's standards - 80-bit security, and (3) FUTURE, a conservative level that is believed to withstand any near-term future attacks - 128-bit security. These levels affect SSL/TLS settings, including elliptic curve, signature hash functions, and ciphersuites and key sizes.
dm-crypt module. This arrangement provides a low-level mapping that handles encryption and decryption of the device's data. User-level operations, such as creating and accessing encrypted devices, are accomplished through the use of the cryptsetup utility.
swap devices.
Tip
Tip
Tip
kickstart to set a separate passphrase for each new encrypted block device.
--escrowcert parameter to any of the autopart, logvol, part or raid commands. During installation, the encryption keys for the specified devices are saved in files in /root, encrypted with the certificate.
--escrowcert parameter as described in Section 4.2.4.3.2, “Saving Passphrases”, followed by the --backuppassphrase parameter for each of the kickstart commands that relate to the devices for which you want to create backup passphrases.
parted, pvcreate, lvcreate and mdadm.
/dev/sda3) with random data before encrypting it greatly increases the strength of the encryption. The downside is that it can take a very long time.
Warning
dd if=/dev/urandom of=<device>
badblocks -c 10240 -s -w -t random -v <device>
Warning
cryptsetup luksFormat <device>
Note
cryptsetup(8) man page.
cryptsetup isLuks <device> && echo Success
cryptsetup luksDump <device>
device-mapper.
/dev/sda3), is guaranteed to remain constant as long as the LUKS header remains intact. To find a LUKS device's UUID, run the following command:
cryptsetup luksUUID <device>
luks-<uuid>, where <uuid> is replaced with the device's LUKS UUID (eg: luks-50ec957a-5b5a-47ee-85e6-f8085bbc97a8). This naming convention might seem unwieldy but is it not necessary to type it often.
cryptsetup luksOpen <device> <name>
/dev/mapper/<name>, which represents the decrypted device. This block device can be read from and written to like any other unencrypted block device.
dmsetup info <name>
Tip
dmsetup(8) man page.
/dev/mapper/<name>) as any other block device. To create an ext2 filesystem on the mapped device, use the following command:
mke2fs /dev/mapper/<name>
/mnt/test, use the following command:
Important
/mnt/test must exist before executing this command.
mount /dev/mapper/<name> /mnt/test
/etc/crypttab/etc/crypttab file. If the file doesn't exist, create it and change the owner and group to root (root:root) and change the mode to 0744. Add a line to the file with the following format:
<name> <device> none
cryptsetup luksUUID <device>. This ensures the correct device will be identified and used even if the device node (eg: /dev/sda5) changes.
Tip
/etc/crypttab file, read the crypttab(5) man page.
/etc/fstab/dev/mapper/<name> in the /etc/fstab file.
/etc/fstab by UUID or by a filesystem label. The main purpose of this is to provide a constant identifier in the event that the device name (eg: /dev/sda4) changes. LUKS device names in the form of /dev/mapper/luks-<luks_uuid> are based only on the device's LUKS UUID, and are therefore guaranteed to remain constant. This fact makes them suitable for use in /etc/fstab.
Title
/etc/fstab file, read the fstab(5) man page.
$HOME/keyfile.
		dd if=/dev/urandom of=$HOME/keyfile bs=32 count=1
		chmod 600 $HOME/keyfile
cryptsetup luksAddKey <device> ~/keyfile
cryptsetup luksAddKey <device>
cryptsetup luksRemoveKey <device>
su -c "yum install seahorse" or in the GUI using Add/Remove Software.
File menu select New then PGP Key then select Continue. Type your full name, email address, and an optional comment describing who are you (e.g.: John C. Smith, jsmith@example.com, The Man). Select Create. A dialog is displayed asking for a passphrase for the key. Choose a strong passphrase but also easy to remember. Click OK and the key is created.
Warning
KGpg window.
Warning
gpg --gen-key
Enter key to assign a default value if desired. The first prompt asks you to select what kind of key you prefer:
Please select what kind of key you want:
      (1) RSA and RSA (default)
      (2) DSA and Elgamal
      (3) DSA (sign only)
      (4) RSA (sign only)
      Your selection?
In almost all cases, the default is the correct choice. A RSA key allows you not only to sign communications, but also to encrypt files.
RSA keys may be between 1024 and 4096 bits long.
What keysize do you want? (2048)
Again, the default only provides 112 bits of security. Increasing this to 3072 helps provide 128 bits of security and represents a stronger level of security.
Please specify how long the key should be valid.
      0 = key does not expire
      d = key expires in n days
      w = key expires in n weeks
      m = key expires in n months
      y = key expires in n years
      Key is valid for? (0)
1y, for example, makes the key valid for one year. (You may change this expiration date after the key is generated, if you change your mind.)
Important
gpgcode> program asks for signature information, the following prompt appears: Is this correct (y/n)? Enter y to finish the process.
gpg generates random data to make your key as unique as possible. Move your mouse, type random keys, or perform other tasks on the system during this step to speed up the process. Once this step is finished, your keys are complete and ready to use:
pub  3072R/1B2AFA1C 2005-03-31 John Q. Doe <jqdoe@example.com>
Key fingerprint = 117C FE83 22EA B843 3E86  6486 4320 545E 1B2A FA1C
sub  3072R/CEA4B22E 2013-03-31 [expires: 2014-03-31]
gpg --fingerprint jqdoe@example.com
Warning
~/.pinerc file. You need to:
# This variable takes a list of programs that message text is piped into
# after MIME decoding, prior to display.
display-filters=_LEADING("-----BEGIN PGP")_ /home/max/bin/ez-pine-gpg-incoming

# This defines a program that message text is piped into before MIME
# encoding, prior to sending
sending-filters=/home/max/bin/ez-pine-gpg-sign _INCLUDEALLHDRS_,
    /home/username/bin/ez-pine-gpg-encrypt _RECIPIENTS_ gpg-identifier,
    /home/username/bin/ez-pine-gpg-sign-and-encrypt _INCLUDEALLHDRS_ _RECIPIENTS_ gpg-identifier
gpg --fingerprint EMAIL_ADDRESS. The key ID is the same as the last eight characters (4 bytes) of the key fingerprint. It is a good idea to click the option Always encrypt to myself when sending encrypted mail. You may also want to select Always sign outgoing messages when using this account.
Notice
gpg --keyserver pgp.mit.edu --search email address. To import the correct key, you may need to match the key ID with the information provided by Evolution.
yum install thunderbird-enigmail at a command line. Alternatively, you can install thunderbird-enigmail using by going to System -> Administration -> Add/Remove Software.
/var/log/secure and /var/log/audit/audit.log. Note: sending logs to a dedicated log server helps prevent attackers from easily modifying local logs to avoid detection.
sudo to execute commands as root when required. Users capable of running sudo are specified in /etc/sudoers. Use the visudo utility to edit /etc/sudoers.
System -> Preferences -> Software Updates. In KDE it is located at: Applications -> Settings -> Software Updates.
Important
yum install yum-plugin-security command.
sudo yum install libykneomgr pcsc-lite pcsc-tools gnupg2 gnupg2-smime --enablerepo=updates-testing
sudo systemctl start pcscd.service pcscd.socket
sudo systemctl enable pcscd.service pcscd.socket
ykneomgr -a, then copy the first 12 characters of last key to the clipboard.
ykneomgr -D d27600012401, and then it should return with no output. This deletes the version of the OpenPGP applet that is on the card.
.cap file from http://opensource.yubico.com/ykneo-openpgp/releases.html. For this example, we downloaded ykneo-openpgp-1.0.5.cap.
ykneomgr -i /tmp/ykneo-openpgp-1.0.5.cap to install the new version of the OpenPGP applet.
gpg --card-status to make sure GPG can see and talk to the card.
gpg: detected reader `Yubico Yubikey NEO OTP+CCID 00 00'
Application ID ...: D2760001240102000000000000010000
Version ..........: 2.0
Manufacturer .....: test card
Serial number ....: 00000001
Name of cardholder: [not set]
Language prefs ...: [not set]
Sex ..............: unspecified
URL of public key : [not set]
Login data .......: [not set]
Signature PIN ....: forced
Key attributes ...: 2048R 2048R 2048R
Max. PIN lengths .: 127 127 127
PIN retry counter : 3 3 3
Signature counter : 0
Signature key ....: [none]
Encryption key....: [none]
Authentication key: [none]
General key info..: [none]
gpg --card-edit to edit the settings on the card.
admin to turn on admin mode, do 1 and 3, and set a pin for each. Can be alpha-numeric.
q to quit.
name to add your name.
lang to set your language (en for example).
sex to set your gender.
quit to quit.
gpg --edit-key key-id
addcardkey to generate a new key on the Yubikey Neo
Signature key.
gpg2 --card-status. If it can't see your card, you probably forgot to install the gnupg2-smime package.
sudo gpg2 --no-default-keyring --keyring ~/.gnupg/pubring.gpg --secret-keyring ~/.gnupg/secring.gpg --edit-key key-id
toggle to switch between public key and secret key
key 2 to select the 2nd subkey. Now you'll notice a * next to the key.
keytocard to write the key to the Yubikey Neo.
sepolicy Suitesystemd Access Control~]$ls -l file1-rwxrw-r-- 1 user1 group1 0 2009-08-30 11:03 file1
rwx, control the access the Linux user1 user (in this case, the owner) has to file1. The next three permission bits, rw-, control the access the Linux group1 group has to file1. The last three permission bits, r--, control the access everyone else has to file1, which includes all users and processes.
~]$ls -Z file1-rwxrw-r-- user1 group1 unconfined_u:object_r:user_home_t:s0 file1
unconfined_u), a role (object_r), a type (user_home_t), and a level (s0). This information is used to make access control decisions. With DAC, access is controlled based only on Linux user and group IDs. It is important to remember that SELinux policy rules are checked after DAC rules. SELinux policy rules are not used if DAC rules deny access first.
Linux and SELinux Users
user_u user, results in a Linux user that is not able to run (unless configured otherwise) set user ID (setuid) applications, such as sudo and su, as well as preventing them from executing files and applications in their home directory. If configured, this prevents users from executing malicious files from their home directories.
named daemon itself, and by other processes.
setenforce utility to change between enforcing and permissive mode. Changes made with setenforce do not persist across reboots. To change to enforcing mode, as the Linux root user, run the setenforce 1 command. To change to permissive mode, run the setenforce 0 command. Use the getenforce utility to view the current SELinux mode.
~]$ls -Z file1-rwxrw-r-- user1 group1 unconfined_u:object_r:user_home_t:s0 file1
~]#semanage login -lLogin Name SELinux User MLS/MCS Range Service __default__ unconfined_u s0-s0:c0.c1023 * root unconfined_u s0-s0:c0.c1023 * system_u system_u s0-s0:c0.c1023 *
Login Name column lists Linux users.
SELinux User column lists which SELinux user the Linux user is mapped to. For processes, the SELinux user limits which roles and levels are accessible.
MLS/MCS Range column, is the level used by Multi-Level Security (MLS) and Multi-Category Security (MCS).
Service column determines the correct SELinux context, in which the Linux user is supposed to be logged in to the system. By default, the asterisk (*) character is used, which stands for any service.
s0-s0 is the same as s0). Each level is a sensitivity-category pair, with categories being optional. If there are categories, the level is written as sensitivity:category-set. If there are no categories, it is written as sensitivity.
c0.c3 is the same as c0,c1,c2,c3. The /etc/selinux/targeted/setrans.conf file maps levels (s0:c0) to human-readable form (that is CompanyConfidential). In Fedora, targeted policy enforces MCS, and in MCS, there is just one sensitivity, s0. MCS in Fedora supports 1024 different categories: c0 through to c1023. s0-s0:c0.c1023 is sensitivity s0 and authorized for all categories.
entrypoint type for the new domain. The entrypoint permission is used in SELinux policy and controls which applications can be used to enter a domain. The following example demonstrates a domain transition:
Procedure 10.1. An Example of a Domain Transition
passwd utility. The /usr/bin/passwd executable is labeled with the passwd_exec_t type:
~]$ls -Z /usr/bin/passwd-rwsr-xr-x root root system_u:object_r:passwd_exec_t:s0 /usr/bin/passwd
passwd utility accesses /etc/shadow, which is labeled with the shadow_t type:
~]$ls -Z /etc/shadow-r--------. root root system_u:object_r:shadow_t:s0 /etc/shadow
passwd_t domain are allowed to read and write to files labeled with the shadow_t type. The shadow_t type is only applied to files that are required for a password change. This includes /etc/gshadow, /etc/shadow, and their backup files.
passwd_t domain has entrypoint permission to the passwd_exec_t type.
passwd utility, the user's shell process transitions to the passwd_t domain. With SELinux, since the default action is to deny, and a rule exists that allows (among other things) applications running in the passwd_t domain to access files labeled with the shadow_t type, the passwd application is allowed to access /etc/shadow, and update the user's password.
passwd_t domain to access objects labeled with the shadow_t file type, other SELinux policy rules must be met before the subject can transition to a new domain. In this example, Type Enforcement ensures:
passwd_t domain can only be entered by executing an application labeled with the passwd_exec_t type; can only execute from authorized shared libraries, such as the lib_t type; and cannot execute any other applications.
passwd_t, can write to files labeled with the shadow_t type. Even if other processes are running with superuser privileges, those processes cannot write to files labeled with the shadow_t type, as they are not running in the passwd_t domain.
passwd_t domain. For example, the sendmail process running in the sendmail_t domain does not have a legitimate reason to execute passwd; therefore, it can never transition to the passwd_t domain.
passwd_t domain can only read and write to authorized types, such as files labeled with the etc_t or shadow_t types. This prevents the passwd application from being tricked into reading or writing arbitrary files.
ps -eZ command to view the SELinux context for processes. For example:
Procedure 10.2. View the SELinux Context for the passwd Utility
passwd utility. Do not enter a new password:
~]$passwdChanging password for user user_name. Changing password for user_name. (current) UNIX password:
~]$ps -eZ | grep passwdunconfined_u:unconfined_r:passwd_t:s0-s0:c0.c1023 13212 pts/1 00:00:00 passwd
Ctrl+C to cancel the passwd utility.
passwd utility (labeled with the passwd_exec_t type) is executed, the user's shell process transitions to the passwd_t domain. Remember that the type defines a domain for processes, and a type for files.
ps utility again. Note that below is a truncated example of the output, and may differ on your system:
]$ps -eZsystem_u:system_r:dhcpc_t:s0 1869 ? 00:00:00 dhclient system_u:system_r:sshd_t:s0-s0:c0.c1023 1882 ? 00:00:00 sshd system_u:system_r:gpm_t:s0 1964 ? 00:00:00 gpm system_u:system_r:crond_t:s0-s0:c0.c1023 1973 ? 00:00:00 crond system_u:system_r:kerneloops_t:s0 1983 ? 00:00:05 kerneloops system_u:system_r:crond_t:s0-s0:c0.c1023 1991 ? 00:00:00 atd
system_r role is used for system processes, such as daemons. Type Enforcement then separates each domain.
~]$id -Zunconfined_u:unconfined_r:unconfined_t:s0-s0:c0.c1023
unconfined_u user, running as the unconfined_r role, and is running in the unconfined_t domain. s0-s0 is an MLS range, which in this case, is the same as just s0. The categories the user has access to is defined by c0.c1023, which is all categories (c0 through to c1023).
unconfined_t domain, and system processes started by init run in the initrc_t domain; both of these domains are unconfined.
sshd or httpd, is confined in Fedora. Also, most processes that run as the root user and perform tasks for users, such as the passwd utility, are confined. When a process is confined, it runs in its own domain, such as the httpd process running in the httpd_t domain. If a confined process is compromised by an attacker, depending on SELinux policy configuration, an attacker's access to resources and the possible damage they can do is limited.
Procedure 10.3. How to Verify SELinux Status
~]$sestatusSELinux status: enabled SELinuxfs mount: /selinux Current mode: enforcing Mode from config file: enforcing Policy version: 24 Policy from config file: targeted
/var/www/html/ directory:
~]#touch /var/www/html/testfile
~]$ls -Z /var/www/html/testfile-rw-r--r-- root root unconfined_u:object_r:httpd_sys_content_t:s0 /var/www/html/testfile
testfile file is labeled with the SELinux unconfined_u user. RBAC is used for processes, not files. Roles do not have a meaning for files; the object_r role is a generic role used for files (on persistent storage and network file systems). Under the /proc/ directory, files related to processes may use the system_r role.
[18] The httpd_sys_content_t type allows the httpd process to access this file.
httpd) from reading files that are not correctly labeled, such as files intended for use by Samba. This is an example, and should not be used in production. It assumes that the httpd and wget packages are installed, the SELinux targeted policy is used, and that SELinux is running in enforcing mode.
Procedure 10.4. An Example of Confined Process
httpd daemon:
~]#systemctl start httpd.service
~]$systemctl status httpd.servicehttpd.service - The Apache HTTP Server Loaded: loaded (/usr/lib/systemd/system/httpd.service; disabled) Active: active (running) since Mon 2013-08-05 14:00:55 CEST; 8s ago
~]$wget http://localhost/testfile--2009-11-06 17:43:01-- http://localhost/testfile Resolving localhost... 127.0.0.1 Connecting to localhost|127.0.0.1|:80... connected. HTTP request sent, awaiting response... 200 OK Length: 0 [text/plain] Saving to: `testfile' [ <=> ] 0 --.-K/s in 0s 2009-11-06 17:43:01 (0.00 B/s) - `testfile' saved [0/0]
chcon command relabels files; however, such label changes do not survive when the file system is relabeled. For permanent changes that survive a file system relabel, use the semanage utility, which is discussed later. As root, run the following command to change the type to a type used by Samba:
~]#chcon -t samba_share_t /var/www/html/testfile
~]$ls -Z /var/www/html/testfile-rw-r--r-- root root unconfined_u:object_r:samba_share_t:s0 /var/www/html/testfile
httpd process access to testfile. Change into a directory where your user has write access to, and run the following command. Unless there are changes to the default configuration, this command fails:
~]$wget http://localhost/testfile--2009-11-06 14:11:23-- http://localhost/testfile Resolving localhost... 127.0.0.1 Connecting to localhost|127.0.0.1|:80... connected. HTTP request sent, awaiting response... 403 Forbidden 2009-11-06 14:11:23 ERROR 403: Forbidden.
testfile:
~]#rm -i /var/www/html/testfile
httpd to be running, as root, run the following command to stop it:
~]#systemctl stop httpd.service
httpd process access to testfile in step 2, because the file was labeled with a type that the httpd process does not have access to, SELinux denied access.
auditd daemon is running, an error similar to the following is logged to /var/log/audit/audit.log:
type=AVC msg=audit(1220706212.937:70): avc:  denied  { getattr } for  pid=1904 comm="httpd" path="/var/www/html/testfile" dev=sda5 ino=247576 scontext=unconfined_u:system_r:httpd_t:s0 tcontext=unconfined_u:object_r:samba_share_t:s0  tclass=file

type=SYSCALL msg=audit(1220706212.937:70): arch=40000003 syscall=196 success=no exit=-13 a0=b9e21da0 a1=bf9581dc a2=555ff4 a3=2008171 items=0 ppid=1902 pid=1904 auid=500 uid=48 gid=48 euid=48 suid=48 fsuid=48 egid=48 sgid=48 fsgid=48 tty=(none) ses=1 comm="httpd" exe="/usr/sbin/httpd" subj=unconfined_u:system_r:httpd_t:s0 key=(null)
/var/log/httpd/error_log:
[Wed May 06 23:00:54 2009] [error] [client 127.0.0.1] (13)Permission denied: access to /testfile denied
initrc_t domain, unconfined kernel processes run in the kernel_t domain, and unconfined Linux users run in the unconfined_t domain. For unconfined processes, SELinux policy rules are applied, but policy rules exist that allow processes running in unconfined domains almost all access. Processes running in unconfined domains fall back to using DAC rules exclusively. If an unconfined process is compromised, SELinux does not prevent an attacker from gaining access to system resources and data, but of course, DAC rules are still used. SELinux is a security enhancement on top of DAC rules – it does not replace them.
httpd) can access data intended for use by Samba, when running unconfined. Note that in Fedora, the httpd process runs in the confined httpd_t domain by default. This is an example, and should not be used in production. It assumes that the httpd, wget, dbus and audit packages are installed, that the SELinux targeted policy is used, and that SELinux is running in enforcing mode.
Procedure 10.5. An Example of Unconfined Process
chcon command relabels files; however, such label changes do not survive when the file system is relabeled. For permanent changes that survive a file system relabel, use the semanage utility, which is discussed later. As the root user, run the following command to change the type to a type used by Samba:
~]#chcon -t samba_share_t /var/www/html/testfile
~]$ls -Z /var/www/html/testfile-rw-r--r-- root root unconfined_u:object_r:samba_share_t:s0 /var/www/html/testfile
httpd process is not running:
~]$systemctl status httpd.servicehttpd.service - The Apache HTTP Server Loaded: loaded (/usr/lib/systemd/system/httpd.service; disabled) Active: inactive (dead)
httpd process:
~]#systemctl stop httpd.service
httpd process run unconfined, run the following command as root to change the type of the /usr/sbin/httpd file, to a type that does not transition to a confined domain:
~]#chcon -t unconfined_exec_t /usr/sbin/httpd
/usr/sbin/httpd is labeled with the unconfined_exec_t type:
~]$ls -Z /usr/sbin/httpd-rwxr-xr-x root root system_u:object_r:unconfined_exec_t:s0 /usr/sbin/httpd
httpd process and confirm, that it started successfully:
~]#systemctl start httpd.service
~]#systemctl status httpd.servicehttpd.service - The Apache HTTP Server Loaded: loaded (/usr/lib/systemd/system/httpd.service; disabled) Active: active (running) since Thu 2013-08-15 11:17:01 CEST; 5s ago
httpd running in the unconfined_t domain:
~]$ps -eZ | grep httpdunconfined_u:unconfined_r:unconfined_t:s0 7721 ? 00:00:00 httpd unconfined_u:unconfined_r:unconfined_t:s0 7723 ? 00:00:00 httpd unconfined_u:unconfined_r:unconfined_t:s0 7724 ? 00:00:00 httpd unconfined_u:unconfined_r:unconfined_t:s0 7725 ? 00:00:00 httpd unconfined_u:unconfined_r:unconfined_t:s0 7726 ? 00:00:00 httpd unconfined_u:unconfined_r:unconfined_t:s0 7727 ? 00:00:00 httpd unconfined_u:unconfined_r:unconfined_t:s0 7728 ? 00:00:00 httpd unconfined_u:unconfined_r:unconfined_t:s0 7729 ? 00:00:00 httpd unconfined_u:unconfined_r:unconfined_t:s0 7730 ? 00:00:00 httpd
~]$wget http://localhost/testfile--2009-05-07 01:41:10-- http://localhost/testfile Resolving localhost... 127.0.0.1 Connecting to localhost|127.0.0.1|:80... connected. HTTP request sent, awaiting response... 200 OK Length: 0 [text/plain] Saving to: `testfile.1' [ <=> ]--.-K/s in 0s 2009-05-07 01:41:10 (0.00 B/s) - `testfile.1' saved [0/0]
httpd process does not have access to files labeled with the samba_share_t type, httpd is running in the unconfined unconfined_t domain, and falls back to using DAC rules, and as such, the wget command succeeds. Had httpd been running in the confined httpd_t domain, the wget command would have failed.
restorecon utility restores the default SELinux context for files. As root, run the following command to restore the default SELinux context for /usr/sbin/httpd:
~]#restorecon -v /usr/sbin/httpdrestorecon reset /usr/sbin/httpd context system_u:object_r:unconfined_exec_t:s0->system_u:object_r:httpd_exec_t:s0
/usr/sbin/httpd is labeled with the httpd_exec_t type:
~]$ls -Z /usr/sbin/httpd-rwxr-xr-x root root system_u:object_r:httpd_exec_t:s0 /usr/sbin/httpd
httpd. After restarting, confirm that httpd is running in the confined httpd_t domain:
~]#systemctl restart httpd.service
~]$ps -eZ | grep httpdsystem_u:system_r:httpd_t:s0 8883 ? 00:00:00 httpd system_u:system_r:httpd_t:s0 8884 ? 00:00:00 httpd system_u:system_r:httpd_t:s0 8885 ? 00:00:00 httpd system_u:system_r:httpd_t:s0 8886 ? 00:00:00 httpd system_u:system_r:httpd_t:s0 8887 ? 00:00:00 httpd system_u:system_r:httpd_t:s0 8888 ? 00:00:00 httpd system_u:system_r:httpd_t:s0 8889 ? 00:00:00 httpd
testfile:
~]#rm -i /var/www/html/testfilerm: remove regular empty file `/var/www/html/testfile'? y
httpd to be running, as root, run the following command to stop httpd:
~]#systemctl stop httpd.service
semanage login -l command as root:
~]#semanage login -lLogin Name SELinux User MLS/MCS Range Service __default__ unconfined_u s0-s0:c0.c1023 * root unconfined_u s0-s0:c0.c1023 * system_u system_u s0-s0:c0.c1023 *
__default__ login by default, which is mapped to the SELinux unconfined_u user. The following line defines the default mapping:
__default__ unconfined_u s0-s0:c0.c1023
unconfined_u user. It assumes that the root user is running unconfined, as it does by default in Fedora:
Procedure 10.6. Mapping a New Linux User to the SELinux unconfined_u User
newuser:
~]#useradd newuser
newuser user. Run the following command as root:
~]#passwd newuserChanging password for user newuser. New UNIX password: Enter a password Retype new UNIX password: Enter the same password again passwd: all authentication tokens updated successfully.
newuser user. When you log in, the pam_selinux PAM module automatically maps the Linux user to an SELinux user (in this case, unconfined_u), and sets up the resulting SELinux context. The Linux user's shell is then launched with this context. Run the following command to view the context of a Linux user:
[newuser@localhost ~]$id -Zunconfined_u:unconfined_r:unconfined_t:s0-s0:c0.c1023
Note
newuser user on your system, log out of the Linux newuser's session, log in with your account, and run the userdel -r newuser command as root. It will remove newuser along with their home directory.
unconfined_t domain to its own confined domain, the unconfined Linux user is still subject to the restrictions of that confined domain. The security benefit of this is that, even though a Linux user is running unconfined, the application remains confined. Therefore, the exploitation of a flaw in the application can be limited by the policy.
unconfined_t domain. The SELinux policy can also define a transition from a confined user domain to its own target confined domain. In such a case, confined Linux users are subject to the restrictions of that target confined domain. The main point is that special privileges are associated with the confined users according to their role. In the table below, you can see examples of basic confined domains for Linux users in Fedora:
Table 10.1. SELinux User Capabilities
| User | Domain | X Window System | su or sudo | Execute in home directory and /tmp/ (default) | Networking |
|---|---|---|---|---|---|
| sysadm_u | sysadm_t | yes | su and sudo | yes | yes |
| staff_u | staff_t | yes | only sudo | yes | yes |
| user_u | user_t | yes | no | yes | yes |
| guest_u | guest_t | no | no | no | yes |
| xguest_u | xguest_t | yes | no | no | Firefox only |
user_t, guest_t, xguest_t, and git_shell_t domains can only run set user ID (setuid) applications if SELinux policy permits it (for example, passwd). These users cannot run the su and sudo setuid applications, and therefore cannot use these applications to become root.
sysadm_t, staff_t, user_t, and xguest_t domains can log in via the X Window System and a terminal.
guest_t and xguest_t domains cannot execute applications in their home directories or the /tmp/ directory, preventing them from executing applications, which inherit users' permissions, in directories they have write access to. This helps prevent flawed or malicious applications from modifying users' files.
staff_t and user_t domains can execute applications in their home directories and /tmp/. See Section 10.6.6, “Booleans for Users Executing Applications” for information about allowing and preventing users from executing applications in their home directories and /tmp/.
xguest_t domain have is Firefox connecting to web pages.
mount command; mounting NFS volumes; and how to preserve SELinux contexts when copying and archiving files and directories.
restorecon, secon, setfiles, semodule, load_policy, and setsebool, for operating and managing SELinux.
selinux-policy.conf file and RPM macros.
avcstat, getenforce, getsebool, matchpathcon, selinuxconlist, selinuxdefcon, selinuxenabled, and setenforce utilities.
yum install <package-name> command:
sealert utility, also provided in this package.
apol and seaudit utilities. The setools-console package provides the sechecker, sediff, seinfo, sesearch, and findcon command-line utilities. Refer to the Tresys Technology SETools page for information about these utilities. Note that setools and setools-gui packages are available only when the Red Hat Network Optional channel is enabled. For further information, see Scope of Coverage Details.
s0-s0:c0.c1023, to a form that is easier to read, such as SystemLow-SystemHigh.
semanage, audit2allow, audit2why, and chcat, for operating and managing SELinux.
system-config-selinux, a graphical utility for managing SELinux.
yum install setroubleshoot command).
auditd daemon is running, an SELinux denial message, such as the following, is written to /var/log/audit/audit.log by default:
type=AVC msg=audit(1223024155.684:49): avc: denied { getattr } for pid=2000 comm="httpd" path="/var/www/html/file1" dev=dm-0 ino=399185 scontext=unconfined_u:system_r:httpd_t:s0 tcontext=system_u:object_r:samba_share_t:s0 tclass=file
/var/log/message file:
May 7 18:55:56 localhost setroubleshoot: SELinux is preventing httpd (httpd_t) "getattr" to /var/www/html/file1 (samba_share_t). For complete SELinux messages. run sealert -l de7e30d6-5488-466d-a606-92c9f40d316d
setroubleshootd no longer constantly runs as a service. However, it is still used to analyze the AVC messages. Two new programs act as a method to start setroubleshoot when needed:
sedispatch utility runs as a part of the audit subsystem. When an AVC denial message is returned, sedispatch sends a message using dbus. These messages go straight to setroubleshootd if it is already running. If it is not running, sedispatch starts it automatically.
seapplet utility runs in the system toolbar, waiting for dbus messages in setroubleshootd. It launches the notification bubble, allowing the user to review AVC messages.
Procedure 10.7. Starting Daemons Automatically
auditd and rsyslogd daemons to automatically start at boot, run the following commands as the root user:
~]#chkconfig --levels 2345 auditd on
~]#chkconfig --levels 2345 rsyslog on
systemctl status service-name.service command to check if these services are running, for example:
~]#systemctl status auditd.serviceauditd.service - Security Auditing Service Loaded: loaded (/usr/lib/systemd/system/auditd.service; enabled) Active: active (running) since Thu 2013-08-15 09:10:37 CEST; 23min ago
Active: inactive (dead)), use the systemctl start service-name.service command as root to start them. For example:
~]#systemctl start auditd.service
/etc/selinux/config file is the main SELinux configuration file. It controls the SELinux mode and the SELinux policy to use:
# This file controls the state of SELinux on the system.
# SELINUX= can take one of these three values:
#       enforcing - SELinux security policy is enforced.
#       permissive - SELinux prints warnings instead of enforcing.
#       disabled - No SELinux policy is loaded.
SELINUX=enforcing
# SELINUXTYPE= can take one of these two values:
#       targeted - Targeted processes are protected,
#       mls - Multi Level Security protection.
SELINUXTYPE=targeted
SELINUX=enforcingSELINUX option sets the mode SELinux runs in. SELinux has three modes: enforcing, permissive, and disabled. When using enforcing mode, SELinux policy is enforced, and SELinux denies access based on SELinux policy rules. Denial messages are logged. When using permissive mode, SELinux policy is not enforced. SELinux does not deny access, but denials are logged for actions that would have been denied if running SELinux in enforcing mode. When using disabled mode, SELinux is disabled (the SELinux module is not registered with the Linux kernel), and only DAC rules are used.
SELINUXTYPE=targetedSELINUXTYPE option sets the SELinux policy to use. Targeted policy is the default policy. Only change this option if you want to use the MLS policy. For information on how to enable the MLS policy, refer to Section 10.4.11.2, “Enabling MLS in SELinux”.
Important
getenforce or sestatus commands to check the status of SELinux. The getenforce command returns Enforcing, Permissive, or Disabled.
sestatus command returns the SELinux status and the SELinux policy being used:
~]$sestatusSELinux status: enabled SELinuxfs mount: /selinux Current mode: enforcing Mode from config file: enforcing Policy version: 24 Policy from config file: targeted
Important
dracut utility has to be run to put SELinux awareness into the initramfs file system. Failing to do so causes SELinux not to start during system startup.
SELINUX=disabled option is configured in /etc/selinux/config:
# This file controls the state of SELinux on the system.
# SELINUX= can take one of these three values:
#       enforcing - SELinux security policy is enforced.
#       permissive - SELinux prints warnings instead of enforcing.
#       disabled - No SELinux policy is loaded.
SELINUX=disabled
# SELINUXTYPE= can take one of these two values:
#       targeted - Targeted processes are protected,
#       mls - Multi Level Security protection.
SELINUXTYPE=targeted
getenforce command returns Disabled:
~]$getenforceDisabled
Procedure 10.8. Enabling SELinux
rpm utility:
~]$rpm -qa | grep selinuxselinux-policy-3.12.1-136.el7.noarch libselinux-2.2.2-4.el7.x86_64 selinux-policy-targeted-3.12.1-136.el7.noarch libselinux-utils-2.2.2-4.el7.x86_64 libselinux-python-2.2.2-4.el7.x86_64
~]$rpm -qa | grep policycoreutilspolicycoreutils-2.2.5-6.el7.x86_64 policycoreutils-python-2.2.5-6.el7.x86_64
~]$rpm -qa | grep setroubleshootsetroubleshoot-server-3.2.17-2.el7.x86_64 setroubleshoot-3.2.17-2.el7.x86_64 setroubleshoot-plugins-3.0.58-2.el7.noarch
yum utility as root to install them:
~]#yum install package_name
SELINUX=permissive in the /etc/selinux/config file:
# This file controls the state of SELinux on the system.
# SELINUX= can take one of these three values:
#       enforcing - SELinux security policy is enforced.
#       permissive - SELinux prints warnings instead of enforcing.
#       disabled - No SELinux policy is loaded.
SELINUX=permissive
# SELINUXTYPE= can take one of these two values:
#       targeted - Targeted processes are protected,
#       mls - Multi Level Security protection.
SELINUXTYPE=targeted
~]#reboot
*** Warning -- SELinux targeted policy relabel is required.
*** Relabeling could take a very long time, depending on file
*** system size and speed of hard drives.
****
* (asterisk) character on the bottom line represents 1000 files that have been labeled. In the above example, four * characters represent 4000 files have been labeled. The time it takes to label all files depends upon the number of files on the system, and the speed of the hard disk drives. On modern systems, this process can take as little as 10 minutes.
~]#grep "SELinux is preventing" /var/log/messages
/var/log/messages file, configure SELINUX=enforcing in /etc/selinux/config:
# This file controls the state of SELinux on the system.
# SELINUX= can take one of these three values:
#       enforcing - SELinux security policy is enforced.
#       permissive - SELinux prints warnings instead of enforcing.
#       disabled - No SELinux policy is loaded.
SELINUX=enforcing
# SELINUXTYPE= can take one of these two values:
#       targeted - Targeted processes are protected,
#       mls - Multi Level Security protection.
SELINUXTYPE=targeted
getenforce returns Enforcing:
~]$getenforceEnforcing
~]#semanage login -lLogin Name SELinux User MLS/MCS Range Service __default__ unconfined_u s0-s0:c0.c1023 * root unconfined_u s0-s0:c0.c1023 * system_u system_u s0-s0:c0.c1023 *
SELinux-user username is already defined warnings if they occur, where username can be unconfined_u, guest_u, or xguest_u:
Procedure 10.9. Fixing User Mappings
~]#semanage user -a -S targeted -P user -R "unconfined_r system_r" -r s0-s0:c0.c1023 unconfined_u
~]#semanage login -m -S targeted -s "unconfined_u" -r s0-s0:c0.c1023 __default__
~]#semanage login -m -S targeted -s "unconfined_u" -r s0-s0:c0.c1023 root
~]#semanage user -a -S targeted -P user -R guest_r guest_u
~]#semanage user -a -S targeted -P user -R xguest_r xguest_u
Important
SELINUX=disabled in the /etc/selinux/config file:
# This file controls the state of SELinux on the system.
# SELINUX= can take one of these three values:
#       enforcing - SELinux security policy is enforced.
#       permissive - SELinux prints warnings instead of enforcing.
#       disabled - No SELinux policy is loaded.
SELINUX=disabled
# SELINUXTYPE= can take one of these two values:
#       targeted - Targeted processes are protected,
#       mls - Multi Level Security protection.
SELINUXTYPE=targeted
getenforce command returns Disabled:
~]$getenforceDisabled
semanage boolean -l command as the Linux root user. The following example does not list all Booleans and the output is shortened for brevity:
~]#semanage boolean -lSELinux boolean State Default Description ftp_home_dir (off , off) Determine whether ftpd can read... smartmon_3ware (off , off) Determine whether smartmon can... mpd_enable_homedirs (off , off) Determine whether mpd can traverse...
SELinux boolean column lists Boolean names. The Description column lists whether the Booleans are on or off, and what they do.
ftp_home_dir Boolean is off, preventing the FTP daemon (vsftpd) from reading and writing to files in user home directories:
ftp_home_dir (off , off) Determine whether ftpd can read...
getsebool -a command lists Booleans, whether they are on or off, but does not give a description of each one. The following example does not list all Booleans:
~]$getsebool -acvs_read_shadow --> off daemons_dump_core --> on ftp_home_dir --> off
getsebool boolean-name command to only list the status of the boolean-name Boolean:
~]$getsebool cvs_read_shadowcvs_read_shadow --> off
~]$getsebool cvs_read_shadow daemons_dump_core ftp_home_dircvs_read_shadow --> off daemons_dump_core --> on ftp_home_dir --> off
setsebool utility in the setsebool boolean_name on/off form to enable or disable Booleans.
httpd_can_network_connect_db Boolean:
Procedure 10.10. Configuring Booleans
httpd_can_network_connect_db Boolean is off, preventing Apache HTTP Server scripts and modules from connecting to database servers:
~]$getsebool httpd_can_network_connect_dbhttpd_can_network_connect_db --> off
~]#setsebool httpd_can_network_connect_db on
getsebool utility to verify the Boolean has been enabled:
~]$getsebool httpd_can_network_connect_dbhttpd_can_network_connect_db --> on
setsebool -P boolean-name on command as root:
[19]
~]#setsebool -P httpd_can_network_connect_db on
getsebool, setsebool, and semanage utilities. Use the auto-completion with getsebool and setsebool to complete both command-line parameters and Booleans. To list only the command-line parameters, add the hyphen character ("-") after the command name and hit the Tab key:
~]# setsebool -[Tab]
-P
~]$ getsebool samba_[Tab]
samba_create_home_dirs   samba_export_all_ro      samba_run_unconfined
samba_domain_controller  samba_export_all_rw      samba_share_fusefs
samba_enable_home_dirs   samba_portmapper         samba_share_nfs
~]# setsebool -P virt_use_[Tab]
virt_use_comm     virt_use_nfs      virt_use_sanlock
virt_use_execmem  virt_use_rawip    virt_use_usb
virt_use_fusefs   virt_use_samba    virt_use_xserver
semanage utility is used with several command-line arguments that are completed one by one. The first argument of a semanage command is an option, which specifies what part of SELinux policy is managed:
~]# semanage [Tab]
boolean     export      import      login       node        port
dontaudit   fcontext    interface   module      permissive  user
~]# semanage fcontext -[Tab]
-a           -D           --equal      --help       -m           -o
--add        --delete     -f           -l           --modify     -S
-C           --deleteall  --ftype      --list       -n           -t
-d           -e           -h           --locallist  --noheading  --type
~]#semanage fcontext -a -t samba<tab> samba_etc_t samba_secrets_t sambagui_exec_t samba_share_t samba_initrc_exec_t samba_unconfined_script_exec_t samba_log_t samba_unit_file_t samba_net_exec_t
~]# semanage port -a -t http_port_t -p tcp 81ls -Z command:
~]$ls -Z file1-rw-rw-r-- user1 group1 unconfined_u:object_r:user_home_t:s0 file1
unconfined_u), a role (object_r), a type (user_home_t), and a level (s0). This information is used to make access control decisions. On DAC systems, access is controlled based on Linux user and group IDs. SELinux policy rules are checked after DAC rules. SELinux policy rules are not used if DAC rules deny access first.
chcon, semanage fcontext, and restorecon.
chcon command changes the SELinux context for files. However, changes made with the chcon command do not survive a file system relabel, or the execution of the restorecon command. SELinux policy controls whether users are able to modify the SELinux context for any given file. When using chcon, users provide all or part of the SELinux context to change. An incorrect file type is a common cause of SELinux denying access.
chcon -t type file-name command to change the file type, where type is an SELinux type, such as httpd_sys_content_t, and file-name is a file or directory name:
~]$chcon -t httpd_sys_content_t file-name
chcon -R -t type directory-name command to change the type of the directory and its contents, where type is an SELinux type, such as httpd_sys_content_t, and directory-name is a directory name:
~]$chcon -R -t httpd_sys_content_t directory-name
Procedure 10.11. Changing a File's or Directory's Type
file1 was a directory.
~]$touch file1
~]$ls -Z file1-rw-rw-r-- user1 group1 unconfined_u:object_r:user_home_t:s0 file1
file1 includes the SELinux unconfined_u user, object_r role, user_home_t type, and the s0 level. For a description of each part of the SELinux context, see Section 10.2, “SELinux Contexts”.
samba_share_t. The -t option only changes the type. Then view the change:
~]$chcon -t samba_share_t file1
~]$ls -Z file1-rw-rw-r-- user1 group1 unconfined_u:object_r:samba_share_t:s0 file1
file1 file. Use the -v option to view what changes:
~]$restorecon -v file1restorecon reset file1 context unconfined_u:object_r:samba_share_t:s0->system_u:object_r:user_home_t:s0
samba_share_t, is restored to the correct, user_home_t type. When using targeted policy (the default SELinux policy in Fedora), the restorecon command reads the files in the /etc/selinux/targeted/contexts/files/ directory, to see which SELinux context files should have.
Procedure 10.12. Changing a Directory and its Contents Types
/var/www/html/):
/mkdir/directory and then 3 empty files (file1, file2, and file3) within this directory. The /web/ directory and files in it are labeled with the default_t type:
~]#mkdir /web
~]#touch /web/file{1,2,3}
~]#ls -dZ /webdrwxr-xr-x root root unconfined_u:object_r:default_t:s0 /web
~]#ls -lZ /web-rw-r--r-- root root unconfined_u:object_r:default_t:s0 file1 -rw-r--r-- root root unconfined_u:object_r:default_t:s0 file2 -rw-r--r-- root root unconfined_u:object_r:default_t:s0 file3
/web/ directory (and its contents) to httpd_sys_content_t:
~]#chcon -R -t httpd_sys_content_t /web/
~]#ls -dZ /web/drwxr-xr-x root root unconfined_u:object_r:httpd_sys_content_t:s0 /web/
~]#ls -lZ /web/-rw-r--r-- root root unconfined_u:object_r:httpd_sys_content_t:s0 file1 -rw-r--r-- root root unconfined_u:object_r:httpd_sys_content_t:s0 file2 -rw-r--r-- root root unconfined_u:object_r:httpd_sys_content_t:s0 file3
restorecon utility as root:
~]#restorecon -R -v /web/restorecon reset /web context unconfined_u:object_r:httpd_sys_content_t:s0->system_u:object_r:default_t:s0 restorecon reset /web/file2 context unconfined_u:object_r:httpd_sys_content_t:s0->system_u:object_r:default_t:s0 restorecon reset /web/file3 context unconfined_u:object_r:httpd_sys_content_t:s0->system_u:object_r:default_t:s0 restorecon reset /web/file1 context unconfined_u:object_r:httpd_sys_content_t:s0->system_u:object_r:default_t:s0
chcon.
Note
semanage fcontext command is used to change the SELinux context of files. When using targeted policy, changes are written to files located in the /etc/selinux/targeted/contexts/files/ directory:
file_contexts file specifies default contexts for many files, as well as contexts updated via semanage fcontext.
file_contexts.local file stores contexts to newly created files and directories not found in file_contexts.
setfiles utility is used when a file system is relabeled and the restorecon utility restores the default SELinux contexts. This means that changes made by semanage fcontext are persistent, even if the file system is relabeled. SELinux policy controls whether users are able to modify the SELinux context for any given file.
~]#semanage fcontext -a options file-name|directory-name
restorecon utility to apply the context changes:
~]#restorecon -v file-name|directory-name
Procedure 10.13. Changing a File's or Directory 's Type
file1 was a directory.
/etc/ directory. By default, newly-created files in /etc/ are labeled with the etc_t type:
~]#touch /etc/file1
~]$ls -Z /etc/file1-rw-r--r-- root root unconfined_u:object_r:etc_t:s0 /etc/file1
~]$ls -dZ directory_name
file1 type to samba_share_t. The -a option adds a new record, and the -t option defines a type (samba_share_t). Note that running this command does not directly change the type; file1 is still labeled with the etc_t type:
~]#semanage fcontext -a -t samba_share_t /etc/file1
~]#ls -Z /etc/file1-rw-r--r-- root root unconfined_u:object_r:etc_t:s0 /etc/file1
semanage fcontext -a -t samba_share_t /etc/file1 command adds the following entry to /etc/selinux/targeted/contexts/files/file_contexts.local:
/etc/file1 unconfined_u:object_r:samba_share_t:s0
restorecon utility to change the type. Because semanage added an entry to file.contexts.local for /etc/file1, restorecon changes the type to samba_share_t:
~]#restorecon -v /etc/file1restorecon reset /etc/file1 context unconfined_u:object_r:etc_t:s0->system_u:object_r:samba_share_t:s0
Procedure 10.14. Changing a Directory and its Contents Types
/var/www/html/):
/mkdir/directory and then 3 empty files (file1, file2, and file3) within this directory. The /web/ directory and files in it are labeled with the default_t type:
~]#mkdir /web
~]#touch /web/file{1,2,3}
~]#ls -dZ /webdrwxr-xr-x root root unconfined_u:object_r:default_t:s0 /web
~]#ls -lZ /web-rw-r--r-- root root unconfined_u:object_r:default_t:s0 file1 -rw-r--r-- root root unconfined_u:object_r:default_t:s0 file2 -rw-r--r-- root root unconfined_u:object_r:default_t:s0 file3
/web/ directory and the files in it, to httpd_sys_content_t. The -a option adds a new record, and the -t option defines a type (httpd_sys_content_t). The "/web(/.*)?" regular expression causes semanage to apply changes to /web/, as well as the files in it. Note that running this command does not directly change the type; /web/ and files in it are still labeled with the default_t type:
~]#semanage fcontext -a -t httpd_sys_content_t "/web(/.*)?"
~]$ls -dZ /webdrwxr-xr-x root root unconfined_u:object_r:default_t:s0 /web
~]$ls -lZ /web-rw-r--r-- root root unconfined_u:object_r:default_t:s0 file1 -rw-r--r-- root root unconfined_u:object_r:default_t:s0 file2 -rw-r--r-- root root unconfined_u:object_r:default_t:s0 file3
semanage fcontext -a -t httpd_sys_content_t "/web(/.*)?" command adds the following entry to /etc/selinux/targeted/contexts/files/file_contexts.local:
/web(/.*)? system_u:object_r:httpd_sys_content_t:s0
restorecon utility to change the type of /web/, as well as all files in it. The -R is for recursive, which means all files and directories under /web/ are labeled with the httpd_sys_content_t type. Since semanage added an entry to file.contexts.local for /web(/.*)?, restorecon changes the types to httpd_sys_content_t:
~]#restorecon -R -v /webrestorecon reset /web context unconfined_u:object_r:default_t:s0->system_u:object_r:httpd_sys_content_t:s0 restorecon reset /web/file2 context unconfined_u:object_r:default_t:s0->system_u:object_r:httpd_sys_content_t:s0 restorecon reset /web/file3 context unconfined_u:object_r:default_t:s0->system_u:object_r:httpd_sys_content_t:s0 restorecon reset /web/file1 context unconfined_u:object_r:default_t:s0->system_u:object_r:httpd_sys_content_t:s0
Note
/etc/ directory that is labeled with the etc_t type, the new file inherits the same type:
~]$ ls -dZ - /etc/
drwxr-xr-x. root root system_u:object_r:etc_t:s0       /etc
~]# touch /etc/file1
~]# ls -lZ /etc/file1
-rw-r--r--. root root unconfined_u:object_r:etc_t:s0   /etc/file1
Procedure 10.15. Deleting an added Context
/web(/.*)?, use quotation marks around the regular expression:
~]#semanage fcontext -d "/web(/.*)?"
file_contexts.local:
~]#semanage fcontext -d file-name|directory-name
file_contexts.local:
/test system_u:object_r:httpd_sys_content_t:s0
/test. To prevent the /test/ directory from being labeled with the httpd_sys_content_t after running restorecon, or after a file system relabel, run the following command as root to delete the context from file_contexts.local:
~]#semanage fcontext -d /test
restorecon utility to restore the default SELinux context.
semanage.
Important
semanage fcontext -a, use the full path to the file or directory to avoid files being mislabeled after a file system relabel, or after the restorecon command is run.
file_t type is the default type of a file that has not yet been assigned EA value. This type is only used for this purpose and does not exist on correctly-labeled file systems, because all files on a system running SELinux should have a proper SELinux context, and the file_t type is never used in file-context configuration
[20].
default_t type is used on files that do not match any pattern in file-context configuration, so that such files can be distinguished from files that do not have a context on disk, and generally are kept inaccessible to confined domains. For example, if you create a new top-level directory, such as /mydirectory/, this directory may be labeled with the default_t type. If services need access to this directory, you need to update the file-contexts configuration for this location. See Section 10.4.6.2, “Persistent Changes: semanage fcontext” for details on adding a context to the file-context configuration.
mount -o context command to override existing extended attributes, or to specify a different, default context for file systems that do not support extended attributes. This is useful if you do not trust a file system to supply the correct attributes, for example, removable media used in multiple systems. The mount -o context command can also be used to support labeling for file systems that do not support extended attributes, such as File Allocation Table (FAT) or NFS volumes. The context specified with the context option is not written to disk: the original contexts are preserved, and are seen when mounting without context (if the file system had extended attributes in the first place).
mount -o context=SELinux_user:role:type:level command when mounting the desired file system. Context changes are not written to disk. By default, NFS mounts on the client side are labeled with a default context defined by policy for NFS volumes. In common policies, this default context uses the nfs_t type. Without additional mount options, this may prevent sharing NFS volumes using other services, such as the Apache HTTP Server. The following example mounts an NFS volume so that it can be shared via the Apache HTTP Server:
~]#mount server:/export /local/mount/point -o \ context="system_u:object_r:httpd_sys_content_t:s0"
-o context. However, since these changes are not written to disk, the context specified with this option does not persist between mounts. Therefore, this option must be used with the same context specified during every mount to retain the desired context. For information about making context mount persistent, refer to Section 10.4.8.5, “Making Context Mounts Persistent”.
-o context, use the SELinux system_u user and object_r role, and concentrate on the type. If you are not using the MLS policy or multi-category security, use the s0 level.
Note
context option, context changes (by users and processes) are prohibited. For example, running the chcon command on a file system mounted with a context option results in a Operation not supported error.
file_t type. If it is desirable to use a different default context, mount the file system with the defcontext option.
/dev/sda2) to the newly-created /test/ directory. It assumes that there are no rules in /etc/selinux/targeted/contexts/files/ that define a context for the /test/ directory:
~]#mount /dev/sda2 /test/ -o defcontext="system_u:object_r:samba_share_t:s0"
/test/) of the file system is treated as if it is labeled with the context specified by defcontext (this label is not stored on disk). This affects the labeling for files created under /test/: new files inherit the samba_share_t type, and these labels are stored on disk.
/test/ while the file system was mounted with a defcontext option retain their labels.
nfs_t type. Depending on policy configuration, services, such as Apache HTTP Server and MariaDB, may not be able to read files labeled with the nfs_t type. This may prevent file systems labeled with this type from being mounted and then read or exported by other services.
context option when mounting to override the nfs_t type. Use the following context option to mount NFS volumes so that they can be shared via the Apache HTTP Server:
~]#mount server:/export /local/mount/point -o context="system_u:object_r:httpd_sys_content_t:s0"
context options, Booleans can be enabled to allow services access to file systems labeled with the nfs_t type.
/export/, which has two subdirectories, /web/ and /database/. The following commands attempt two mounts from a single NFS export, and try to override the context for each one:
~]#mount server:/export/web /local/web -o context="system_u:object_r:httpd_sys_content_t:s0"
~]#mount server:/export/database /local/database -o context="system_u:object_r:mysqld_db_t:s0"
/var/log/messages:
kernel: SELinux: mount invalid. Same superblock, different security settings for (dev 0:15, type nfs)
-o nosharecache,context options. The following example mounts multiple mounts from a single NFS export, with a different context for each mount (allowing a single service access to each one):
~]#mount server:/export/web /local/web -o nosharecache,context="system_u:object_r:httpd_sys_content_t:s0"
~]#mount server:/export/database /local/database -o \ nosharecache,context="system_u:object_r:mysqld_db_t:s0"
server:/export/web is mounted locally to the /local/web/ directory, with all files being labeled with the httpd_sys_content_t type, allowing Apache HTTP Server access. server:/export/database is mounted locally to /local/database/, with all files being labeled with the mysqld_db_t type, allowing MariaDB access. These type changes are not written to disk.
Important
nosharecache options allows you to mount the same subdirectory of an export multiple times with different contexts (for example, mounting /export/web/ multiple times). Do not mount the same subdirectory from an export multiple times with different contexts, as this creates an overlapping mount, where files are accessible under two different contexts.
/etc/fstab file or an automounter map, and use the desired context as a mount option. The following example adds an entry to /etc/fstab for an NFS context mount:
server:/export /local/mount/ nfs context="system_u:object_r:httpd_sys_content_t:s0" 0 0
user_home_t type:
~]$touch file1
~]$ls -Z file1-rw-rw-r-- user1 group1 unconfined_u:object_r:user_home_t:s0 file1
/etc/, the new file is created in accordance to default-labeling rules for /etc/. Copying a file (without additional options) may not preserve the original context:
~]$ls -Z file1-rw-rw-r-- user1 group1 unconfined_u:object_r:user_home_t:s0 file1
~]#cp file1 /etc/
~]$ls -Z /etc/file1-rw-r--r-- root root unconfined_u:object_r:etc_t:s0 /etc/file1
file1 is copied to /etc/, if /etc/file1 does not exist, /etc/file1 is created as a new file. As shown in the example above, /etc/file1 is labeled with the etc_t type, in accordance to default-labeling rules.
cp options to preserve the context of the original file, such as --preserve=context. SELinux policy may prevent contexts from being preserved during copies.
Procedure 10.16. Copying Without Preserving SELinux Contexts
cp command, if no options are given, the type is inherited from the targeted, parent directory.
user_home_t type:
~]$touch file1
~]$ls -Z file1-rw-rw-r-- user1 group1 unconfined_u:object_r:user_home_t:s0 file1
/var/www/html/ directory is labeled with the httpd_sys_content_t type, as shown with the following command:
~]$ls -dZ /var/www/html/drwxr-xr-x root root system_u:object_r:httpd_sys_content_t:s0 /var/www/html/
file1 is copied to /var/www/html/, it inherits the httpd_sys_content_t type:
~]#cp file1 /var/www/html/
~]$ls -Z /var/www/html/file1-rw-r--r-- root root unconfined_u:object_r:httpd_sys_content_t:s0 /var/www/html/file1
Procedure 10.17. Preserving SELinux Contexts When Copying
--preserve=context option to preserve contexts when copying.
user_home_t type:
~]$touch file1
~]$ls -Z file1-rw-rw-r-- user1 group1 unconfined_u:object_r:user_home_t:s0 file1
/var/www/html/ directory is labeled with the httpd_sys_content_t type, as shown with the following command:
~]$ls -dZ /var/www/html/drwxr-xr-x root root system_u:object_r:httpd_sys_content_t:s0 /var/www/html/
--preserve=context option preserves SELinux contexts during copy operations. As shown below, the user_home_t type of file1 was preserved when the file was copied to /var/www/html/:
~]#cp --preserve=context file1 /var/www/html/
~]$ls -Z /var/www/html/file1-rw-r--r-- root root unconfined_u:object_r:user_home_t:s0 /var/www/html/file1
Procedure 10.18. Copying and Changing the Context
--context option to change the destination copy's context. The following example is performed in the user's home directory:
user_home_t type:
~]$touch file1
~]$ls -Z file1-rw-rw-r-- user1 group1 unconfined_u:object_r:user_home_t:s0 file1
--context option to define the SELinux context:
~]$cp --context=system_u:object_r:samba_share_t:s0 file1 file2
--context, file2 would be labeled with the unconfined_u:object_r:user_home_t context:
~]$ls -Z file1 file2-rw-rw-r-- user1 group1 unconfined_u:object_r:user_home_t:s0 file1 -rw-rw-r-- user1 group1 system_u:object_r:samba_share_t:s0 file2
Procedure 10.19. Copying a File Over an Existing File
file1 in the /etc/ directory. As shown below, the file is labeled with the etc_t type:
~]#touch /etc/file1
~]$ls -Z /etc/file1-rw-r--r-- root root unconfined_u:object_r:etc_t:s0 /etc/file1
file2, in the /tmp/ directory. As shown below, the file is labeled with the user_tmp_t type:
~]$touch /tmp/file2
~$ls -Z /tmp/file2-rw-r--r-- root root unconfined_u:object_r:user_tmp_t:s0 /tmp/file2
file1 with file2:
~]#cp /tmp/file2 /etc/file1
file1 labeled with the etc_t type, not the user_tmp_t type from /tmp/file2 that replaced /etc/file1:
~]$ls -Z /etc/file1-rw-r--r-- root root unconfined_u:object_r:etc_t:s0 /etc/file1
Important
/var/www/html/ directory, which is used by the Apache HTTP Server. Since the file is moved, it does not inherit the correct SELinux context:
Procedure 10.20. Moving Files and Directories
user_home_t type:
~]$touch file1
~]$ls -Z file1-rw-rw-r-- user1 group1 unconfined_u:object_r:user_home_t:s0 file1
/var/www/html/ directory:
~]$ls -dZ /var/www/html/drwxr-xr-x root root system_u:object_r:httpd_sys_content_t:s0 /var/www/html/
/var/www/html/ is labeled with the httpd_sys_content_t type. Files and directories created under /var/www/html/ inherit this type, and as such, they are labeled with this type.
file1 to /var/www/html/. Since this file is moved, it keeps its current user_home_t type:
~]#mv file1 /var/www/html/
~]#ls -Z /var/www/html/file1-rw-rw-r-- user1 group1 unconfined_u:object_r:user_home_t:s0 /var/www/html/file1
user_home_t type. If all files comprising a web page are labeled with the user_home_t type, or another type that the Apache HTTP Server cannot read, permission is denied when attempting to access them via web browsers, such as Mozilla Firefox.
Important
mv command may result in the incorrect SELinux context, preventing processes, such as the Apache HTTP Server and Samba, from accessing such files and directories.
matchpathcon utility to check if files and directories have the correct SELinux context. This utility queries the system policy and then provides the default security context associated with the file path.
[22] The following example demonstrates using matchpathcon to verify that files in /var/www/html/ directory are labeled correctly:
Procedure 10.21. Checking the Default SELinux Conxtext with matchpathcon
file1, file2, and file3) in the /var/www/html/ directory. These files inherit the httpd_sys_content_t type from /var/www/html/:
~]#touch /var/www/html/file{1,2,3}
~]#ls -Z /var/www/html/-rw-r--r-- root root unconfined_u:object_r:httpd_sys_content_t:s0 file1 -rw-r--r-- root root unconfined_u:object_r:httpd_sys_content_t:s0 file2 -rw-r--r-- root root unconfined_u:object_r:httpd_sys_content_t:s0 file3
file1 type to samba_share_t. Note that the Apache HTTP Server cannot read files or directories labeled with the samba_share_t type.
~]#chcon -t samba_share_t /var/www/html/file1
matchpathcon -V option compares the current SELinux context to the correct, default context in SELinux policy. Run the following command to check all files in the /var/www/html/ directory:
~]$matchpathcon -V /var/www/html/*/var/www/html/file1 has context unconfined_u:object_r:samba_share_t:s0, should be system_u:object_r:httpd_sys_content_t:s0 /var/www/html/file2 verified. /var/www/html/file3 verified.
matchpathcon command explains that file1 is labeled with the samba_share_t type, but should be labeled with the httpd_sys_content_t type:
/var/www/html/file1 has context unconfined_u:object_r:samba_share_t:s0, should be system_u:object_r:httpd_sys_content_t:s0
file1, as root, use the restorecon utility:
~]#restorecon -v /var/www/html/file1restorecon reset /var/www/html/file1 context unconfined_u:object_r:samba_share_t:s0->system_u:object_r:httpd_sys_content_t:s0
tartar utility does not retain extended attributes by default. Since SELinux contexts are stored in extended attributes, contexts can be lost when archiving files. Use the tar --selinux command to create archives that retain contexts. If a tar archive contains files without extended attributes, or if you want the extended attributes to match the system defaults, use the restorecon utility:
~]$tar -xvf archive.tar | restorecon -f -
restorecon.
tar archive that retains SELinux contexts:
Procedure 10.22. Creating a tar Archive
file1, file2, and file3) in the /var/www/html/ directory. These files inherit the httpd_sys_content_t type from /var/www/html/:
~]#touch /var/www/html/file{1,2,3}
~]#ls -Z /var/www/html/-rw-r--r-- root root unconfined_u:object_r:httpd_sys_content_t:s0 file1 -rw-r--r-- root root unconfined_u:object_r:httpd_sys_content_t:s0 file2 -rw-r--r-- root root unconfined_u:object_r:httpd_sys_content_t:s0 file3
/var/www/html/. Once in this directory, as root, run the following command to create a tar archive named test.tar:
~]$cd /var/www/html/
html]#tar --selinux -cf test.tar file{1,2,3}
/test/, and then allow all users full access to it:
~]#mkdir /test
~]#chmod 777 /test/
test.tar file into /test/:
~]$cp /var/www/html/test.tar /test/
/test/ directory. Once in this directory, run the following command to extract the tar archive:
test]$tar -xvf test.tar
httpd_sys_content_t type has been retained, rather than being changed to default_t, which would have happened had the --selinux not been used:
~]$ls -lZ /test/-rw-r--r-- user1 group1 unconfined_u:object_r:httpd_sys_content_t:s0 file1 -rw-r--r-- user1 group1 unconfined_u:object_r:httpd_sys_content_t:s0 file2 -rw-r--r-- user1 group1 unconfined_u:object_r:httpd_sys_content_t:s0 file3 -rw-r--r-- user1 group1 unconfined_u:object_r:default_t:s0 test.tar
/test/ directory is no longer required, as root, run the following command to remove it, as well as all files in it:
~]#rm -ri /test/
tar, such as the --xattrs option that retains all extended attributes.
starstar utility does not retain extended attributes by default. Since SELinux contexts are stored in extended attributes, contexts can be lost when archiving files. Use the star -xattr -H=exustar command to create archives that retain contexts. The star package is not installed by default. To install star, run the yum install star command as the root user.
star archive that retains SELinux contexts:
Procedure 10.23. Creating a star Archive
file1, file2, and file3) in the /var/www/html/. These files inherit the httpd_sys_content_t type from /var/www/html/:
~]#touch /var/www/html/file{1,2,3}
~]#ls -Z /var/www/html/-rw-r--r-- root root unconfined_u:object_r:httpd_sys_content_t:s0 file1 -rw-r--r-- root root unconfined_u:object_r:httpd_sys_content_t:s0 file2 -rw-r--r-- root root unconfined_u:object_r:httpd_sys_content_t:s0 file3
/var/www/html/ directory. Once in this directory, as root, run the following command to create a star archive named test.star:
~]$cd /var/www/html
html]#star -xattr -H=exustar -c -f=test.star file{1,2,3}star: 1 blocks + 0 bytes (total of 10240 bytes = 10.00k).
/test/, and then allow all users full access to it:
~]#mkdir /test
~]#chmod 777 /test/
test.star file into /test/:
~]$cp /var/www/html/test.star /test/
/test/. Once in this directory, run the following command to extract the star archive:
~]$cd /test/
test]$star -x -f=test.starstar: 1 blocks + 0 bytes (total of 10240 bytes = 10.00k).
httpd_sys_content_t type has been retained, rather than being changed to default_t, which would have happened had the -xattr -H=exustar option not been used:
~]$ls -lZ /test/-rw-r--r-- user1 group1 unconfined_u:object_r:httpd_sys_content_t:s0 file1 -rw-r--r-- user1 group1 unconfined_u:object_r:httpd_sys_content_t:s0 file2 -rw-r--r-- user1 group1 unconfined_u:object_r:httpd_sys_content_t:s0 file3 -rw-r--r-- user1 group1 unconfined_u:object_r:default_t:s0 test.star
/test/ directory is no longer required, as root, run the following command to remove it, as well as all files in it:
~]#rm -ri /test/
star is no longer required, as root, remove the package:
~]#yum remove star
star.
/selinux/avc/cache_stats, and you can specify a different cache file with the -f /path/to/file option.
~]#avcstatlookups hits misses allocs reclaims frees 47517410 47504630 12780 12780 12176 12275
seinfo is a command-line utility that uses a policy.conf file (a single text file containing policy source for versions 12 through 21), a binary policy file, a modular list of policy packages, or a policy list file as input. You must have the setools-console package installed to use the seinfo utility.
seinfo will vary between binary and source files. For example, the policy source file uses the { } brackets to group multiple rule elements onto a single line. A similar effect happens with attributes, where a single attribute expands into one or many types. Because these are expanded and no longer relevant in the binary policy file, they have a return value of zero in the search results. However, the number of rules greatly increases as each formerly one line rule using brackets is now a number of individual lines.
~]#seinfoStatistics for policy file: /etc/selinux/targeted/policy/policy.24 Policy Version & Type: v.24 (binary, mls) Classes: 77 Permissions: 229 Sensitivities: 1 Categories: 1024 Types: 3001 Attributes: 244 Users: 9 Roles: 13 Booleans: 158 Cond. Expr.: 193 Allow: 262796 Neverallow: 0 Auditallow: 44 Dontaudit: 156710 Type_trans: 10760 Type_change: 38 Type_member: 44 Role allow: 20 Role_trans: 237 Range_trans: 2546 Constraints: 62 Validatetrans: 0 Initial SIDs: 27 Fs_use: 22 Genfscon: 82 Portcon: 373 Netifcon: 0 Nodecon: 0 Permissives: 22 Polcap: 2
seinfo utility can also list the number of types with the domain attribute, giving an estimate of the number of different confined processes:
~]#seinfo -adomain -x | wc -l550
unconfined_domain attribute:
~]#seinfo -aunconfined_domain_type -x | wc -l52
--permissive option:
~]#seinfo --permissive -x | wc -l31
| wc -l command in the above commands to see the full lists.
sesearch utility to search for a particular rule in the policy. It is possible to search either policy source files or the binary file. For example:
~]$sesearch --role_allow -t httpd_sys_content_t /etc/selinux/targeted/policy/policy.24Found 20 role allow rules: allow system_r sysadm_r; allow sysadm_r system_r; allow sysadm_r staff_r; allow sysadm_r user_r; allow system_r git_shell_r; allow system_r guest_r; allow logadm_r system_r; allow system_r logadm_r; allow system_r nx_server_r; allow system_r staff_r; allow staff_r logadm_r; allow staff_r sysadm_r; allow staff_r unconfined_r; allow staff_r webadm_r; allow unconfined_r system_r; allow system_r unconfined_r; allow system_r user_r; allow webadm_r system_r; allow system_r webadm_r; allow system_r xguest_r;
sesearch utility can provide the number of allow rules:
~]#sesearch --allow | wc -l262798
~]#sesearch --dontaudit | wc -l156712
Note
Procedure 10.24. Enabling SELinux MLS Policy
~]#yum install selinux-policy-mls
SELINUX=permissive in the /etc/selinux/config file. Also, enable the MLS policy by configuring SELINUXTYPE=mls. Your configuration file should look like this:
# This file controls the state of SELinux on the system.
# SELINUX= can take one of these three values:
#       enforcing - SELinux security policy is enforced.
#       permissive - SELinux prints warnings instead of enforcing.
#       disabled - No SELinux policy is loaded.
SELINUX=permissive
# SELINUXTYPE= can take one of these two values:
#       targeted - Targeted processes are protected,
#       mls - Multi Level Security protection.
SELINUXTYPE=mls
~]#setenforce 0
~]$getenforcePermissive
.autorelabel file in root's home directory to ensure that files are relabeled upon next reboot:
~]#touch /.autorelabel
-F option to this file. This can be done by executing the following command:
~]#echo "-F" >> /.autorelabel
*** Warning -- SELinux mls policy relabel is required.
*** Relabeling could take a very long time, depending on file
*** system size and speed of hard drives.
***********
* (asterisk) character on the bottom line represents 1000 files that have been labeled. In the above example, eleven * characters represent 11000 files which have been labeled. The time it takes to label all files depends upon the number of files on the system, and the speed of the hard disk drives. On modern systems, this process can take as little as 10 minutes. Once the labeling process finishes, the system will automatically reboot.
~]#grep "SELinux is preventing" /var/log/messages
/var/log/messages file, or you have resolved all existing denials, configure SELINUX=enforcing in the /etc/selinux/config file:
# This file controls the state of SELinux on the system.
# SELINUX= can take one of these three values:
#       enforcing - SELinux security policy is enforced.
#       permissive - SELinux prints warnings instead of enforcing.
#       disabled - No SELinux policy is loaded.
SELINUX=enforcing
# SELINUXTYPE= can take one of these two values:
#       targeted - Targeted processes are protected,
#       mls - Multi Level Security protection.
SELINUXTYPE=mls
~]$getenforceEnforcing
~]#sestatus |grep mlsPolicy from config file: mls
Procedure 10.25. Creating a User With a Specific MLS Range
useradd command and map the new Linux user to an existing SELinux user (in this case, user_u):
~]#useradd -Z user_u john
prompt~]# passwd john~]#semanage login -lLogin Name SELinux User MLS/MCS Range Service __default__ unconfined_u s0-s0:c0.c1023 * john user_u s0 * root unconfined_u s0-s0:c0.c1023 * system_u system_u s0-s0:c0.c1023 *
john:
~]#semanage login --modify --seuser user_u --range s2:c100 john
john now has a specific MLS range defined:
~]#semanage login -lLogin Name SELinux User MLS/MCS Range Service __default__ unconfined_u s0-s0:c0.c1023 * john user_u s2:c100 * root unconfined_u s0-s0:c0.c1023 * system_u system_u s0-s0:c0.c1023 *
~]#chcon -R -l s2:c100 /home/john
/tmp/ and /var/tmp/ directories are normally used for temporary storage by all programs, services, and users. Such setup, however, makes these directories vulnerable to race condition attacks, or an information leak based on file names. SELinux offers a solution in the form of polyinstantiated directories. This effectively means that both /tmp/ and /var/tmp/ are instantiated, making them appear private for each user. When instantiation of directories is enabled, each user's /tmp/ and /var/tmp/ directory is automatically mounted under /tmp-inst and /var/tmp/tmp-inst.
Procedure 10.26. Enabling Polyinstantiation Directories
/etc/security/namespace.conf file to enable instantiation of the /tmp/, /var/tmp/, and users' home directories:
~]$tail -n 3 /etc/security/namespace.conf/tmp /tmp-inst/ level root,adm /var/tmp /var/tmp/tmp-inst/ level root,adm $HOME $HOME/$USER.inst/ level
/etc/pam.d/login file, the pam_namespace.so module is configured for session:
~]$grep namespace /etc/pam.d/loginsession required pam_namespace.so
A_t creates a specified object class in a directory labeled B_t and the specified object class is named objectname, it gets the label C_t. This mechanism provides more fine-grained control over processes on the system.
etc_t, then the file is labeled also etc_t. However, this method is useless when it is desirable to have multiple files within a directory with different labels.
A_t creates a specified object class in a directory labeled B_t, the object gets the new C_t label. This practice is problematic if a single program creates multiple objects in the same directory where each object requires a separate label. Moreover, these rules provide only partial control, because names of the created objects are not specified.
strcmp() function. Use of regular expressions or wildcard characters is not considered.
Note
Example 10.1. Examples of Policy Rules Written with File Name Transition
filetrans_pattern(unconfined_t, admin_home_t, ssh_home_t, dir, ".ssh")
unconfined_t type creates the ~/.ssh/ directory in a directory labeled admin_home_t, the ~/.ssh/ directory gets the label ssh_home_t.
filetrans_pattern(staff_t, user_home_dir_t, httpd_user_content_t, dir, "public_html")
filetrans_pattern(thumb_t, user_home_dir_t, thumb_home_t, file, "missfont.log")
filetrans_pattern(kernel_t, device_t, xserver_misc_device_t, chr_file, "nvidia0")
filetrans_pattern(puppet_t, etc_t, krb5_conf_t, file, "krb5.conf")
Note
ptrace() system call allows one process to observe and control the execution of another process and change its memory and registers. This call is used primarily by developers during debugging, for example when using the strace utility. When ptrace() is not needed, it can be disabled to improve system security. This can be done by enabling the deny_ptrace Boolean, which denies all processes, even those that are running in unconfined_t domains, from being able to use ptrace() on other processes.
deny_ptrace Boolean is disabled by default. To enable it, run the setsebool -P deny_ptrace on command as the root user:
~]#setsebool -P deny_ptrace on
~]$getsebool deny_ptracedeny_ptrace --> on
setsebool -P deny_ptrace off command as root:
~]#setsebool -P deny_ptrace off
Note
setsebool -P command makes persistent changes. Do not use the -P option if you do not want changes to persist across reboots.
ptrace() system call. To list all domains that are allowed to use ptrace(), run the following command. Note that the setools-console package provides the sesearch utility and that the package is not installed by default.
~]#sesearch -A -p ptrace,sys_ptrace -C | grep -v deny_ptrace | cut -d ' ' -f 5
sepolicy Suitesepolicy utility provides a suite of features to query the installed SELinux policy. These features are either new or were previously provided by separate utilities, such as sepolgen or setrans. The suite allows you to generate transition reports, man pages, or even new policy modules, thus giving users easier access and better understanding of the SELinux policy.
sepolicy. Run the following command as the root user to install sepolicy:
~]#yum install policycoreutils-devel
sepolicy suite provides the following features that are invoked as command-line parameters:
Table 10.2. The sepolicy Features
| Feature | Description |
|---|---|
| booleans | Query the SELinux Policy to see description of Booleans |
| communicate | Query the SELinux policy to see if domains can communicate with each other |
| generate | Generate an SELinux policy module template |
| gui | Graphical User Interface for SELinux Policy |
| interface | List SELinux Policy interfaces |
| manpage | Generate SELinux man pages |
| network | Query SELinux policy network information |
| transition | Query SELinux policy and generate a process transition report |
sepolicy Python Bindingssesearch and seinfo utilities. The sesearch utility is used for searching rules in a SELinux policy while the seinfo utility allows you to query various other components in the policy.
sesearch and seinfo have been added so that you can use the functionality of these utilities via the sepolicy suite. See the example below:
> python
>>> import sepolicy
>>> sepolicy.info(sepolicy.ATTRIBUTE)
Returns a dictionary of all information about SELinux Attributes
>>>sepolicy.search([sepolicy.ALLOW])
Returns a dictionary of all allow rules in the policy.
sepolicy generatesepolgen or selinux-polgengui utilities were used for generating a SELinux policy. These tools have been merged to the sepolicy suite and the sepolicy generate command is used to generate an initial SELinux policy module template.
sepolgen, it is not necessary to run sepolicy generate as the root user. This utility also creates an RPM spec file, which can be used to build an RPM package that installs the policy package file (NAME.pp) and the interface file (NAME.if) to the correct location, provides installation of the SELinux policy into the kernel, and fixes the labeling. The setup script continues to install SELinux policy and sets up the labeling. In addition, a manual page based on the installed policy is generated using the sepolicy manpage command.
[23] Finally, sepolicy generate builds and compiles the SELinux policy and the manual page into an RPM package, ready to be installed on other systems.
sepolicy generate is executed, the following files are produced:
NAME.te – type enforcing fileNAME.if – interface fileNAME.te file and associates file paths to the types. Utilities, such as restorecon and rpm, use these paths to write labels.
NAME_selinux.spec – RPM spec filesepolicy manpage -d NAME command to generate the man page.
NAME.sh – helper shell scriptsepolicy generate prints out all generated paths from the source domain to the target domain. See the sepolicy-generate(8) manual page for further information about sepolicy generate.
sepolicy transitionsetrans utility was used to examine if transition between two domain or process types is possible and printed out all intermediary types that are used to transition between these domains or processes. Now, setrans is provided as part of the sepolicy suite and the sepolicy transition command is now used instead.
sepolicy transition command queries a SELinux policy and creates a process transition report. The sepolicy transition command requires two command-line arguments – a source domain (specified by the -s option) and a target domain (specified by the -t option). If only the source domain is entered, sepolicy transition lists all possible domains that the source domain can transition to. The following output does not contain all entries. The “@” character means “execute”:
~]$sepolicy transition -s httpd_thttpd_t @ httpd_suexec_exec_t --> httpd_suexec_t httpd_t @ mailman_cgi_exec_t --> mailman_cgi_t httpd_t @ abrt_retrace_worker_exec_t --> abrt_retrace_worker_t httpd_t @ dirsrvadmin_unconfined_script_exec_t --> dirsrvadmin_unconfined_script_t httpd_t @ httpd_unconfined_script_exec_t --> httpd_unconfined_script_t
sepolicy transition examines SELinux policy for all transition paths from the source domain to the target domain and lists these paths. The output below is not complete:
~]$sepolicy transition -s httpd_t -t system_mail_thttpd_t @ exim_exec_t --> system_mail_t httpd_t @ courier_exec_t --> system_mail_t httpd_t @ sendmail_exec_t --> system_mail_t httpd_t ... httpd_suexec_t @ sendmail_exec_t --> system_mail_t httpd_t ... httpd_suexec_t @ exim_exec_t --> system_mail_t httpd_t ... httpd_suexec_t @ courier_exec_t --> system_mail_t httpd_t ... httpd_suexec_t ... httpd_mojomojo_script_t @ sendmail_exec_t --> system_mail_t
sepolicy transition.
sepolicy manpagesepolicy manpage command generates manual pages based on the SELinux policy that document process domains. As a result, such documentation is always up-to-date. Each name of automatically generated manual pages consists of the process domain name and the _selinux suffix, for example httpd_selinux.
Entrypoints section contains all executable files that need to be executed during a domain transition.
Process Types section lists all process types that begin with the same prefix as the target domain.
Booleans section lists Booleans associated with the domain.
Port Types section contains the port types matching the same prefix as the domain and describes the default port numbers assigned to these port types.
Managed Files section describes the types that the domain is allowed to write to and the default paths associated with these types.
File Contexts section contains all file types associated with the domain and describes how to use these file types along with the default path labeling on a system.
Sharing Files section explains how to use the domain sharing types, such as public_content_t.
sepolicy manpage.
sepolicy gui~]# yum install policycoreutils-guisepolicy gui command or navigate through the menu to the submenu and then select SELinux Policy Management Tool.
su and sudo commands. This helps protect the system from the user. Refer to Section 10.3.3, “Confined and Unconfined Users” for further information about confined users.
~]#semanage login -lLogin Name SELinux User MLS/MCS Range Service __default__ unconfined_u s0-s0:c0.c1023 * root unconfined_u s0-s0:c0.c1023 * system_u system_u s0-s0:c0.c1023 *
__default__ login by default (which is in turn mapped to the SELinux unconfined_u user). When a Linux user is created with the useradd command, if no options are specified, they are mapped to the SELinux unconfined_u user. The following defines the default-mapping:
__default__ unconfined_u s0-s0:c0.c1023 *
unconfined_u user run in the unconfined_t domain. This is seen by running the id -Z command while logged-in as a Linux user mapped to unconfined_u:
~]$id -Zunconfined_u:unconfined_r:unconfined_t:s0-s0:c0.c1023
unconfined_t domain, SELinux policy rules are applied, but policy rules exist that allow Linux users running in the unconfined_t domain almost all access. If unconfined Linux users execute an application that SELinux policy defines can transition from the unconfined_t domain to its own confined domain, unconfined Linux users are still subject to the restrictions of that confined domain. The security benefit of this is that, even though a Linux user is running unconfined, the application remains confined, and therefore, the exploitation of a flaw in the application can be limited by policy.
Note
useradd command, use the -Z option to specify which SELinux user they are mapped to. The following example creates a new Linux user, useruuser, and maps that user to the SELinux user_u user. Linux users mapped to the SELinux user_u user run in the user_t domain. In this domain, Linux users are unable to run setuid applications unless SELinux policy permits it (such as passwd), and cannot run the su or sudo command, preventing them from becoming the root user with these commands.
Procedure 10.27. Confining a New Linux User to user_u SELinux User
useruuser) that is mapped to the SELinux user_u user.
~]#useradd -Z user_u useruuser
useruuser and user_u, run the following command as root:
~]#semanage login -lLogin Name SELinux User MLS/MCS Range Service __default__ unconfined_u s0-s0:c0.c1023 * root unconfined_u s0-s0:c0.c1023 * system_u system_u s0-s0:c0.c1023 * useruuser user_u s0 *
useruuser user:
~]#passwd useruuserChanging password for user useruuser. New password: Enter a password Retype new password: Enter the same password again passwd: all authentication tokens updated successfully.
useruuser user. When you log in, the pam_selinux module maps the Linux user to an SELinux user (in this case, user_u), and sets up the resulting SELinux context. The Linux user's shell is then launched with this context. Run the following command to view the context of a Linux user:
~]$id -Zuser_u:user_r:user_t:s0
useruuser's session, and log back in with your account. If you do not want the Linux useruuser user, run the following command as root to remove it, along with its home directory:
~]#userdel -r useruuser
unconfined_u user (the default behavior), and you would like to change which SELinux user they are mapped to, use the semanage login command. The following example creates a new Linux user named newuser, then maps that Linux user to the SELinux user_u user:
Procedure 10.28. Mapping Linux Users to the SELinux Users
newuser). Since this user uses the default mapping, it does not appear in the semanage login -l output:
~]#useradd newuser
~]#semanage login -lLogin Name SELinux User MLS/MCS Range Service __default__ unconfined_u s0-s0:c0.c1023 * root unconfined_u s0-s0:c0.c1023 * system_u system_u s0-s0:c0.c1023 *
newuser user to the SELinux user_u user, run the following command as root:
~]#semanage login -a -s user_u newuser
-a option adds a new record, and the -s option specifies the SELinux user to map a Linux user to. The last argument, newuser, is the Linux user you want mapped to the specified SELinux user.
newuser user and user_u, use the semanage utility again:
~]#semanage login -lLogin Name SELinux User MLS/MCS Range Service __default__ unconfined_u s0-s0:c0.c1023 * newuser user_u s0 * root unconfined_u s0-s0:c0.c1023 * system_u system_u s0-s0:c0.c1023 *
newuser user:
~]#passwd newuserChanging password for user newuser. New password: Enter a password Retype new password: Enter the same password again passwd: all authentication tokens updated successfully.
newuser user. Run the following command to view the newuser's SELinux context:
~]$id -Zuser_u:user_r:user_t:s0
newuser's session, and log back in with your account. If you do not want the Linux newuser user, run the following command as root to remove it, along with its home directory:
~]#userdel -r newuser
newuser user and user_u:
~]#semanage login -d newuser
~]#semanage login -lLogin Name SELinux User MLS/MCS Range Service __default__ unconfined_u s0-s0:c0.c1023 * root unconfined_u s0-s0:c0.c1023 * system_u system_u s0-s0:c0.c1023 *
__default__ login by default (which is in turn mapped to the SELinux unconfined_u user). If you would like new Linux users, and Linux users not specifically mapped to an SELinux user to be confined by default, change the default mapping with the semanage login command.
unconfined_u to user_u:
~]#semanage login -m -S targeted -s "user_u" -r s0 __default__
__default__ login is mapped to user_u:
~]#semanage login -lLogin Name SELinux User MLS/MCS Range Service __default__ user_u s0-s0:c0.c1023 * root unconfined_u s0-s0:c0.c1023 * system_u system_u s0-s0:c0.c1023 *
semanage login -l output, they are mapped to user_u, as per the __default__ login.
__default__ login to the SELinux unconfined_u user:
~]#semanage login -m -S targeted -s "unconfined_u" -r s0-s0:c0.c1023 __default__
~]#yum install xguest
getenforce utility to confirm that SELinux is running in enforcing mode:
~]$getenforceEnforcing
Guest account is added to the GDM login screen.
/tmp/ directory, which they have write access to, helps prevent flawed or malicious applications from modifying files that users own. In Fedora, by default, Linux users in the guest_t and xguest_t domains cannot execute applications in their home directories or /tmp/; however, by default, Linux users in the user_t and staff_t domains can.
setsebool utility, which must be run as the root user. The setsebool -P command makes persistent changes. Do not use the -P option if you do not want changes to persist across reboots:
guest_t domain to execute applications in their home directories and /tmp/:
~]#setsebool -P guest_exec_content on
xguest_t domain to execute applications in their home directories and /tmp/:
~]#setsebool -P xguest_exec_content on
user_t domain from executing applications in their home directories and /tmp/:
~]#setsebool -P user_exec_content off
staff_t domain from executing applications in their home directories and /tmp/:
~]#setsebool -P staff_exec_content off
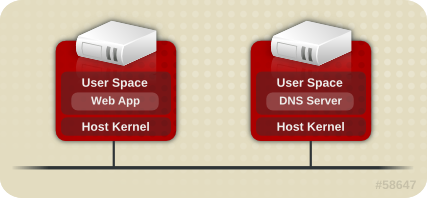
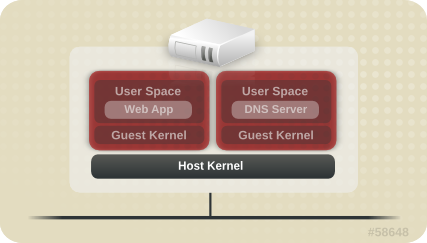
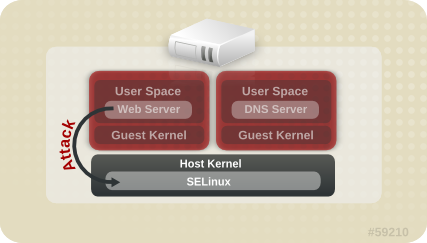
~]#ps -eZ | grep qemusystem_u:system_r:svirt_t:s0:c87,c520 27950 ? 00:00:17 qemu-kvm system_u:system_r:svirt_t:s0:c639,c757 27989 ? 00:00:06 qemu-system-x86
~]#ls -lZ /var/lib/libvirt/images/*system_u:object_r:svirt_image_t:s0:c87,c520 image1
Table 10.3. sVirt Labels
| Type | SELinux Context | Description |
|---|---|---|
| Virtual Machine Processes | system_u:system_r:svirt_t:MCS1 | MCS1 is a randomly selected MCS field. Currently approximately 500,000 labels are supported. |
| Virtual Machine Image | system_u:object_r:svirt_image_t:MCS1 | Only processes labeled svirt_t with the same MCS fields are able to read/write these image files and devices. |
| Virtual Machine Shared Read/Write Content | system_u:object_r:svirt_image_t:s0 | All processes labeled svirt_t are allowed to write to the svirt_image_t:s0 files and devices. |
| Virtual Machine Image | system_u:object_r:virt_content_t:s0 | System default label used when an image exits. No svirt_t virtual processes are allowed to read files/devices with this label. |
virsh command-line utility provided by the libvirt package.
systemd Access Controlsystemd daemon. In previous releases, daemons could be started in two ways:
init daemon launched an init.rc script and then this script launched the desired daemon. For example, the Apache server, which was started at boot, got the following SELinux label:
system_u:system_r:httpd_t:s0
init.rc script manually, causing the daemon to run. For example, when the systemctl restart httpd.service command was invoked on the Apache server, the resulting SELinux label looked as follows:
unconfined_u:system_r:httpd_t:s0
systemd daemon, the transitions are very different. As systemd handles all the calls to start and stop daemons on the system, using the init_t type, it can override the user part of the label when a daemon is restarted manually. As a result, the labels in both scenarios above are system_u:system_r:httpd_t:s0 as expected and the SELinux policy could be improved to govern which domains are able to control which units.
systemd starts and stops all services, and users and processes communicate with systemd using the systemctl utility. The systemd daemon has the ability to consult the SELinux policy and check the label of the calling process and the label of the unit file that the caller tries to manage, and then ask SELinux whether or not the caller is allowed the access. This approach strengthens access control to critical system capabilities, which include starting and stopping system services.
systemctl to send a D-Bus message to systemd, which would in turn start or stop whatever service NetworkManager requested. In fact, NetworkManager was allowed to do everything systemctl could do. It was also impossible to setup confined administrators so that they could start or stop just particular services.
systemd also works as an SELinux Access Manager. It can retrieve the label of the process running systemctl or the process that sent a D-Bus message to systemd. The daemon then looks up the label of the unit file that the process wanted to configure. Finally, systemd can retrieve information from the kernel if the SELinux policy allows the specific access between the process label and the unit file label. This means a compromised application that needs to interact with systemd for a specific service can now be confined via SELinux. Policy writers can also use these fine-grained controls to confine administrators. Policy changes involve a new class called service, with the following permissions:
class service
{
       start
       stop
       status
       reload
       kill
       load
       enable
       disable
}
systemd do not match in all cases. A mapping was defined to line up systemd method calls with SELinux access checks. Table 10.4, “Mapping of systemd unit file method calls on SELinux access checks” maps access checks on unit files while Table 10.5, “Mapping of systemd general system calls on SELinux access checks” covers access checks for the system in general. If no match is found in either table, then the undefined system check is called.
Table 10.4. Mapping of systemd unit file method calls on SELinux access checks
systemd unit file method | SELinux access check |
|---|---|
| DisableUnitFiles | disable |
| EnableUnitFiles | enable |
| GetUnit | status |
| GetUnitByPID | status |
| GetUnitFileState | status |
| Kill | stop |
| KillUnit | stop |
| LinkUnitFiles | enable |
| ListUnits | status |
| LoadUnit | status |
| MaskUnitFiles | disable |
| PresetUnitFiles | enable |
| ReenableUnitFiles | enable |
| Reexecute | start |
| Reload | reload |
| ReloadOrRestart | start |
| ReloadOrRestartUnit | start |
| ReloadOrTryRestart | start |
| ReloadOrTryRestartUnit | start |
| ReloadUnit | reload |
| ResetFailed | stop |
| ResetFailedUnit | stop |
| Restart | start |
| RestartUnit | start |
| Start | start |
| StartUnit | start |
| StartUnitReplace | start |
| Stop | stop |
| StopUnit | stop |
| TryRestart | start |
| TryRestartUnit | start |
| UnmaskUnitFiles | enable |
Table 10.5. Mapping of systemd general system calls on SELinux access checks
systemd general system call | SELinux access check |
|---|---|
| ClearJobs | reboot |
| FlushDevices | halt |
| Get | status |
| GetAll | status |
| GetJob | status |
| GetSeat | status |
| GetSession | status |
| GetSessionByPID | status |
| GetUser | status |
| Halt | halt |
| Introspect | status |
| KExec | reboot |
| KillSession | halt |
| KillUser | halt |
| ListJobs | status |
| ListSeats | status |
| ListSessions | status |
| ListUsers | status |
| LockSession | halt |
| PowerOff | halt |
| Reboot | reboot |
| SetUserLinger | halt |
| TerminateSeat | halt |
| TerminateSession | halt |
| TerminateUser | halt |
Example 10.2. SELinux Policy for a System Service
sesearch utility, you can list policy rules for a system service. For example, calling the sesearch -A -s NetworkManager_t -c service command returns:
allow NetworkManager_t dnsmasq_unit_file_t : service { start stop status reload kill load } ;
allow NetworkManager_t nscd_unit_file_t : service { start stop status reload kill load } ;
allow NetworkManager_t ntpd_unit_file_t : service { start stop status reload kill load } ;
allow NetworkManager_t pppd_unit_file_t : service { start stop status reload kill load } ;
allow NetworkManager_t polipo_unit_file_t : service { start stop status reload kill load } ;
journaldsystemd, the journald daemon (also known as systemd-journal) is the alternative for the syslog utility, which is a system service that collects and stores logging data. It creates and maintains structured and indexed journals based on logging information that is received from the kernel, from user processes using the libc syslog() function, from standard and error output of system services, or using its native API. It implicitly collects numerous metadata fields for each log message in a secure way.
systemd-journal service can be used with SELinux to increase security. SELinux controls processes by only allowing them to do what they were designed to do; sometimes even less, depending on the security goals of the policy writer. For example, SELinux prevents a compromised ntpd process from doing anything other than handle Network Time. However, the ntpd process sends syslog messages, so that SELinux would allow the compromised process to continue to send those messages. The compromised ntpd could format syslog messages to match other daemons and potentially mislead an administrator, or even worse, a utility that reads the syslog file into compromising the whole system.
systemd-journal daemon verifies all log messages and, among other things, adds SELinux labels to them. It is then easy to detect inconsistencies in log messages and prevent an attack of this type before it occurs. You can use the journalctl utility to query logs of systemd journals. If no command-line arguments are specified, running this utility lists the full content of the journal, starting from the oldest entries. To see all logs generated on the system, including logs for system components, execute journalctl as root. If you execute it as a non-root user, the output will be limited only to logs related to the currently logged-in user.
Example 10.3. Listing Logs with journalctl
journalctl for listing all logs related to a particular SELinux label. For example, the following command lists all logs logged under the system_u:system_r:policykit_t:s0 label:
~]# journalctl _SELINUX_CONTEXT=system_u:system_r:policykit_t:s0
Oct 21 10:22:42 localhost.localdomain polkitd[647]: Started polkitd version 0.112
Oct 21 10:22:44 localhost.localdomain polkitd[647]: Loading rules from directory /etc/polkit-1/rules.d
Oct 21 10:22:44 localhost.localdomain polkitd[647]: Loading rules from directory /usr/share/polkit-1/rules.d
Oct 21 10:22:44 localhost.localdomain polkitd[647]: Finished loading, compiling and executing 5 rules
Oct 21 10:22:44 localhost.localdomain polkitd[647]: Acquired the name org.freedesktop.PolicyKit1 on the system bus Oct 21 10:23:10 localhost polkitd[647]: Registered Authentication Agent for unix-session:c1 (system bus name :1.49, object path /org/freedesktop/PolicyKit1/AuthenticationAgent, locale en_US.UTF-8) (disconnected from bus)
Oct 21 10:23:35 localhost polkitd[647]: Unregistered Authentication Agent for unix-session:c1 (system bus name :1.80 [/usr/bin/gnome-shell --mode=classic], object path /org/freedesktop/PolicyKit1/AuthenticationAgent, locale en_US.utf8)
journalctl, see the journalctl(1) manual page.
audit2allow.
| Daemon | Log Location |
|---|---|
| auditd on | /var/log/audit/audit.log |
| auditd off; rsyslogd on | /var/log/messages |
| setroubleshootd, rsyslogd, and auditd on | /var/log/audit/audit.log. Easier-to-read denial messages also sent to /var/log/messages |
setroubleshootd and auditd daemons are running, a warning is displayed when access is denied by SELinux:

Forbidden

You don't have permission to access file name on this server
/var/log/messages and /var/log/audit/audit.log for "SELinux is preventing" and "denied" errors respectively. This can be done by running the following commands as the root user:
~]#grep "SELinux is preventing" /var/log/messages
~]#grep "denied" /var/log/audit/audit.log
/var/www/html/ for a website, an administrator wants to use /srv/myweb/. On Fedora, the /srv/ directory is labeled with the var_t type. Files and directories created and /srv/ inherit this type. Also, newly-created top-level directories (such as /myserver/) may be labeled with the default_t type. SELinux prevents the Apache HTTP Server (httpd) from accessing both of these types. To allow access, SELinux must know that the files in /srv/myweb/ are to be accessible to httpd:
~]#semanage fcontext -a -t httpd_sys_content_t "/srv/myweb(/.*)?"
semanage command adds the context for the /srv/myweb/ directory (and all files and directories under it) to the SELinux file-context configuration
[24]. The semanage utility does not change the context. As root, run the restorecon utility to apply the changes:
~]#restorecon -R -v /srv/myweb
matchpathcon utility checks the context of a file path and compares it to the default label for that path. The following example demonstrates using matchpathcon on a directory that contains incorrectly labeled files:
~]$matchpathcon -V /var/www/html/*/var/www/html/index.html has context unconfined_u:object_r:user_home_t:s0, should be system_u:object_r:httpd_sys_content_t:s0 /var/www/html/page1.html has context unconfined_u:object_r:user_home_t:s0, should be system_u:object_r:httpd_sys_content_t:s0
index.html and page1.html files are labeled with the user_home_t type. This type is used for files in user home directories. Using the mv command to move files from your home directory may result in files being labeled with the user_home_t type. This type should not exist outside of home directories. Use the restorecon utility to restore such files to their correct type:
~]#restorecon -v /var/www/html/index.htmlrestorecon reset /var/www/html/index.html context unconfined_u:object_r:user_home_t:s0->system_u:object_r:httpd_sys_content_t:s0
-R option:
~]#restorecon -R -v /var/www/html/restorecon reset /var/www/html/page1.html context unconfined_u:object_r:samba_share_t:s0->system_u:object_r:httpd_sys_content_t:s0 restorecon reset /var/www/html/index.html context unconfined_u:object_r:samba_share_t:s0->system_u:object_r:httpd_sys_content_t:s0
matchpathcon.
semanage command.
httpd_can_network_connect_db Boolean:
~]#setsebool -P httpd_can_network_connect_db on
getsebool and grep utilities to see if any Booleans are available to allow access. For example, use the getsebool -a | grep ftp command to search for FTP related Booleans:
~]$getsebool -a | grep ftpftpd_anon_write --> off ftpd_full_access --> off ftpd_use_cifs --> off ftpd_use_nfs --> off ftp_home_dir --> off ftpd_connect_db --> off httpd_enable_ftp_server --> off tftp_anon_write --> off
getsebool -a command. For a list of Booleans, an explanation of what each one is, and whether they are on or off, run the semanage boolean -l command as root. Refer to Section 10.4.5, “Booleans” for information about listing and configuring Booleans.
semanage port -l | grep http command as root to list http related ports:
~]#semanage port -l | grep httphttp_cache_port_t tcp 3128, 8080, 8118 http_cache_port_t udp 3130 http_port_t tcp 80, 443, 488, 8008, 8009, 8443 pegasus_http_port_t tcp 5988 pegasus_https_port_t tcp 5989
http_port_t port type defines the ports Apache HTTP Server can listen on, which in this case, are TCP ports 80, 443, 488, 8008, 8009, and 8443. If an administrator configures httpd.conf so that httpd listens on port 9876 (Listen 9876), but policy is not updated to reflect this, the following command fails:
~]#systemctl start httpd.serviceJob for httpd.service failed. See 'systemctl status httpd.service' and 'journalctl -xn' for details.
~]#systemctl status httpd.servicehttpd.service - The Apache HTTP Server Loaded: loaded (/usr/lib/systemd/system/httpd.service; disabled) Active: failed (Result: exit-code) since Thu 2013-08-15 09:57:05 CEST; 59s ago Process: 16874 ExecStop=/usr/sbin/httpd $OPTIONS -k graceful-stop (code=exited, status=0/SUCCESS) Process: 16870 ExecStart=/usr/sbin/httpd $OPTIONS -DFOREGROUND (code=exited, status=1/FAILURE)
/var/log/audit/audit.log:
type=AVC msg=audit(1225948455.061:294): avc: denied { name_bind } for pid=4997 comm="httpd" src=9876 scontext=unconfined_u:system_r:httpd_t:s0 tcontext=system_u:object_r:port_t:s0 tclass=tcp_socket
httpd to listen on a port that is not listed for the http_port_t port type, run the semanage port command to add a port to policy configuration
[25]:
~]#semanage port -a -t http_port_t -p tcp 9876
-a option adds a new record; the -t option defines a type; and the -p option defines a protocol. The last argument is the port number to add.
audit2allow utility to create a custom policy module to allow access. Refer to Section 10.10.3.8, “Allowing Access: audit2allow” for information about using audit2allow.
audit2allow.
~]$ls -l /var/www/html/index.html-rw-r----- 1 root root 0 2009-05-07 11:06 index.html
index.html is owned by the root user and group. The root user has read and write permissions (-rw), and members of the root group have read permissions (-r-). Everyone else has no access (---). By default, such permissions do not allow httpd to read this file. To resolve this issue, use the chown command to change the owner and group. This command must be run as root:
~]#chown apache:apache /var/www/html/index.html
httpd runs as the Linux Apache user. If you run httpd with a different user, replace apache:apache with that user.
dontaudit rules. These rules are common in standard policy. The downside of dontaudit is that, although SELinux denies access, denial messages are not logged, making troubleshooting more difficult.
dontaudit rules, allowing all denials to be logged, run the following command as root:
~]# semodule -DB
-D option disables dontaudit rules; the -B option rebuilds policy. After running semodule -DB, try exercising the application that was encountering permission problems, and see if SELinux denials — relevant to the application — are now being logged. Take care in deciding which denials should be allowed, as some should be ignored and handled via dontaudit rules. If in doubt, or in search of guidance, contact other SELinux users and developers on an SELinux list, such as fedora-selinux-list.
dontaudit rules, run the following command as root:
~]# semodule -B
dontaudit rules, run the sesearch --dontaudit command. Narrow down searches using the -s domain option and the grep command. For example:
~]$sesearch --dontaudit -s smbd_t | grep squiddontaudit smbd_t squid_port_t : tcp_socket name_bind ; dontaudit smbd_t squid_port_t : udp_socket name_bind ;
httpd accessing NFS volumes). This information may be in the standard manual page or in the manual page that can be automatically generated from SELinux policy for every service domain using the sepolicy manpage utility. Such manual pages are named in the service-name_selinux format.
samba_enable_home_dirs Boolean allows Samba to share users home directories.
Red Hat SELinux BIND Security Profile section). The named_selinux(8) manual page describes that, by default, named cannot write to master zone files, and to allow such access, the named_write_master_zones Boolean must be enabled.
sepolicy manpage” for further information about sepolicy manpage.
audit2allow could then be used to help write the policy. This put the whole system at risk. With permissive domains, only the domain in the new policy can be marked permissive, without putting the whole system at risk.
semanage permissive -a domain command, where domain is the domain you want to make permissive. For example, run the following command as root to make the httpd_t domain (the domain the Apache HTTP Server runs in) permissive:
~]#semanage permissive -a httpd_t
semodule -l | grep permissive command as root. For example:
~]#semodule -l | grep permissivepermissive_httpd_t 1.0 permissivedomains 1.0.0
semanage permissive -d domain command as root. For example:
~]#semanage permissive -d httpd_t
permissivedomains.pp module contains all of the permissive domain declarations that are presented on the system. To disable all permissive domains, run the following command as root:
~]#semodule -d permissivedomains
SYSCALL message is different for permissive domains. The following is an example AVC denial (and the associated system call) from the Apache HTTP Server:
type=AVC msg=audit(1226882736.442:86): avc:  denied  { getattr } for  pid=2427 comm="httpd" path="/var/www/html/file1" dev=dm-0 ino=284133 scontext=unconfined_u:system_r:httpd_t:s0 tcontext=unconfined_u:object_r:samba_share_t:s0 tclass=file

type=SYSCALL msg=audit(1226882736.442:86): arch=40000003 syscall=196 success=no exit=-13 a0=b9a1e198 a1=bfc2921c a2=54dff4 a3=2008171 items=0 ppid=2425 pid=2427 auid=502 uid=48 gid=48 euid=48 suid=48 fsuid=48 egid=48 sgid=48 fsgid=48 tty=(none) ses=4 comm="httpd" exe="/usr/sbin/httpd" subj=unconfined_u:system_r:httpd_t:s0 key=(null)
httpd_t domain is not permissive, and as such, the action is denied, and the SYSCALL message contains success=no. The following is an example AVC denial for the same situation, except the semanage permissive -a httpd_t command has been run to make the httpd_t domain permissive:
type=AVC msg=audit(1226882925.714:136): avc:  denied  { read } for  pid=2512 comm="httpd" name="file1" dev=dm-0 ino=284133 scontext=unconfined_u:system_r:httpd_t:s0 tcontext=unconfined_u:object_r:samba_share_t:s0 tclass=file

type=SYSCALL msg=audit(1226882925.714:136): arch=40000003 syscall=5 success=yes exit=11 a0=b962a1e8 a1=8000 a2=0 a3=8000 items=0 ppid=2511 pid=2512 auid=502 uid=48 gid=48 euid=48 suid=48 fsuid=48 egid=48 sgid=48 fsgid=48 tty=(none) ses=4 comm="httpd" exe="/usr/sbin/httpd" subj=unconfined_u:system_r:httpd_t:s0 key=(null)
success=yes in the SYSCALL message.
auditd, rsyslogd, and setroubleshootd daemons are running. Refer to Section 10.4.2, “Which Log File is Used” for information about starting these daemons. A number of utilites are available for searching for and viewing SELinux AVC messages, such as ausearch, aureport, and sealert.
ausearch utility that can query the audit daemon logs based for events based on different search criteria.
[26] The ausearch utility accesses /var/log/audit/audit.log, and as such, must be run as the root user:
| Searching For | Command |
|---|---|
| all denials | ausearch -m avc |
| denials for that today | ausearch -m avc -ts today |
| denials from the last 10 minutes | ausearch -m avc -ts recent |
-c comm-name option, where comm-name is the executable’s name, for example, httpd for the Apache HTTP Server, and smbd for Samba:
~]#ausearch -m avc -c httpd
~]#ausearch -m avc -c smbd
ausearch command, it is advised to use either the --interpret (-i) option for easier readability, or the --raw (-r) option for script processing. Refer to the ausearch(8) manual page for further ausearch options.
aureport utility, which produces summary reports of the audit system logs.
[27] The aureport utility accesses /var/log/audit/audit.log, and as such, must be run as the root user. To view a list of SELinux denial messages and how often each one occurred, run the aureport -a command. The following is example output that includes two denials:
~]#aureport -aAVC Report ======================================================== # date time comm subj syscall class permission obj event ======================================================== 1. 05/01/2009 21:41:39 httpd unconfined_u:system_r:httpd_t:s0 195 file getattr system_u:object_r:samba_share_t:s0 denied 2 2. 05/03/2009 22:00:25 vsftpd unconfined_u:system_r:ftpd_t:s0 5 file read unconfined_u:object_r:cifs_t:s0 denied 4
sealert utility, which reads denial messages translated by setroubleshoot-server.
[28] Denials are assigned IDs, as seen in /var/log/messages. The following is an example denial from messages:
setroubleshoot: SELinux is preventing httpd (httpd_t) "getattr" to /var/www/html/file1 (samba_share_t). For complete SELinux messages. run sealert -l 84e0b04d-d0ad-4347-8317-22e74f6cd020
84e0b04d-d0ad-4347-8317-22e74f6cd020. The -l option takes an ID as an argument. Running the sealert -l 84e0b04d-d0ad-4347-8317-22e74f6cd020 command presents a detailed analysis of why SELinux denied access, and a possible solution for allowing access.
setroubleshootd, dbus and auditd daemons are running, a warning is displayed when access is denied by SELinux.
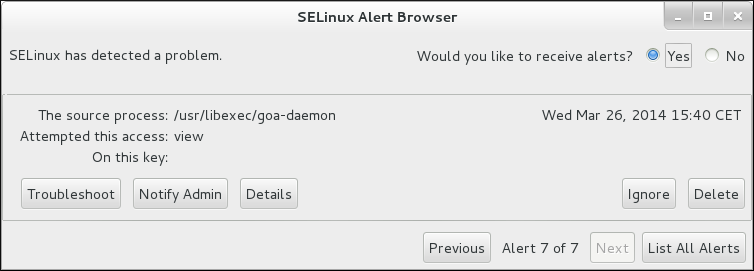
sealert -b command to launch the sealert GUI.
sealert -l \* command to view a detailed analysis of all denials.
sealert -a /var/log/audit/audit.log -H > audit.html command to create a HTML version of the sealert analysis, as seen with the sealert GUI.
/var/log/audit/audit.log. The following is an example AVC denial message (and the associated system call) that occurred when the Apache HTTP Server (running in the httpd_t domain) attempted to access the /var/www/html/file1 file (labeled with the samba_share_t type):
type=AVC msg=audit(1226874073.147:96): avc: denied { getattr } for pid=2465 comm="httpd" path="/var/www/html/file1" dev=dm-0 ino=284133 scontext=unconfined_u:system_r:httpd_t:s0 tcontext=unconfined_u:object_r:samba_share_t:s0 tclass=file
type=SYSCALL msg=audit(1226874073.147:96): arch=40000003 syscall=196 success=no exit=-13 a0=b98df198 a1=bfec85dc a2=54dff4 a3=2008171 items=0 ppid=2463 pid=2465 auid=502 uid=48 gid=48 euid=48 suid=48 fsuid=48 egid=48 sgid=48 fsgid=48 tty=(none) ses=6 comm="httpd" exe="/usr/sbin/httpd" subj=unconfined_u:system_r:httpd_t:s0 key=(null)
getattr entry indicates the source process was trying to read the target file's status information. This occurs before reading files. This action is denied due to the file being accessed having a wrong label. Commonly seen permissions include getattr, read, and write.
exe= section of the system call (SYSCALL) message, which in this case, is exe="/usr/sbin/httpd".
httpd_t domain.
file1. Note that the samba_share_t type is not accessible to processes running in the httpd_t domain.
tcontext may match the scontext, for example, when a process attempts to execute a system service that will change characteristics of that running process, such as the user ID. Also, the tcontext may match the scontext when a process tries to use more resources (such as memory) than normal limits allow, resulting in a security check to see if that process is allowed to break those limits.
SYSCALL) message, two items are of interest:
success=no: indicates whether the denial (AVC) was enforced or not. success=no indicates the system call was not successful (SELinux denied access). success=yes indicates the system call was successful. This can be seen for permissive domains or unconfined domains, such as initrc_t and kernel_t.
exe="/usr/sbin/httpd": the full path to the executable that launched the process, which in this case, is exe="/usr/sbin/httpd".
scontext) with the target context (tcontext). Should the process (scontext) be accessing such an object (tcontext)? For example, the Apache HTTP Server (httpd_t) should only be accessing types specified in the httpd_selinux(8) manual page, such as httpd_sys_content_t, public_content_t, and so on, unless configured otherwise.
/var/log/messages. The following is an example AVC denial (logged to messages) that occurred when the Apache HTTP Server (running in the httpd_t domain) attempted to access the /var/www/html/file1 file (labeled with the samba_share_t type):
hostname setroubleshoot: SELinux is preventing httpd (httpd_t) "getattr" to /var/www/html/file1 (samba_share_t). For complete SELinux messages. run sealert -l 84e0b04d-d0ad-4347-8317-22e74f6cd020
sealert -l 84e0b04d-d0ad-4347-8317-22e74f6cd020 command to view the complete message. This command only works on the local machine, and presents the same information as the sealert GUI:
~]$sealert -l 84e0b04d-d0ad-4347-8317-22e74f6cd020Summary: SELinux is preventing httpd (httpd_t) "getattr" to /var/www/html/file1 (samba_share_t). Detailed Description: SELinux denied access to /var/www/html/file1 requested by httpd. /var/www/html/file1 has a context used for sharing by different program. If you would like to share /var/www/html/file1 from httpd also, you need to change its file context to public_content_t. If you did not intend to this access, this could signal a intrusion attempt. Allowing Access: You can alter the file context by executing chcon -t public_content_t '/var/www/html/file1' Fix Command: chcon -t public_content_t '/var/www/html/file1' Additional Information: Source Context unconfined_u:system_r:httpd_t:s0 Target Context unconfined_u:object_r:samba_share_t:s0 Target Objects /var/www/html/file1 [ file ] Source httpd Source Path /usr/sbin/httpd Port <Unknown> Host hostname Source RPM Packages httpd-2.2.10-2 Target RPM Packages Policy RPM selinux-policy-3.5.13-11.fc12 Selinux Enabled True Policy Type targeted MLS Enabled True Enforcing Mode Enforcing Plugin Name public_content Host Name hostname Platform Linux hostname 2.6.27.4-68.fc12.i686 #1 SMP Thu Oct 30 00:49:42 EDT 2008 i686 i686 Alert Count 4 First Seen Wed Nov 5 18:53:05 2008 Last Seen Wed Nov 5 01:22:58 2008 Local ID 84e0b04d-d0ad-4347-8317-22e74f6cd020 Line Numbers Raw Audit Messages node=hostname type=AVC msg=audit(1225812178.788:101): avc: denied { getattr } for pid=2441 comm="httpd" path="/var/www/html/file1" dev=dm-0 ino=284916 scontext=unconfined_u:system_r:httpd_t:s0 tcontext=unconfined_u:object_r:samba_share_t:s0 tclass=file node=hostname type=SYSCALL msg=audit(1225812178.788:101): arch=40000003 syscall=196 success=no exit=-13 a0=b8e97188 a1=bf87aaac a2=54dff4 a3=2008171 items=0 ppid=2439 pid=2441 auid=502 uid=48 gid=48 euid=48 suid=48 fsuid=48 egid=48 sgid=48 fsgid=48 tty=(none) ses=3 comm="httpd" exe="/usr/sbin/httpd" subj=unconfined_u:system_r:httpd_t:s0 key=(null)
/var/log/messages. In this example, the httpd process was denied access to a file (file1), which is labeled with the samba_share_t type.
file1 is labeled with the samba_share_t type. This type is used for files and directories that you want to export via Samba. The description suggests changing the type to a type that can be accessed by the Apache HTTP Server and Samba, if such access is desired.
file1 type to public_content_t, which is accessible to the Apache HTTP Server and Samba.
selinux-policy-3.5.13-11.fc12), but may not help towards solving why the denial occurred.
/var/log/audit/audit.log that are associated with the denial. Refer to Section 10.10.3.6, “Raw Audit Messages” for information about each item in the AVC denial.
Warning
audit2allow utility.
audit2allow utility gathers information from logs of denied operations and then generates SELinux policy allow rules.
[29] After analyzing denial messages as per Section 10.10.3.7, “sealert Messages”, and if no label changes or Booleans allowed access, use audit2allow to create a local policy module. When access is denied by SELinux, running audit2allow generates Type Enforcement rules that allow the previously denied access.
audit2allow to create a policy module:
/var/log/audit/audit.log file:
type=AVC msg=audit(1226270358.848:238): avc: denied{ write }for pid=13349comm="certwatch"name="cache" dev=dm-0 ino=218171 scontext=system_u:system_r:certwatch_t:s0tcontext=system_u:object_r:var_t:s0tclass=dir type=SYSCALL msg=audit(1226270358.848:238): arch=40000003 syscall=39 success=no exit=-13 a0=39a2bf a1=3ff a2=3a0354 a3=94703c8 items=0 ppid=13344 pid=13349 auid=4294967295 uid=0 gid=0 euid=0 suid=0 fsuid=0 egid=0 sgid=0 fsgid=0 tty=(none) ses=4294967295 comm="certwatch" exe="/usr/bin/certwatch" subj=system_u:system_r:certwatch_t:s0 key=(null)
var_t type. Analyze the denial message as per Section 10.10.3.7, “sealert Messages”. If no label changes or Booleans allowed access, use audit2allow to create a local policy module.
audit2allow utility reads /var/log/audit/audit.log, and as such, must be run as the root user:
~]#audit2allow -w -atype=AVC msg=audit(1226270358.848:238): avc: denied { write } for pid=13349 comm="certwatch" name="cache" dev=dm-0 ino=218171 scontext=system_u:system_r:certwatch_t:s0 tcontext=system_u:object_r:var_t:s0 tclass=dir Was caused by: Missing type enforcement (TE) allow rule. You can use audit2allow to generate a loadable module to allow this access.
-a command-line option causes all audit logs to be read. The -w option produces the human-readable description. As shown, access was denied due to a missing Type Enforcement rule.
~]#audit2allow -a#============= certwatch_t ============== allow certwatch_t var_t:dir write;
Important
Fedora product, and select the selinux-policy component. Include the output of the audit2allow -w -a and audit2allow -a commands in such bug reports.
audit2allow -a, run the following command as root to create a custom module. The -M option creates a Type Enforcement file (.te) with the name specified with -M, in your current working directory:
~]#audit2allow -a -M mycertwatch******************** IMPORTANT *********************** To make this policy package active, execute: semodule -i mycertwatch.pp
audit2allow compiles the Type Enforcement rule into a policy package (.pp):
~]#lsmycertwatch.pp mycertwatch.te
~]#semodule -i mycertwatch.pp
Important
audit2allow may allow more access than required. It is recommended that policy created with audit2allow be posted to the upstream SELinux list for review. If you believe there is a bug in the policy, please create a bug in Red Hat Bugzilla.
grep utility to narrow down the input for audit2allow. The following example demonstrates using grep to only send denial messages related to certwatch through audit2allow:
~]#grep certwatch /var/log/audit/audit.log | audit2allow -R -M mycertwatch2******************** IMPORTANT *********************** To make this policy package active, execute: semodule -i mycertwatch2.pp
secadm_r.
setsebool httpd_can_network_connect_db off command. For changes that persist across reboots, run the setsebool -P httpd_can_network_connect_db off command.
/etc/selinux/targeted/contexts/files/ directory define contexts for files and directories. Files in this directory are read by the restorecon and setfiles utilities to restore files and directories to their default contexts.
sepolicy manpage” for more information about sepolicy manpage.
/etc/selinux/targeted/contexts/files/ define contexts for files and directories. Files in this directory are read by the restorecon and setfiles utilities to restore files and directories to their default contexts.
semanage port -a command adds an entry to the /etc/selinux/targeted/modules/active/ports.local file. Note that by default, this file can only be viewed by root.
rpm -q httpd to see if the httpd package is installed. If it is not installed and you want to use the Apache HTTP Server, run the following command as the root user to install it:
yum install httpd
httpd) runs confined by default. Confined processes run in their own domains, and are separated from other confined processes. If a confined process is compromised by an attacker, depending on SELinux policy configuration, an attacker's access to resources and the possible damage they can do is limited. The following example demonstrates the httpd processes running in their own domain. This example assumes the httpd package is installed:
getenforce to confirm SELinux is running in enforcing mode:
$ getenforce Enforcing
getenforce command returns Enforcing when SELinux is running in enforcing mode.
service httpd start as the root user to start httpd:
# service httpd start Starting httpd: [ OK ]
ps -eZ | grep httpd to view the httpd processes:
$ ps -eZ | grep httpd unconfined_u:system_r:httpd_t:s0 2850 ? 00:00:00 httpd unconfined_u:system_r:httpd_t:s0 2852 ? 00:00:00 httpd unconfined_u:system_r:httpd_t:s0 2853 ? 00:00:00 httpd unconfined_u:system_r:httpd_t:s0 2854 ? 00:00:00 httpd unconfined_u:system_r:httpd_t:s0 2855 ? 00:00:00 httpd unconfined_u:system_r:httpd_t:s0 2856 ? 00:00:00 httpd unconfined_u:system_r:httpd_t:s0 2857 ? 00:00:00 httpd unconfined_u:system_r:httpd_t:s0 2858 ? 00:00:00 httpd unconfined_u:system_r:httpd_t:s0 2859 ? 00:00:00 httpd
httpd processes is unconfined_u:system_r:httpd_t:s0. The second last part of the context, httpd_t, is the type. A type defines a domain for processes and a type for files. In this case, the httpd processes are running in the httpd_t domain.
httpd_t, interact with files, other processes, and the system in general. Files must be labeled correctly to allow httpd access to them. For example, httpd can read files labeled with the httpd_sys_content_t type, but can not write to them, even if Linux permissions allow write access. Booleans must be turned on to allow certain behavior, such as allowing scripts network access, allowing httpd access to NFS and CIFS file systems, and httpd being allowed to execute Common Gateway Interface (CGI) scripts.
/etc/httpd/conf/httpd.conf is configured so httpd listens on a port other than TCP ports 80, 443, 488, 8008, 8009, or 8443, the semanage port command must be used to add the new port number to SELinux policy configuration. The following example demonstrates configuring httpd to listen on a port that is not defined in SELinux policy configuration for httpd, and, as a consequence, httpd failing to start. This example also demonstrates how to then configure the SELinux system to allow httpd to successfully listen on a non-standard port that is not already defined in the policy. This example assumes the httpd package is installed. Run each command in the example as the root user:
service httpd status to confirm httpd is not running:
# service httpd status httpd is stopped
service httpd stop to stop the process:
# service httpd stop Stopping httpd: [ OK ]
semanage port -l | grep -w http_port_t to view the ports SELinux allows httpd to listen on:
# semanage port -l | grep -w http_port_t http_port_t tcp 80, 443, 488, 8008, 8009, 8443
/etc/httpd/conf/httpd.conf as the root user. Configure the Listen option so it lists a port that is not configured in SELinux policy configuration for httpd. In this example, httpd is configured to listen on port 12345:
# Change this to Listen on specific IP addresses as shown below to # prevent Apache from glomming onto all bound IP addresses (0.0.0.0) # #Listen 12.34.56.78:80 Listen 127.0.0.1:12345
service httpd start to start httpd:
# service httpd start Starting httpd: (13)Permission denied: make_sock: could not bind to address 127.0.0.1:12345 no listening sockets available, shutting down Unable to open logs [FAILED]
/var/log/messages:
setroubleshoot: SELinux is preventing the httpd (httpd_t) from binding to port 12345. For complete SELinux messages. run sealert -l f18bca99-db64-4c16-9719-1db89f0d8c77
httpd to listen on port 12345, as used in this example, the following command is required:
# semanage port -a -t http_port_t -p tcp 12345
service httpd start again to start httpd and have it listen on the new port:
# service httpd start Starting httpd: [ OK ]
httpd to listen on a non-standard port (TCP 12345 in this example), httpd starts successfully on this port.
httpd is listening and communicating on TCP port 12345, open a telnet connection to the specified port and issue a HTTP GET command, as follows:
# telnet localhost 12345 Trying 127.0.0.1... Connected to localhost. Escape character is '^]'. GET / HTTP/1.0 HTTP/1.1 200 OK Date: Tue, 31 Mar 2009 13:12:10 GMT Server: Apache/2.2.11 (Fedora) Accept-Ranges: bytes Content-Length: 3918 Content-Type: text/html; charset=UTF-8 [...continues...]
/var/www/html/ directory, and shows the file inheriting the httpd_sys_content_t type from its parent directory (/var/www/html/):
ls -dZ /var/www/html to view the SELinux context of /var/www/html/:
$ ls -dZ /var/www/html drwxr-xr-x root root system_u:object_r:httpd_sys_content_t:s0 /var/www/html
/var/www/html/ is labeled with the httpd_sys_content_t type.
touch /var/www/html/file1 as the root user to create a new file.
ls -Z /var/www/html/file1 to view the SELinux context:
$ ls -Z /var/www/html/file1 -rw-r--r-- root root unconfined_u:object_r:httpd_sys_content_t:s0 /var/www/html/file1
ls -Z command shows file1 labeled with the httpd_sys_content_t type. SELinux allows httpd to read files labeled with this type, but not write to them, even if Linux permissions allow write access. SELinux policy defines what types a process running in the httpd_t domain (where httpd runs) can read and write to. This helps prevent processes from accessing files intended for use by another process.
httpd can access files labeled with the httpd_sys_content_t type (intended for the Apache HTTP Server), but by default, can not access files labeled with the samba_share_t type (intended for Samba). Also, files in user home directories are labeled with the user_home_t type: by default, this prevents httpd from reading or writing to files in user home directories.
httpd. Different types allow you to configure flexible access:
httpd_sys_content_t.html files used by a static website. Files labeled with this type are accessible (read only) to httpd and scripts executed by httpd. By default, files and directories labeled with this type can not be written to or modified by httpd or other processes. Note: by default, files created in or copied into /var/www/html/ are labeled with the httpd_sys_content_t type.
httpd_sys_script_exec_thttpd to execute. This type is commonly used for Common Gateway Interface (CGI) scripts in /var/www/cgi-bin/. By default, SELinux policy prevents httpd from executing CGI scripts. To allow this, label the scripts with the httpd_sys_script_exec_t type and turn the httpd_enable_cgi Boolean on. Scripts labeled with httpd_sys_script_exec_t run in the httpd_sys_script_t domain when executed by httpd. The httpd_sys_script_t domain has access to other system domains, such as postgresql_t and mysqld_t.
httpd_sys_content_rw_thttpd_sys_script_exec_t type, but can not be modified by scripts labeled with any other type. You must use the httpd_sys_content_rw_t type to label files that will be read from and written to by scripts labeled with the httpd_sys_script_exec_t type.
httpd_sys_content_ra_thttpd_sys_script_exec_t type, but can not be modified by scripts labeled with any other type. You must use the httpd_sys_content_ra_t type to label files that will be read from and appended to by scripts labeled with the httpd_sys_script_exec_t type.
httpd_unconfined_script_exec_thttpd, or for the entire system.
chcon command. Changes made with chcon do not survive a file system relabel or the restorecon command. SELinux policy controls whether users are able to modify the SELinux context for any given file. The following example demonstrates creating a new directory and an index.html file for use by httpd, and labeling that file and directory to allow httpd access to them:
mkdir -p /my/website as the root user to create a top-level directory structure to store files to be used by httpd.
default_t type. This type is inaccessible to confined services:
$ ls -dZ /my drwxr-xr-x root root unconfined_u:object_r:default_t:s0 /my
chcon -R -t httpd_sys_content_t /my/ as the root user to change the type of the /my/ directory and subdirectories, to a type accessible to httpd. Now, files created under /my/website/ inherit the httpd_sys_content_t type, rather than the default_t type, and are therefore accessible to httpd:
# chcon -R -t httpd_sys_content_t /my/ # touch /my/website/index.html # ls -Z /my/website/index.html -rw-r--r-- root root unconfined_u:object_r:httpd_sys_content_t:s0 /my/website/index.html
semanage fcontext command to make label changes that survive a relabel and the restorecon command. This command adds changes to file-context configuration. Then, run the restorecon command, which reads file-context configuration, to apply the label change. The following example demonstrates creating a new directory and an index.html file for use by httpd, and persistently changing the label of that directory and file to allow httpd access to them:
mkdir -p /my/website as the root user to create a top-level directory structure to store files to be used by httpd.
semanage fcontext -a -t httpd_sys_content_t "/my(/.*)?"
"/my(/.*)?" expression means the label change applies to the /my/ directory and all files and directories under it.
touch /my/website/index.html as the root user to create a new file.
restorecon -R -v /my/ as the root user to apply the label changes (restorecon reads file-context configuration, which was modified by the semanage command in step 2):
# restorecon -R -v /my/ restorecon reset /my context unconfined_u:object_r:default_t:s0->system_u:object_r:httpd_sys_content_t:s0 restorecon reset /my/website context unconfined_u:object_r:default_t:s0->system_u:object_r:httpd_sys_content_t:s0 restorecon reset /my/website/index.html context unconfined_u:object_r:default_t:s0->system_u:object_r:httpd_sys_content_t:s0
setsebool command. For example, to turn the allow_httpd_anon_write Boolean on, run the following command as the root user:
# setsebool -P allow_httpd_anon_write on
on to off in the command, as shown below:
# setsebool -P allow_httpd_anon_write off
Note
-P option if you do not want setsebool changes to persist across reboots.
httpd is running:
allow_httpd_anon_writehttpd only read access to files labeled with the public_content_rw_t type. Enabling this Boolean will allow httpd to write to files labeled with the public_content_rw_t type, such as a public directory containing files for a public file transfer service.
allow_httpd_mod_auth_ntlm_winbindmod_auth_ntlm_winbind module in httpd.
allow_httpd_mod_auth_pammod_auth_pam module in httpd.
allow_httpd_sys_script_anon_writepublic_content_rw_t type, as used in a public file transfer service.
httpd_builtin_scriptinghttpd scripting. Having this Boolean enabled is often required for PHP content.
httpd_can_network_connecthttpd_can_network_connect_dbhttpd_can_network_relayhttpd is being used as a forward or reverse proxy.
httpd_can_sendmailhttpd. Turn this Boolean on to allow HTTP modules to send mail.
httpd_dbus_avahihttpd access to the avahi service via D-Bus. Turn this Boolean on to allow this access.
httpd_enable_cgihttpd from executing CGI scripts. Turn this Boolean on to allow httpd to execute CGI scripts (CGI scripts must be labeled with the httpd_sys_script_exec_t type).
httpd_enable_ftp_serverhttpd to listen on the FTP port and act as an FTP server.
httpd_enable_homedirshttpd from accessing user home directories. Turn this Boolean on to allow httpd access to user home directories; for example, content in /home/*/.
httpd_execmemhttpd to execute programs that require memory addresses that are both executable and writeable. Enabling this Boolean is not recommended from a security standpoint as it reduces protection against buffer overflows, however certain modules and applications (such as Java and Mono applications) require this privilege.
httpd_ssi_exechttpd_tmp_exechttpd to execute files in temporary directories.
httpd_tty_commhttpd is allowed access to the controlling terminal. Usually this access is not required, however in cases such as configuring an SSL certificate file, terminal access is required to display and process a password prompt.
httpd_unifiedhttpd_t complete access to all of the httpd types (i.e. to execute, read, or write sys_content_t). When disabled, there is separation in place between web content that is read-only, writeable or executable. Disabling this Boolean ensures an extra level of security but adds the administrative overhead of having to individually label scripts and other web content based on the file access that each should have.
httpd_use_cifshttpd access to files on CIFS file systems that are labeled with the cifs_t type, such as file systems mounted via Samba.
httpd_use_gpghttpd to make use of GPG encryption.
httpd_use_nfshttpd access to files on NFS file systems that are labeled with the nfs_t type, such as file systems mounted via NFS.
.html files for that website with the httpd_sys_content_t type. By default, the Apache HTTP Server can not write to files that are labeled with the httpd_sys_content_t type. The following example creates a new directory to store files for a read-only website:
mkdir /mywebsite as the root user to create a top-level directory.
/mywebsite/index.html file. Copy and paste the following content into /mywebsite/index.html:
<html> <h2>index.html from /mywebsite/</h2> </html>
/mywebsite/, as well as files and subdirectories under it, label /mywebsite/ with the httpd_sys_content_t type. Run the following command as the root user to add the label change to file-context configuration:
# semanage fcontext -a -t httpd_sys_content_t "/mywebsite(/.*)?"
restorecon -R -v /mywebsite as the root user to make the label changes:
# restorecon -R -v /mywebsite restorecon reset /mywebsite context unconfined_u:object_r:default_t:s0->system_u:object_r:httpd_sys_content_t:s0 restorecon reset /mywebsite/index.html context unconfined_u:object_r:default_t:s0->system_u:object_r:httpd_sys_content_t:s0
/etc/httpd/conf/httpd.conf as the root user. Comment out the existing DocumentRoot option. Add a DocumentRoot "/mywebsite" option. After editing, these options should look as follows:
#DocumentRoot "/var/www/html" DocumentRoot "/mywebsite"
service httpd status as the root user to see the status of the Apache HTTP Server. If the server is stopped, run service httpd start as the root user to start it. If the server is running, run service httpd restart as the root user to restart the service (this also applies any changes made to httpd.conf).
http://localhost/index.html. The following is displayed:
index.html from /mywebsite/
nfs_t type. Also, by default, Samba shares mounted on the client side are labeled with a default context defined by policy. In common policies, this default context uses the cifs_t type.
nfs_t or cifs_t types. This may prevent file systems labeled with these types from being mounted and then read or exported by other services. Booleans can be turned on or off to control which services are allowed to access the nfs_t and cifs_t types.
httpd_use_nfs Boolean on to allow httpd to access and share NFS file systems (labeled with the nfs_t type. Run the setsebool command as the root user to turn the Boolean on:
setsebool -P httpd_use_nfs on
httpd_use_cifs Boolean on to allow httpd to access and share CIFS file systems (labeled with the cifs_t type. Run the setsebool command as the root user to turn the Boolean on:
setsebool -P httpd_use_cifs on
Note
-P option if you do not want setsebool changes to persist across reboots.
httpd_sys_content_t type, which are intended for use by the Apache HTTP Server. Files can be shared between the Apache HTTP Server, FTP, rsync, and Samba, if the desired files are labeled with the public_content_t or public_content_rw_t type.
mkdir /shares as the root user to create a new top-level directory to share files between multiple services.
default_t type. This type is inaccessible to confined services:
$ ls -dZ /shares drwxr-xr-x root root unconfined_u:object_r:default_t:s0 /shares
/shares/index.html file. Copy and paste the following content into /shares/index.html:
<html> <body> <p>Hello</p> </body> </html>
/shares/ with the public_content_t type allows read-only access by the Apache HTTP Server, FTP, rsync, and Samba. Run the following command as the root user to add the label change to file-context configuration:
semanage fcontext -a -t public_content_t "/shares(/.*)?"
restorecon -R -v /shares/ as the root user to apply the label changes:
# restorecon -R -v /shares/ restorecon reset /shares context unconfined_u:object_r:default_t:s0->system_u:object_r:public_content_t:s0 restorecon reset /shares/index.html context unconfined_u:object_r:default_t:s0->system_u:object_r:public_content_t:s0
/shares/ through Samba:
rpm -q samba samba-common samba-client to confirm the samba, samba-common, and samba-client packages are installed (version numbers may differ):
$ rpm -q samba samba-common samba-client samba-3.5.2-59.fc13.i386 samba-common-3.5.2-59.fc13.i386 samba-client-3.5.2-59.fc13.i386
yum install package-name as the root user.
/etc/samba/smb.conf as the root user. Add the following entry to the bottom of this file to share the /shares/ directory through Samba:
[shares] comment = Documents for Apache HTTP Server, FTP, rsync, and Samba path = /shares public = yes writeable = no
smbpasswd -a username as the root user to create a Samba account, where username is an existing Linux user. For example, smbpasswd -a testuser creates a Samba account for the Linux testuser user:
# smbpasswd -a testuser New SMB password: Enter a password Retype new SMB password: Enter the same password again Added user testuser.
smbpasswd -a username, where username is the username of a Linux account that does not exist on the system, causes a Cannot locate Unix account for 'username'! error.
service smb start as the root user to start the Samba service:
service smb start Starting SMB services: [ OK ]
smbclient -U username -L localhost to list the available shares, where username is the Samba account added in step 3. When prompted for a password, enter the password assigned to the Samba account in step 3 (version numbers may differ):
$ smbclient -U username -L localhost Enter username's password: Domain=[HOSTNAME] OS=[Unix] Server=[Samba 3.5.2-59.fc13] Sharename Type Comment --------- ---- ------- shares Disk Documents for Apache HTTP Server, FTP, rsync, and Samba IPC$ IPC IPC Service (Samba Server Version 3.5.2-59) username Disk Home Directories Domain=[HOSTNAME] OS=[Unix] Server=[Samba 3.5.2-59.fc13] Server Comment --------- ------- Workgroup Master --------- -------
mkdir /test/ as the root user to create a new directory. This directory will be used to mount the shares Samba share.
shares Samba share to /test/, replacing username with the username from step 3:
mount //localhost/shares /test/ -o user=username
cat /test/index.html to view the file, which is being shared through Samba:
$ cat /test/index.html <html> <body> <p>Hello</p> </body> </html>
/shares/ through the Apache HTTP Server:
rpm -q httpd to confirm the httpd package is installed (version number may differ):
$ rpm -q httpd httpd-2.2.11-6.i386
yum install httpd as the root user to install it.
/var/www/html/ directory. Run the following command as the root user to create a link (named shares) to the /shares/ directory:
ln -s /shares/ shares
service httpd start as the root user to start the Apache HTTP Server:
service httpd start Starting httpd: [ OK ]
http://localhost/shares. The /shares/index.html file is displayed.
index.html file if it exists. If /shares/ did not have index.html, and instead had file1, file2, and file3, a directory listing would occur when accessing http://localhost/shares:
rm -i /shares/index.html as the root user to remove the index.html file.
touch /shares/file{1,2,3} as the root user to create three files in /shares/:
# touch /shares/file{1,2,3}
# ls -Z /shares/
-rw-r--r-- root root system_u:object_r:public_content_t:s0 file1
-rw-r--r-- root root unconfined_u:object_r:public_content_t:s0 file2
-rw-r--r-- root root unconfined_u:object_r:public_content_t:s0 file3
service httpd status as the root user to see the status of the Apache HTTP Server. If the server is stopped, run service httpd start as the root user to start it.
http://localhost/shares. A directory listing is displayed:

semanage port -l | grep -w "http_port_t" as the root user to list the ports SELinux allows httpd to listen on:
# semanage port -l | grep -w http_port_t http_port_t tcp 80, 443, 488, 8008, 8009, 8443
http to listen on TCP ports 80, 443, 488, 8008, 8009, or 8443. If /etc/httpd/conf/httpd.conf is configured so that httpd listens on any port not listed for http_port_t, httpd fails to start.
httpd to run on a port other than TCP ports 80, 443, 488, 8008, 8009, or 8443:
/etc/httpd/conf/httpd.conf as the root user so the Listen option lists a port that is not configured in SELinux policy for httpd. The following example configures httpd to listen on the 10.0.0.1 IP address, and on port 12345:
# Change this to Listen on specific IP addresses as shown below to # prevent Apache from glomming onto all bound IP addresses (0.0.0.0) # #Listen 12.34.56.78:80 Listen 10.0.0.1:12345
semanage port -a -t http_port_t -p tcp 12345 as the root user to add the port to SELinux policy configuration.
semanage port -l | grep -w http_port_t as the root user to confirm the port is added:
# semanage port -l | grep -w http_port_t http_port_t tcp 12345, 80, 443, 488, 8008, 8009, 8443
httpd on port 12345, run semanage port -d -t http_port_t -p tcp 12345 as the root user to remove the port from policy configuration.
rpm -q samba to see if the samba package is installed. If it is not installed and you want to use Samba, run the following command as the root user to install it:
yum install samba
smbd) runs confined by default. Confined services run in their own domains, and are separated from other confined services. The following example demonstrates the smbd process running in its own domain. This example assumes the samba package is installed:
getenforce to confirm SELinux is running in enforcing mode:
$ getenforce Enforcing
getenforce command returns Enforcing when SELinux is running in enforcing mode.
service smbd start as the root user to start smbd:
service smb start Starting SMB services: [ OK ]
ps -eZ | grep smb to view the smbd processes:
$ ps -eZ | grep smb unconfined_u:system_r:smbd_t:s0 16420 ? 00:00:00 smbd unconfined_u:system_r:smbd_t:s0 16422 ? 00:00:00 smbd
smbd processes is unconfined_u:system_r:smbd_t:s0. The second last part of the context, smbd_t, is the type. A type defines a domain for processes and a type for files. In this case, the smbd processes are running in the smbd_t domain.
smbd to access and share them. For example, smbd can read and write to files labeled with the samba_share_t type, but by default, can not access files labeled with the httpd_sys_content_t type, which is intended for use by the Apache HTTP Server. Booleans must be turned on to allow certain behavior, such as allowing home directories and NFS file systems to be exported through Samba, as well as to allow Samba to act as a domain controller.
samba_share_t type to allow Samba to share them. Only label files you have created, and do not relabel system files with the samba_share_t type: Booleans can be turned on to share such files and directories. SELinux allows Samba to write to files labeled with the samba_share_t type, as long as /etc/samba/smb.conf and Linux permissions are set accordingly.
samba_etc_t type is used on certain files in /etc/samba/, such as smb.conf. Do not manually label files with the samba_etc_t type. If files in /etc/samba/ are not labeled correctly, run restorecon -R -v /etc/samba as the root user to restore such files to their default contexts. If /etc/samba/smb.conf is not labeled with the samba_etc_t type, the service smb start command may fail and an SELinux denial may be logged. The following is an example denial logged to /var/log/messages when /etc/samba/smb.conf was labeled with the httpd_sys_content_t type:
setroubleshoot: SELinux is preventing smbd (smbd_t) "read" to ./smb.conf (httpd_sys_content_t). For complete SELinux messages. run sealert -l deb33473-1069-482b-bb50-e4cd05ab18af
allow_smbd_anon_writesmbd to write to a public directory, such as an area reserved for common files that otherwise has no special access restrictions.
samba_create_home_dirssamba_domain_controlleruseradd, groupadd and passwd.
samba_enable_home_dirssamba_export_all_rosamba_share_t type to be shared through Samba. When the samba_export_all_ro Boolean is on, but the samba_export_all_rw Boolean is off, write access to Samba shares is denied, even if write access is configured in /etc/samba/smb.conf, as well as Linux permissions allowing write access.
samba_export_all_rwsamba_share_t type to be exported through Samba. Permissions in /etc/samba/smb.conf and Linux permissions must be configured to allow write access.
samba_run_unconfined/var/lib/samba/scripts directory.
samba_share_fusefsfusefs file systems.
samba_share_nfssmbd from having full access to NFS shares via Samba. Enabling this Boolean will allow Samba to share NFS file systems.
use_samba_home_dirsvirt_use_sambarpm -q samba samba-common samba-client to confirm the samba, samba-common, and samba-client packages are installed. If any of these packages are not installed, install them by running yum install package-name as the root user.
mkdir /myshare as the root user to create a new top-level directory to share files through Samba.
touch /myshare/file1 as the root user to create an empty file. This file is used later to verify the Samba share mounted correctly.
samba_share_t type, as long as /etc/samba/smb.conf and Linux permissions are set accordingly. Run the following command as the root user to add the label change to file-context configuration:
semanage fcontext -a -t samba_share_t "/myshare(/.*)?"
restorecon -R -v /myshare as the root user to apply the label changes:
# restorecon -R -v /myshare restorecon reset /myshare context unconfined_u:object_r:default_t:s0->system_u:object_r:samba_share_t:s0 restorecon reset /myshare/file1 context unconfined_u:object_r:default_t:s0->system_u:object_r:samba_share_t:s0
/etc/samba/smb.conf as the root user. Add the following to the bottom of this file to share the /myshare/ directory through Samba:
[myshare] comment = My share path = /myshare public = yes writeable = no
smbpasswd -a username as the root user to create a Samba account, where username is an existing Linux user. For example, smbpasswd -a testuser creates a Samba account for the Linux testuser user:
# smbpasswd -a testuser New SMB password: Enter a password Retype new SMB password: Enter the same password again Added user testuser.
smbpasswd -a username, where username is the username of a Linux account that does not exist on the system, causes a Cannot locate Unix account for 'username'! error.
service smb start as the root user to start the Samba service:
service smb start Starting SMB services: [ OK ]
smbclient -U username -L localhost to list the available shares, where username is the Samba account added in step 7. When prompted for a password, enter the password assigned to the Samba account in step 7 (version numbers may differ):
$ smbclient -U username -L localhost Enter username's password: Domain=[HOSTNAME] OS=[Unix] Server=[Samba 3.5.2-59.fc13] Sharename Type Comment --------- ---- ------- myshare Disk My share IPC$ IPC IPC Service (Samba Server Version 3.5.2-59.fc13) username Disk Home Directories Domain=[HOSTNAME] OS=[Unix] Server=[Samba 3.5.2-59.fc13] Server Comment --------- ------- Workgroup Master --------- -------
mkdir /test/ as the root user to create a new directory. This directory will be used to mount the myshare Samba share.
myshare Samba share to /test/, replacing username with the username from step 7:
mount //localhost/myshare /test/ -o user=username
ls /test/ to view the file1 file created in step 3:
$ ls /test/ file1
samba_share_t type, for example, when wanting to share a website in /var/www/html/. For these cases, use the samba_export_all_ro Boolean to share any file or directory (regardless of the current label), allowing read only permissions, or the samba_export_all_rw Boolean to share any file or directory (regardless of the current label), allowing read and write permissions.
/var/www/html/, and then shares that file through Samba, allowing read and write permissions. This example assumes the httpd, samba, samba-common, samba-client, and wget packages are installed:
/var/www/html/file1.html file. Copy and paste the following content into /var/www/html/file1.html:
<html> <h2>File being shared through the Apache HTTP Server and Samba.</h2> </html>
ls -Z /var/www/html/file1.html to view the SELinux context of file1.html:
$ ls -Z /var/www/html/file1.html -rw-r--r--. root root unconfined_u:object_r:httpd_sys_content_t:s0 /var/www/html/file1.html
file1.index.html is labeled with the httpd_sys_content_t. By default, the Apache HTTP Server can access this type, but Samba can not.
service httpd start as the root user to start the Apache HTTP Server:
service httpd start Starting httpd: [ OK ]
wget http://localhost/file1.html command. Unless there are changes to the default configuration, this command succeeds:
$ wget http://localhost/file1.html --2009-03-02 16:32:01-- http://localhost/file1.html Resolving localhost... 127.0.0.1 Connecting to localhost|127.0.0.1|:80... connected. HTTP request sent, awaiting response... 200 OK Length: 84 [text/html] Saving to: `file1.html.1' 100%[=======================>] 84 --.-K/s in 0s 2009-03-02 16:32:01 (563 KB/s) - `file1.html.1' saved [84/84]
/etc/samba/smb.conf as the root user. Add the following to the bottom of this file to share the /var/www/html/ directory through Samba:
[website] comment = Sharing a website path = /var/www/html/ public = no writeable = no
/var/www/html/ directory is labeled with the httpd_sys_content_t type. By default, Samba can not access files and directories labeled with the httpd_sys_content_t type, even if Linux permissions allow it. To allow Samba access, run the following command as the root user to turn the samba_export_all_ro Boolean on:
setsebool -P samba_export_all_ro on
-P option if you do not want the change to persist across reboots. Note: turning the samba_export_all_ro Boolean on allows Samba to access any type.
service smb start as the root user to start smbd:
service smb start Starting SMB services: [ OK ]
vsftpd) is designed from the ground up to be fast, stable, and, most importantly, secure. Its ability to handle large numbers of connections efficiently and securely is why vsftpd is the only stand-alone FTP distributed with Red Hat Enterprise Linux.
[33]
rpm -q vsftpd to see if vsftpd is installed:
$ rpm -q vsftpd
yum install vsftpd
vsftpd, runs confined by default. SELinux policy defines how vsftpd interacts with files, processes, and with the system in general. For example, when an authenticated user logs in via FTP, they can not read from or write to files in their home directories: SELinux prevents vsftpd from accessing user home directories by default. Also, by default, vsftpd does not have access to NFS or CIFS file systems, and anonymous users do not have write access, even if such write access is configured in /etc/vsftpd/vsftpd.conf. Booleans can be turned on to allow the previously mentioned access.
rpm -q vsftpd to see if the vsftpd package is installed. If it is not, run yum install vsftpd as the root user to install it.
vsftpd only allows anonymous users to log in by default. To allow authenticated users to log in, edit /etc/vsftpd/vsftpd.conf as the root user. Uncomment the local_enable=YES option:
# Uncomment this to allow local users to log in. local_enable=YES
service vsftpd start as the root user to start vsftpd. If the service was running before editing vsftpd.conf, run service vsftpd restart as the root user to apply the configuration changes:
service vsftpd start Starting vsftpd for vsftpd: [ OK ]
ftp localhost as the user you are currently logged in with. When prompted for your name, make sure your username is displayed. If the correct username is displayed, press Enter, otherwise, enter the correct username:
$ ftp localhost Connected to localhost (127.0.0.1). 220 (vsFTPd 2.1.0) Name (localhost:username): 331 Please specify the password. Password: Enter your password 230 Login successful. Remote system type is UNIX. Using binary mode to transfer files. ftp>
ls command from the ftp prompt. With the ftp_home_dir Boolean off, SELinux prevents vsftpd access to home directories, resulting in this command failing to return a directory listing:
ftp> ls 227 Entering Passive Mode (127,0,0,1,225,210). 150 Here comes the directory listing. 226 Transfer done (but failed to open directory).
/var/log/messages:
setroubleshoot: SELinux is preventing the ftp daemon from reading users home directories (username). For complete SELinux messages. run sealert -l c366e889-2553-4c16-b73f-92f36a1730ce
ftp_home_dir Boolean by running the following command as the root user:
# setsebool -P ftp_home_dir=1
Note
ls command again from the ftp prompt. Now that SELinux is allowing home directory browsing via the ftp_home_dir Boolean, the directory is displayed:
ftp> ls 227 Entering Passive Mode (127,0,0,1,56,215). 150 Here comes the directory listing. -rw-rw-r-- 1 501 501 0 Mar 30 09:22 file1 -rw-rw-r-- 1 501 501 0 Mar 30 09:22 file2 226 Directory Send OK. ftp>
/var/ftp/ when they log in via FTP. This directory is labeled with the public_content_t type, allowing only read access, even if write access is configured in /etc/vsftpd/vsftpd.conf. The public_content_t type is accessible to other services, such as Apache HTTP Server, Samba, and NFS.
public_content_tpublic_content_t type to share them read-only through vsftpd. Other services, such as Apache HTTP Server, Samba, and NFS, also have access to files labeled with this type. Files labeled with the public_content_t type can not be written to, even if Linux permissions allow write access. If you require write access, use the public_content_rw_t type.
public_content_rw_tpublic_content_rw_t type to share them with read and write permissions through vsftpd. Other services, such as Apache HTTP Server, Samba, and NFS, also have access to files labeled with this type; however, Booleans for each service must be turned on before such services can write to files labeled with this type.
vsftpd:
allow_ftpd_anon_writevsftpd from writing to files and directories labeled with the public_content_rw_t type. Turn this Boolean on to allow users to upload files via FTP. The directory where files are uploaded to must be labeled with the public_content_rw_t type and Linux permissions set accordingly.
allow_ftpd_full_accesspublic_content_t or public_content_rw_t types.
allow_ftpd_use_cifsvsftpd to access files and directories labeled with the cifs_t type; therefore, having this Boolean enabled allows you to share file systems mounted via Samba through vsftpd.
allow_ftpd_use_nfsvsftpd to access files and directories labeled with the nfs_t type; therefore, having this Boolean enabled allows you to share file systems mounted via NFS through vsftpd.
ftp_home_dir550 Failed to open file. An SELinux denial is logged to /var/log/messages.
ftpd_connect_dbhttpd_enable_ftp_serverhttpd to listen on the FTP port and act as a FTP server.
tftp_anon_writemkdir -p /myftp/pub as the root user to create a new top-level directory.
/myftp/pub/ directory to allow a Linux user write access. This example changes the owner and group from root to owner user1 and group root. Replace user1 with the user you want to give write access to:
# chown user1:root /myftp/pub # chmod 775 /myftp/pub
chown command changes the owner and group permissions. The chmod command changes the mode, allowing the user1 user read, write, and execute permissions, and members of the root group read, write, and execute permissions. Everyone else has read and execute permissions: this is required to allow the Apache HTTP Server to read files from this directory.
public_content_t type allow them to be read by FTP, Apache HTTP Server, Samba, and rsync. Files labeled with the public_content_rw_t type can be written to by FTP. Other services, such as Samba, require Booleans to be set before they can write to files labeled with the public_content_rw_t type. Label the top-level directory (/myftp/) with the public_content_t type, to prevent copied or newly-created files under /myftp/ from being written to or modified by services. Run the following command as the root user to add the label change to file-context configuration:
semanage fcontext -a -t public_content_t /myftp
restorecon -R -v /myftp/ to apply the label change:
# restorecon -R -v /myftp/ restorecon reset /myftp context unconfined_u:object_r:default_t:s0->system_u:object_r:public_content_t:s0
/myftp is labeled with the public_content_t type, and /myftp/pub/ is labeled with the default_t type:
$ ls -dZ /myftp/ drwxr-xr-x. root root system_u:object_r:public_content_t:s0 /myftp/ $ ls -dZ /myftp/pub/ drwxrwxr-x. user1 root unconfined_u:object_r:default_t:s0 /myftp/pub/
public_content_rw_t type. This example uses /myftp/pub/ as the directory FTP can write to. Run the following command as the root user to add the label change to file-context configuration:
semanage fcontext -a -t public_content_rw_t "/myftp/pub(/.*)?"
restorecon -R -v /myftp/pub as the root user to apply the label change:
# restorecon -R -v /myftp/pub restorecon reset /myftp/pub context system_u:object_r:default_t:s0->system_u:object_r:public_content_rw_t:s0
allow_ftpd_anon_write Boolean must be on to allow vsftpd to write to files that are labeled with the public_content_rw_t type. Run the following command as the root user to turn this Boolean on:
setsebool -P allow_ftpd_anon_write on
-P option if you do not want changes to persist across reboots.
/myftp/pub/ directory:
cd ~/ to change into your home directory. Then, run mkdir myftp to create a directory to store files to upload via FTP.
cd ~/myftp to change into the ~/myftp/ directory. In this directory, create an ftpupload file. Copy the following contents into this file:
File upload via FTP from a home directory.
getsebool allow_ftpd_anon_write to confirm the allow_ftpd_anon_write Boolean is on:
$ getsebool allow_ftpd_anon_write allow_ftpd_anon_write --> on
setsebool -P allow_ftpd_anon_write on as the root user to turn it on. Do not use the -P option if you do not want the change to persist across reboots.
service vsftpd start as the root user to start vsftpd:
# service vsftpd start Starting vsftpd for vsftpd: [ OK ]
ftp localhost. When prompted for a username, enter the the username of the user who has write access, then, enter the correct password for that user:
$ ftp localhost Connected to localhost (127.0.0.1). 220 (vsFTPd 2.1.0) Name (localhost:username): 331 Please specify the password. Password: Enter the correct password 230 Login successful. Remote system type is UNIX. Using binary mode to transfer files. ftp>
rpm -q nfs-utils to see if the nfs-utils is installed. If it is not installed and you want to use NFS, run the following command as the root user to install it:
yum install nfs-utils
NFS daemons are confined by default. SELinux policy does not allow NFS to share files by default. If you want to share NFS partitions, this can be configured via the nfs_export_all_ro and nfs_export_all_rw Booleans, as described below. These Booleans are however not required when files to be shared are labeled with the public_content_t or public_content_rw_t types. NFS can share files labeled with these types even if the nfs_export_all_ro and nfs_export_all_rw Booleans are off.
nfs_t type.The following types are used with NFS. Different types allow you to configure flexible access:
var_lib_nfs_t/var/lib/nfs directory. This type should not need to be changed in normal operation. To restore changes to the default settings, run the restorecon -R -v /var/lib/nfs command as the root user.
nfsd_exec_t/usr/sbin/rpc.nfsd file is labeled with the nfsd_exec_t, as are other system executables and libraries related to NFS. Users should not label any files with this type. nfsd_exec_t will transition to nfs_t.
allow_ftpd_use_nfsftpd access to NFS mounts.
allow_nfsd_anon_writenfsd to write to a public directory anonymously; such as to an area reserved for common files that otherwise has no special access restrictions.
httpd_use_nfshttpd to access files stored on a NFS filesystem.
nfs_export_all_ronfs_export_all_rwqemu_use_nfssamba_share_nfssmbd from having full access to NFS shares via Samba. Enabling this Boolean will allow Samba to share NFS file systems.
use_nfs_home_dirsvirt_use_nfsxen_use_nfsnfs-srv with an IP address of 192.168.1.1, and a client with a hostname of nfs-client and an IP address of 192.168.1.100. Both hosts are on the same subnet (192.168.1.0/24). This is an example only and assumes that the nfs-utils package is installed, that the SELinux targeted policy is used, and that SELinux is running in enforced mode.
nfs-srv.
setsebool command to disable read/write mounting of NFS file systems:
setsebool -P nfs_export_all_rw off
Note
-P option if you do not want setsebool changes to persist across reboots.
rpm -q nfs-utils to confirm the nfs-utils package is installed. The nfs-utils package provides support programs for using NFS and should be installed on a NFS server and on any clients in use. If this package is not installed, install it by running yum install nfs-utils as the root user.
mkdir /myshare as the root user to create a new top-level directory to share using NFS.
touch /myshare/file1 as the root user to create a new empty file in the shared area. This file will be accessed later by the client.
/myshare directory full Linux access rights for all users:
# chmod -R 777 /myshare
Warning
/etc/exports file and add the following line to the top of the file:
/myshare 192.168.1.100(rw)
/myshare, the host or network range that nfs-srv will share to (in this case the IP address of a single host, nfs-client at 192.168.1.100), and finally the share permissions. Read and write permissions are given here, as indicated by (rw).
MOUNTD_PORT,STATD_PORT,LOCKD_TCPPORT and LOCKD_UDPPORT variables. Changing the port numbers in this file is not required for this example.
service nfs start as the root user to start NFS and its related services:
# service nfs start Starting NFS services: [ OK ] Starting NFS quotas: [ OK ] Starting NFS daemon: [ OK ] Starting NFS mountd: [ OK ]
exportfs -rv as the root user:
# exportfs -rv exporting 192.168.1.100:/myshare
showmount -e as the root user to show all exported file systems:
# showmount -e Export list for nfs-srv: /myshare 192.168.1.100
nfs-srv has been configured to allow NFS communications to nfs-client at 192.168.1.100, and full Linux file systems permissions are active. If SELinux were disabled, the client would be able to mount this share and have full access over it. However, as the nfs_export_all_rw Boolean is disabled, the client is currently not able to mount this file system, as shown below. This step should be performed on the client, nfs-client:
[nfs-client]# mkdir /myshare [nfs-client]# mount.nfs 192.168.1.1:/myshare /myshare mount.nfs: access denied by server while mounting 192.168.1.1:/myshare/
nfs-srv:
[nfs-srv]# setsebool -P nfs_export_all_rw on
nfs-client:
[nfs-client]# mount.nfs 192.168.1.1:/myshare /myshare [nfs-client]# [nfs-client]# ls /myshare total 0 -rwxrwxrwx. 1 root root 0 2009-04-16 12:07 file1 [nfs-client]#
named daemon. BIND lets users locate computer resources and services by name instead of numerical addresses.
rpm -q bind to see if the bind package is installed. If it is not installed and you want to use BIND, run the following command as the root user to install it:
yum install bind
/var/named/slaves,/var/named/dynamic and /var/named/data directories allow zone files to be updated via zone transfers and dynamic DNS updates. Files in /var/named are labeled with the name_zone_t type, which is used for master zone files.
/etc/named.conf to place slave zones in /var/named/slaves. The following is an example of a domain entry in /etc/named.conf for a slave DNS server that stores the zone file for testdomain.com in /var/named/slaves:
zone "testdomain.com" {
type slave;
masters { IP-address; };
file "/var/named/slaves/db.testdomain.com";
};
name_zone_t, the named_write_master_zones Boolean must be enabled to allow zone transfers and dynamic DNS to update the zone file. Also, the mode of the parent directory has to be changed to allow the named user or group read, write and execue access.
/var/named/ are labeled with name_cache_t type, a file system relabel or running restorecon -R /var/ will change their type to named_zone_t.
named_zone_tnamed can only modify files of this type if the named_write_master_zones Boolean is turned on.
named_cache_tnamed can write to files labeled with this type, without additional Booleans being set. Files copied or created in the /var/named/slaves,/var/named/dynamic and /var/named/data directories are automatically labeled with the named_cache_t type.
named_write_master_zonesnamed from writing to zone files or directories labeled with the named_zone_t type. named does not usually need to write to zone files; but in the case that it needs to, or if a secondary server needs to write to zone files, enable this Boolean to allow this action.
/var/named/dynamic directory for zone files you want updated via dynamic DNS. Files created in or copied into /var/named/dynamic inherit Linux permissions that allow named to write to them. As such files are labeled with the named_cache_t type, SELinux allows named to write to them.
/var/named/dynamic is labeled with the named_zone_t type, dynamic DNS updates may not be successful for a certain period of time as the update needs to be written to a journal first before being merged. If the zone file is labeled with the named_zone_t type when the journal attempts to be merged, an error such as the following is logged to /var/log/messages:
named[PID]: dumping master file: rename: /var/named/dynamic/zone-name: permission denied
/var/log/messages:
setroubleshoot: SELinux is preventing named (named_t) "unlink" to zone-name (named_zone_t)
restorecon -R -v /var/named/dynamic command as the Linux root user.
rpm -q cvs to see if the cvs package is installed. If it is not installed and you want to use CVS, run the following command as the root user to install it:
yum install cvs
cvs daemon runs as cvs_t. By default in Fedora, CVS is only allowed to read and write certain directories. The label cvs_data_t defines which areas the cvs daemon has read and write access to. When using CVS with SELinux, assigning the correct label is essential for clients to have full access to the area reserved for CVS data.
cvs_data_tcvs_exec_t/usr/bin/cvs binary.
allow_cvs_read_shadowcvs daemon to access the /etc/shadow file for user authentication.
cvs-srv with an IP address of 192.168.1.1 and a client with a hostname of cvs-client and an IP address of 192.168.1.100. Both hosts are on the same subnet (192.168.1.0/24). This is an example only and assumes that the cvs and xinetd packages are installed, that the SELinux targeted policy is used, and that SELinux is running in enforced mode.
Note
cvs-srv.
rpm -q cvs to see if the cvs package is installed. If it is not installed, run yum install cvs as the root user to install it. Run rpm -q xinetd to see if the xinetd package is installed. If it is not installed, run yum install xinetd as the root user to install it.
CVS. This can be done via the groupadd CVS command as the root user, or by using the system-config-users tool.
cvsuser and make this user a member of the CVS group. This can be done using the system-config-users tool.
/etc/services file and make sure that the CVS server has uncommented entries looking similar to the following:
cvspserver 2401/tcp # CVS client/server operations cvspserver 2401/udp # CVS client/server operations
/cvs directory to house the repository:
[root@cvs-srv]# mkdir /cvs
/cvs directory to all users:
[root@cvs-srv]# chmod -R 777 /cvs
Warning
/etc/xinetd.d/cvs file and make sure that the CVS section is uncommented and configured to use the /cvs directory. The file should look similar to:
service cvspserver
{
disable = no
port = 2401
socket_type = stream
protocol = tcp
wait = no
user = root
passenv = PATH
server = /usr/bin/cvs
env = HOME=/cvs
server_args = -f --allow-root=/cvs pserver
# bind = 127.0.0.1
xinetd daemon by running service xinetd start as the root user.
cvsuser user, run the following command:
[cvsuser@cvs-client]$ cvs -d /cvs init
cvs-client and try to log in remotely. The following step should be performed on cvs-client:
[cvsuser@cvs-client]$ export CVSROOT=:pserver:cvsuser@192.168.1.1:/cvs [cvsuser@cvs-client]$ [cvsuser@cvs-client]$ cvs login Logging in to :pserver:cvsuser@192.168.1.1:2401/cvs CVS password: ******** cvs [login aborted]: unrecognized auth response from 192.168.100.1: cvs pserver: cannot open /cvs/CVSROOT/config: Permission denied
cvs-srv:
/cvs directory as the root user in order to recursively label any existing and new data in the /cvs directory, giving it the cvs_data_t type:
[root@cvs-srv]# semanage fcontext -a -t cvs_data_t '/cvs(/.*)?' [root@cvs-srv]# restorecon -R -v /cvs
cvs-client should now be able to log in and access all CVS resources in this repository:
[cvsuser@cvs-client]$ export CVSROOT=:pserver:cvsuser@192.168.1.1:/cvs [cvsuser@cvs-client]$ [cvsuser@cvs-client]$ cvs login Logging in to :pserver:cvsuser@192.168.1.1:2401/cvs CVS password: ******** [cvsuser@cvs-client]$
rpm -q squid to see if the squid package is installed. If it is not installed and you want to use squid, run the following command as the root user to install it:
# yum install squid
getenforce to confirm SELinux is running in enforcing mode:
$ getenforce Enforcing
getenforce command returns Enforcing when SELinux is running in enforcing mode.
service squid start as the root user to start squid:
# service squid start Starting squid: [ OK ]
ps -eZ | grep squid to view the squid processes:
$ ps -eZ | grep squid unconfined_u:system_r:squid_t:s0 2522 ? 00:00:00 squid unconfined_u:system_r:squid_t:s0 2524 ? 00:00:00 squid unconfined_u:system_r:squid_t:s0 2526 ? 00:00:00 ncsa_auth unconfined_u:system_r:squid_t:s0 2527 ? 00:00:00 ncsa_auth unconfined_u:system_r:squid_t:s0 2528 ? 00:00:00 ncsa_auth unconfined_u:system_r:squid_t:s0 2529 ? 00:00:00 ncsa_auth unconfined_u:system_r:squid_t:s0 2530 ? 00:00:00 ncsa_auth unconfined_u:system_r:squid_t:s0 2531 ? 00:00:00 unlinkd
squid processes is unconfined_u:system_r:squid_t:s0. The second last part of the context, squid_t, is the type. A type defines a domain for processes and a type for files. In this case, the squid processes are running in the squid_t domain.
/etc/squid/squid.conf is configured so squid listens on a port other than the default TCP ports 3128, 3401 or 4827, the semanage port command must be used to add the required port number to the SELinux policy configuration. The following example demonstrates configuring squid to listen on a port that is not initially defined in SELinux policy configuration for squid, and, as a consequence, squid failing to start. This example also demonstrates how to then configure the SELinux system to allow squid to successfully listen on a non-standard port that is not already defined in the policy. This example assumes the squid package is installed. Run each command in the example as the root user:
service squid status to confirm squid is not running:
# service squid status squid is stopped
service squid stop to stop the process:
# service squid stop Stopping squid: [ OK ]
semanage port -l | grep -w squid_port_t to view the ports SELinux allows squid to listen on:
semanage port -l | grep -w -i squid_port_t squid_port_t tcp 3128, 3401, 4827 squid_port_t udp 3401, 4827
/etc/squid/squid.conf as the root user. Configure the http_port option so it lists a port that is not configured in SELinux policy configuration for squid. In this example, squid is configured to listen on port 10000:
# Squid normally listens to port 3128 http_port 10000
service squid start to start squid:
# service squid start Starting squid: .................... [FAILED]
/var/log/messages:
localhost setroubleshoot: SELinux is preventing the squid (squid_t) from binding to port 1000. For complete SELinux messages. run sealert -l 97136444-4497-4fff-a7a7-c4d8442db982
squid to listen on port 10000, as used in this example, the following command is required:
# semanage port -a -t squid_port_t -p tcp 10000
service squid start again to start squid and have it listen on the new port:
# service squid start Starting squid: [ OK ]
squid to listen on a non-standard port (TCP 10000 in this example), squid starts successfully on this port.
squid. Different types allow you to configure flexible access:
httpd_squid_script_exec_tcachemgr.cgi, which provides a variety of statistics about squid and its configuration.
squid_cache_tcache_dir directive in /etc/squid/squid.conf. By default, files created in or copied into /var/cache/squid and /var/spool/squid are labeled with the squid_cache_t type. Files for the squidGuard URL redirector plugin for squid created in or copied to /var/squidGuard are also labeled with the squid_cache_t type. Squid is only able to use files and directories that are labeled with this type for its cached data.
squid_conf_tsquid uses for its configuration. Existing files, or those created in or copied to /etc/squid and /usr/share/squid are labeled with this type, including error messages and icons.
squid_exec_t/usr/sbin/squid.
squid_log_t/var/log/squid or /var/log/squidGuard must be labeled with this type.
squid_initrc_exec_tsquid which is located at /etc/rc.d/init.d/squid.
squid_var_run_t/var/run, especially the process id (PID) named /var/run/squid.pid which is created by squid when it runs.
squid_connect_anysquid_use_tproxyrpm -q squid to see if the squid package is installed. If it is not installed, run yum install squid as the root user to install it.
/etc/squid/squid.conf and confirm that the cache_dir directive is uncommented and looks similar to the following:
cache_dir ufs /var/spool/squid 100 16 256
cache_dir directive to be used in this example; it consists of the Squid storage format (ufs), the directory on the system where the cache resides (/var/spool/squid), the amount of disk space in megabytes to be used for the cache (100), and finally the number of first-level and second-level cache directories to be created (16 and 256 respectively).
http_access allow localnet directive is uncommented. This allows traffic from the localnet ACL which is automatically configured in a default installation of Squid on Fedora 13. It will allow client machines on any existing RFC1918 network to have access through the proxy, which is sufficient for this simple example.
visible_hostname directive is uncommented and is configured to the hostname of the machine. The value should be the fully qualified domain name (FQDN) of the host:
visible_hostname squid.example.com
service squid start to start squid. As this is the first time squid has started, this command will initialise the cache directories as specified above in the cache_dir directive and will then start the squid daemon. The output is as follows if squid starts successfully:
# /sbin/service squid start init_cache_dir /var/spool/squid... Starting squid: . [ OK ]
squid process ID (PID) has started as a confined service, as seen here by the squid_var_run_t value:
# ls -lZ /var/run/squid.pid
-rw-r--r--. root squid unconfined_u:object_r:squid_var_run_t:s0 /var/run/squid.pid
localnet ACL configured earlier is successfully able to use the internal interface of this host as its proxy. This can be configured in the settings for all common web browsers, or system-wide. Squid is now listening on the default port of the target machine (TCP 3128), but the target machine will only allow outgoing connections to other services on the Internet via common ports. This is a policy defined by SELinux itself. SELinux will deny access to non-standard ports, as shown in the next step:
SELinux is preventing the squid daemon from connecting to network port 10000
squid_connect_any Boolean must be modified, as it is disabled by default. To turn the squid_connect_any Boolean on, run the following command as the root user:
# setsebool -P squid_connect_any on
Note
-P option if you do not want setsebool changes to persist across reboots.
rpm -q mysql-server to see if the mysql-server package is installed. If it is not installed, run the following command as the root user to install it:
yum install mysql-server
getenforce to confirm SELinux is running in enforcing mode:
$ getenforce Enforcing
getenforce command returns Enforcing when SELinux is running in enforcing mode.
service mysqld start as the root user to start mysqld:
# service mysqld start Initializing MySQL database: Installing MySQL system tables... [ OK ] Starting MySQL: [ OK ]
ps -eZ | grep mysqld to view the mysqld processes:
$ ps -eZ | grep mysqld unconfined_u:system_r:mysqld_safe_t:s0 6035 pts/1 00:00:00 mysqld_safe unconfined_u:system_r:mysqld_t:s0 6123 pts/1 00:00:00 mysqld
mysqld processes is unconfined_u:system_r:mysqld_t:s0. The second last part of the context, mysqld_t, is the type. A type defines a domain for processes and a type for files. In this case, the mysqld processes are running in the mysqld_t domain.
mysql. Different types allow you to configure flexible access:
mysqld_db_t/var/lib/mysql, however this can be changed. If the location for the MySQL database is changed, the new location must be labeled with this type. Refer to the following example for instructions on how to change the default database location and how to label the new section appropriately.
mysqld_etc_t/etc/my.cnf and any other configuration files in the /etc/mysql directory.
mysqld_exec_tmysqld binary located at /usr/libexec/mysqld, which is the default location for the MySQL binary on Fedora 12. Other systems may locate this binary at /usr/sbin/mysqld which should also be labeled with this type.
mysqld_initrc_exec_t/etc/rc.d/init.d/mysqld by default in Fedora 12.
mysqld_log_t/var/log/ matching the mysql.* wildcard must be labeled with this type.
mysqld_var_run_t/var/run/mysqld, specifically the process id (PID) named /var/run/mysqld/mysqld.pid which is created by the mysqld daemon when it runs. This type is also used for related socket files such as /var/lib/mysql/mysql.sock. Files such as these must be labeled correctly for proper operation as a confined service.
exim_can_connect_dbexim mailer to initiate connections to a database server.
ftpd_connect_dbftp daemons to initiate connections to a database server.
httpd_can_network_connect_db/var/lib/mysql. This is where SELinux expects it to be by default, and hence this area is already labeled appropriately for you, using the mysqld_db_t type.
/var/lib/mysql.
ls -lZ /var/lib/mysql to view the SELinux context of the default database location for mysql:
# ls -lZ /var/lib/mysql
drwx------. mysql mysql unconfined_u:object_r:mysqld_db_t:s0 mysql
mysqld_db_t which is the default context element for the location of database files. This context will have to be manually applied to the new database location that will be used in this example in order for it to function properly.
mysqlshow -u root -p and enter the mysqld root password to show the available databases:
# mysqlshow -u root -p Enter password: ******* +--------------------+ | Databases | +--------------------+ | information_schema | | mysql | | test | | wikidb | +--------------------+
mysqld daemon with service mysqld stop as the root user:
# service mysqld stop Stopping MySQL: [ OK ]
/opt/mysql is used:
# mkdir -p /opt/mysql
# cp -R /var/lib/mysql/* /opt/mysql/
# chown -R mysql:mysql /opt/mysql
ls -lZ /opt to see the initial context of the new directory:
# ls -lZ /opt
drwxr-xr-x. mysql mysql unconfined_u:object_r:usr_t:s0 mysql
usr_t of this newly created directory is not currently suitable to SELinux as a location for MySQL database files. Once the context has been changed, MySQL will be able to function properly in this area.
/etc/my.cnf with a text editor and modify the datadir option so that it refers to the new location. In this example the value that should be entered is /opt/mysql.
[mysqld] datadir=/opt/mysqlSave this file and exit.
service mysqld start as the root user to start mysqld. At this point a denial will be logged to /var/log/messages:
# service mysqld start Timeout error occurred trying to start MySQL Daemon. Starting MySQL: [FAILED] # tail -f /var/log/messages localhost setroubleshoot: SELinux is preventing mysqld (mysqld_t) "write" usr_t. For complete SELinux messages. run sealert -l 50d8e725-994b-499c-9caf-a676c50fb802
/opt/mysql is not labeled correctly for MySQL data files. SELinux is stopping MySQL from having access to the content labeled as usr_t. Perform the following steps to resolve this problem:
semanage command to add a context mapping for /opt/mysql:
semanage fcontext -a -t mysqld_db_t "/opt/mysql(/.*)?"
/etc/selinux/targeted/contexts/files/file_contexts.local file:
# grep -i mysql /etc/selinux/targeted/contexts/files/file_contexts.local /opt/mysql(/.*)? system_u:object_r:mysqld_db_t:s0
restorecon command to apply this context mapping to the running system:
restorecon -R -v /opt/mysql
/opt/mysql location has been labeled with the correct context for MySQL, the mysqld daemon starts:
# service mysqld start Starting MySQL: [ OK ]
/opt/mysql:
ls -lZ /opt
drwxr-xr-x. mysql mysql system_u:object_r:mysqld_db_t:s0 mysql
mysqld daemon has started successfully. At this point all running services should be tested to confirm normal operation.
rpm -q postgresql-server to see if the postgresql-server package is installed. If it is not installed, run the following command as the root user to install it:
yum install postgresql-server
getenforce to confirm SELinux is running in enforcing mode:
$ getenforce Enforcing
getenforce command returns Enforcing when SELinux is running in enforcing mode.
service postgresql start as the root user to start postgresql:
service postgresql start Starting postgresql service: [ OK ]
ps -eZ | grep postgres to view the postgresql processes:
ps -eZ | grep postgres unconfined_u:system_r:postgresql_t:s0 395 ? 00:00:00 postmaster unconfined_u:system_r:postgresql_t:s0 397 ? 00:00:00 postmaster unconfined_u:system_r:postgresql_t:s0 399 ? 00:00:00 postmaster unconfined_u:system_r:postgresql_t:s0 400 ? 00:00:00 postmaster unconfined_u:system_r:postgresql_t:s0 401 ? 00:00:00 postmaster unconfined_u:system_r:postgresql_t:s0 402 ? 00:00:00 postmaster
postgresql processes is unconfined_u:system_r:postgresql_t:s0. The second last part of the context, postgresql_t, is the type. A type defines a domain for processes and a type for files. In this case, the postgresql processes are running in the postgresql_t domain.
postgresql. Different types allow you to configure flexible access:
postgresql_db_t/usr/lib/pgsql/test/regres
/usr/share/jonas/pgsql
/var/lib/pgsql/data
/var/lib/postgres(ql)?
postgresql_etc_t/etc/postgresql.
postgresql_exec_t/usr/bin/initdb(.sepgsql)?
/usr/bin/(se)?postgres
/usr/lib(64)?/postgresql/bin/.*
/usr/lib/phsql/test/regress/pg_regress
postgresql_initrc_exec_t/etc/rc.d/init.d/postgresql.
postgresql_log_t/var/lib/pgsql/logfile
/var/lib/pgsql/pgstartup.log
/var/lib/sepgsql/pgstartup.log
/var/log/postgresql
/var/log/postgres.log.*
/var/log/rhdb/rhdb
/var/log/sepostgresql.log.*
postgresql_var_run_t/var/run/postgresql.
allow_user_postgresql_connect/var/lib/pgsql/data. This is where SELinux expects it to be by default, and hence this area is already labeled appropriately for you, using the postgresql_db_t type.
ls -lZ /var/lib/pgsql to view the SELinux context of the default database location for postgresql:
# ls -lZ /var/lib/pgsql
drwx------. postgres postgres system_u:object_r:postgresql_db_t:s0 data
postgresql_db_t which is the default context element for the location of database files. This context will have to be manually applied to the new database location that will be used in this example in order for it to function properly.
/opt/postgresql/data is used. If you use a different location, replace the text in the following steps with your location:
# mkdir -p /opt/postgresql/data
# ls -lZ /opt/postgresql/
drwxr-xr-x. root root unconfined_u:object_r:usr_t:s0 data
# chown -R postgres:postgres /opt/postgresql
/etc/rc.d/init.d/postgresql with a text editor and modify all PGDATA and PGLOG variables to point to the new location:
# vi /etc/rc.d/init.d/postgresql PGDATA=/opt/postgresql/data PGLOG=/opt/postgresql/data/pgstartup.logSave this file and exit the text editor.
su - postgres -c "initdb -D /opt/postgresql/data"
semanage command to add a context mapping for /opt/postgresql and any other directories/files within it:
semanage fcontext -a -t postgresql_db_t "/opt/postgresql(/.*)?"
/etc/selinux/targeted/contexts/files/file_contexts.local file:
# grep -i postgresql /etc/selinux/targeted/contexts/files/file_contexts.local /opt/postgresql(/.*)? system_u:object_r:postgresql_db_t:s0
restorecon command to apply this context mapping to the running system:
restorecon -R -v /opt/postgresql
/opt/postgresql location has been labeled with the correct context for PostgreSQL, the postgresql service will start successfully:
# service postgresql start Starting postgreSQL service: [ OK ]
/opt/postgresql:
ls -lZ /opt
drwxr-xr-x. root root system_u:object_r:postgresql_db_t:s0 postgresql
ps command that the postgresql process displays the new location:
# ps aux | grep -i postmaster
postgres 21564 0.3 0.3 42308 4032 ? S 10:13 0:00 /usr/bin/postmaster -p 5432 -D /opt/postgresql/data
postgresql daemon has started successfully. At this point all running services should be tested to confirm normal operation.
rpm -q rsync to see if the rsync package is installed. If it is not installed, run the following command as the root user to install it:
yum install rsync
rsync.
rsync. Different types all you to configure flexible access:
public_content_trsync. If a special directory is created to house files to be shared with rsync, the directory and its contents need to have this label applied to them.
rsync_exec_t/usr/bin/rsync system binary.
rsync_log_trsync log file, located at /var/log/rsync.log by default. To change the location of the file rsync logs to, use the --log-file=FILE option to the rsync command at run-time.
rsync_var_run_trsyncd lock file, located at /var/run/rsyncd.lock. This lock file is used by the rsync server to manage connection limits.
allow_rsync_anon_writersync in the rsync_t domain to manage files, links and directories that have a type of public_content_rw_t. Often these are public files used for public file transfer services. Files and directories must be labeled public_content_rw_t.
rsync_clientrsync to initiate connections to ports defined as rsync_port_t, as well as allowing rsync to manage files, links and directories that have a type of rsync_data_t. Note that the rsync daemon must be in the rsync_t domain in order for SELinux to enact its control over rsync. The configuration example in this chapter demonstrates rsync running in the rsync_t domain.
rsync_export_all_rorsync in the rsync_t domain to export NFS and CIFS file systems with read-only access to clients.
rsync daemon to run normally on a non-standard port.
Getting rsync to launch as rsync_t
getenforce to confirm SELinux is running in enforcing mode:
$ getenforce Enforcing
getenforce command returns Enforcing when SELinux is running in enforcing mode.
which command to confirm that the rsync binary is in the system path:
$ which rsync /usr/bin/rsync
rsync as a daemon, a configuration file should be used and saved as /etc/rsyncd.conf. Note that the following configuration file used in this example is very simple and is not indicative of all the possible options that are available, rather it is just enough to demonstrate the rsync daemon:
log file = /var/log/rsyncd.log
pid file = /var/run/rsyncd.pid
lock file = /var/run/rsync.lock
[files]
path = /srv/files
comment = file area
read only = false
timeout = 300
rsync --daemon is not sufficient for SELinux to offer its protection over rsync. Refer to the following output:
# rsync --daemon
# ps x | grep rsync
8231 ? Ss 0:00 rsync --daemon
8233 pts/3 S+ 0:00 grep rsync
# ps -eZ | grep rsync
unconfined_u:unconfined_r:unconfined_t:s0-s0:c0.c1023 8231 ? 00:00:00 rsync
ps command, the context shows the rsync daemon running in the unconfined_t domain. This indicates that rsync has not transitioned to the rsync_t domain as it was launched by the rsync --daemon command. At this point SELinux can not enforce its rules and policy over this daemon. Refer to the following steps to see how to fix this problem. In the following steps, rsync will transition to the rsync_t domain by launching it from a properly-labeled init script. Only then can SELinux and its protection mechanisms have an effect over rsync. This rsync process should be killed before proceeding to the next step.
/etc/rc.d/init.d/rsyncd. The following steps show how to label this script as initrc_exec_t:
semanage command to add a context mapping for /etc/rc.d/init.d/rsyncd:
semanage fcontext -a -t initrc_exec_t "/etc/rc.d/init.d/rsyncd"
/etc/selinux/targeted/contexts/files/file_contexts.local file:
# grep rsync /etc/selinux/targeted/contexts/files/file_contexts.local /etc/rc.d/init.d/rsyncd system_u:object_r:initrc_exec_t:s0
restorecon command to apply this context mapping to the running system:
restorecon -R -v /etc/rc.d/init.d/rsyncd
ls to confirm the script has been labeled appropriately. Note that in the following output the script has been labeled as initrc_exec_t:
ls -lZ /etc/rc.d/init.d/rsyncd
-rwxr-xr-x. root root system_u:object_r:initrc_exec_t:s0 /etc/rc.d/init.d/rsyncd
rsyncd via the new script. Now that rsync has started from an init script that has been appropriately labeled, the process will start as rsync_t:
# /etc/rc.d/init.d/rsync start
Starting rsyncd: [ OK ]
ps -eZ | grep rsync
unconfined_u:system_r:rsync_t:s0 9794 ? 00:00:00 rsync
SELinux can now enforce its protection mechanisms over the rsync daemon as it is now runing in the rsync_t domain.
rsyncd running in the rsync_t domain. The next example shows how to get this daemon successfully running on a non-default port. TCP port 10000 is used in the next example.
Running the rsync daemon on a non-default port
/etc/rsyncd.conf file and add the port = 10000 line at the top of the file in the global configuration area (ie., before any file areas are defined). The new configuration file will look like:
log file = /var/log/rsyncd.log
pid file = /var/run/rsyncd.pid
lock file = /var/run/rsync.lock
port = 10000
[files]
path = /srv/files
comment = file area
read only = false
timeout = 300
Jul 22 10:46:59 localhost setroubleshoot: SELinux is preventing the rsync (rsync_t) from binding to port 10000. For complete SELinux messages. run sealert -l c371ab34-639e-45ae-9e42-18855b5c2de8
semanage command to add TCP port 10000 to SELinux policy in rsync_port_t:
# semanage port -a -t rsync_port_t -p tcp 10000
rsync_port_t, rsyncd will start and operate normally on this port:
# /etc/rc.d/init.d/rsync start Starting rsyncd: [ OK ]
# netstat -lnp | grep 10000
tcp 0 0 0.0.0.0:10000 0.0.0.0:* LISTEN 9910/rsync
rsyncd to operate on TCP port 10000.
rpm -q postfix to see if the postfix package is installed. If it is not installed, run the following command as the root user to install it:
yum install postfix
getenforce to confirm SELinux is running in enforcing mode:
$ getenforce Enforcing
getenforce command returns Enforcing when SELinux is running in enforcing mode.
service postfix start as the root user to start postfix:
service postfix start Starting postfix: [ OK ]
ps -eZ | grep postfix to view the postfix processes:
ps -eZ | grep postfix system_u:system_r:postfix_master_t:s0 1651 ? 00:00:00 master system_u:system_r:postfix_pickup_t:s0 1662 ? 00:00:00 pickup system_u:system_r:postfix_qmgr_t:s0 1663 ? 00:00:00 qmgr
master process is unconfined_u:system_r:postfix_master_t:s0. The second last part of the context, postfix_master_t, is the type for this process. A type defines a domain for processes and a type for files. In this case, the master process is running in the postfix_master_t domain.
Postfix. Different types all you to configure flexible access:
postfix_etc_t/etc/postfix.
postfix_data_t/var/lib/postfix.
Note
$ grep postfix /etc/selinux/targeted/contexts/files/file_contexts
allow_postfix_local_write_mail_spoolrpm -q spamassassin to see if the spamassassin package is installed. If it is not installed, run the following command as the root user to install it:
yum install spamassassin
Running SpamAssassin on a non-default port
semanage command to show the port that SELinux allows spamd to listen on by default:
# semanage port -l | grep spamd spamd_port_t tcp 783
spamd_port_t as the port for SpamAssassin to operate on.
/etc/sysconfig/spamassassin configuration file and modify it so that it will start SpamAssassin on the example port TCP/10000:
# Options to spamd SPAMDOPTIONS="-d -p 10000 -c m5 -H"
/etc/init.d/spamassassin start
Starting spamd: [2203] warn: server socket setup failed, retry 1: spamd: could not create INET socket on 127.0.0.1:10000: Permission denied
[2203] warn: server socket setup failed, retry 2: spamd: could not create INET socket on 127.0.0.1:10000: Permission denied
[2203] error: spamd: could not create INET socket on 127.0.0.1:10000: Permission denied
spamd: could not create INET socket on 127.0.0.1:10000: Permission denied
[FAILED]
SELinux is preventing the spamd (spamd_t) from binding to port 10000.
semanage command to modify SELinux policy in order to allow SpamAssassin to operate on the example port (TCP/10000):
semanage port -a -t spamd_port_t -p tcp 10000
# /etc/init.d/spamassassin start Starting spamd: [ OK ] # netstat -lnp | grep 10000 tcp 0 0 127.0.0.1:10000 0.0.0.0:* LISTEN 2224/spamd.pid
spamd is properly operating on TCP port 10000 as it has been allowed access to that port by SELinux policy.
| Revision History | |||
|---|---|---|---|
| Revision 1.0-1 | Mon January 13 2014 | ||
| |||