rcrpanel accepts a single command line parameter, the input file containing the description of the panel. It produces its output on
stdout, which means that in most cases, the user will redirect the output to a file. For example:
rcrpanel mypanel.txt >mypanel.ps
There are no command line switches available.
The output image will be centered on a standard size page. The smallest page on which the panel will fit is selected from the following list, in order:
| 216x179 mm - U.S. Letter |
| 210x297 mm - A4 |
| 216x279 mm - U.S. Legal |
| 297x420 mm - A3 |
| 279x432 mm - Tabloid |
| 594x841 mm - A1 |
| 559x894 mm - D |
| 841x1189 mm - A0 |
| 1000X1414 mm - B0 |
The input file contains lines describing the various controls. Most lines are of the form
Command = something
where the spaces around the equal sign are significant, and the command itself is case-sensitive.
Measurements are in units of millimeters. Angles are in degrees. Colors are given as 24 bit C style integers where each byte represents the amount of red, green, or blue.
In general, the order of commands makes no difference. However, the Text command must be immediately followed by a line containing the text to be displayed, and those commands affecting the appearance of a Dial affect the preceding Dial command.
This command takes a single color following the equal sign. The entire panel will be filled with this color.
Background = 0xfff5e8
Note, however, that the interior of controls will not be filled with this color, allowing the alignment marks to be viewed for drilling, even if the panel were filled with a dark color.
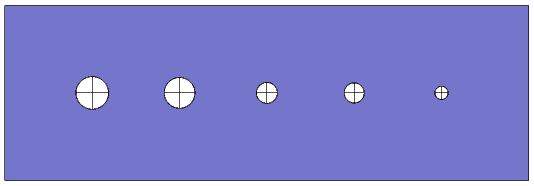
This is used for large diameter controls such as large pots and the like. It takes 2 values after the equal sign representing the position of the control on the panel.
ControlLarge = 23.0 30.0
This command generates an outline for a 5 mm LED. Like the other control commands, it takes 2 values, the X and Y positions on the panel of the center of the LED.
This is used for 1/4" phone jacks and similar controls. The 2 values after the equal sign represent the position on the panel.
This command generates an outline for a 3.5 mm phone jack. The two values are the X and Y positions of the jack on the panel.
This command generates an outline for a 2.5 mm phone jack. The two values are the X and Y positions of the jack on the panel.
ControlTiny = 75.0 30.0
This command defines the size of the panel. The 2 dimensions are the width and height of the panel.
Panel = 193.675 53.975
This command takes no arguments. If this command appears anywhere in the input file, the resulting PostScript will be flipped left to right (for printing on the reverse side of transfer media or transparency material).
This command is somewhat different from the others. After the equal sign, it takes 3 floating point numbers, a color, and a text string. The first 2 floating point numbers are the X, Y position of the text on the panel. The third number is the height of the text. The color represents the color of the text, and the text string represents the font to be used. No checking is done before preparing the PostScript; you are responsible for ensuring that the font is available on your printer.
This command is then followed by another line containing the text to be displayed.
Text = 100.0 10.0 5.0 0x7f4f00 Times-Roman-Bold
Filter
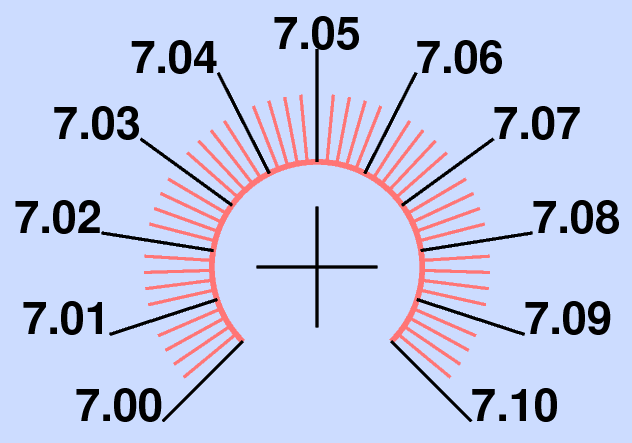
This command introduces a new dial. The
Dial command describes the X,Y center of the dial. The following commands then further refine the details of this particular dial. This relationship between the
Dial command and it's successors is the only place where the order of the commands within the file matters.
Dial = 170.0 30.0
This command takes a single value which is the radius of the circle which forms the inside of the tick marks. This command refers to the current
Dial command.
Radius = 7.0
This command describes the angle over which the control may operate. Typically, this would be 270 for a potentiometer and 180 for a variable capacitor. This command refers to the current Dial command.
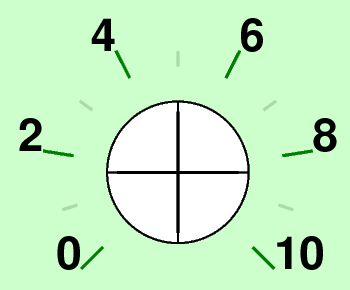
This command describes the total number of tick marks, large and small, to be drawn. This is usually an odd number since the starting and ending values are counted. Typically this will be 11, 101, or a similar number. This command refers to the current
Dial command.
NumTicks = 101
This command tells the program how many small tick marks there are per large tick mark. This command refers to the current
Dial command.
BigPer = 10
This command describes the length of the small tick marks. This command refers to the current
Dial command.
SizeTicks = 6.5
This command describes the length of the large tick marks. This command refers to the current
Dial command.
SizeBig = 7.5
8.6.2.17. StartingIndicator
This command describes the value to be placed on the furthest counterclockwise large tick mark. This command refers to the current Dial command.
8.6.2.18. IncrementPerBigTick
This command tells rcrpanel how much to increment the value in StartingIndicator for each succeeding large tick mark. This command refers to the current Dial command.
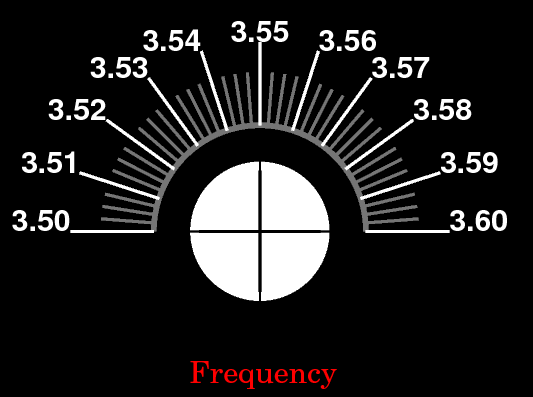
This command describes how large to make the annotation on the ticks. This command refers to the current Dial command.
This command takes a single color as an argument, which is used to draw the inner circle. This command refers to the current Dial command.
8.6.2.21. ColorTickMarks
This command permits setting the color to draw the small tick marks. This command refers to the current Dial command.
8.6.2.22. ColorBigTickMarks
This command permits setting the color to draw the large tick marks. This command refers to the current Dial command.
This command accepts a single color which will be used for the annotation. This command refers to the current Dial command.
By default, rcrpanel arranges dials so the dead spot on the control is straight down. This is the desired behavior in almost all cases. However, sometimes you may want to rotate a control to some other orientation. The single argument to StartAngle is the number of degrees clockwise to rotate the control. This command refers to the current Dial command.