Product SiteDocumentation Site

Documentation 0.1

Fedora Multiboot Guide

Booting Fedora and other operating systems.

Fedora Documentation Project

Legal Notice

Copyright © 2013 Fedora Project Contributors.
The text of and illustrations in this document are licensed by Red Hat under a Creative Commons Attribution–Share Alike 3.0 Unported license ("CC-BY-SA"). An explanation of CC-BY-SA is available at http://creativecommons.org/licenses/by-sa/3.0/. The original authors of this document, and Red Hat, designate the Fedora Project as the "Attribution Party" for purposes of CC-BY-SA. In accordance with CC-BY-SA, if you distribute this document or an adaptation of it, you must provide the URL for the original version.
Red Hat, as the licensor of this document, waives the right to enforce, and agrees not to assert, Section 4d of CC-BY-SA to the fullest extent permitted by applicable law.
Red Hat, Red Hat Enterprise Linux, the Shadowman logo, JBoss, MetaMatrix, Fedora, the Infinity Logo, and RHCE are trademarks of Red Hat, Inc., registered in the United States and other countries.
For guidelines on the permitted uses of the Fedora trademarks, refer to https://fedoraproject.org/wiki/Legal:Trademark_guidelines.
Linux® is the registered trademark of Linus Torvalds in the United States and other countries.
Java® is a registered trademark of Oracle and/or its affiliates.
XFS® is a trademark of Silicon Graphics International Corp. or its subsidiaries in the United States and/or other countries.
MySQL® is a registered trademark of MySQL AB in the United States, the European Union and other countries.
All other trademarks are the property of their respective owners.

Abstract

The Fedora Multiboot Guide explains using Fedora to enable booting of one or more additional operating systems. The Guide covers the basic principles of GRUB, Fedora's bootloader, and demonstrates configuration of GRUB on both BIOS and UEFI systems.
1. Introduction
2. Bootloader Basics
3. Is your system UEFI or BIOS?
4. Making Room for Fedora
4.1. Using the Fedora Installer to resize partitions
4.2. Resizing an NTFS filesystem the command line
5. The GRUB Bootloader
5.1. GRUB Basics
5.2. Changing GRUB entries at boot
5.3. Reinstalling GRUB
5.4. Configuring the GRUB Bootloader
6. Multiboot on BIOS Systems
6.1. BIOS Basics
7. Multiboot on UEFI Systems
7.1. UEFI Basics
7.2. Booting with Windows
7.3. Booting on Apple systems
8. Boot Options
A. Revision History
Index

1. Introduction

Fedora 21 can be used as the only operating system on your computer, or you can dual boot Fedora with another operating system. Fedora can enable selection of other options at boot, often with little to no user configuration. Systems that can boot more than two operating systems are referred to as multiboot systems.
Installing Fedora on a system where another operating system is installed requires unallocated drive space. Section 4, “Making Room for Fedora” explains options for creating this free space.
When your system starts, it first performs self tests, then loads a bootloader, GRUB. GRUB provides a menu so you can select the Fedora kernel or other operating system you would like to boot, and GRUBs configuration file stores options and settings required for initial booting of the selected operating system. Read Section 5, “The GRUB Bootloader” for more information on GRUB.
Changing Fedora's boot options can be helpful, especially when troubleshooting. Section 5.4, “Configuring the GRUB Bootloader” explains how to change these options once or permanently.
The system's firmware allows basic configuration, performs initial startup, initializes hardware, and brings up the bootloader. Until recently, this firmware was referred to as the BIOS, or Basic Input Output System, which is described in Section 2, “Bootloader Basics”. Newer systems, such as those sold with Windows 8, use a newer type called UEFI or Universal Extensible Firmware Interface, which is described in Section 2, “Bootloader Basics”
In most cases, the Fedora installer will recognize other operating systems on your computer and create boot menu entries for them. If an operating system such as Windows is installed after Fedora, GRUB may be overwritten and require reinstallation. Some circumstances, such as missing menu entries, require refreshing of the menu entries. These tasks are explained in Section 6, “Multiboot on BIOS Systems” or Section 7, “Multiboot on UEFI Systems”
The Guide also covers concerns regarding booting of specific operating systems. For information regarding booting of Fedora with Windows 8, refer to Section 7.2, “Booting with Windows”. To learn about using Fedora on Apple hardware, read Section 7.3, “Booting on Apple systems”

Using Root Safely

Many of the procedures in this guide involve editing of files or execution of commands that can only be performed as root. The root account should be used with educated caution and only when required. Your system can break or fail to boot if the account is misused.
If your normal user account is configured as an administrator, you can use sudo to enter your user password and execute privileged commands:
      [fedorauser@localhost ~]$ sudo <command>
      [sudo] password for fedorauser:
You can also open a root shell using the root password su. The hyphen ( - ) in the example is important because it ensures that you will work in a root environment, and not act on normal user files with root privileges.
        [fedorauser@localhost ~]$ su -
        Password:
	[root@localhost ~]#
The root prompt is always a hash ( # ) and a normal user prompt is always a dollar sign ( $ ). Example commands in this guide will include one of these prompts to show the privileges required for the action.
To keep your system healthy and safe, do not execute user applications as root or log into a desktop environment as root.

2. Bootloader Basics

To boot a modern operating system, a computer must identify the kernel, storage, and various options at the time of booting. Software called a bootloader keeps track of these parameters, manages settings for different operating systems, and loads the kernel.
Historically, bootloaders have been installed into the first part of a drive, known as the Master Boot Record (MBR) or Boot Sector. The computer's firmware, or BIOS, would check the boot sector for bootable code on startup, and load whatever it found. As bootloaders became more complex, and therefore required more space, the MBR came to contain only a pointer to the second stage of the bootloader.
The second stage of the bootloader performs the actual work. Because the BIOS does not know how to open and read from filesystems, the bootloader finds the operating system, presents a menu, interacts with the user as required, and launches the OS. It was installed in the part of the drive between the MBR and the beginning of the first filesystem, known as the MBR Gap. Less featureful bootloaders could also be installed in the gap between the start of the partition and the beginning of the partition's filesystem, but because this can damage the filesystem if the gap is too small the practice is no longer supported.
BIOS is short for Basic Input Output System, and the software is indeed very simple. BIOS systems had a number of technical limitations, such as being unable to boot from disks larger than 2 TB and extremely limited interfaces. GUID Partition Table (GPT) partitioning schemes also came with larger drives, overcoming the MBR partitioning scheme's 4 partition limit. To overcome these issues and add new features, a newer firmware implementation was developed, called the Unified Extensible Firmware Interface.
Instead of reading the bootloader from the drive, UEFI systems store information about available bootloaders right on the system firmware. The bootloaders themselves and sometimes small applications such as memory testing utilites are stored on the UEFI system partition. This partition is usually a FAT filesystem, has a standardized partition identifier, and is mounted at /boot/efi. Each operating system places files required for booting in a dedicated directory of this partition, and the boot entry in the firmware points to these files. UEFI systems will usually also support BIOS style booting for compatibility reasons, using a feature called the Compatibility Support Module (CSM).
On Linux systems, the data used by the bootloader is traditionally contained in a boot partition, mounted at and known as /boot. The boot partition contains the kernel, a read only filesystem that holds tools used by the kernel during bootup, called an initramfs, and files for the menus and for the bootloader itself. These files were traditionally placed on a different partition because the bootloader did not support complex storage arrangements, and could not read the kernel and initramfs from them. Because a simple, separate boot also allows for easier disaster recovery, the practice has continued to this day.
Fedora supports both UEFI and BIOS systems, using the GRUB bootloader, which is short for GNU GRand Unified Bootloader. GRUB provides a boot menu and support for many filesystems, as well as software for scanning the system for available operating systems and adding them to the menu.

3. Is your system UEFI or BIOS?

Because commands and file locations differ between BIOS and UEFI systems, it is important to identify which you have before attempting advanced boot configuration.

Identifying a BIOS system

  • Older computers are more likely to use BIOS. UEFI systems did not become commonplace until after 2010.
  • 32 bit systems are almost always BIOS. ( UEFI booting of 32 bit systems is not supported by Fedora )
  • Your computer originally shipped with Windows Vista or XP.
  • The computer's manual and the system setup menu do not mention UEFI, EFI, or SecureBoot.

The term BIOS is still used with UEFI systems

Because BIOS systems have been around for so long, the term BIOS is often used to describe UEFI systems as well. Manufacturers might list system firmware updates as BIOS updates or provide directions to enter the BIOS setup menu. The word has come to represent the pre-OS menu on your computer as much as the actual software, but your system may still be UEFI capable.

Identifying a UEFI system

  • Newer systems are more likely to use UEFI. If you bought your computer new in 2013 or after, it probably has UEFI.
  • Your computer shipped with Windows 8. The terms of service for Windows 8 require SecureBoot, a UEFI feature.
  • Your system setup menu has a graphical interface or mouse support. UEFI menus can be more elaborate.
  • The system's boot menu gives you the option of booting media via UEFI, or has boot options describing operating systems instead of just physical drives. The boot order menu might look like this:
              UEFI: Generic USB Stick
              Generic USB Stick
              UEFI: DVD-RW Drive
              DVD-RW Drive
              Fedora
              Windows
    

4. Making Room for Fedora

Fedora requires a volume of unallocated storage space for installation. To make room for Fedora, both the existing filesystem and the partition it resides on must be resized.

4.1. Using the Fedora Installer to resize partitions

The Fedora installer provides a guided graphical method for resizing partitions and reclaiming space. This method is simpler and easier than the others discussed in this section. For most simple dual boot situations, using the installer to reclaim space will be the most expedient and foolproof method.
Resizing partitions with the Fedora installer is covered in the Fedora Installation Guide

4.2. Resizing an NTFS filesystem the command line

This section explains using tools provided by Fedora to resize an NTFS partition. A terminal window from a liveCD can be used.

Disable Windows fast reboot feature!

Newer versions of Windows use a strategy of suspending some system processes to disk to speed startup times. Modifying a filesystem in this state can corrupt or damage the data, so the linux NTFS drivers will not mount it. If the filesystem were to be mounted, the cached view if the files may differ from the changes you made in Fedora, with the most likely result of loosing your changes - or worse.
Before attempting any operation on an NTFS volume from Fedora, make sure you have disabled this feature in Windows.

Procedure 1.  Selecting and resizing a partition.

  1. Show available filesystems:
          # blkid
    /dev/sda1: SEC_TYPE="msdos" UUID="32AE-E651" TYPE="vfat" PARTLABEL="EFI System Partition" PARTUUID="0315942d-8c2c-414f-a560-cfa499494a72" 
    /dev/sda2: UUID="593153ae-2b67-4a5b-9efa-fa3954953abd" TYPE="ext4" PARTUUID="68cadad8-6de2-4ef7-96ff-f58e5114fdcc" 
    /dev/sda3: UUID="P2xKTQ-aQWG-z2Uv-jSw5-kkUK-SN5Q-cNf3PI" TYPE="LVM2_member" PARTUUID="7ba7ed40-b43f-4e71-b83e-51629bf7db47" 
    /dev/sda5: UUID="44B6BAD1B6BAC2AA" TYPE="ntfs" PARTUUID="9c62d1dc-dedd-4d4c-9728-5f2ef69f2b42" 
    
  2. ntfs partitions indicate the existing Windows installation. Examine the partitions on the /dev/sda drive.
                # parted /dev/sda print
    Model: ATA ST9320328CS (scsi)
    Disk /dev/sda: 320GB
    Sector size (logical/physical): 512B/512B
    Partition Table: gpt
    Disk Flags: pmbr_boot
    
    Number  Start   End    Size    File system  Name                          Flags
     1      1049kB  211MB  210MB   fat16        EFI System Partition          boot
     2      211MB   735MB  524MB   ext4
     3      735MB   119GB  118GB
     4      119GB   119GB  134MB                Microsoft reserved partition  msftres
     5      119GB   215GB  96.2GB  ntfs
    
  3. Partition number 5 is a large filesystem, and probably has some free space to share. Check how much of that space is in use.
                # ntfsresize --info /dev/sda5
    ntfsresize v2013.1.13 (libntfs-3g)
    Device name        : /dev/sda5
    NTFS volume version: 3.1
    Cluster size       : 4096 bytes
    Current volume size: 96234107392 bytes (96235 MB)
    Current device size: 96234110976 bytes (96235 MB)
    Checking filesystem consistency ...
    100.00 percent completed
    Accounting clusters ...
    Space in use       : 29222 MB (30.4%)
    Collecting resizing constraints ...
    You might resize at 29221265408 bytes or 29222 MB (freeing 67013 MB).
    Please make a test run using both the -n and -s options before real resizing!
    
  4. Resize the filesystem. Make sure to balance the available space, despite the suggestion from ntfsresize to shrink to the bare minimum. A very full filesystem can cause problems for any operating system.
                  # ntfsresize --size 40G /dev/sda5
    ntfsresize v2013.1.13 (libntfs-3g)
    Device name        : /dev/sda5
    NTFS volume version: 3.1
    Cluster size       : 4096 bytes
    Current volume size: 96234107392 bytes (96235 MB)
    Current device size: 96234110976 bytes (96235 MB)
    New volume size    : 39999996416 bytes (40000 MB)
    Checking filesystem consistency ...
    100.00 percent completed
    Accounting clusters ...
    Space in use       : 29222 MB (30.4%)
    Collecting resizing constraints ...
    Needed relocations : 0 (0 MB)
    WARNING: Every sanity check passed and only the dangerous operations left.
    Make sure that important data has been backed up! Power outage or computer
    crash may result major data loss!
    Are you sure you want to proceed (y/[n])? y
    Schedule chkdsk for NTFS consistency check at Windows boot time ...
    Resetting $LogFile ... (this might take a while)
    Updating $BadClust file ...
    Updating $Bitmap file ...
    Updating Boot record ...
    Syncing device ...
    Successfully resized NTFS on device '/dev/sda5'.
    You can go on to shrink the device for example with Linux fdisk.
    IMPORTANT: When recreating the partition, make sure that you
      1)  create it at the same disk sector (use sector as the unit!)
      2)  create it with the same partition type (usually 7, HPFS/NTFS)
      3)  do not make it smaller than the new NTFS filesystem size
      4)  set the bootable flag for the partition if it existed before
    Otherwise you won't be able to access NTFS or can't boot from the disk!
    If you make a mistake and don't have a partition table backup then you
    can recover the partition table by TestDisk or Parted's rescue mode.        
    

Procedure 2. Resizing the partition

  1. To make sure that the partition is recreated accurately, work using sectors as units instead of bytes. The first figure we need is the sector the filesystem starts on.
                  # parted /dev/sda unit s print
    Model: ATA ST9320328CS (scsi)
    Disk /dev/sda: 625142448s
    Sector size (logical/physical): 512B/512B
    Partition Table: gpt
    Disk Flags: pmbr_boot
    
    Number  Start       End         Size        File system  Name                          Flags
     1      2048s       411647s     409600s     fat16        EFI System Partition          boot
     2      411648s     1435647s    1024000s    ext4
     3      1435648s    232122367s  230686720s
     4      232122368s  232384511s  262144s                  Microsoft reserved partition  msftres
     5      232384512s  420341759s  187957248s  ntfs
     6      420341760s  420343807s  2048s                                                  bios_grub
     7      420343808s  421367807s  1024000s    ext4
     8      421367808s  625141759s  203773952s
    
    The partition starts on sector 232384512, and the sector size is 512 bytles
  2. Calculate the size of the filesystem in sectors, and the end of the new partition
    • After resizing, the filesystem is marked as dirty so it will be checked on the next Windows boot. Clear this flag so that we can run further commands.
                          #ntfsfix -d /dev/sda5
      Mounting volume... OK
      Processing of $MFT and $MFTMirr completed successfully.
      Checking the alternate boot sector... OK
      NTFS volume version is 3.1.
      NTFS partition /dev/sda5 was processed successfully.   
      
    • Find the cluster size and number of clusters.
                          # ntfsinfo -m /dev/sda5|grep Cluster
          Cluster Size: 4096
          Volume Size in Clusters: 9765624
          Compression Block Clusters: 0
          Free Clusters: 2631945 (27.0%)
      
    • Calculate the size in sectors of the new filesystem.

      Equation 1. Filesystem size in sectors

      4096 bytes per cluster × 9765624 total clusters ÷ 512 bytes per sector = 78124992 sectors
    • Find the end of the new partition.

      Equation 2. End sector of new partition

      232384512 start + 78124992 filesystem = 310509504 end sector
      Adding onto the end sector value costs little free space and provides a margin of error. Consider padding the end of your partition for best results.
  3. Use parted to resize the ntfs filesystem on /dev/sda. Using the s after the number ensures parted uses sectors as the unit.
                  # parted /dev/sda
    GNU Parted 3.1
    Using /dev/sda
    Welcome to GNU Parted! Type 'help' to view a list of commands.
    (parted)
    (parted) rm 5
    (parted) mkpart
    Partition name?  []? windowsdisk
    File system type?  [ext2]? ntfs                                           
    Start? 232384512s                                                         
    End? 310509504s      
    (parted) quit
    
  4. Check the partition table to confirm the free space is available, and exit parted.
            (parted) print free                                                       
    Model: ATA ST9320328CS (scsi)
    Disk /dev/sda: 320GB
    Sector size (logical/physical): 512B/512B
    Partition Table: gpt
    Disk Flags: pmbr_boot
    
    Number  Start   End     Size    File system  Name                          Flags
            17.4kB  1049kB  1031kB  Free Space
     1      1049kB  211MB   210MB   fat16        EFI System Partition          boot
     2      211MB   735MB   524MB   ext4
     3      735MB   119GB   118GB
     4      119GB   119GB   134MB                Microsoft reserved partition  msftres
     5      119GB   159GB   40.0GB  ntfs
            159GB   215GB   56.2GB  Free Space
     
            (parted) quit
    

5. The GRUB Bootloader

5.1. GRUB Basics

Fedora uses the GRUB bootloader. Short for GNU GRand Unified Bootloader. GRUB is a powerful and versatile bootloader that meets most needs. For other platforms such as IBM System Z or cloud images, Fedora may use other bootloaders, but because they are not likely to multiboot, this document does not address them.
The primary configuration file for GRUB describes the menu presented to the user, including the options passed to each operating system definition it boots. It also contains options for GRUB itself, such as the default option, timeout before continuing to the default option, and the visual presentation of the menu.
On BIOS systems, this file is located on the boot partition, as /boot/grub2/grub.cfg.
On UEFI systems, this file is located on the UEFI system partition, as /boot/efi/EFI/fedora/grub.cfg.

Do not edit GRUB configurations directly!

Any changes made directly to the GRUB configuration files will be overwritten when the file is regenerated, such as after a kernel update. Instead of editing these files directly, edit the templates that are used to generate them. This process is covered in Section 5.4, “Configuring the GRUB Bootloader”
GRUB can identify and directly boot most Unix type operating systems. You only need one GRUB configuration to boot them all, but each should have a dedicated /boot partition. Operating systems such as Windows cannot be booted directly, but GRUB can identify and chainload them.

5.2. Changing GRUB entries at boot

Changing selection or adding arguments to a GRUB menu entry at boot time can be useful for testing or troubleshooting purposes. You might have a graphics issue to troubleshoot by booting temporarily into a non-graphical target, a hardware issue to work around with a kernel parameter, or a problem to resolve by selecting an alternate kernel. This section covers the procedure for adding boot arguments, see Section 8, “Boot Options” for some arguments you might use.
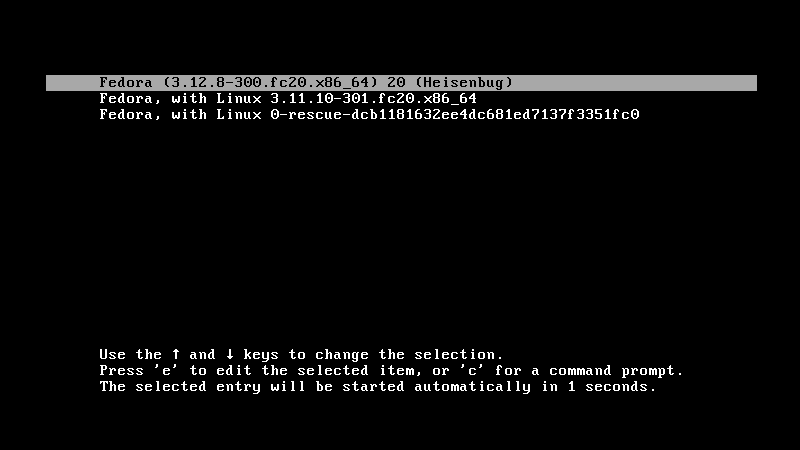
The Rescue option

The normal boot entries for Fedora use a trimmed down initramfs, or initial boot filesystem. This host-only initramfs had information only about the hardware on your computer, allowing the system to boot more quickly by avoid loading unneeded drivers.
One of the default menu entries for Fedora is a rescue entry. This will load the same Fedora environment as the other entries, but loads a full initramfs.
The rescue option is useful if you have problems after adding new hardware. You can use the rescue option to regenerate the initramfs for all boot entries using this command:
        # dracut --regenerate-all --force
  1. Turn on or reboot your computer. When the GRUB menu ( Figure 1, “GRUB menu during countdown” ) appears, press the Esc key to stop the countdown.
    GRUB menu during countdown

    Figure 1. GRUB menu during countdown

  2. Use the arrow keys to highlight the desired boot entry.
    1. If you want to boot an alternate menu entry without editing, press Enter to continue.
    2. If you want to edit the entry before booting, press e to edit.
    1. The initial screen displayed for editing shows information GRUB needs to find and boot the operating system, as pictured in Figure 2, “The GRUB edit screen, Part 1”. These lines should not be changed.
      The GRUB edit screen, Part 1

      Figure 2. The GRUB edit screen, Part 1

    2. Using the arrow keys, move down to the line that contains the boot arguments. On UEFI systems, this line will begin with 
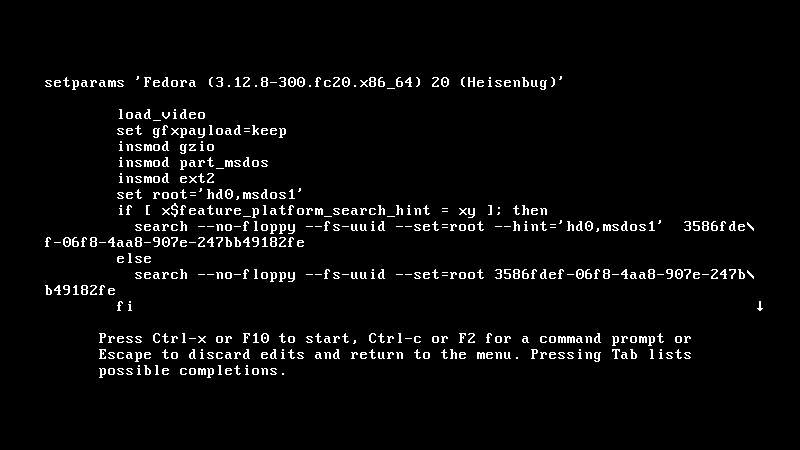
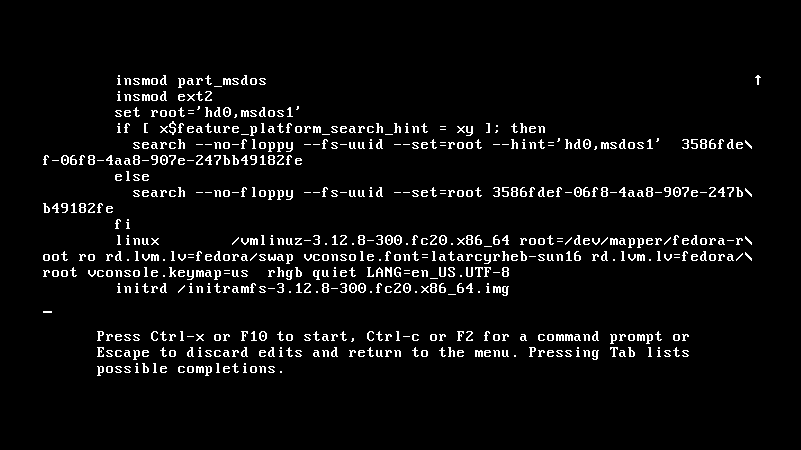
linuxefi, or on BIOS systems the line will begin with linux. The next argument on the line will typically be the kernel, a string beginning with /vmlinuz-. This is shown in Figure 3, “The GRUB edit screen, Part 1”.
      Press the End key to move to the end of the line.
      The GRUB edit screen, Part 1

      Figure 3. The GRUB edit screen, Part 1

      Getting more information during boot

      The default boot parameters for Fedora include rghb and quiet. These enable the boot splash screen instead of showing details about services, mountpoints, and other units as the sytem boots. If you are troubleshooting a boot issue or want to see more information when Fedora loads, removing these parameters will disable the splash screen.
  3. Type in your desired parameters and press Ctrl+x to boot. See Section 8, “Boot Options” for some parameters you might find useful.

5.3. Reinstalling GRUB

This section describes the process for reinstalling the GRUB bootloader and recreating the configuration. Unlike legacy GRUB, which required users to manually create entries, GRUB2 will scan the system for bootable systems and automatically create the menu configuration. There are a number of reasons to reinstall GRUB:
The boot menu does not include an available operating systems.
The bootloader has been overwritten during installation of Windows or another operating system.
You have chosen not to use anaconda to install grub.

5.3.1. Refreshing GRUB configuration

To recreate the GRUB configuration from a booted system, use the grub2-mkconfig utility. The program will scan your system and create menu entries for what it finds. You should also use grub2-mkconfig after customizing menu entries, a process described in Section 5.4, “Configuring the GRUB Bootloader”
Refresh GRUB configuration on a BIOS system:
          # grub2-mkconfig -o /boot/grub2/grub.cfg
Refresh GRUB configuration on UEFI systems:
          #grub2-mkconfig -o /boot/efi/EFI/fedora/grub.cfg

5.4. Configuring the GRUB Bootloader

GRUB configuration files can be found in several places:
/etc/default/grub
Configuration for GRUB itself is defined in /etc/default/grub. The default options used when creating new entries for Fedora can also be found here.
/etc/grub.d/
Files in /etc/grub.d are used as templates for creating new GRUB entries as well as custom boot entries.
/boot
The /boot directory contains Fedora's kernel and initramfs.
On BIOS systems, this directory also contains the configuration for GRUB itself.
/boot/efi/EFI
This directory is only found on UEFI systems, and is within the UEFI System Partition. Both GRUB configuration files and the GRUB executable can be found in /boot/efi/EFI.

5.4.1. Permanently adding to Fedora boot entries

The options that GRUB passes to Fedora when booting are generated from the discovered filesystems and from the value of GRUB_CMDLINE_LINUX in /etc/default/grub.
Adding a parameter to the end of GRUB_CMDLINE_LINUX and regenerating grub.cfg will apply the parameter to all current and future Fedora boot entries.

Example 1. In practice: Fixing backlight issues with kernel parameters

Some laptops have problems with the display backlight using the default configuration. The screen might be too bright, too dim, flicker, or even appear to be completely black.
The issue can often be resolved by directing the system to prefer vendor-specific drivers for the backlight using the acpi_backlight=vendor parameter.
  1. With root permissions, open the file /etc/default/grub.
                  # nano /etc/default/grub
                   GRUB_TIMEOUT=0 GRUB_DISTRIBUTOR="$(sed 's, release .*$,,g' /etc/system-release)" GRUB_DEFAULT=saved GRUB_DISABLE_SUBMENU=true GRUB_TERMINAL_OUTPUT="console" GRUB_CMDLINE_LINUX="vconsole.font=latarcyrheb-sun16 $([ -x /usr/sbin/rhcrashkernel-param ] && /usr/sbin/rhcrashkernel-param || :) vconsole.keymap=us rhgb quiet" GRUB_DISABLE_RECOVERY="true" 
    
  2. Add the parameter to the end of GRUB_CMDLINE_LINUX and save the file.
                   GRUB_TIMEOUT=0 GRUB_DISTRIBUTOR="$(sed 's, release .*$,,g' /etc/system-release)" GRUB_DEFAULT=saved GRUB_DISABLE_SUBMENU=true GRUB_TERMINAL_OUTPUT="console" GRUB_CMDLINE_LINUX="vconsole.font=latarcyrheb-sun16 $([ -x /usr/sbin/rhcrashkernel-param ] && /usr/sbin/rhcrashkernel-param || :) vconsole.keymap=us rhgb quiet acpi_backlight=vendor" GRUB_DISABLE_RECOVERY="true" 
    
  3. Regenerate the GRUB configuration to apply the new changes.
    1. For BIOS systems:
                        # grub2-mkconfig -o /boot/grub/grub2.cfg
      
    2. For UEFI systems:
                        # grub2-mkconfig -o /boot/efi/EFI/fedora/grub.cfg
      

6. Multiboot on BIOS Systems

6.1. BIOS Basics

7. Multiboot on UEFI Systems

7.1. UEFI Basics

7.2. Booting with Windows

7.3. Booting on Apple systems

8. Boot Options

Boot options come in several categories:
  1. Systemd arguments
  2. Kernel parameters
  3. Dracut options

A. Revision History

Revision History
Revision 0-0Sun Jul 14 2013Dude McPants
Initial creation of book by publican

Index